OpenCV学习笔记(17):直方图反向投影(二)
什么是反向投影:
- 反向投影是一种记录给定图像中的像素点如何适应直方图模型像素分布的方式。
- 简单的讲, 所谓反向投影就是首先计算某一特征的直方图模型,然后使用模型去寻找图像中存在的该特征。
- 例如, 你有一个肤色直方图 ( Hue-Saturation 直方图 ),你可以用它来寻找图像中的肤色区域:
直方图反向投影的步骤:
1. In each pixel of our Test Image (i.e. p(i; j) ), collect the data and find the correspondent bin location for
that pixel (i.e. (hi;j; si;j) ).对测试图像中的每个像素 ( ![]() ),获取色调数据并找到该色调(
),获取色调数据并找到该色调( ![]() )在直方图中的bin的位置。
)在直方图中的bin的位置。
2. Lookup the model histogram in the correspondent bin - (hi;j; si;j) - and read the bin value. 查询 模型直方图 中对应的bin -
3. Store this bin value in a new image (BackProjection). Also, you may consider to normalize the model
histogram first, so the output for the Test Image can be visible for you. 将此数值储存在新的图像中(BackProjection)。 你也可以先归一化 模型直方图 ,这样测试图像的输出就可以在屏幕显示了
4. Applying the steps above, we get the following BackProjection image for our Test Image
5. In terms of statistics, the values stored in BackProjection represent the probability that a pixel in Test
Image belongs to a skin area, based on the model histogram that we use. For instance in our Test image,
the brighter areas are more probable to be skin area (as they actually are), whereas the darker areas have
less probability (notice that these “dark” areas belong to surfaces that have some shadow on it, which in
turns affects the detection).使用统计学的语言, BackProjection 中储存的数值代表了测试图像中该像素属于皮肤区域的 概率
mixChannels: 从输入中拷贝某通道到输出中特定的通道。
C++: void mixChannels(const Mat*src, size_t nsrcs, Mat* dst, size_t ndsts, const int* fromTo, size_t npairs)
- &hsv: 一系列输入图像的数组, 被拷贝的通道的来源
- 1: 输入数组中图像的数目
- &hue: 一系列目的图像的数组, 储存拷贝的通道
- 1: 目的数组中图像的数目
- ch[] = {0,0}: 通道索引对的数组,指示如何将输入图像的某一通道拷贝到目的图像的某一通道。在这里,&hsv图像的Hue(0) 通道被拷贝到&hue图像(单通道)的0 通道。
- 1: 通道索引对德数目
#include "opencv2/imgproc/imgproc.hpp"
#include "opencv2/imgcodecs.hpp"
#include "opencv2/highgui/highgui.hpp"
#include
using namespace cv;
using namespace std;
/// Global Variables
Mat src; Mat hsv; Mat hue;
int bins = 25;
/// Function Headers
void Hist_and_Backproj(int, void* );
/**
* @function main
*/
int main( int, char** argv )
{
/// Read the image
src = imread( argv[1], 1 );
/// Transform it to HSV
cvtColor( src, hsv, COLOR_BGR2HSV );
/// Use only the Hue value
hue.create( hsv.size(), hsv.depth() );
int ch[] = { 0, 0 };
mixChannels( &hsv, 1, &hue, 1, ch, 1 );
/// Create Trackbar to enter the number of bins
const char* window_image = "Source image";
namedWindow( window_image, WINDOW_AUTOSIZE );
createTrackbar("* Hue bins: ", window_image, &bins, 180, Hist_and_Backproj );
Hist_and_Backproj(0, 0);
/// Show the image
imshow( window_image, src );
/// Wait until user exits the program
waitKey(0);
return 0;
}
/**
* @function Hist_and_Backproj
* @brief Callback to Trackbar
*/
void Hist_and_Backproj(int, void* )
{
MatND hist;
int histSize = MAX( bins, 2 );
float hue_range[] = { 0, 180 };
const float* ranges = { hue_range };
/// Get the Histogram and normalize it
calcHist( &hue, 1, 0, Mat(), hist, 1, &histSize, &ranges, true, false );
normalize( hist, hist, 0, 255, NORM_MINMAX, -1, Mat() );
/// Get Backprojection
MatND backproj;
calcBackProject( &hue, 1, 0, hist, backproj, &ranges, 1, true );
/// Draw the backproj
imshow( "BackProj", backproj );
/// Draw the histogram
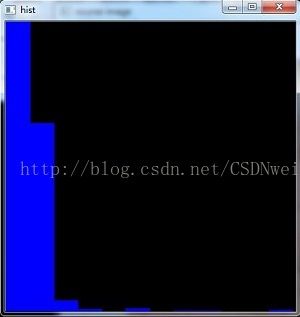
int w = 400; int h = 400;
int bin_w = cvRound( (double) w / histSize );
Mat histImg = Mat::zeros( w, h, CV_8UC3 );
for( int i = 0; i < bins; i ++ )
{ rectangle( histImg, Point( i*bin_w, h ), Point( (i+1)*bin_w, h - cvRound( hist.at(i)*h/255.0 ) ), Scalar( 0, 0, 255 ), -1 ); }
imshow( "Histogram", histImg );
} 

汉语翻译版:http://www.opencv.org.cn/opencvdoc/2.3.2/html/doc/tutorials/imgproc/histograms/back_projection/back_projection.html
(高级)使用 H-S 直方图和 floodFill(漫水填充) 来定义皮肤区域的掩码
参考:http://www.tuicool.com/articles/6FJvAb
一、引言 · 水漫填充的定义
漫水填充法是一种用特定的颜色填充联通区域,通过设置可连通像素的上下限以及连通方式来达到不同的填充效果的方法。漫水填充经常被用来标记或分离图像的一部分以便对其进行进一步处理或分析,也可以用来从输入图像获取掩码区域,掩码会加速处理过程,或只处理掩码指定的像素点,操作的结果总是某个连续的区域。
二、漫水填充法的基本思想
所谓漫水填充,简单来说,就是自动选中了和种子点相连的区域,接着将该区域替换成指定的颜色,这是个非常有用的功能,经常用来标记或者分离图像的一部分进行处理或分析.漫水填充也可以用来从输入图像获取掩码区域,掩码会加速处理过程,或者只处理掩码指定的像素点.
以此填充算法为基础,类似photoshop的魔术棒选择工具就很容易实现了。漫水填充(FloodFill)是查找和种子点联通的颜色相同的点,魔术棒选择工具则是查找和种子点联通的颜色相近的点,将和初始种子像素颜色相近的点压进栈作为新种子
在OpenCV中,漫水填充是填充算法中最通用的方法。且在OpenCV 2.X中,使用C++重写过的FloodFill函数有两个版本。一个不带掩膜mask的版本,和一个带mask的版本。这个掩膜mask,就是用于进一步控制哪些区域将被填充颜色(比如说当对同一图像进行多次填充时)。这两个版本的FloodFill,都必须在图像中选择一个种子点,然后把临近区域所有相似点填充上同样的颜色,不同的是,不一定将所有的邻近像素点都染上同一颜色,漫水填充操作的结果总是某个连续的区域。当邻近像素点位于给定的范围(从loDiff到upDiff)内或在原始seedPoint像素值范围内时,FloodFill函数就会为这个点涂上颜色。
三、floodFill函数详解
在OpenCV中,漫水填充算法由floodFill函数实现,其作用是用我们指定的颜色从种子点开始填充一个连接域。连通性由像素值的接近程度来衡量。OpenCV2.X有两个C++重写版本的floodFill。
第一个版本的floodFill :
int floodFill(InputOutputArray image, Point seedPoint, Scalar newVal, Rect* rect=0, Scalar loDiff=Scalar(), Scalar upDiff=Scalar(), int flags=4 )
第二个版本的floodFill:
int floodFill(InputOutputArray image, InputOutputArray mask, Point seedPoint,Scalar newVal, Rect* rect=0, Scalar loDiff=Scalar(), Scalar upDiff=Scalar(), int flags=4 )
下面是一起介绍的参数详解。除了第二个参数外,其他的参数都是共用的。
- 第一个参数,InputOutputArray类型的image, 输入/输出1通道或3通道,8位或浮点图像,具体参数由之后的参数具体指明。
- 第二个参数, InputOutputArray类型的mask,这是第二个版本的floodFill独享的参数,表示操作掩模,。它应该为单通道、8位、长和宽上都比输入图像 image 大两个像素点的图像。第二个版本的floodFill需要使用以及更新掩膜,所以这个mask参数我们一定要将其准备好并填在此处。需要注意的是,漫水填充不会填充掩膜mask的非零像素区域。例如,一个边缘检测算子的输出可以用来作为掩膜,以防止填充到边缘。同样的,也可以在多次的函数调用中使用同一个掩膜,以保证填充的区域不会重叠。 另外需要注意的是,掩膜mask会比需填充的图像大,所以 mask 中与输入图像(x,y)像素点相对应的点的坐标为(x+1,y+1)。
- 第三个参数,Point类型的seedPoint,漫水填充算法的起始点。
- 第四个参数,Scalar类型的newVal,像素点被染色的值,即在重绘区域像素的新值。
- 第五个参数,Rect*类型的rect,有默认值0,一个可选的参数,用于设置floodFill函数将要重绘区域的最小边界矩形区域。
- 第六个参数,Scalar类型的loDiff,有默认值Scalar( ),表示当前观察像素值与其部件邻域像素值或者待加入该部件的种子像素之间的亮度或颜色之负差(lower brightness/color difference)的最大值。
- 第七个参数,Scalar类型的upDiff,有默认值Scalar( ),表示当前观察像素值与其部件邻域像素值或者待加入该部件的种子像素之间的亮度或颜色之正差(lower brightness/color difference)的最大值。
- 第八个参数,int类型的flags,操作标志符,此参数包含三个部分,比较复杂,我们一起详细看看。
-
- 低八位 (第0~7位)用于控制算法的连通性,可取4 (4为缺省值) 或者 8。如果设为4,表示填充算法只考虑当前像素水平方向和垂直方向的相邻点;如果设为 8,除上述相邻点外,还会包含对角线方向的相邻点。
- 高八位 部分(16~23位)可以为0 或者如下两种选项标识符的组合:
-
- FLOODFILL_FIXED_RANGE - 如果设置为这个标识符的话,就会考虑当前像素与种子像素之间的差,否则就考虑当前像素与其相邻像素的差。也就是说,这个范围是浮动的。
- FLOODFILL_MASK_ONLY - 如果设置为这个标识符的话,函数不会去填充改变原始图像 (也就是忽略第三个参数newVal), 而是去填充掩模图像(mask)。这个标识符只对第二个版本的floodFill有用,因第一个版本里面压根就没有mask参数。
-
- 中间八位 部分,上面关于高八位FLOODFILL_MASK_ONLY标识符中已经说的很明显,需要输入符合要求的掩码。Floodfill的flags参数的中间八位的值就是用于指定填充掩码图像的值的。但如果flags中间八位的值为0,则掩码会用1来填充。
而所有flags可以用or操作符连接起来,即“|”。例如,如果想用8邻域填充,并填充固定像素值范围,填充掩码而不是填充源图像,以及设填充值为38,那么输入的参数是这样:
flags=8 | FLOODFILL_MASK_ONLY | FLOODFILL_FIXED_RANGE | (38<<8)#include
#include
using namespace cv;
using namespace std;
Mat src, hsv, mask;
int low = 20; int up = 20;
void get_mask(int event, int x, int y, int, void*);
void hist_and_backproj();
int main()
{
src = imread("hand.jpg");
if (!src.data)
{
cout << "load image error!" << endl;
return -1;
}
cvtColor(src, hsv, CV_BGR2HSV);
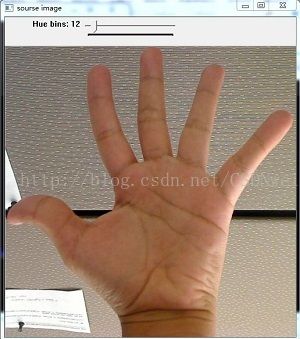
char *windowname = "sourse image";
namedWindow(windowname, CV_WINDOW_AUTOSIZE);
imshow(windowname, src);
createTrackbar("low", windowname, &low, 255, 0);
createTrackbar("up", windowname, &up, 255, 0);
setMouseCallback(windowname,get_mask, 0);
waitKey(0);
return 0;
}
void get_mask(int event, int x, int y, int, void*)
{
if (event != EVENT_LBUTTONDOWN)
return;
Point seed = Point(x, y);
Scalar newval = Scalar(120, 120, 120);
int connectivity = 8;
int newMaskval = 255;
Mat mask2 = Mat::zeros(src.rows + 2, src.cols + 2, CV_8UC1);
int flag = connectivity + (newMaskval << 8) + FLOODFILL_FIXED_RANGE + FLOODFILL_MASK_ONLY;
floodFill(src, mask2, seed, newval, 0, Scalar(low, low, low), Scalar(up, up, up), flag);
mask = mask2(Range(1, mask2.rows - 1), Range(1, mask2.cols - 1));
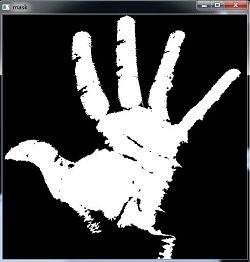
imshow("mask", mask);
hist_and_backproj();
}
void hist_and_backproj()
{
MatND hist;
int h_bins = 30, s_bins = 32;
int histSize[] = { h_bins, s_bins };
float h_ranges[] = { 0, 179 };
float s_ranges[] = { 0, 255 };
const float* ranges[] = { h_ranges, s_ranges };
int channels[] = { 0, 1 };
calcHist(&hsv,1, channels, mask, hist, 2, histSize, ranges, true, false);
normalize(hist, hist, 0, 255, NORM_MINMAX, -1, Mat());
MatND backproj;
calcBackProject(&hsv, 1, channels, hist, backproj, ranges, 1, true);
imshow("proj", backproj);
}