序
前面两篇文章讲了client credentials以及password授权模式,本文就来讲一下authorization code授权码模式。
配置
security config
@EnableWebSecurity
@EnableGlobalMethodSecurity(prePostEnabled = true)
public class SecurityConfig extends WebSecurityConfigurerAdapter {

    /**
     * 1\这里记得设置requestMatchers,不拦截需要token验证的url
     * 不然会优先被这个filter拦截,走用户端的认证而不是token认证
     * 2\这里记得对oauth的url进行保护,正常是需要登录态才可以
     */
    @Override
    public void configure(HttpSecurity http) throws Exception {
        http.csrf().disable();
        http
                .requestMatchers().antMatchers("/oauth/**","/login/**","/logout/**")
                .and()
                .authorizeRequests()
                .antMatchers("/oauth/**").authenticated()
                .and()
                .formLogin().permitAll();
    }

    @Bean
    @Override
    protected UserDetailsService userDetailsService(){
        InMemoryUserDetailsManager manager = new InMemoryUserDetailsManager();
        manager.createUser(User.withUsername("demoUser1").password("123456").authorities("USER").build());
        manager.createUser(User.withUsername("demoUser2").password("123456").authorities("USER").build());
        return manager;
    }

    /**
     * support password grant type
     * @return
     * @throws Exception
     */
    @Override
    @Bean
    public AuthenticationManager authenticationManagerBean() throws Exception {
        return super.authenticationManagerBean();
    }
}
新增formLogin,用于页面授权
resource server config
@Configuration
@EnableResourceServer
public class ResourceServerConfig extends ResourceServerConfigurerAdapter {

    @Override
    public void configure(HttpSecurity http) throws Exception {
        http.requestMatchers().antMatchers("/api/**")
                .and()
                .authorizeRequests()
                .antMatchers("/api/**").authenticated();
}
oauth server config
@Configuration
@EnableAuthorizationServer //提供/oauth/authorize,/oauth/token,/oauth/check_token,/oauth/confirm_access,/oauth/error
public class OAuth2ServerConfig extends AuthorizationServerConfigurerAdapter {

    @Override
    public void configure(AuthorizationServerSecurityConfigurer oauthServer) throws Exception {
        oauthServer
                .realm("oauth2-resources")
                .tokenKeyAccess("permitAll()") //url:/oauth/token_key,exposes public key for token verification if using JWT tokens
                .checkTokenAccess("isAuthenticated()") //url:/oauth/check_token allow check token
                .allowFormAuthenticationForClients();
    }

    @Autowired
    private AuthenticationManager authenticationManager;

    @Override
    public void configure(AuthorizationServerEndpointsConfigurer endpoints) throws Exception {
        endpoints.authenticationManager(authenticationManager);
    }

    @Override
    public void configure(ClientDetailsServiceConfigurer clients) throws Exception {
        clients.inMemory()
                .withClient("demoApp")
                .secret("demoAppSecret")
                .redirectUris("http://baidu.com")
                .authorizedGrantTypes("authorization_code", "client_credentials", "refresh_token",
                        "password", "implicit")
                .scopes("all")
                .resourceIds("oauth2-resource")
                .accessTokenValiditySeconds(1200)
                .refreshTokenValiditySeconds(50000);
    }
}
注意,这里要配置redirectUris
请求授权
浏览器访问
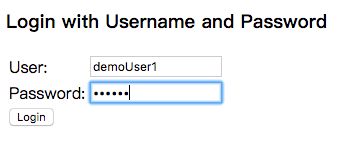
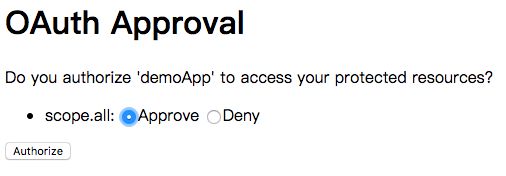
http://localhost:8080/oauth/authorize?response_type=code&client_id=demoApp&redirect_uri=http://baidu.com- 没有登录需要先登录
- 登陆后approve
- 之后有个code
https://www.baidu.com/?code=p1ancF携带code获取token
curl -i -d "grant_type=authorization_code&code=p1ancF&client_id=demoApp&client_secret=demoAppSecret" -X POST http://localhost:8080/oauth/token报错
HTTP/1.1 400
X-Content-Type-Options: nosniff
X-XSS-Protection: 1; mode=block
Cache-Control: no-cache, no-store, max-age=0, must-revalidate
Pragma: no-cache
Expires: 0
X-Frame-Options: DENY
X-Application-Context: application
Cache-Control: no-store
Pragma: no-cache
Content-Type: application/json;charset=UTF-8
Transfer-Encoding: chunked
Date: Sun, 03 Dec 2017 08:09:21 GMT
Connection: close

{"error":"invalid_grant","error_description":"Redirect URI mismatch."}
url需要传递redirect_uri,另外AuthorizationServerConfigurerAdapter需要配置一致的
需要传递
curl -i -d "grant_type=authorization_code&code=luAJTn&client_id=demoApp&client_secret=demoAppSecret&redirect_uri=http://baidu.com" -X POST http://localhost:8080/oauth/token成功返回
HTTP/1.1 200
X-Content-Type-Options: nosniff
X-XSS-Protection: 1; mode=block
Cache-Control: no-cache, no-store, max-age=0, must-revalidate
Pragma: no-cache
Expires: 0
X-Frame-Options: DENY
X-Application-Context: application
Cache-Control: no-store
Pragma: no-cache
Content-Type: application/json;charset=UTF-8
Transfer-Encoding: chunked
Date: Sun, 03 Dec 2017 08:17:40 GMT

{"access_token":"c80408d4-5afb-4f87-9538-9fb45b149941","token_type":"bearer","refresh_token":"d59e5113-9174-4258-8915-169857032ed0","expires_in":1199,"scope":"all"}
错误返回
HTTP/1.1 400
X-Content-Type-Options: nosniff
X-XSS-Protection: 1; mode=block
Cache-Control: no-cache, no-store, max-age=0, must-revalidate
Pragma: no-cache
Expires: 0
X-Frame-Options: DENY
X-Application-Context: application
Cache-Control: no-store
Pragma: no-cache
Content-Type: application/json;charset=UTF-8
Transfer-Encoding: chunked
Date: Sun, 03 Dec 2017 08:17:09 GMT
Connection: close

{"error":"invalid_grant","error_description":"Invalid authorization code: p1ancF"}
这个code只能用一次,如果这一次失败了则需要重新申请
携带token请求资源
curl -i http://localhost:8080/api/blog/1?access_token=c80408d4-5afb-4f87-9538-9fb45b149941成功返回
HTTP/1.1 200
X-Content-Type-Options: nosniff
X-XSS-Protection: 1; mode=block
Cache-Control: no-cache, no-store, max-age=0, must-revalidate
Pragma: no-cache
Expires: 0
X-Frame-Options: DENY
X-Application-Context: application
Content-Type: text/plain;charset=UTF-8
Content-Length: 14
Date: Sun, 03 Dec 2017 08:19:25 GMT

this is blog 1
check token
curl -i -X POST -H "Accept: application/json" -u "demoApp:demoAppSecret" http://localhost:8080/oauth/check_token?token=c80408d4-5afb-4f87-9538-9fb45b149941返回
HTTP/1.1 200
X-Content-Type-Options: nosniff
X-XSS-Protection: 1; mode=block
Cache-Control: no-cache, no-store, max-age=0, must-revalidate
Pragma: no-cache
Expires: 0
X-Frame-Options: DENY
X-Application-Context: application
Content-Type: application/json;charset=UTF-8
Transfer-Encoding: chunked
Date: Sun, 03 Dec 2017 08:20:57 GMT

{"aud":["oauth2-resource"],"exp":1512290260,"user_name":"demoUser1","authorities":["USER"],"client_id":"demoApp","scope":["all"]}
这样就大功告成了
doc
- Implementing OAuth2 with Spring Security
- OAuth 2.0 筆記 (4.1) Authorization Code Grant Flow 細節

