版本记录
| 版本号 | 时间 |
|---|---|
| V1.0 | 2019.09.18 星期三 |
前言
iOS中有关视图控件用户能看到的都在UIKit框架里面,用户交互也是通过UIKit进行的。感兴趣的参考上面几篇文章。
1. UIKit框架(一) —— UIKit动力学和移动效果(一)
2. UIKit框架(二) —— UIKit动力学和移动效果(二)
3. UIKit框架(三) —— UICollectionViewCell的扩张效果的实现(一)
4. UIKit框架(四) —— UICollectionViewCell的扩张效果的实现(二)
5. UIKit框架(五) —— 自定义控件:可重复使用的滑块(一)
6. UIKit框架(六) —— 自定义控件:可重复使用的滑块(二)
7. UIKit框架(七) —— 动态尺寸UITableViewCell的实现(一)
8. UIKit框架(八) —— 动态尺寸UITableViewCell的实现(二)
9. UIKit框架(九) —— UICollectionView的数据异步预加载(一)
10. UIKit框架(十) —— UICollectionView的数据异步预加载(二)
11. UIKit框架(十一) —— UICollectionView的重用、选择和重排序(一)
12. UIKit框架(十二) —— UICollectionView的重用、选择和重排序(二)
13. UIKit框架(十三) —— 如何创建自己的侧滑式面板导航(一)
14. UIKit框架(十四) —— 如何创建自己的侧滑式面板导航(二)
15. UIKit框架(十五) —— 基于自定义UICollectionViewLayout布局的简单示例(一)
16. UIKit框架(十六) —— 基于自定义UICollectionViewLayout布局的简单示例(二)
17. UIKit框架(十七) —— 基于自定义UICollectionViewLayout布局的简单示例(三)
18. UIKit框架(十八) —— 基于CALayer属性的一种3D边栏动画的实现(一)
19. UIKit框架(十九) —— 基于CALayer属性的一种3D边栏动画的实现(二)
20. UIKit框架(二十) —— 基于UILabel跑马灯类似效果的实现(一)
21. UIKit框架(二十一) —— UIStackView的使用(一)
22. UIKit框架(二十二) —— 基于UIPresentationController的自定义viewController的转场和展示(一)
23. UIKit框架(二十三) —— 基于UIPresentationController的自定义viewController的转场和展示(二)
24. UIKit框架(二十四) —— 基于UICollectionViews和Drag-Drop在两个APP间的使用示例 (一)
25. UIKit框架(二十五) —— 基于UICollectionViews和Drag-Drop在两个APP间的使用示例 (二)
26. UIKit框架(二十六) —— UICollectionView的自定义布局 (一)
27. UIKit框架(二十七) —— UICollectionView的自定义布局 (二)
28. UIKit框架(二十八) —— 一个UISplitViewController的简单实用示例 (一)
源码
1. Swift
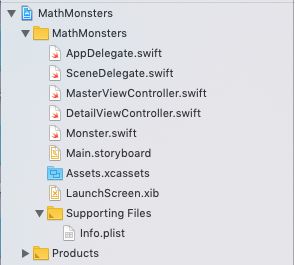
首先看下工程组织结构
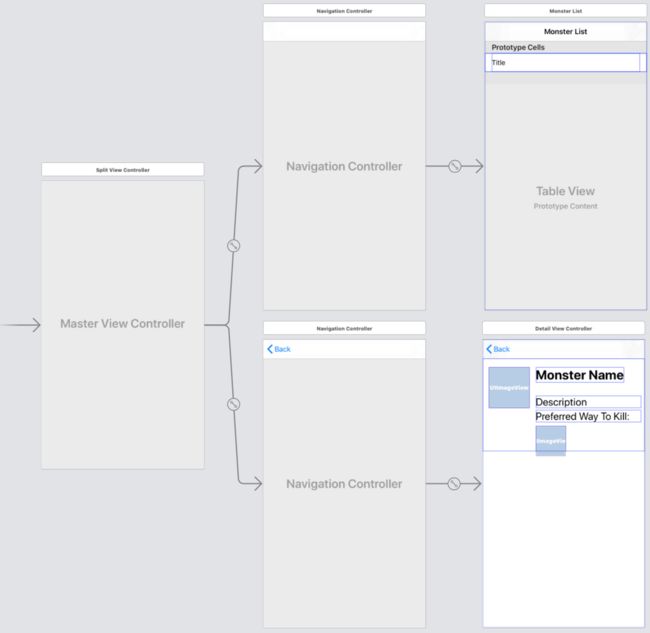
接着看下sb中的内容
下面就是源码了
1. AppDelegate
import UIKit

@UIApplicationMain
class AppDelegate: UIResponder, UIApplicationDelegate {
  // - MARK: UISceneSession Lifecycle

  func application(_ application: UIApplication, configurationForConnecting connectingSceneSession: UISceneSession, options: UIScene.ConnectionOptions) -> UISceneConfiguration {
    // Called when a new scene session is being created.
    // Use this method to select a configuration to create the new scene with.
    return UISceneConfiguration(name: "Default Configuration", sessionRole: connectingSceneSession.role)
  }
}
2. SceneDelegate.swift
import UIKit

class SceneDelegate: UIResponder, UIWindowSceneDelegate {
  var window: UIWindow?

  func scene(_ scene: UIScene, willConnectTo session: UISceneSession, options connectionOptions: UIScene.ConnectionOptions) {
    guard
      let splitViewController = window?.rootViewController as? UISplitViewController,
      let leftNavController = splitViewController.viewControllers.first as? UINavigationController,
      let masterViewController = leftNavController.viewControllers.first as? MasterViewController,
      let detailViewController = (splitViewController.viewControllers.last as? UINavigationController)?.topViewController as? DetailViewController
      else { fatalError() }

    let firstMonster = masterViewController.monsters.first
    detailViewController.monster = firstMonster
    masterViewController.delegate = detailViewController
    detailViewController.navigationItem.leftItemsSupplementBackButton = true
    detailViewController.navigationItem.leftBarButtonItem = splitViewController.displayModeButtonItem
  }
}
3. MasterViewController.swift
import UIKit

protocol MonsterSelectionDelegate: class {
  func monsterSelected(_ newMonster: Monster)
}

class MasterViewController: UITableViewController {
  let monsters = [
    Monster(name: "Cat-Bot", description: "MEE-OW",
            iconName: "meetcatbot", weapon: .sword),
    Monster(name: "Dog-Bot", description: "BOW-WOW",
            iconName: "meetdogbot", weapon: .blowgun),
    Monster(name: "Explode-Bot", description: "BOOM!",
            iconName: "meetexplodebot", weapon: .smoke),
    Monster(name: "Fire-Bot", description: "Will Make You Steamed",
            iconName: "meetfirebot", weapon: .ninjaStar),
    Monster(name: "Ice-Bot", description: "Has A Chilling Effect",
            iconName: "meeticebot", weapon: .fire),
    Monster(name: "Mini-Tomato-Bot", description: "Extremely Handsome",
            iconName: "meetminitomatobot", weapon: .ninjaStar)
  ]

  weak var delegate: MonsterSelectionDelegate?

  // MARK: - Table view data source

  override func tableView(_ tableView: UITableView, numberOfRowsInSection section: Int) -> Int {
    return monsters.count
  }

  override func tableView(_ tableView: UITableView, cellForRowAt indexPath: IndexPath) -> UITableViewCell {
    let cell = tableView.dequeueReusableCell(withIdentifier: "Cell", for: indexPath)
    let monster = monsters[indexPath.row]
    cell.textLabel?.text = monster.name
    return cell
  }

  override func tableView(_ tableView: UITableView, didSelectRowAt indexPath: IndexPath) {
    let selectedMonster = monsters[indexPath.row]
    delegate?.monsterSelected(selectedMonster)
    if
      let detailViewController = delegate as? DetailViewController,
      let detailNavigationController = detailViewController.navigationController {
        splitViewController?.showDetailViewController(detailNavigationController, sender: nil)
    }
  }
}
4. DetailViewController.swift
import UIKit

class DetailViewController: UIViewController {
  @IBOutlet weak var nameLabel: UILabel!
  @IBOutlet weak var descriptionLabel: UILabel!
  @IBOutlet weak var iconImageView: UIImageView!
  @IBOutlet weak var weaponImageView: UIImageView!

  var monster: Monster? {
    didSet {
      refreshUI()
    }
  }

  private func refreshUI() {
    loadViewIfNeeded()
    nameLabel.text = monster?.name
    descriptionLabel.text = monster?.description
    iconImageView.image = monster?.icon
    weaponImageView.image = monster?.weapon.image
  }
}

extension DetailViewController: MonsterSelectionDelegate {
  func monsterSelected(_ newMonster: Monster) {
    monster = newMonster
  }
}
5. Monster.swift
import UIKit

enum Weapon {
  case blowgun, ninjaStar, fire, sword, smoke

  var image: UIImage {
    switch self {
    case .blowgun:
      return UIImage(named: "blowgun.png")!
    case .fire:
      return UIImage(named: "fire.png")!
    case .ninjaStar:
      return UIImage(named: "ninjastar.png")!
    case .smoke:
      return UIImage(named: "smoke.png")!
    case .sword:
      return UIImage(named: "sword.png")!
    }
  }
}

class Monster {
  let name: String
  let description: String
  let iconName: String
  let weapon: Weapon

  init(name: String, description: String, iconName: String, weapon: Weapon) {
    self.name = name
    self.description = description
    self.iconName = iconName
    self.weapon = weapon
  }

  var icon: UIImage? {
    return UIImage(named: iconName)
  }
}
后记
本篇主要讲述了一个UISplitViewController的简单实用示例,感兴趣的给个赞或者关注~~~
