本文讲述了HTML5+jQuery插件Quicksand实现超酷的星际争霸2兵种分类展示效果。分享给大家供大家参考,具体如下:
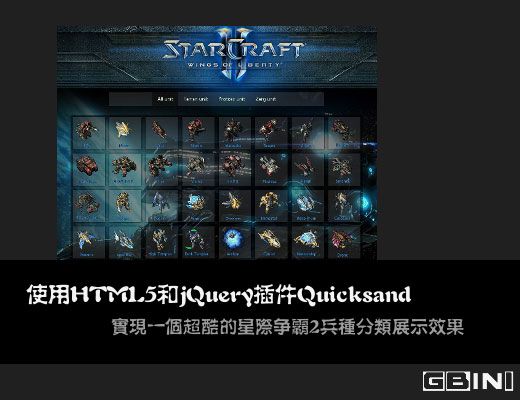
因为本人是星际争霸系列游戏的忠实拥簇,所以在今天的jQuery教程中,我们将使用HTML5和jQuery插件Quicksand来创建一个超酷的星际争霸兵种效果图。希望大家喜欢!
先来看看效果图:
HTML5代码
首先我们使用HTML5的代码来创建一个html文档,将所需的quicksand类库,及其jquery类库,还有HTML5类库倒入,如下:
    Starcraft 2 Unit Show Demo


      Starcraft 2 Unit


    //所有的兵种图片显示在这里
在以上代码中,我们将在container中插入需要展示的兵种图片,如下:


以上代码中,我们定义了兵种类别,分别为Terran,Protoss和Zerg单位。
在HTML5中,我们可以在data属性中存储数据,然后在jQuery中直接使用data方法调用取出,以上代码中我们将通过data-tag中定义的类别来展示所有兵种。
Javascript代码
gbin1.js
生成兵种的分类导航,如下:
$(document).ready(function(){
  var items = $('#starcraft li'), itemsByTag = {};
  items.each(function(i){
    var elem = $(this);
    //使用jQuery的html5数据处理方法取得兵种分类
    var tag = elem.data('tag');
    elem.attr('data-id',i);
    //去空格
    tag = $.trim(tag);
    if(!(tag in itemsByTag)){
      itemsByTag[tag] = [];
    }
   //添加到分类中
    itemsByTag[tag].push(elem);
  });
  ...
  ...
});
创建实际显示的兵种内容,如下:
function createList(text,items){
var ul = $('- ',{'class':'hidden'});
//生成兵种分类的数据
$.each(items,function(){
$(this).clone().appendTo(ul);
});
ul.appendTo('#container');
var a = $('',{
html: text,
href:'#',
data: {list:ul}
}).appendTo('#navbar');
}
生成导航栏点击动作,并生成放大效果。
//使用live方法来给动态生成内容添加事件
$('li').live('click', function(e){
if($('#details').is(":visible")){
$('#details').hide();
}
var src = $(this).find('img').attr('src');
$('#details').html($('![]() ',{
src: src,
width: '150px',
height: '150px'
}));
var details = $('#details');
var offset = $(this).offset();
$('#details').css({"left":offset.left-32, "top":offset.top-32}).show(function() {
$('#details img').animate({
width: '150px',
height: '150px',
}, 800);
});
});
',{
src: src,
width: '150px',
height: '150px'
}));
var details = $('#details');
var offset = $(this).offset();
$('#details').css({"left":offset.left-32, "top":offset.top-32}).show(function() {
$('#details img').animate({
width: '150px',
height: '150px',
}, 800);
});
});
CSS代码
/*-------------------------
  Simple reset
--------------------------*/
*{
  margin:0;
  padding:0;
}
/*-------------------------
  General Styles
--------------------------*/
html{
  background: url('../unit/bg_tile.jpg') #000d20;
}
body{
  font:14px Arial, sans-serif;
  min-height: 930px;
}
a, a:visited {
  text-decoration:none;
  outline:none;
  color:#54a6de;
}
a:hover{
  text-decoration:underline;
}
/*----------------------------
  Headers
-----------------------------*/
header{
  display: block;
  height: 120px;
  padding: 10px;
}
#details{
  display:none;
  position:absolute;
  width:150px;
  height:150px;
  z-index:10;
  background: url('../unit/dark.png');
  border: 1px solid #222;
  -moz-border-radius: 5px 5px 5px 5px;
}
h1{
  background:url('../unit/logo.gif') no-repeat left top;
  height: 60px;
  margin: 45px auto;
  overflow: hidden;
  text-align: center;
  text-indent: -99999px;
}
/*----------------------------
  navbar bar
-----------------------------*/
#navbar {
  background: url("../unit/light.png") ;
  display: block;
  height: 39px;
  margin: 25px auto;
  margin-top: 60px;
  position: relative;
  width: 600px;
  text-align:center;
}
#navbar a{
  color: #FFFFFF;
  display: inline-block;
  height: 39px;
  line-height: 37px;
  padding: 0 15px;
  text-shadow:1px 1px 1px #315218;
}
#navbar a:hover{
  text-decoration:none;
}
#navbar a.active{
  background: url("../unit/dark.png");
  box-shadow:  1px 0 0 rgba(255, 255, 255, 0.2),
        -1px 0 0 rgba(255, 255, 255, 0.2),
        1px 0 1px rgba(0,0,0,0.2) inset,
        -1px 0 1px rgba(0,0,0,0.2) inset;
}
/*----------------------------
  Content area
-----------------------------*/
#container{
  display:block;
  overflow:hidden;
  width: 816px;
  margin:0 auto;
}
#container li{
  background: url("../unit/light.png");
  float: left;
  height: 90px;
  list-style: none outside none;
  margin: 6px;
  position: relative;
  width: 90px;
  -moz-box-shadow: 0 0 5px #000;
  -webkit-box-shadow: 0 0 5px #000;
  box-shadow: 0 0 5px #000;
}
#container ul{
  overflow:hidden;
  background: url("../unit/dark.png");
}
#container ul.hidden{
  display:none;
}
完整实例代码点击此处本站下载。
PS:这里再为大家推荐几款代码格式化、美化工具,相信大家在以后的开发过程中会用得到:
在线JavaScript代码美化、格式化工具:
http://tools.jb51.net/code/js
JavaScript压缩/格式化/加密工具:
http://tools.jb51.net/code/jscompress
PHP代码在线格式化美化工具:
http://tools.jb51.net/code/phpformat
XML代码在线格式化美化工具:
http://tools.jb51.net/code/xmlcodeformat
json代码在线格式化/美化/压缩/编辑/转换工具:
http://tools.jb51.net/code/jsoncodeformat
在线JSON代码检验、检验、美化、格式化工具:
http://tools.jb51.net/code/json
更多关于jQuery相关内容感兴趣的读者可查看本站专题:《jquery中Ajax用法总结》、《jQuery表格(table)操作技巧汇总》、《jQuery拖拽特效与技巧总结》、《jQuery扩展技巧总结》、《jQuery常见经典特效汇总》、《jQuery动画与特效用法总结》、《jquery选择器用法总结》及《jQuery常用插件及用法总结》
希望本文所述对大家jQuery程序设计有所帮助。