SpringBoot学习---第一篇:构建第一个SpringBoot工程
Spring Boot可以轻松创建单独的,生产级的基于Spring的应用程序,我们只管“运行”。查看Spring平台和第三方库。大多数Spring Boot应用程序只需要很少的Spring配置。
一、Features
- 创建独立的Spring应用程序
- 直接嵌入Tomcat,Jetty或Undertow(无需部署WAR文件)
- 提供“初始”的POM文件内容,以简化Maven配置
- 尽可能时自动配置Spring和第三方库
- 提供生产就绪的功能,如指标,健康检查和外部化配置
- 绝对无代码生成,也不需要XML配置
二、Quick start
本项目使用的环境:
- 开发工具:Intellij IDEA
- springboot: 2.0.3
- jdk:1.8
- maven:3
步骤:
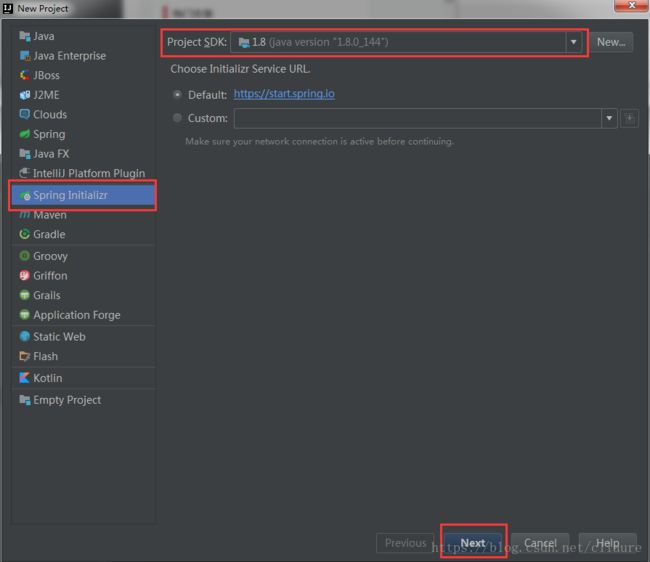
1.创建一个springboot项目:
点击
File -> Project->Spring Initializr
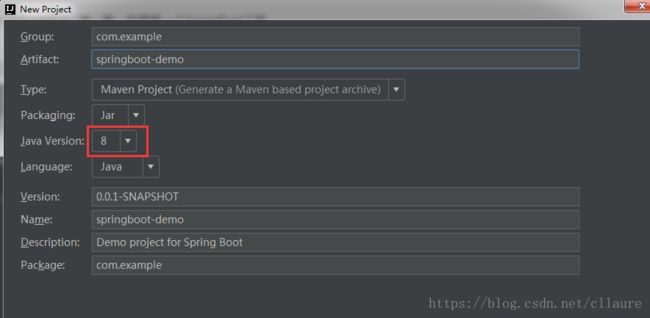
2.创建项目的文件结构以及jdk的版本
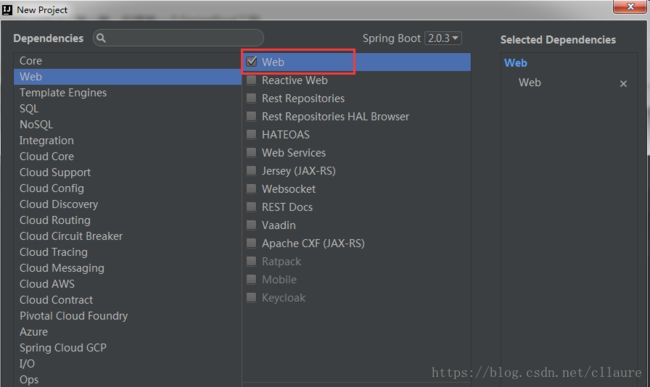
3.选择项目所需要的依赖
然后点击finish。
4.看一下文件的结构:
- src
    -main
        -java
            -package
                #主函数,启动类,运行它如果运行了 Tomcat、Jetty、Undertow 等容器
                -SpringbootApplication
        -resouces
            #存放静态资源 js/css/images 等
            - statics
            #存放 html 模板文件
            - templates
            #主要的配置文件,SpringBoot启动时候会自动加载application.yml/application.properties
            - application.yml
    #测试文件存放目录
    -test
 # pom.xml 文件是Maven构建的基础,里面包含了我们所依赖JAR和Plugin的信息
- pom
5.查看一下pom.xml:
   4.0.0

   com.example
   springboot-demo
   0.0.1-SNAPSHOT
   jar

   springboot-demo
   Demo project for Spring Boot


      org.springframework.boot
      spring-boot-starter-parent
      2.0.3.RELEASE


      UTF-8
      UTF-8
      1.8


         org.springframework.boot
         spring-boot-starter-web


         org.springframework.boot
         spring-boot-starter-test
         test


            org.springframework.boot
            spring-boot-maven-plugin
其他依赖可以参考:官方文档
6.启动类:
注意事项:一个项目中切记不要出现多个main函数,否在在打包的时候spring-boot-maven-plugin将找不到主函数(主动指定打包主函数入口除外…)。
import org.springframework.boot.SpringApplication;
import org.springframework.boot.autoconfigure.SpringBootApplication;

/**
 * 该注解指定项目为springboot,由此类当作程序入口
 * 自动装配 web 依赖的环境
 */
@SpringBootApplication
public class SpringbootDemoApplication {

	public static void main(String[] args) {
		SpringApplication.run(SpringbootDemoApplication.class, args);
	}
}
7.案例演示:
创建com.example.demo.controller 包,在该包下创建一个 Controller 类,如下:
import org.springframework.web.bind.annotation.RequestMapping;
import org.springframework.web.bind.annotation.RestController;


@RestController
public class HelloWorldController {

    @RequestMapping("/helloworld")
    public String helloworld() {
        return "helloworld";
    }
}
@RestController 等同于 (@Controller 与 @ResponseBody)
8.运行示例:
  .   ____          _            __ _ _
 /\\ / ___'_ __ _ _(_)_ __  __ _ \ \ \ \
( ( )\___ | '_ | '_| | '_ \/ _` | \ \ \ \
 \\/  ___)| |_)| | | | | || (_| |  ) ) ) )
  '  |____| .__|_| |_|_| |_\__, | / / / /
 =========|_|==============|___/=/_/_/_/
::Spring Boot:: (v2.0.3.RELEASE)
... ...
...  : Tomcat started on port(s): 8080 (http) with context path ''
如果打开Web浏览器访问http://localhost:8080/helloworld , 应该会看到以下输出:
三、热部署
当我们修改文件和创建文件时,都需要重新启动项目。这样频繁的操作很浪费时间,配置热部署可以让项目自动加载变化的文件,省去的手动操作。
第一步:引入热加载的插件
在 pom.xml 文件中添加如下配置:
   org.springframework.boot
   spring-boot-devtools
   true
在 pom.xml 文件中添加如下配置:
project 中添加spring-boot-maven-plugin,主要在eclipse中起作用,idea不需要加此配置,springboot 项目的话,应该是有此配置,加里面的内容即可。
                org.springframework.boot
                spring-boot-maven-plugin

                    true
第二步 : idea设置
1、点击: file ,Settings ,Build ,Execution,Deplment
然后记得apply,ok。
2、组合键:Shift+ALT+Ctrl+/ ,选择“Registry”,回车,找到“complier.automake.allow.when.app.running”
14年版本如下:
15版本或者是更高版本如下:
然后快捷键是Ctrl + Shift +A ,一样找到complier.automake.allow.when.app.running,点击勾选即可。
第三步:设置完成后,修改完代码按ctrl + F9 ,就可以不用重启就直接调试了。
四、多环境切换
springboot 提供多环境配置的机制,让开发者非常容易的根据需求而切换不同的配置环境。
在 src/main/resources 目录下创建三个配置文件:
- application-dev.properties:用于开发环境
- application-test.properties:用于测试环境
- application-prod.properties:用于生产环境
我们可以在这个三个配置文件中设置不同的信息,application.properties 配置公共的信息。
在 application.properties 中配置:
spring.profiles.active=dev
表示激活 application-dev.properties 文件配置, springboot 会加载使用 application.properties 和 application-dev.properties 配置文件的信息。
同理,可将 spring.profiles.active 的值修改成 test 或 prod 达到切换环境的目的。
五、参考文献
springboot 在idea中实现热部署
Spring Boot Reference Guide
Spring Boot 入门之基础篇(一)


