【unity shader】高级光照 --- 薄膜干涉
-光照模型是shader编程的核心与基础。 一般的光照模型–不管是lambert还是phong–其实都是对现实光照的模拟。
但是现实中的光照效果要复杂得多。但就光的反射而言, 薄膜干涉就是一种非常常见的高级光照效果。
什么是薄膜干涉?
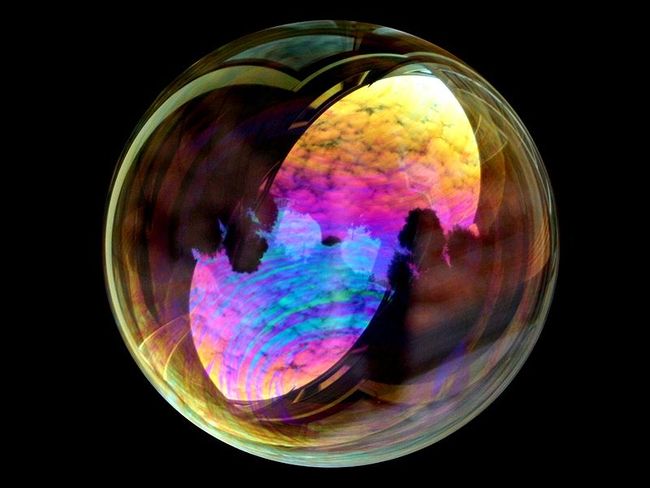
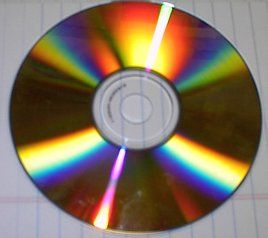
薄膜干涉的常见例子可以是阳光下的肥皂泡, 又或者是一张光盘
关于薄膜干涉的原理,可以参考wiki上的介绍 【https://en.wikipedia.org/wiki/Thin-film_interference】

如图所示,光线进入薄膜时,在薄膜的上下表面均产生反射,由于反射光线走过的路径不同,就产生了一个光程差。一般,当光程差正好等于光线波长的整数倍时候,反射光线就彼此增强,当光程差等于波长的整数倍又半波长时,光线就彼此抵消。
光程差与波长有关,又与光线的入射角度相关,所以我们就看到了阳光下的肥皂泡呈现出红绿蓝的光谱,并且随着观察角度的不同而不断变化。
薄膜干涉的shader编程
- 利用Ramp贴图模拟薄膜干涉效果
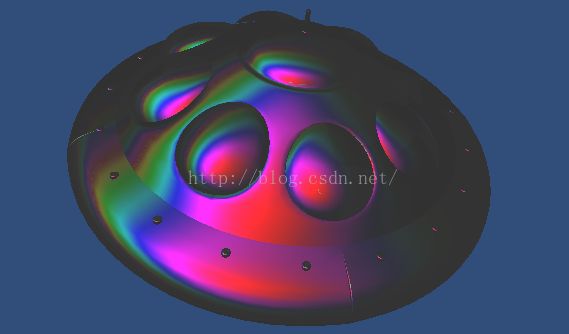
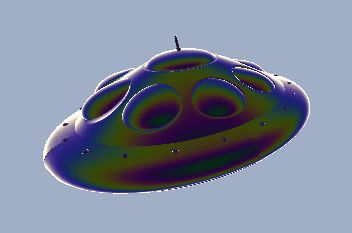
薄膜干涉的shader模拟,在NVIDIA的网站教程中有一个范例。对一艘外星UFO施以薄膜干涉,效果是这样滴。

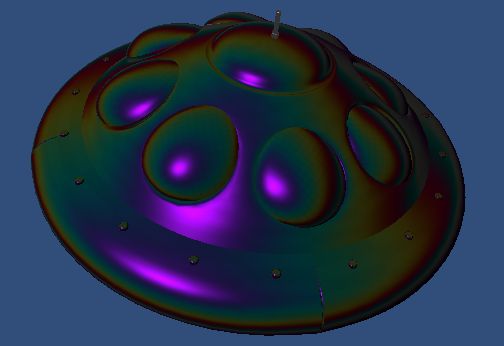
网上有人将这个demo转到了unity shader中,画风有些不一样了。
具体差异从何而来先不管,这个shader的实现原理就是计算光程差,以此为坐标对一副Ramp贴图采样,从而模拟光谱效果。实际观感还有赖于其他手段优化。

完整的shader代码如下:
Shader "thinfilm2" {
    Properties {
      _MainTex ("Texture", 2D) = "white" {}
      _Ramp ("Shading Ramp", 2D) = "gray" {}
      _SurfColor ("Specular Color", Color) = (0.5, 0.5, 0.5, 1)
      _SpecExpon ("Spec Power", Range (0, 125)) = 12
      _FilmDepth ("Film Depth", Range (0, 1)) = 0.05
    }
    SubShader {
      Tags { "RenderType" = "Opaque" }
      CGPROGRAM
      #pragma surface surf Ramp

      sampler2D _Ramp;
      float _SurfColor;
      float _SpecExpon;
      float _FilmDepth;


    half4 LightingRamp (SurfaceOutput s, half3 lightDir, half3 viewDir, half atten) {

          half3 Hn = normalize (lightDir + viewDir);

          half ndl = dot (s.Normal, lightDir);
          half ndh = dot (s.Normal, Hn);
          half ndv = dot (s.Normal, viewDir);

          float3 diff = max(0,ndl).xxx;

          float nh = max (0, ndh);

          float3 spec = pow (nh, _SpecExpon).xxx;

          //*viewdepth即光程差,这里用光在薄膜中行程长度近似。*
          float viewdepth = _FilmDepth/ndv*2.0;
          half3 ramp = tex2D (_Ramp, viewdepth.xx).rgb;
          half4 c;
          c.rgb = (s.Albedo*_SurfColor * diff + ramp * spec) *(atten);
          c.a = s.Alpha;
          return c;
      }

      struct Input {
          float2 uv_MainTex;
          half3 viewDir;
      };
      sampler2D _MainTex;
      void surf (Input IN, inout SurfaceOutput o) {
         o.Albedo = tex2D (_MainTex, IN.uv_MainTex).rgb;
      }
      ENDCG
    }
    Fallback "Diffuse"
}- 模拟光程差公式
薄膜干涉的光程差公式很简单,已知光的波长,折射率以及薄膜厚度,即可求解。
当光程差等于波长的整数倍又半波长时,反射加强;
当光程差等于半波长的整数倍,反射抵消。
我们利用三角函数来实现反射的周期特性,同时针对红绿蓝光设定不同的波长和折射率,这样就模拟出了一个实时的薄膜干涉效果
相应的shader代码如下:
Shader "Unlit/thinfilm_Unlit_IOR"
{
    Properties
    {
        _MainTex("Texture", 2D) = "white" {}
    _FilmDepth("film thickness", Range(1, 2000)) = 500.0
        _IOR("refraction index", Vector) = (0.9, 1.0, 1.1, 1.0)
    }
        SubShader
    {
        Tags{ "RenderType" = "Opaque" }
        LOD 100

        Pass
    {
        CGPROGRAM
#pragma vertex vert
#pragma fragment frag
        // make fog work
#pragma multi_compile_fog

#include "UnityCG.cginc"
#include "Lighting.cginc"
        struct appdata
    {
        float4 vertex : POSITION;
        float4 normal: NORMAL;
        float2 uv : TEXCOORD0;
    };

    struct v2f
    {
        float3 worldNormal : TEXCOORD0;
        float3 worldPos : TEXCOORD1;
        float2 uv : TEXCOORD2;
        UNITY_FOG_COORDS(1)
            float4 vertex : SV_POSITION;
    };

    sampler2D _MainTex;
    float4 _MainTex_ST;
    Vector _IOR;


    fixed thinFilmReflectance(fixed cosI, float lambda, float thickness, float IOR)
    {
        float PI = 3.1415926;
        fixed sin2R = saturate((1 - pow(cosI, 2)) / pow(IOR,2));
        fixed cosR = sqrt(1 - sin2R);
        float phi = 2.0*IOR*thickness*cosR / lambda + 0.5; //计算光程差
        fixed reflectionRatio = 1 - pow(cos(phi * PI*2.0)*0.5+0.5, 1.0);  //反射系数

        fixed  refRatio_min = pow((1 - IOR) / (1 + IOR), 2.0);

        reflectionRatio = refRatio_min + (1.0 - refRatio_min) * reflectionRatio;

        return reflectionRatio;
    }

    v2f vert(appdata v)
    {
        v2f o;

        o.vertex = mul(UNITY_MATRIX_MVP, v.vertex);
        // Transform the normal fram object space to world space
        o.worldNormal = mul(v.normal, (float3x3)_World2Object);
        // Transform the vertex from object spacet to world space
        o.worldPos = mul(_Object2World, v.vertex).xyz;


        o.uv = TRANSFORM_TEX(v.uv, _MainTex);
        UNITY_TRANSFER_FOG(o,o.vertex);
        return o;
    }


    float _FilmDepth;

    fixed4 frag(v2f i) : SV_Target
    {
        fixed3 worldNormal = normalize(i.worldNormal);
        fixed3 worldLightDir = normalize(_WorldSpaceLightPos0.xyz);
        // Get the view direction in world space
        fixed3 viewDir = normalize(_WorldSpaceCameraPos.xyz - i.worldPos.xyz);
        // Get the reflect direction in world space
        fixed3 reflectDir = normalize(reflect(-worldLightDir, worldNormal));
        fixed3 H = normalize(viewDir + worldLightDir);

        fixed ndl = max(0,dot(worldNormal, worldLightDir));
        fixed hdn = dot(worldNormal, H);
        //fixed ndv = max(0, dot(worldNormal, viewDir));
        fixed rdv = max(0, dot(reflectDir, viewDir));
        // sample the texture
        fixed4 albedo = tex2D(_MainTex, i.uv);

        fixed ref_red = thinFilmReflectance(hdn, 650.0, _FilmDepth, _IOR.r); //红光
        fixed ref_green = thinFilmReflectance(hdn, 510.0, _FilmDepth, _IOR.g); //绿光
        fixed ref_blue = thinFilmReflectance(hdn, 470.0, _FilmDepth, _IOR.b); //蓝光
        fixed4 tfi_rgb = fixed4(ref_red, ref_green, ref_blue, 1.0);

        fixed4 col = albedo*tfi_rgb*ndl*0.35 +tfi_rgb * pow(rdv, 25.);
        col.a = 1.0;
        // apply fog
        //UNITY_APPLY_FOG(i.fogCoord, col);
        return col;
    }
        ENDCG
    }
    }
}
- fresnel(菲涅尔)方程计算法
菲涅尔方程(wiki),这个比较高端了,是光学中的经典公式,用于描述光(或者一切电磁波)在不同介质表面的折射反射。因此用菲涅尔方程不仅能模拟光的薄膜干涉,还能模拟包括色散等更复杂的光学效应。关于菲涅尔方程的编程,完全参照网上一篇博文。最终的实现效果也很真实,而且还自带了很漂亮的rim light。
参考阅读
【1】