基于Red5与ffmpeg实现rtmp处理NVR或摄像头的监控视频处理方案
背景
各大监控视频平台厂商与外对接均是基于IE的OCX插件方式提供实时视频查看、历史视频回放与历史视频下载。在h5已大行其道的当下,基于IE的OCX插件方式已满足不了广大客户的实际需求,因此需要一个兼容各大主流浏览器与手机浏览的监控视频处理方案。
方案
red5是基于Flash的流媒体服务的一款基于Java的开源流媒体服务器。
ffmpeg是一套可以用来记录、转换数字音频、视频,并能将其转化为流的开源计算机程序。
本方案利用Red5发布RTMP流媒体服务器,向外提供实时、历史的RTMP推流;利用FFmpeg实现RTSP当作源推送到RTMP服务器;基于jsplayer实现视频展示。
具体细节上代码:
安装Red5,下载地址:https://github.com/Red5/red5-server,如不了具体安装步骤请自行百度。
安装ffmpeg,下载地址:https://ffmpeg.zeranoe.com/builds/win64/static/ffmpeg-20180325-5b31dd1-win64-static.zip,如不了具体安装步骤请自行百度。
实现
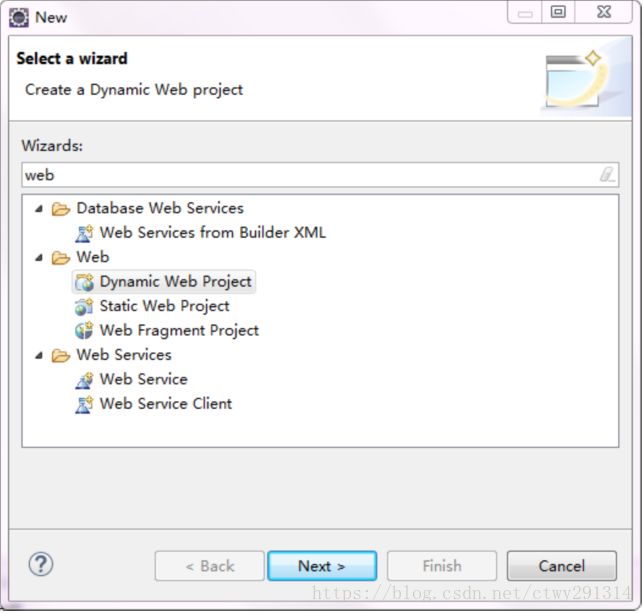
构建基于Red5的Web项目
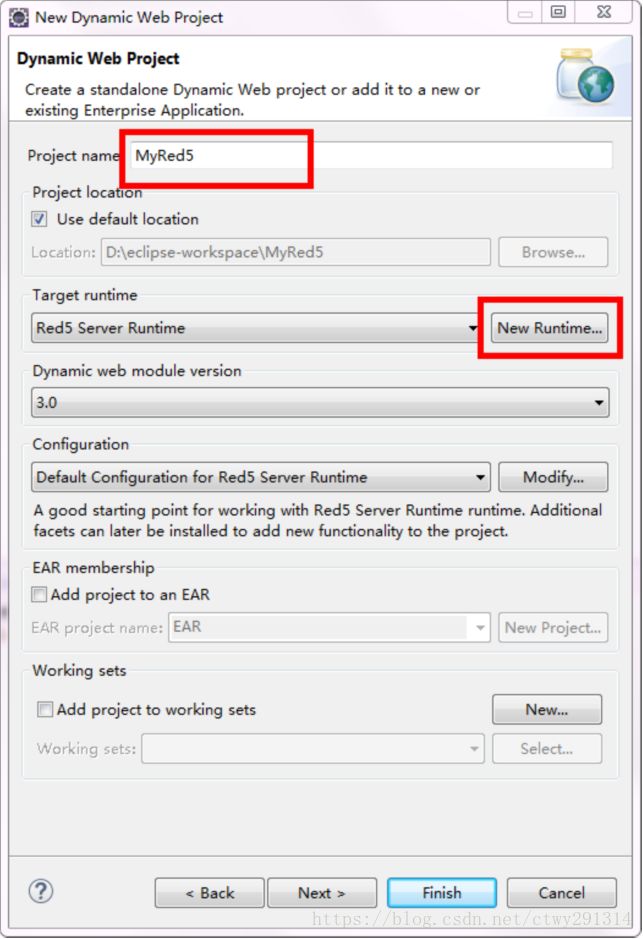
target runtime 选择 new runtime
选择Red5并next
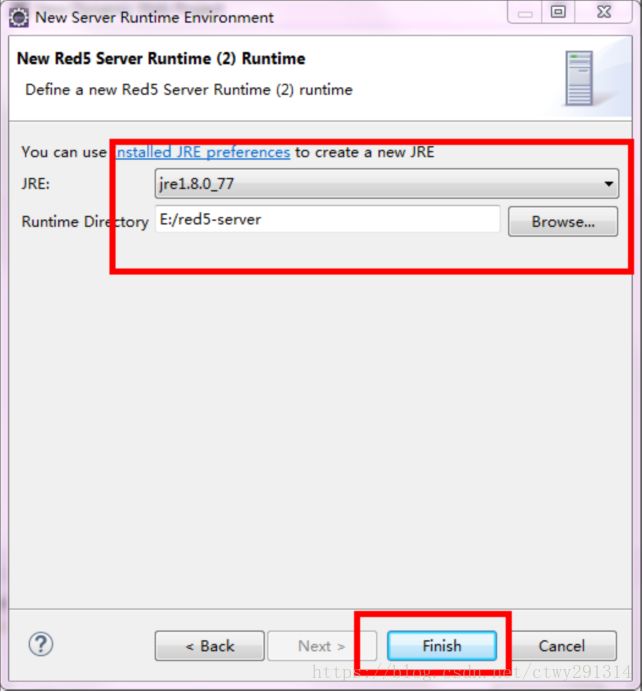
选择jdk1.8 ,把red5目录指向,我们解压的red5 server文件夹
点击Finish
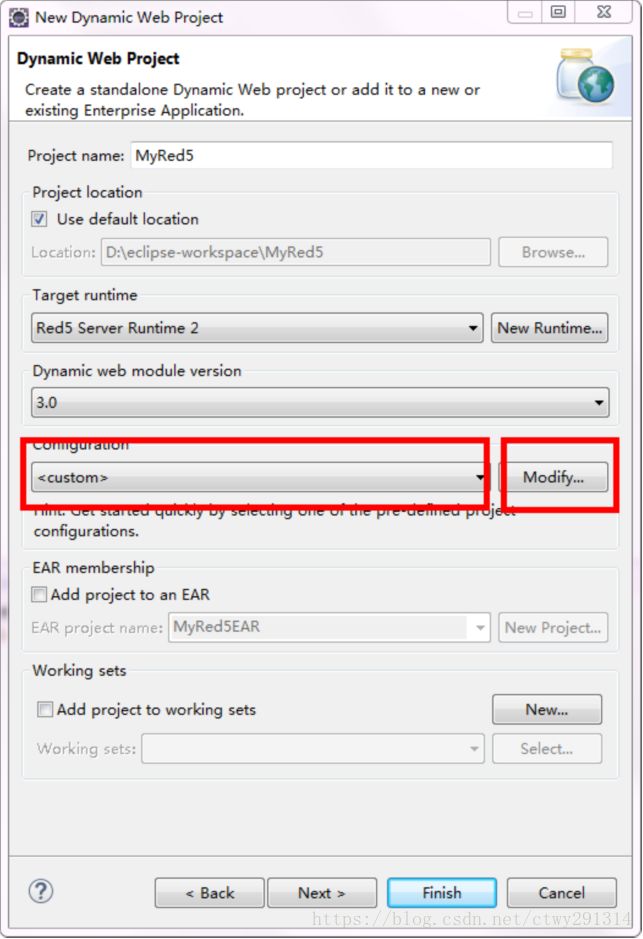
勾选red5 application generation
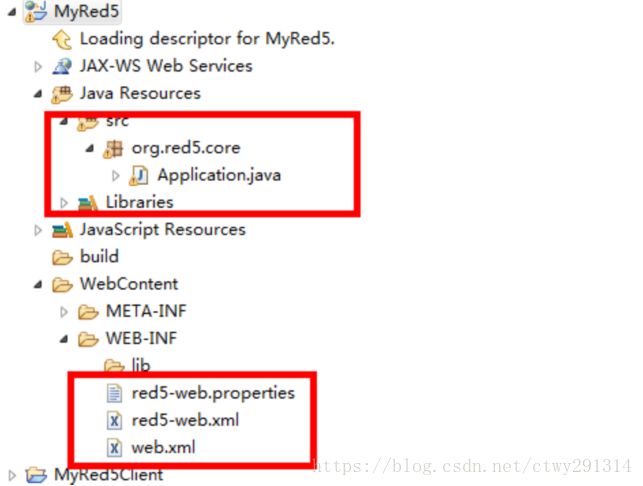
点击Finish,经过以上步骤基于Red5的Web项目已构建成功。项目结构如下:
搭建Red5服务器
右键New->Server
选择Red5,并Next
修改对应目录选择Red5并next,点击Finish,此时Red5服务器已搭建完成。
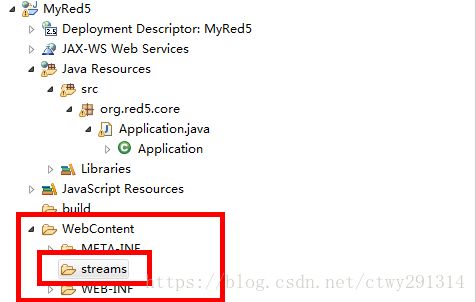
在WebContent目录下创建streams文件夹,streams目录下存放mp4或flv格式的视频文件,发布到Red5中即可实现历史视频的RTMP推送。
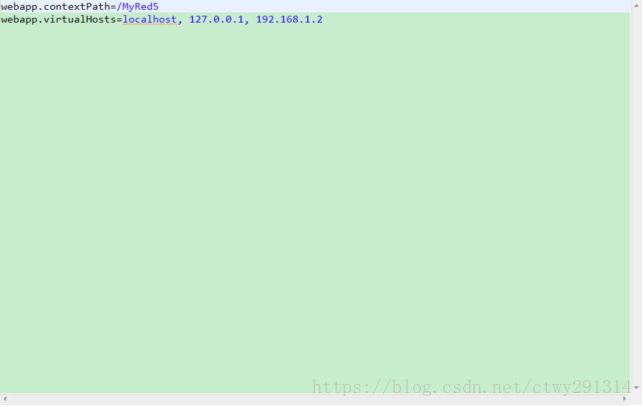
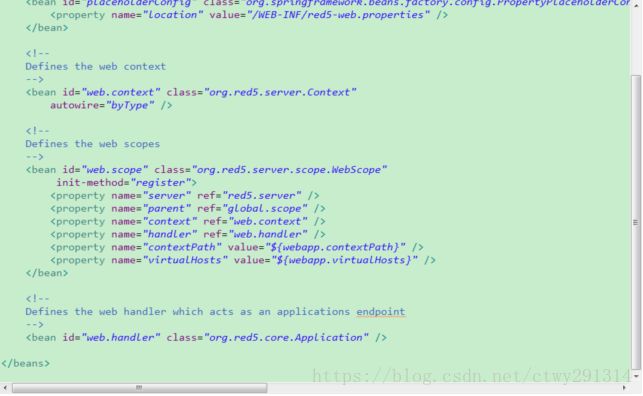
基于以上的项目修改为maven项目,新建maven项目名称为MyVideo并中添加上图的web.xml、red5-web.xml、red5-web.properties、Application.java并修改相应配置,具体见下图,
其中web.xml
	MyVideo


		webAppRootKey
		/MyVideo


		org.red5.logging.ContextLoggingListener


		LoggerContextFilter
		org.red5.logging.LoggerContextFilter


		LoggerContextFilter
		/*


		gateway
		org.red5.server.net.servlet.AMFGatewayServlet
		1


		encodingFilter
		org.springframework.web.filter.CharacterEncodingFilter

			encoding
			UTF-8


		encodingFilter
		/*


		gateway
		/gateway


			Forbidden
			/streams/*


		org.springframework.web.util.IntrospectorCleanupListener


		springMVC Servlet
		springmvc
		org.springframework.web.servlet.DispatcherServlet

			contextConfigLocation

			classpath:spring-mvc.xml

		2


		springmvc
		/
red5-web.xml
这块多啰嗦一下,在SpringMvc项目中配置applicationContext.xml,在red5项目中则配置在red5-web.xml。
其中red5-web.properties
webapp.contextPath=/MyVideo
webapp.virtualHosts=*

db.driver=com.mysql.jdbc.Driver
db.url=jdbc:mysql://127.0.0.1:3306/actdemo1?useUnicode=true&characterEncoding=UTF-8&rewriteBatchedStatements=true
db.username=root
db.password=1qaz@wsx
其中spring-mvc.xml
			5368709120


			UTF-8
其中mybatis-config.xml
其中loadFFmpeg.properties
#ffmpeg执行路径,一般为ffmpeg的安装目录,该路径只能是目录,不能为具体文件路径,否则会报错
path=E:/ffmpeg-20180227-fa0c9d6-win64-static/bin/
#存放任务的默认Map的初始化大小
size=10
#是否输出debug消息
debug=true
部分业务代码:
其中Application.java,为了节省服务器资源在对应摄像头点击播放时触发ffmpeg进行RTMP推流。
package com;

import java.text.SimpleDateFormat;
import java.util.Collection;
import java.util.Date;
import java.util.HashMap;
import java.util.Map;
import org.red5.server.adapter.MultiThreadedApplicationAdapter;
import org.red5.server.api.IClient;
import org.red5.server.api.IConnection;
import org.red5.server.api.scope.IScope;
import org.red5.server.api.stream.IBroadcastStream;
import org.red5.server.api.stream.ISubscriberStream;
import com.gm.FFmpegCommandManager.FFmpegManager;
import com.gm.FFmpegCommandManager.FFmpegManagerImpl;
import com.gm.FFmpegCommandManager.entity.TaskEntity;
import com.gm.entity.Camera;
import com.gm.service.CameraService;


/**
 * Red5业务处理核心
 *
 */
public class Application extends MultiThreadedApplicationAdapter {


	public static Map streamList = new HashMap();


	@Override
	public boolean connect(IConnection conn) {
		System.out.println("connect");
		return super.connect(conn);
	}

	@Override
	public void disconnect(IConnection arg0, IScope arg1) {
		System.out.println("disconnect");
		super.disconnect(arg0, arg1);
	}
	/**
	 * 开始发布直播
	 */
	@Override
	public void streamPublishStart(IBroadcastStream stream) {
		System.out.println("[streamPublishStart]********** ");
		System.out.println("发布Key: " + stream.getPublishedName());

		System.out.println(
				"发布时间:" + new SimpleDateFormat("yyyy-MM-dd hh:mm:ss").format(new Date(stream.getCreationTime())));
		System.out.println("****************************** ");
	}

	/**
	 * 流结束
	 */
	@Override
	public void streamBroadcastClose(IBroadcastStream arg0) {

		super.streamBroadcastClose(arg0);
	}

	/**
	 * 用户断开播放
	 */
	@Override
	public void streamSubscriberClose(ISubscriberStream arg0) {

		super.streamSubscriberClose(arg0);
	}

	/**
	 * 链接rtmp服务器
	 */
	@Override
	public boolean appConnect(IConnection arg0, Object[] arg1) {
		// TODO Auto-generated method stub

		System.out.println("[appConnect]********** ");
		System.out.println("请求域:" + arg0.getScope().getContextPath());
		System.out.println("id:" + arg0.getClient().getId());
		System.out.println("name:" + arg0.getClient().getId());
		System.out.println("********************** ");
		return super.appConnect(arg0, arg1);
	}

	/**
	 * 加入了rtmp服务器
	 */
	@Override
	public boolean join(IClient arg0, IScope arg1) {

		// TODO Auto-generated method stub
		System.out.println("[join]**************** ");
		System.out.println("id:"+arg0.getId());
		System.out.println("********************** ");
		return super.join(arg0, arg1);
	}

	/**
	 * 开始播放流
	 */
	@Override
	public void streamSubscriberStart(ISubscriberStream stream) {

		String streamScope = stream.getScope().getContextPath();
		String streamKey = stream.getBroadcastStreamPublishName();

		/**
		 * rtmp://172.19.12.240/MyVideo/stream/test ,其中/MyVideo/stream为请求域,test为播放key,stream和test都可作为参数
		 *
		 'file': 'test',
    	 'streamer': 'rtmp://172.19.12.240/MyVideo/stream/',


		 * rtmp://172.19.12.240/MyVideo/stream.test ,其中/MyVideo为请求域,stream.test为播放key,stream和test都可作为参数
		 *
		 'file': 'stream.test',
    	 'streamer': 'rtmp://172.19.12.240/MyVideo/',
		 */

		System.out.println("[streamSubscriberStart]********** ");
		System.out.println("播放域:" + streamScope);
		System.out.println("播放Key:" + stream.getBroadcastStreamPublishName());

		//streamKey示例:stream_1
		if (streamKey.contains("stream") && !streamKey.contains("HD")) {
			//判断摄像头ID还是物理文件,物理文件无需进行处理,摄像头需对其进行rtsp转rtmp,如遇多台机器访问同一摄像头实时,无需ffmpeg进行再次转码,streamList访问总是+1,如退出连接且streamList访问数为1时,管理转流进程
			stream.getScope().setAttribute("streamKey", streamKey);

			boolean flag = true;
			FFmpegManager manager = new FFmpegManagerImpl();
			Collection list = manager.queryAll();
			for (TaskEntity task : list) {
				if(task.getId().equals(streamKey)) {
					flag = false;
					streamList.put(streamKey,streamList.get(streamKey)+1);
					System.out.println("streamKey="+streamKey+",当前客户端连接数:"+streamList.get(streamKey));
					break;
				}
			}

			if(flag) {
				CameraService cameraService  = (CameraService) scope.getContext().getBean("cameraService");
				Camera camera = cameraService.find(Integer.parseInt(streamKey.split("_")[1]));
				camera.setCameraId(streamKey);
				/*camera.setCameraRtsp("rtsp://184.72.239.149/vod/mp4://BigBuckBunny_175k.mov");*/
				camera.setCameraRtmp("rtmp://172.19.12.240/" + streamScope + "/");

				Map map = new HashMap();
				map.put("appName", camera.getCameraId());
				map.put("input", camera.getCameraRtsp());
				map.put("output", camera.getCameraRtmp());
				map.put("codec", "h264");
				map.put("fmt", "flv");
				map.put("fps", "25");
				map.put("rs", "640x360");
				map.put("twoPart", "0");//twoPart=2时,推出两个rtmp流,一个自定义码流与元码流

				// 执行任务,id就是appName,如果执行失败返回为null
				String id = manager.start(map);
				TaskEntity info = manager.query(id);
				streamList.put(streamKey, 1);
				System.out.println("streamKey="+streamKey+",当前客户端连接数:"+streamList.get(streamKey));
			}
		}


		System.out.println("********************************* ");

		String sessionId = stream.getConnection().getSessionId();
		stream.getConnection().setAttribute(null, null);

		super.streamSubscriberStart(stream);
	}

	/**
	 * 离开了rtmp服务器
	 */
	@Override
	public void leave(IClient arg0, IScope arg1) {
		System.out.println("[leave]**************************");

		FFmpegManager manager = new FFmpegManagerImpl();

		if (arg1.getAttribute("streamKey") != null) {
			String streamKey = arg1.getAttribute("streamKey").toString();
			Collection list = manager.queryAll();

			System.out.println("ffmpeg在线执行数量:" + list.size());

			for (TaskEntity task : list) {
				if(task.getId().equals(streamKey)) {
					if (streamList.get(streamKey) == 1) {
						manager.stop(streamKey);
						streamList.remove(streamKey);
						System.out.println("streamKey="+streamKey+",当前客户端连接数:0");

					} else {
						streamList.put(streamKey,streamList.get(streamKey)-1);
						System.out.println("streamKey="+streamKey+",当前客户端连接数:"+streamList.get(streamKey));
					}
					break;
				}
			}
		}
		super.leave(arg0, arg1);
	}

} 部分业务相关代码在此就不贴,实现效果:模拟下类似插件式的四画面
可通过
runtime.exec(command);触发FFmpeg进行推流,推流命令:
ffmpeg -i rtsp://admin:[email protected]/h265/ch1/av_stream -f flv -r 25 -g 25 -s 640x360 -an rtmp://172.19.12.240/live/test123 -vcodec h264 -f flv -an rtmp://172.19.12.240/live/test123HDffmpeg常见命令参照我的另一篇博客地址
ffmpeg不同可以进行推流还可以实现转录到本地,这样历史视频查看功能也就实现了。
此方案还有很多可以去优化的地方,大家可以在评论区下进行探讨,相同学习提高。
