grpc java 基础教程
1 RPC 框架原理
RPC 框架的目标就是让远程服务调用更加简单、透明,RPC 框架负责屏蔽底层的传输方式(TCP 或者 UDP)、序列化方式(XML/Json/ 二进制)和通信细节。服务调用者可以像调用本地接口一样调用远程的服务提供者,而不需要关心底层通信细节和调用过程。RPC 框架的调用原理图如下所示:
2 业界主流的 RPC 框架
业界主流的 RPC 框架整体上分为三类:1. 支持多语言的 RPC 框架,比较成熟的有 Google 的 gRPC、Apache(Facebook)的 Thrift;
2. 只支持特定语言的 RPC 框架,例如新浪微博的 Motan;
3. 支持服务治理等服务化特性的分布式服务框架,其底层内核仍然是 RPC 框架, 例如阿里的 Dubbo。
随着微服务的发展,基于语言中立性原则构建微服务,逐渐成为一种主流模式,例如对于后端并发处理要求高的微服务,比较适合采用 Go 语言构建,而对于前端的 Web 界面,则更适合 Java 和 JavaScript。因此,基于多语言的 RPC 框架来构建微服务,是一种比较好的技术选择。例如 Netflix,API 服务编排层和后端的微服务之间就采用 gRPC 进行通信。
3 gRPC 简介
gRPC 是一个高性能、开源和通用的 RPC 框架,面向服务端和移动端,基于 HTTP/2 设计。
4 gRPC 特点
1. 语言中立,支持多种语言;2. 基于 IDL 文件定义服务,通过 proto3 工具生成指定语言的数据结构、服务端接口以及客户端 Stub;
3. 通信协议基于标准的 HTTP/2 设计,支持双向流、消息头压缩、单 TCP 的多路复用、服务端推送等特性,这些特性使得 gRPC 在移动端设备上更加省电和节省网络流量;
4. 序列化支持 PB(Protocol Buffer)和 JSON,PB 是一种语言无关的高性能序列化框架,基于 HTTP/2 + PB, 保障了 RPC 调用的高性能。
5 简单样例
本文的demo使用的项目构建工具是gradle,版本是4.6,配置如下:
apply plugin: 'java'
apply plugin: 'eclipse'
apply plugin: 'com.google.protobuf'

repositories {
    jcenter()
}

buildscript {
    repositories {
        mavenCentral()
    }
    dependencies {
        classpath 'com.google.protobuf:protobuf-gradle-plugin:0.8.3'
    }
}

sourceSets {
    main {
        java{
            srcDir 'gen/main/java'
            srcDir 'gen/main/grpc'
        }
        proto {
            srcDir 'src/main/proto'
        }
    }
}

jar {
    from {
        configurations.runtime.collect {
            it.isDirectory() ? it : zipTree(it)
        }
        configurations.compile.collect {
            it.isDirectory() ? it : zipTree(it)
        }
    }
    manifest {
        attributes 'Main-Class': 'com.ylifegroup.protobuf.server.GRpcServer'
    }
}

protobuf {
  protoc {
    artifact = "com.google.protobuf:protoc:3.5.1-1"
  }
  plugins {
    grpc {
      artifact = 'io.grpc:protoc-gen-grpc-java:1.11.0'
    }
  }
  generatedFilesBaseDir = "$projectDir/gen/"
  generateProtoTasks {
    all()*.plugins {
      grpc {}
    }
  }
}


dependencies {
    //json
    compile group: 'com.alibaba', name: 'fastjson', version: '1.2.8'
    //logback
    compile 'ch.qos.logback:logback-classic:1.1.8'
    //logstash-logback-encoder
    compile 'net.logstash.logback:logstash-logback-encoder:4.8'
    //grpc
    compile 'io.grpc:grpc-netty:1.11.0'
    compile 'io.grpc:grpc-protobuf:1.11.0'
    compile 'io.grpc:grpc-stub:1.11.0'
    //ssl
    compile 'io.netty:netty-tcnative-boringssl-static:2.0.8.Final'
    //netty
    compile 'io.netty:netty-all:4.1.22.Final'
    // The production code uses the SLF4J logging API at compile time
    compile 'org.slf4j:slf4j-api:1.7.21'
    testCompile 'junit:junit:4.12'
}

tasks.withType(JavaCompile) {
	options.encoding = "UTF-8"
	options.fork = true
}

eclipse {
  classpath {
    defaultOutputDir = file('build/eclipse/bin')
  }
}

clean {
    delete protobuf.generatedFilesBaseDir
}
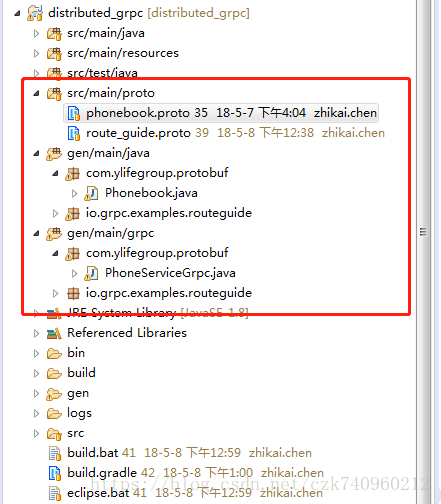
简单说明一下,apply plugin: 'com.google.protobuf' ,这个是生成protobuf的强大工具,能够把proto文件生成protobuf对应的基础文件跟rpc文件;sourceSets定义了protobuf生成的规范,srcDir 'src/main/proto'表示存放proto原始文件目录, srcDir 'gen/main/java'表示存放proto基础文件的目录,srcDir 'gen/main/grpc'表示基础文件对应的rpc调用目录。整体项目结构图如下:
其中,grpc的基本依赖如下(no android):
//grpc
    compile 'io.grpc:grpc-netty:1.11.0'
    compile 'io.grpc:grpc-protobuf:1.11.0'
compile 'io.grpc:grpc-stub:1.11.0'按照之前概念说的,基于 IDL 文件定义服务,通过 proto3 工具生成指定语言的数据结构、服务端接口以及客户端 Stub,本demo 的 phonebook.proto 定义如下
syntax = "proto3";

option go_package = "user";
option java_package = "com.ylifegroup.protobuf";

enum PhoneType {
    HOME = 0;
    WORK = 1;
    OTHER = 2;
}

message ProtobufUser {
  int32 id = 1;
  string name = 2;
  message Phone{
  PhoneType phoneType = 1;
  string phoneNumber = 2;
  }
  repeated Phone phones = 3;
}

message AddPhoneToUserRequest{
  int32 uid = 1;
  PhoneType phoneType = 2;
  string phoneNumber = 3;
}

message AddPhoneToUserResponse{
  bool result = 1;
}

service PhoneService {
  rpc addPhoneToUser(AddPhoneToUserRequest) returns (AddPhoneToUserResponse);
}
其中rpc的配置是:
service PhoneService {
  rpc addPhoneToUser(AddPhoneToUserRequest) returns (AddPhoneToUserResponse);
}
其它部分都是基本数据的定义。
那么接下来怎么 通过 proto3 工具生成指定语言的数据结构、服务端接口以及客户端 Stub 呢?
运行gradle指令: gradle build
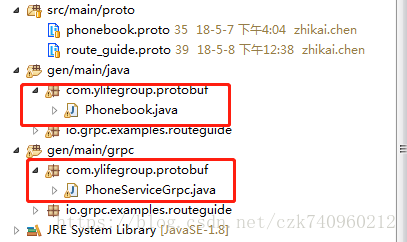
我们看到生成了grpc对应的PhoneServiceGrpc文件,以及其基础类Phonebook。
到此基础工作已经准备好了,接下来我们构建server服务,构建server服务之前我们需要重新实现PhoneServiceGrpc,
/**
 * @describe PhoneService Imp
 * @author zhikai.chen
 * @date 2018年5月7日 下午3:56:54
 */
import com.ylifegroup.protobuf.PhoneServiceGrpc;
import com.ylifegroup.protobuf.Phonebook.AddPhoneToUserRequest;
import com.ylifegroup.protobuf.Phonebook.AddPhoneToUserResponse;

import io.grpc.stub.StreamObserver;

public class PhoneServiceImp extends PhoneServiceGrpc.PhoneServiceImplBase{

    @Override
    public void addPhoneToUser(AddPhoneToUserRequest request, StreamObserver responseObserver) {
        // TODO Auto-generated method stub
        AddPhoneToUserResponse response = null;
        if(request.getPhoneNumber().length() == 11 ){
            System.out.printf("uid = %s , phone type is %s, nubmer is %s\n", request.getUid(), request.getPhoneType(), request.getPhoneNumber());
            response = AddPhoneToUserResponse.newBuilder().setResult(true).build();
        }else{
            System.out.printf("The phone nubmer %s is wrong!\n",request.getPhoneNumber());
            response = AddPhoneToUserResponse.newBuilder().setResult(false).build();
        }
        responseObserver.onNext(response);
        responseObserver.onCompleted();
    }

}
为了项目的简单易懂,这里我们使用默认的Block配置
import java.io.IOException;

import org.slf4j.Logger;
import org.slf4j.LoggerFactory;

import com.kenhome.protobuf.service.PhoneServiceImp;

import io.grpc.Server;
import io.grpc.ServerBuilder;

/**
 * @describe GRpcServer demo
 * @author zhikai.chen
 * @date 2018年5月7日 下午3:55:10
 */
public class GRpcServerDefault {

    private static final Logger logger = LoggerFactory.getLogger(GRpcServerDefault.class);

    private Server server;

    private void start() throws IOException {
        /* The port on which the server should run */
        int port = 50051;
        server = ServerBuilder
                .forPort(port)
                .addService(new PhoneServiceImp())
                .build()
                .start();
        logger.info("Server started, listening on " + port);
        Runtime.getRuntime().addShutdownHook(new Thread() {
            @Override
            public void run() {
                System.err.println("*** shutting down gRPC server since JVM is shutting down");
                GRpcServerDefault.this.stop();
                System.err.println("*** server shut down");
            }
        });
    }

    private void stop() {
        if (server != null) {
            server.shutdown();
        }
    }

    /**
     * Await termination on the main thread since the grpc library uses daemon
     * threads.
     */
    private void blockUntilShutdown() throws InterruptedException {
        if (server != null) {
            server.awaitTermination();
        }
    }

    /**
     * Main launches the server from the command line.
     */
    public static void main(String[] args) throws IOException, InterruptedException {
        final GRpcServerDefault server = new GRpcServerDefault();
        server.start();
        server.blockUntilShutdown();
    }

}
ServerBuilder 底层默认使用netty4.1的nio非阻塞模型。服务提供的内容通过addService添加 ,这里对应的是我们刚刚重写的PhoneServiceImp类。
最后我们来构建client类,一样的为了项目的易懂,这里也使用默认的Block配置:
import java.util.concurrent.TimeUnit;

import org.slf4j.Logger;
import org.slf4j.LoggerFactory;

import com.ylifegroup.protobuf.PhoneServiceGrpc;
import com.ylifegroup.protobuf.Phonebook.AddPhoneToUserRequest;
import com.ylifegroup.protobuf.Phonebook.AddPhoneToUserResponse;
import com.ylifegroup.protobuf.Phonebook.PhoneType;

import io.grpc.ManagedChannel;
import io.grpc.ManagedChannelBuilder;
import io.grpc.StatusRuntimeException;

/**
 * @describe GRpcClient Block demo
 * @author zhikai.chen
 * @date 2018年5月7日 下午4:00:58
 */
public class GRpcClientBlock {

    private static final Logger logger = LoggerFactory.getLogger(GRpcClientBlock.class);

    private final ManagedChannel channel;

    private final PhoneServiceGrpc.PhoneServiceBlockingStub blockingStub;

    /** Construct client connecting to gRPC server at {@code host:port}. */
    public GRpcClientBlock(String host, int port) {
        ManagedChannelBuilder channelBuilder = ManagedChannelBuilder.forAddress(host, port).usePlaintext();
        channel = channelBuilder.build();
        blockingStub = PhoneServiceGrpc.newBlockingStub(channel);
    }

    public void shutdown() throws InterruptedException {
        channel.shutdown().awaitTermination(5, TimeUnit.SECONDS);
    }

    /** add phone to user. */
    public void addPhoneToUser(int uid, PhoneType phoneType, String phoneNubmer) {
        logger.info("Will try to add phone to user " + uid);
        AddPhoneToUserRequest request = AddPhoneToUserRequest.newBuilder().setUid(uid).setPhoneType(phoneType)
                .setPhoneNumber(phoneNubmer).build();
        AddPhoneToUserResponse response;
        try {
            response = blockingStub.addPhoneToUser(request);
        } catch (StatusRuntimeException e) {
            logger.warn("RPC failed: {0} --> "+e.getLocalizedMessage(), e.getStatus());
            return;
        }
        logger.info("Result: " + response.getResult());
    }

    public static void main(String[] args) throws Exception {
        GRpcClientBlock client = new GRpcClientBlock("localhost", 50051);
        try {
            client.addPhoneToUser(1, PhoneType.WORK, "13888888888");
        } finally {
            client.shutdown();
        }
    }

}
ManagedChannel 将处理后的请求和响应传递给与之相关联的 ClientCall 进行上层处理,同时,ManagedChannel 提供了对 Channel 的生命周期管理(链路创建、空闲、关闭等)。
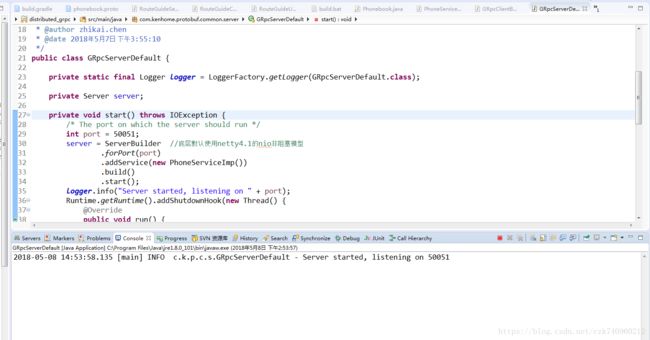
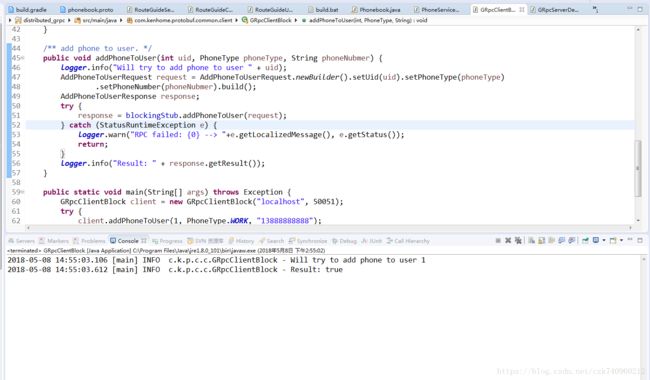
运行效果:
好了,本教程就到这里了,下一章我会为大家讲解grpc有哪些io通信模型,以及他们各个部分简单的使用。


