ISCSI服务器的部署
一什么是ISCSI
SCSI( Internet Small Computer System Interface 互联网小型计算机系统接口)是由IBM 下属的两大研发机构一一加利福尼亚AImaden和以色列Haifa研究中心共同开发的,是一个供硬件设备使用的、可在IP协议上层运行的SCSI指令集,是一种开放的基于IP协议的工业技术标准。该协议可以用TCP/IP对SCSI指令进行封装,使得这些指令能够通过基于IP网络进行传输,从而实现SCSI 和TCP/IP协议的连接。对于局域网环境中的用户来说,采用该标准只需要不多的投资就可以方便、快捷地对信息和数据进行交互式传输及管理。
ISCSI技术的核心是在TCP/IP网络上传输SCSI协议,是指用TCP/IP报文、和ISCSI报文封装SCSI报文,使得SCSI命令和数据可以在普通以太网络上进行传输。
iSCSI 协议定义了在 TCP/IP 网络发送、接收 block(数据块)级的存储数据的规则和方 法。发送端将SCSI命令和数据封装到 TCP/IP 包中再通过网络转发,接收端收到 TCP/IP 包 之后,将其还原为SCSI命令和数据并执行,完成之后将返回的SCSI命令和数据再封装到 TCP/IP 包中再传送回发送端。而整个过程在用户看来,使用远端的存储设备就象访问本地的 SCSI设备一样简单。
SCSI设备的主机接口一般默认都是IP接口,可以直接与以太网络交换机和iSCSI交换机连接,形成一个存储区域网络。根据主机端HBA卡、网络交换机的不同,iSCSI设备与主机之间有三种连接方式。
第一种:以太网卡+initiator软件方式。
第二种:硬件TOE网卡+initiator软件方式。
第三种:iSCSI HBA卡连接方式。
二、ISCSI服务的部署
@服务端
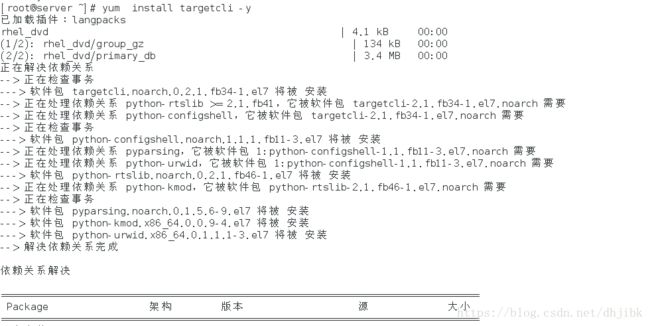
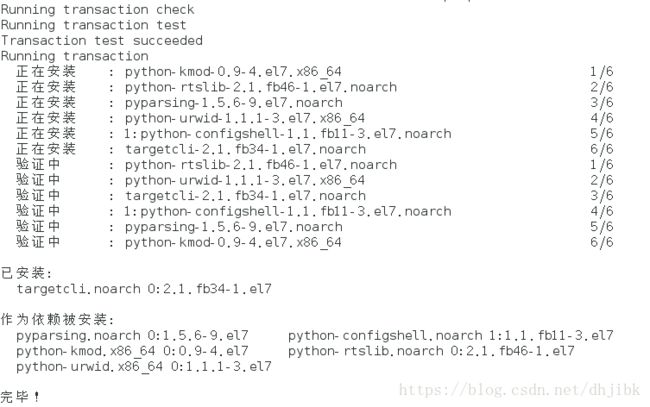
[root@localhost ~]# yum install targetcli -y
#安装targetcli安装包
Loaded plugins: langpacks
rhel_dvd                           | 4.1 kB     00:00

.................此处省略

  python-kmod.x86_64 0:0.9-4.el7
  python-rtslib.noarch 0:2.1.fb46-1.el7
  python-urwid.x86_64 0:1.1.1-3.el7

Complete!
[root@localhost ~]# targetcli
#登陆服务
#targetcli是 用于查看、编辑和保存内核目标配置的 shell子系统,也称为  丽鸥。
#这使的管理员要分配地方贮存资源支持由要么文件、卷、本地 SCSI 设备或 ramdisk,并将它们导出到远程 系统通过网络织物,
Warning: Could not load preferences file /root/.targetcli/prefs.bin.
targetcli shell version 2.1.fb34
Copyright 2011-2013 by Datera, Inc and others.
For help on commands, type 'help'.
/> exit
Global pref auto_save_on_exit=true
Last 10 configs saved in /etc/target/backup.
Configuration saved to /etc/target/saveconfig.json
[root@localhost ~]# fdisk  /dev/vdb
 #磁盘分区, 添加一个分区
Welcome to fdisk (util-linux 2.23.2).

Changes will remain in memory only, until you decide to write them.
Be careful before using the write command.

Device does not contain a recognized partition table
Building a new DOS disklabel with disk identifier 0x0020a8d7.

Command (m for help): n #创建分区
Partition type:
   p   primary (0 primary, 0 extended, 4 free) #主分区
   e   extended #扩展分区
Select (default p): p  #此时选择p,所以创建的是主分区
Partition number (1-4, default 1): 1 #选择哪个分区
First sector (2048-20971519, default 2048):
Using default value 2048
Last sector, +sectors or +size{K,M,G} (2048-20971519, default 20971519): +2G  #设置分区的内存容量
Partition 1 of type Linux and of size 2 GiB is set

Command (m for help): p #显示磁盘信息

Disk /dev/vdb: 10.7 GB, 10737418240 bytes, 20971520 sectors
Units = sectors of 1 * 512 = 512 bytes
Sector size (logical/physical): 512 bytes / 512 bytes
I/O size (minimum/optimal): 512 bytes / 512 bytes
Disk label type: dos
Disk identifier: 0x0020a8d7

   Device Boot      Start         End      Blocks   Id  System
/dev/vdb1            2048     4196351     2097152   83  Linux

Command (m for help): wq #保存并退出
The partition table has been altered!

Calling ioctl() to re-read partition table.
Syncing disks.
[root@localhost ~]# partprobe  #从内核中重新读取
[root@localhost ~]# systemctl start target #打开服务
[root@localhost ~]# targetcli  #登陆服务
targetcli shell version 2.1.fb34
Copyright 2011-2013 by Datera, Inc and others.
For help on commands, type 'help'.

/> ls #查看设备
o- / ................................................... [...]
  o- backstores ........................................ [...]  #设备
  | o- block ............................ [Storage Objects: 0]
  | o- fileio ........................... [Storage Objects: 0]
  | o- pscsi ............................ [Storage Objects: 0]
  | o- ramdisk .......................... [Storage Objects: 0]
  o- iscsi ...................................... [Targets: 0]  #资源
  o- loopback ................................... [Targets: 0]
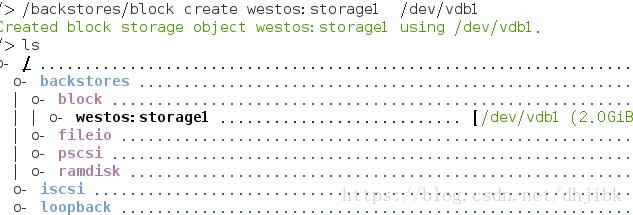
/> /backstores/block create westos:storage1 /dev/vdb1
#关联设备,并将/dev/vdb1分区重新创建成westos:storage1
/> /iscsi create iqn.2018-06.com.example:storage1
#在/iscsi目录下创建iqn
Created target iqn.2018-06.com.example:storage1.
Created TPG 1.
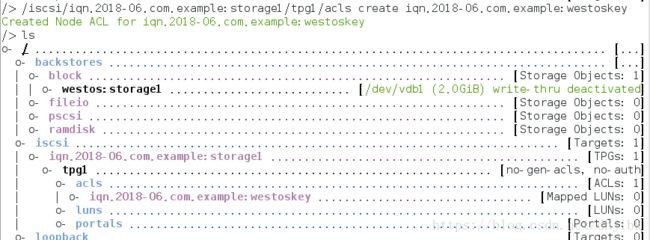
/> /iscsi/iqn.2018-06.com.example:storage1/tpg1/acls create iqn.2018-06.com.example:westoskey
#创建acl并进行加密
#iSCSI 协议是通过客户端名称进行验证的,也就是说,用户在访问存储共享资源时不需要输入密码,只要 iSCSI 客户端的名称与服务端中设置的访问控制列表中某一名称条目一致即可,因此需要在 iSCSI 服务端的配置文件中写入一串能够验证用户信息的名称
Created Node ACL for iqn.2018-06.com.example:westoskey
/> /iscsi/iqn.2018-06.com.example:storage1/tpg1/luns create  /backstores/block/westos:storage1
 #创建lun,关联设备
Created LUN 0.
Created LUN 0->0 mapping in node ACL iqn.2018-06.com.example:westoskey
/> /iscsi/iqn.2018-06.com.example:storage1/tpg1/portals  create  172.25.254.218  #打开端口
#位于生产环境中的服务器上可能有多块网卡,需要我们在配置文件中手动定义 iSCSI 服务端的信息,规定使用哪块网卡。
#即在 portals 参数目录中写上服务器的 IP 地址。接下来将由系统自动开启服务器
Using default IP port 3260 #这里使用的默认ip端口为3260
Created network portal 172.25.254.218:3260. #已经成功创建172.25.254.218这台主机的端口
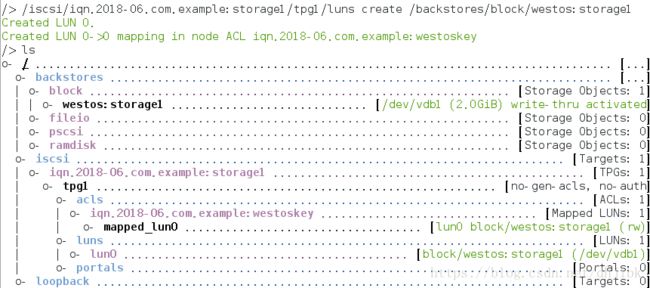
/> ls #查看设备,由下图可以看出成功创建
o- / ............................................ [...]
  o- backstores ................................. [...]
  | o- block ..................... [Storage Objects: 1]
  | | o- westos:storage1  [/dev/vdb1 (2.0GiB) write-thru activated]
  | o- fileio .................... [Storage Objects: 0]
  | o- pscsi ..................... [Storage Objects: 0]
  | o- ramdisk ................... [Storage Objects: 0]
  o- iscsi ............................... [Targets: 1]
  | o- iqn.2018-06.com.example:storage1 ..... [TPGs: 1]
  |   o- tpg1 .................. [no-gen-acls, no-auth]
  |     o- acls ............................. [ACLs: 1]
  |     | o- iqn.2018-06.com.example:westoskey  [Mapped LUNs: 1]
  |     |   o- mapped_lun0  [lun0 block/westos:storage1 (rw)]
  |     o- luns ............................. [LUNs: 1]
  |     | o- lun0 . [block/westos:storage1 (/dev/vdb1)]
  |     o- portals ....................... [Portals: 1]
  |       o- 172.25.254.218:3260 ................. [OK]
  o- loopback ............................ [Targets: 0]
/> exit #退出
Global pref auto_save_on_exit=true
Last 10 configs saved in /etc/target/backup.
#最后10条配置信息存放路径
Configuration saved to /etc/target/saveconfig.json
#配置信息存放路径
实例
服务安装
建立共享磁盘:2G
配置共享设备
(1)查看服务器的相关信息

(2)关联设备
(3)在/iscsi目录下创建iqn

(4))创建acl并进行加密
(2)@客户端
前面讲到,iSCSI 协议是通过客户端的名称来进行验证,而该名称也是 iSCSI 客户端的唯一标识,而且必须与服务端配置文件中访问控制列表中的信息一致,否则客户端在尝试访问存储共享设备时,系统会弹出验证失败的保存信息。
[root@client ~]# yum search iscsi
#查询有官iscsi的安装包
Loaded plugins: langpacks
===================== N/S matched: iscsi =====================
iscsi-initiator-utils.i686 : iSCSI daemon and utility programs
iscsi-initiator-utils.x86_64 : iSCSI daemon and utility
                             : programs
iscsi-initiator-utils-iscsiuio.x86_64 : Userspace
     ...: configuration daemon required for some iSCSI
     ...: hardware
libiscsi.i686 : iSCSI client library
libiscsi.x86_64 : iSCSI client library

  Name and summary matches only, use "search all" for everything.
[root@client ~]# yum install iscsi-initiator-utils.x86_64 -y
#安装isxsi-initiators-utils.x86_64的安装包
Loaded plugins: langpacks
Package iscsi-initiator-utils-6.2.0.873-21.el7.x86_64 already installed and latest version
Nothing to do
[root@client ~]# vim  /etc/iscsi/initiatorname.iscsi
#编辑iscsi文件
InitiatorName=iqn.2018-06.com.example:westoskey #加密
[root@client ~]# systemctl start iscsi
#打开iscsi服务
[root@client iscsi]# iscsiadm  -m discovery -t st -p 172.25.254.218
 #查找设备使用 iscsiam 命令进行查看
 iscsiadm 是用于管理、查询、插入、更新或删除 iSCSI 数据库配置文件的命令行工具
   -m discovery       #参数的目的是扫描并发现可用的存储资源
   -t st              #参数为执行扫描操作的类型
   -p 172.25.151.150  #参数为 iSCSI 服务端的 IP 地址
172.25.254.218:3260,1 iqn.2018-06.com.example:storage1
[root@client iscsi]# iscsiadm  -m node -T
iqn.2018-06.com.example:storage1 -p 172.25.254.218 -l
 # 登陆
 # -m node       参数为将客户端所在主机作为一台节点服务器
 #-T targetname 参数为要使用的存储资源(大家可以直接复制前面命令中扫描发现的结果,以免录入错误)
 #-p 172.25.254.218,参数依然为 iSCSI 服务端的 IP 地址
 #--login 或-l      参数表示进行登录验证。
Logging in to [iface: default, target: iqn.2018-06.com.example:storage1, portal: 172.25.254.218,3260] (multiple)
Login to [iface: default, target: iqn.2018-06.com.example:storage1, portal: 172.25.254.218,3260] successful.
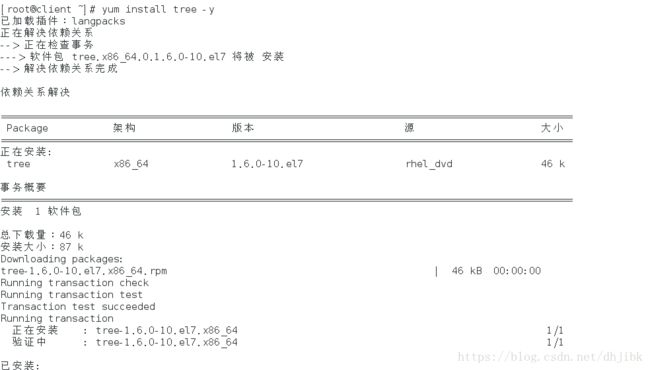
[root@client iscsi]# fdisk -l
#查看磁盘信息
....................
Disk /dev/sda: 2147 MB, 2147483648 bytes, 4194304 sectors
Units = sectors of 1 * 512 = 512 bytes
#此时我们在这一行可以看到sda的磁盘
Sector size (logical/physical): 512 bytes / 512 bytes
I/O size (minimum/optimal): 512 bytes / 4194304 bytes
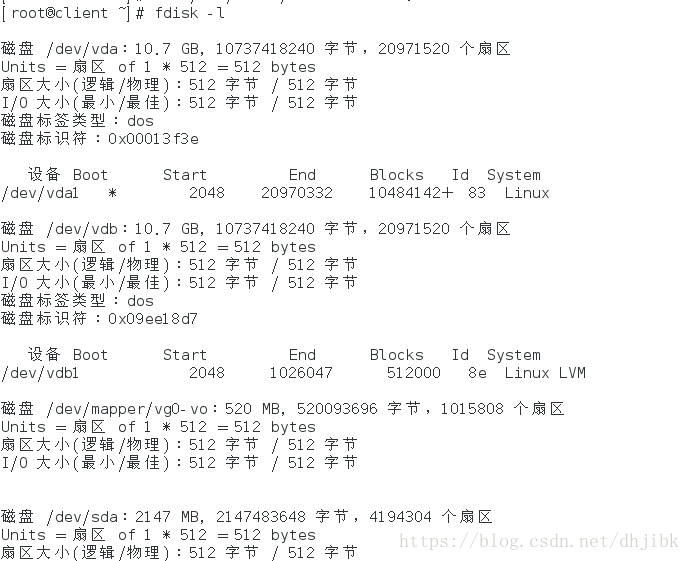
[root@client ~]# yum install tree
 #安装树形架构的安装包
[root@client ~]# tree /var/lib/iscsi
#查看iscis的文件管理系统
/var/lib/iscsi
|-- ifaces
|-- isns
|-- nodes
|   `-- iqn.2018-06.com.example:storage1
|       `-- 172.25.254.218,3260,1
|           `-- default
|-- send_targets
|   `-- 172.25.254.218,3260
|       |-- iqn.2018-06.com.example:storage1,172.25.254.218,3260,1,default -> /var/lib/iscsi/nodes/iqn.2018-06.com.example:storage1/172.25.254.218,3260,1
|       `-- st_config
|-- slp
`-- static

10 directories, 2 files
实例
InitiatorName= iqn.2018-06.com.example:westoskey
重新启动服务
![]()
使用 iscsiam 命令进行查看
![]()
登录 iSCSI服务端,由下图可以看出登陆成功

如果出现下面的情况,应考虑/etc/iscsi/initatorname.iscsi文件是否写的正确
![]()

登录验证后可在客户端可发现多了 2G 磁盘 /dev/sda
安装树状结构
查看资源共享的端口开放状态

(3)挂载
[root@client ~]# fdisk  /dev/sda
#进行磁盘划分
Welcome to fdisk (util-linux 2.23.2).

Changes will remain in memory only, until you decide to write them.
Be careful before using the write command.

Device does not contain a recognized partition table
Building a new DOS disklabel with disk identifier 0xb468055d.

Command (m for help): n #创建分区
Partition type:
   p   primary (0 primary, 0 extended, 4 free)
   e   extended
Select (default p): p #选择主分区
Partition number (1-4, default 1): 1 #默认为1
First sector (8192-4194303, default 8192):
Using default value 8192
Last sector, +sectors or +size{K,M,G} (8192-4194303, default 4194303):
Using default value 4194303
Partition 1 of type Linux and of size 2 GiB is set

Command (m for help): wq #退出保存
The partition table has been altered!
Calling ioctl() to re-read partition table.
Syncing disks.
[root@client ~]# partprobe
 #从内核中重新读取
[root@client ~]# fdisk -l
#显示磁盘信息
Disk /dev/vda: 10.7 GB, 10737418240 bytes, 20971520 sectors
Units = sectors of 1 * 512 = 512 bytes
Sector size (logical/physical): 512 bytes / 512 bytes
I/O size (minimum/optimal): 512 bytes / 512 bytes
Disk label type: dos
Disk identifier: 0x00013f3e

   Device Boot      Start         End      Blocks   Id  System
/dev/vda1            2048    20971519    10484736   83  Linux

Disk /dev/vdb: 10.7 GB, 10737418240 bytes, 20971520 sectors
Units = sectors of 1 * 512 = 512 bytes
Sector size (logical/physical): 512 bytes / 512 bytes
I/O size (minimum/optimal): 512 bytes / 512 bytes
Disk label type: dos
Disk identifier: 0x09ee18d7

   Device Boot      Start         End      Blocks   Id  System
/dev/vdb1            2048     1026047      512000   8e  Linux LVM

Disk /dev/mapper/vg0-vo: 520 MB, 520093696 bytes, 1015808 sectors
Units = sectors of 1 * 512 = 512 bytes
Sector size (logical/physical): 512 bytes / 512 bytes
I/O size (minimum/optimal): 512 bytes / 512 bytes


Disk /dev/sda: 2147 MB, 2147483648 bytes, 4194304 sectors
Units = sectors of 1 * 512 = 512 bytes
Sector size (logical/physical): 512 bytes / 512 bytes
I/O size (minimum/optimal): 512 bytes / 4194304 bytes
Disk label type: dos
Disk identifier: 0xb468055d

   Device Boot      Start         End      Blocks   Id  System
/dev/sda1            8192     4194303     2093056   83  Linux
#由这一行我可以看出创建成功
[root@client ~]# mkfs.xfs  /dev/sda1
#对/dev/sda1设备进行格式化
meta-data=/dev/sda1              isize=256    agcount=8, agsize=65408 blks
         =                       sectsz=512   attr=2, projid32bit=1
         =                       crc=0
data     =                       bsize=4096   blocks=523264, imaxpct=25
         =                       sunit=0      swidth=0 blks
naming   =version 2              bsize=4096   ascii-ci=0 ftype=0
log      =internal log           bsize=4096   blocks=2560, version=2
         =                       sectsz=512   sunit=0 blks, lazy-count=1
realtime =none                   extsz=4096   blocks=0, rtextents=0
[root@client ~]# mount  /dev/sda1   /mnt/ #将设备/dev/sda1挂载到/mnt目录下
[root@client ~]# df #查看挂载的状态
Filesystem         1K-blocks    Used Available Use% Mounted on
/dev/vda1           10473900 3199908   7273992  31% /
devtmpfs              469344       0    469344   0% /dev
tmpfs                 484932      80    484852   1% /dev/shm
tmpfs                 484932   12772    472160   3% /run
tmpfs                 484932       0    484932   0% /sys/fs/cgroup
/dev/mapper/vg0-vo    483670    2356    451823   1% /home
/dev/vda1            2082816   33056   2049760   2% /mnt
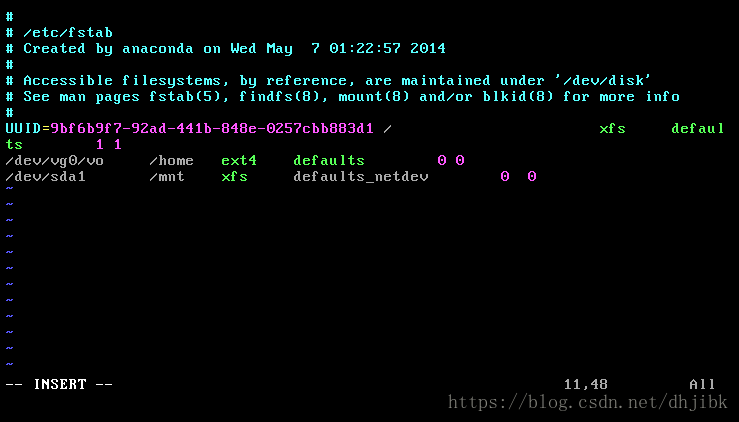
[root@client ~]# vim /etc/fstab  #
/dev/sda1       /mnt    xfs     defaults,_netdev  0  0
#挂载使其先读取网络分区,由于/dev/sdb 是一块网络存储设备,而 iSCSI 协议是基于TCP/IP 网络传输数据的,因此必须在/etc/fstab 配置文件中添加上_netdev 参数,表示当系统联网后再进行挂载操作
以免系统开机时间过长或开机失败
[root@client ~]# reboot #重新启动
Connection to 172.25.254.118 closed by remote host.
Connection to 172.25.254.118 closed.
第一次重启时,可能 会很慢,老是停在一个位置,此时需要将虚拟机关闭:systemctl poweroff desktop,然后打开并显示desktop的图形界面,执行下列命令:systemctl start desktop,systemctl view desktop
如果我们永久挂载时,编辑/etc/fstab
[root@client ~]# vim /etc/fstab  #编辑挂载的文件
/dev/sda1       /mnt    xfs     defaults   0  0
此时重新启动系统时,不能正常重启
就会在重启系统时长按“上健“按e进入密码修改的模式
首先删除linux16这一行的信息直到ro位置处,将ro修改为rw,并添加rd.break

按“ctrl+X来执行

重新编辑挂载的文件
(4)卸载设备/dev/sda1
[root@client ~]# vim  /etc/fstab #编辑/etc/fstab文件
注释掉我们刚才在挂载时写入的信息
[root@client ~]# df
#查看挂载的状态
Filesystem         1K-blocks    Used Available Use% Mounted on
/dev/vda1           10473900 3200468   7273432  31% /
devtmpfs              469344       0    469344   0% /dev
tmpfs                 484932      80    484852   1% /dev/shm
tmpfs                 484932   12820    472112   3% /run
tmpfs                 484932       0    484932   0% /sys/fs/cgroup
/dev/mapper/vg0-vo    483670    2356    451823   1% /home

[root@client ~]# iscsiadm  -m node -T iqn.2018-06.com.example:storage1 -p 172.25.254.218 -u
 #卸载设备,不过重启后设备会再次出现
[root@client ~]# systemctl  restart  iscsi
 #重新启动iscsi,就会重新恢复/dev/sda1设备,可以利用fdisk -l进行查看


**执行下面两条命令,可以彻底删除,重启服务后并不能进行恢复**
[root@client ~]# iscsiadm  -m node -T iqn.2018-06.com.example:storage1 -p 172.25.254.218 -u
#卸载
[root@client ~]# iscsiadm  -m node -T iqn.2018-06.com.example:storage1 -p 172.25.254.218 -o   delete
# 删除,重启后不会出现
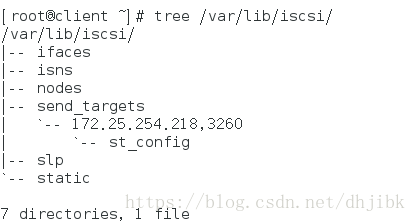
[root@client ~]# tree  /var/lib/iscsi/ #查看设备
/var/lib/iscsi/
|-- ifaces
|-- isns
|-- nodes
|-- send_targets
|   `-- 172.25.254.218,3260
|       `-- st_config
|-- slp
`-- static

7 directories, 1 file
重启系统后,并不会重新恢复,永久删除
实例
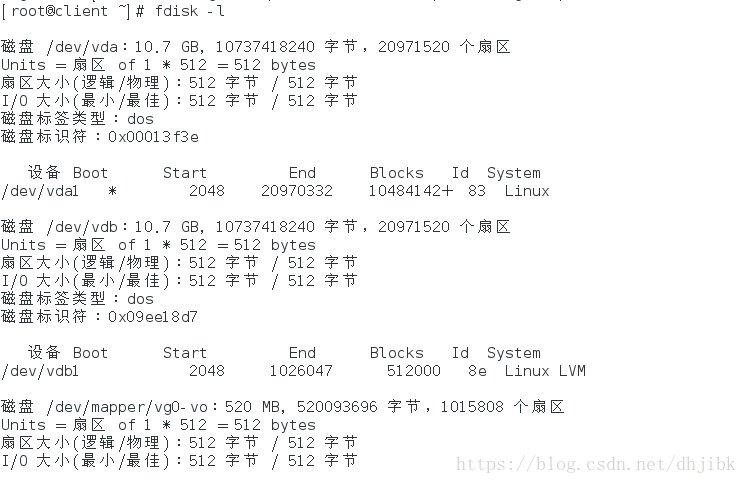
(1)卸载/dev/sda1成功

通过fdisk -l 可查看到效果
执行: tree /var/lib/iscsi/ 可发现对应文件依旧存在

重启服务后再次出现
![]()
设备/dev/sda1再次出现
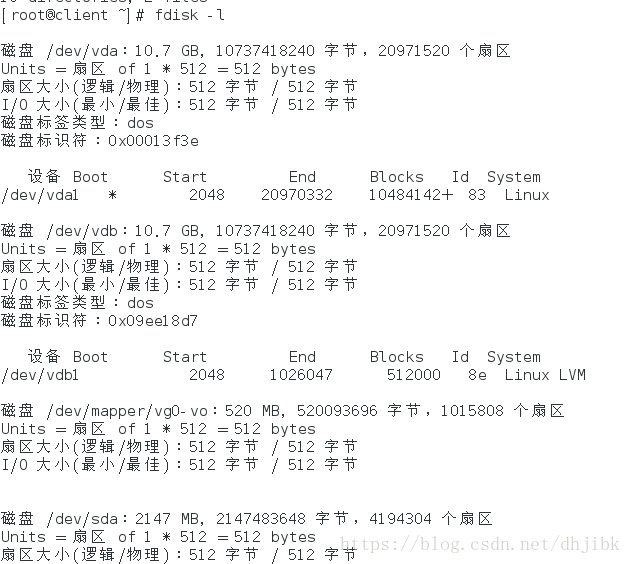
(2)执行下面两条命令,将永久删除

例用fdisk -l查询时,/dev/sda1设备已经消失

进行删除命令,通过 tree 命令发现对应文件消失
