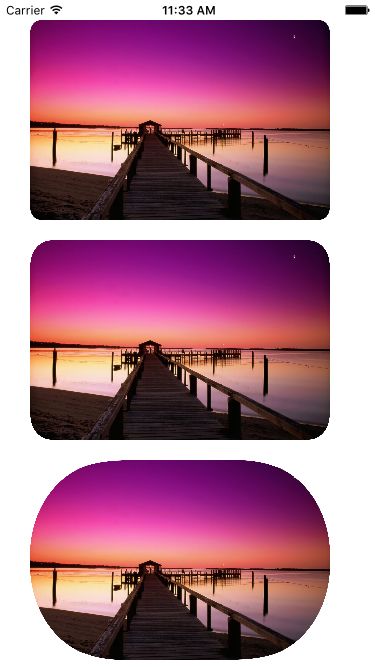
一、通过UIImageView的layer的属性,实现把图像显示成圆角,而无需对图像本身进行处理。在开发中,大部分情况下,我们只需要“显示”圆角,而不是“得到”圆角图像。
imageView.layer.cornerRadius = 100;
imageView.layer.masksToBounds = YES;
**注意: **每个UIView对象都有一个layer属性,这个layer属性实际上是一个CALayer对象, 该对象负责图形的渲染显示。并且layer有一个cornerRadius属性,用来指定layer的边框圆角。其中layer默认显示超出边框的图像,所以必须指定masksToBounds属性为YES,使得layer切掉边框外的部分。
二、剪切图片让图片圆形展示
方案一:
- (UIImage *)roundedCornerImageWithCornerRadius:(CGFloat)radius
{
CGFloat w = self.size.width;
CGFloat h = self.size.height;
CGFloat scale = [UIScreen mainScreen].scale;
if (radius < 0) {
radius = 0;
}else if(radius > MIN(w, h)){
radius = MIN(w, h)/2.0;
}
UIImage *image = nil;
CGRect imageFrame = CGRectMake(0, 0, w, h);
UIGraphicsBeginImageContextWithOptions(self.size, NO, scale);
[[UIBezierPath bezierPathWithRoundedRect:imageFrame cornerRadius:radius] addClip];
[self drawInRect:imageFrame];
image = UIGraphicsGetImageFromCurrentImageContext();
UIGraphicsEndImageContext();
return image;
}
方案二:
- (UIImage*)imageByRoundCornerRadius:(CGFloat)radius
{
UIGraphicsBeginImageContext(self.size);
CGContextRef gc = UIGraphicsGetCurrentContext();
    float x1 = 0.;
    float y1 = 0.;
    float x2 = x1+self.size.width;
    float y2 = y1;
    float x3 = x2;
    float y3 = y1+self.size.height;
    float x4 = x1;
    float y4 = y3;
    radius = radius*2;

    CGContextMoveToPoint(gc, x1, y1+radius);
    CGContextAddArcToPoint(gc, x1, y1, x1+radius, y1, radius);
    CGContextAddArcToPoint(gc, x2, y2, x2, y2+radius, radius);
    CGContextAddArcToPoint(gc, x3, y3, x3-radius, y3, radius);
    CGContextAddArcToPoint(gc, x4, y4, x4, y4-radius, radius);

    CGContextClosePath(gc);
    CGContextClip(gc);

    CGContextTranslateCTM(gc, 0, self.size.height);
    CGContextScaleCTM(gc, 1, -1);
    CGContextDrawImage(gc, CGRectMake(0, 0, self.size.width, self.size.height), self.CGImage);

    UIImage *newimage = UIGraphicsGetImageFromCurrentImageContext();
    UIGraphicsEndImageContext();

    return newimage;
}
参考Demo:https://github.com/524429264/CornerImage
