今天我们来体验下Ceph原生的ISCSI,可能会有人说哪来的原生ISCSI啊,相信细心的童鞋在Ceph L版本发布的时候官网手册里面就出现了一个iscsi的字样。是的,没错,这就是原声版的ISCSI雏形,有好消息就有坏消息,不幸的是,截至到目前为止还不能使用rpm安装,因为红帽没有把rpm释放出来,只能通过git源码或别人分享的rpm包进行安装。
简单来说下iscsi的前生今世,分为两种一种是tgt实现方式,一种是lio实现方式,那么在Ceph原生里面使用的是lio方式,在原生的lio方式出来之前大家普遍采用的是tgt方式来进行Ceph的ISCSI实现。
什么是tgt?
Linux target framework(tgt)是为创建、维护SCSI target 驱动(包括iSCSI、FC、SRP等)提供支持。它的关键目标是简洁地集成到scsi-mid层,并且实现大部分应用层空间的tgt。以 Linux 2.6.38 为分界线,此前Linux 中默认的SCSI target是STGT,之后的标准是 Linux-IO Target。
什么是lio?
Linux-IO Target在Linux内核中(linux 2.6.38后),用软件实现各种SCSI Target,其支持的SAN技术中所有流行的存储协议包括Fibre Channel(Qlogic,linux3.5)、FCoE(linux3.0)、iSCSI(linux 3.1)、iSER (Mellanox InfiniBand,linux3.10), SRP (Mellanox InfiniBand,linux3.3), USB等,同时还能为本机生成模拟的SCSI设备,以及为虚拟机提供基于virtio的SCSI设备。Linux-IO Target使用户能够使用相对廉价的Linux系统实现SCSI、SAN的各种功能,而不用购买昂贵的专业设备。
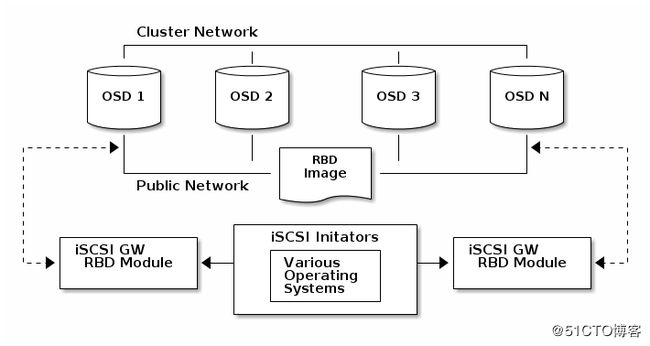
OK,下面进入正题,来看看Ceph ISCSI的架构图
LIO利用TCMU与Ceph的librbd库进行交互,并将RBD images映射给iSCSI客户端。
开始安装之前必须要满足以下条件:
正在运行的Ceph Luminous版本集群或更高版本的存储群集;(本文我们采用的是M版本)
RHEL/CentOS 7.5或者Linux kernel v4.16或更新;
同时拥有以下几个包:
targetcli-2.1.fb47 or newer package
python-rtslib-2.1.fb64 or newer package
tcmu-runner-1.3.0 or newer package
ceph-iscsi-config-2.4 or newer package
ceph-iscsi-cli-2.5 or newer package
注意:我们本次安装ISCSI GW是在OSD 节点上安装
由于很多童鞋可能获取不到rpm包,所以我这里整理了一下所需要的rpm并且分享了出来,以下是链接
链接: https://pan.baidu.com/s/1piNymp6oWLNHvXKaxBszLg 密码: 4vag
安装部分就不说了只要把rpm包下载到本地,安装很简单,下面来说下配置部分:
首先创建一个iscsi gw的配置文件
# touch /etc/ceph/iscsi-gateway.cfg
里面内容如下:
[config]
# Name of the Ceph storage cluster. A suitable Ceph configuration file allowing
# access to the Ceph storage cluster from the gateway node is required, if not
# colocated on an OSD node.
cluster_name = ceph

# Place a copy of the ceph cluster's admin keyring in the gateway's /etc/ceph
# drectory and reference the filename here
gateway_keyring = ceph.client.admin.keyring


# API settings.
# The API supports a number of options that allow you to tailor it to your
# local environment. If you want to run the API under https, you will need to
# create cert/key files that are compatible for each iSCSI gateway node, that is
# not locked to a specific node. SSL cert and key files *must* be called
# 'iscsi-gateway.crt' and 'iscsi-gateway.key' and placed in the '/etc/ceph/' directory
# on *each* gateway node. With the SSL files in place, you can use 'api_secure = true'
# to switch to https mode.

# To support the API, the bear minimum settings are:
api_secure = false

# Additional API configuration options are as follows, defaults shown.
# api_user = admin
# api_password = admin
# api_port = 5001
# trusted_ip_list = 192.168.0.10,192.168.0.11
注意:需要修改的地方就行把trusted_ip_list替换成自己实际场景的节点ip
完事之后重启iscsi服务
# systemctl daemon-reload
# systemctl enable rbd-target-api
# systemctl start rbd-target-api
OK到此为止,iscsi gw已经安装配置完成,下面开始创建iscsi target
1.执行gwcli命令进入iscsi
2.创建iscsi target
> /> cd /iscsi-target
> /iscsi-target>  create iqn.2003-01.com.redhat.iscsi-gw:iscsi-igw
3.创建iSCSI网关。以下使用的IP是用于iSCSI数据传输的IP,它们可以与trusted_ip_list中列出的用于管理操作的IP相同,也可以不同,看有没有做多网卡分离
> /iscsi-target> cd iqn.2003-01.com.redhat.iscsi-gw:iscsi-igw/gateways
> /iscsi-target...-igw/gateways>  create ceph-gw-1 10.172.19.21 skipchecks=true
> /iscsi-target...-igw/gateways>  create ceph-gw-2 10.172.19.22 skipchecks=true
4.创建一个rbd设备disk_1
> /iscsi-target...-igw/gateways> cd /disks
> /disks> create pool=rbd image=disk_1 size=90G
5.创建iqn
> /disks> cd /iscsi-target/iqn.2003-01.com.redhat.iscsi-gw:iscsi-igw/hosts
> /iscsi-target...eph-igw/hosts>  create iqn.1994-05.com.redhat:rh7-client
6.创建chap的用户名密码,并且chap必须设置,否则服务端是禁止连接的
> /iscsi-target...at:rh7-client> auth chap=myiscsiusername/myiscsipassword
7.增加磁盘到客户端
> /iscsi-target...at:rh7-client> disk add rbd.disk_1
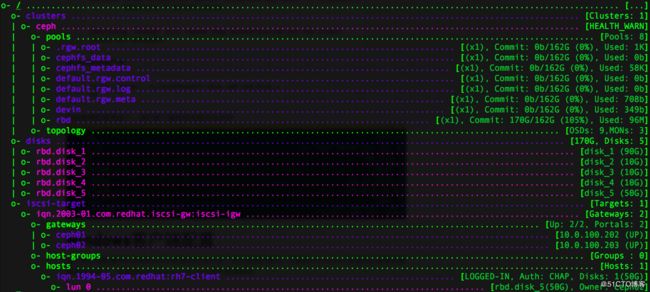
OK,到这里就配置完成了,我们看下最终是什么样的
安装配置完之后就可以挂载使用了,一般也就是windows/Linux,我们先说下Linux下挂载方式
1.安装iscsi工具
# yum install iscsi-initiator-utils
# yum install device-mapper-multipath
2.配置多路径
# mpathconf --enable --with_multipathd y
devices {
        device {
                vendor                 "LIO-ORG"
                hardware_handler       "1 alua"
                path_grouping_policy   "failover"
                path_selector          "queue-length 0"
                failback               60
                path_checker           tur
                prio                   alua
                prio_args              exclusive_pref_bit
                fast_io_fail_tmo       25
                no_path_retry          queue
        }
}
3.重启服务
# systemctl reload multipathd
4.配置chap认证
修改配置客户端的名称为之前设置的名称
# vi /etc/iscsi/initiatorname.iscsi
 InitiatorName= iqn.1994-05.com.redhat:rh7-client
修改chap认证配置文件
 # vi /etc/iscsi/iscsid.conf
 node.session.auth.authmethod = CHAP
 node.session.auth.username = myiscsiusername
 node.session.auth.password = myiscsipassword
5.查询iscsi target
# iscsiadm -m discovery -t -st 10.172.19.21
6.连接target
# iscsiadm -m node -T iqn.2003-01.com.redhat.iscsi-gw:iscsi-igw -l
# multipath –ll
Windows挂载方式
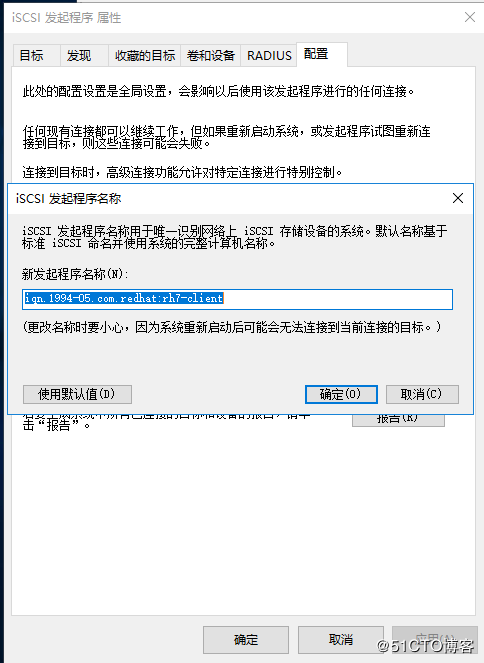
1.修改windows iscsi客户端的名称
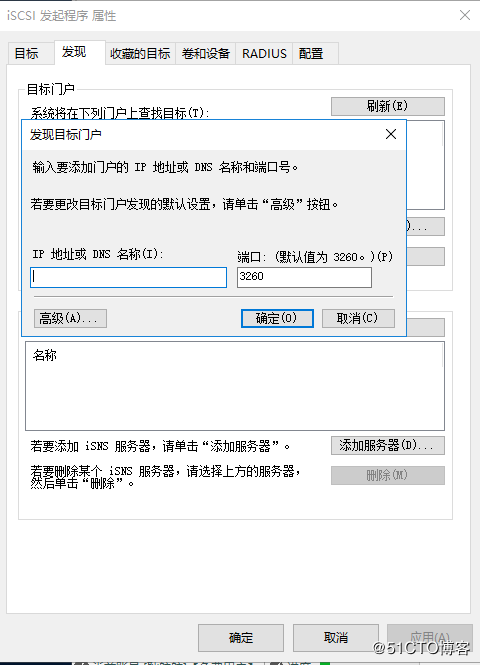
2.如果没自动出现iscsi门户的话,需要手动发现门户
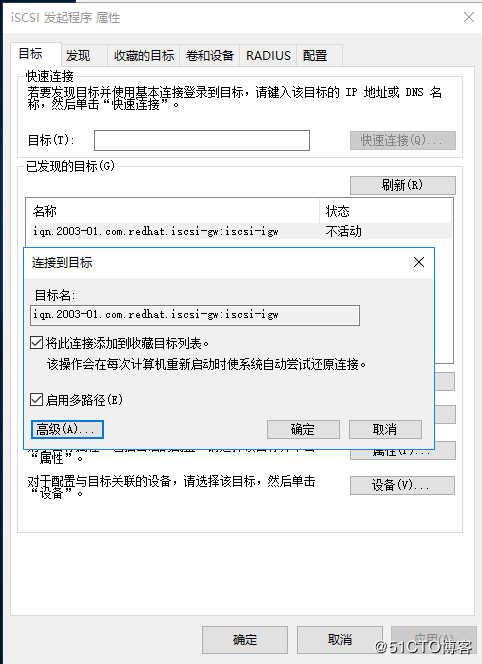
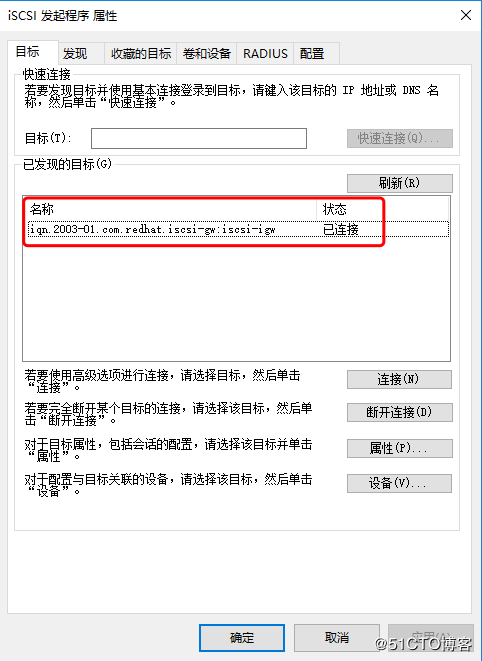
3.这个时候目标里面已经有一个发现的目标了,显示状态是不活动的,点击连接我们来手动连接下
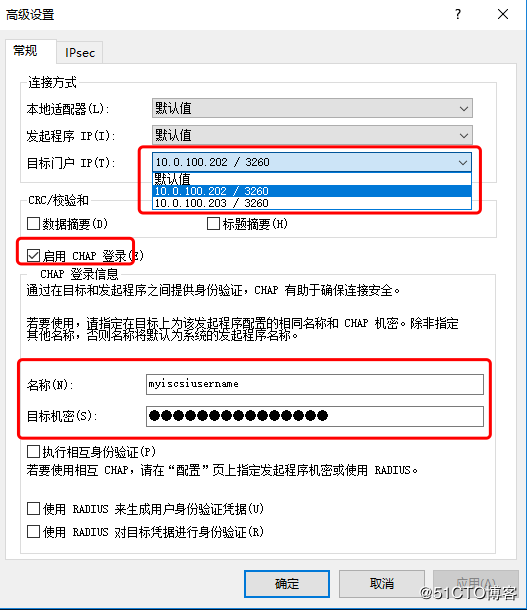
4.点击高级,选择门户IP,填写chap登陆信息,然后chap信息就是之前设置的用户名/密码
5.最后在磁盘管理里面查看磁盘,分区格式化就可以使用了。
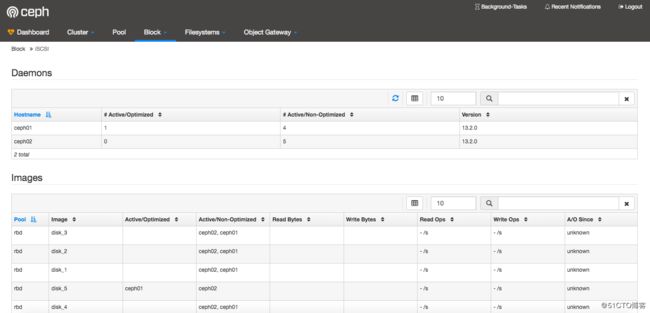
最后秀一把M版本的Dashboard V2
本文参考链接:
http://docs.ceph.com/docs/master/rbd/iscsi-target-cli/
http://www.zphj1987.com/2018/04/11/ceph-ISCSI-GATEWAY/
