看这篇文章的相信都提前对android插件化技术了解一二,最近有需求要使用360的开源RePlugin实现APK插件,说起这个的集成是简单的,但了解这个的原理,其背后涉及的是一系列的知识点,面广,且复杂。陆续会一个一个整理。今天先集成replugin 并实现在宿主APP中直接打开插件APK。
RePlugin---GitHub地址
一.宿主app接入
1.添加 RePlugin Host Gradle 依赖
在项目根目录的 build.gradle(注意:不是 app/build.gradle) 中添加 replugin-host-gradle 依赖:
buildscript {
    dependencies {
        classpath 'com.qihoo360.replugin:replugin-host-gradle:2.2.4'
        ...
    }
}
2.添加 RePlugin Host Library 依赖
在 app/build.gradle 中需要应用 replugin-host-gradle 插件,并添加 replugin-host-lib 依赖:
apply plugin: 'replugin-host-gradle'

repluginHostConfig {
    /**
     * 是否使用 AppCompat 库 现在一般项目都会使用这个库吧。。
     * 不需要个性化配置时,无需添加
     */
    useAppCompat = true

}
dependencies {
    compile 'com.qihoo360.replugin:replugin-host-lib:2.2.4'
    ...
}
3.配置 Application 类
继承RePluginApplication,别忘了在AndroidManifest.xml中配置
public class MainApplication extends RePluginApplication {
}
二、外置插件Apk 接入
什么是外置插件apk,要做到既可以“安装到设备”,又可以“作为插件”使用。要注意是可以独立安装到手机上的,本身就是一个完整的应用。插件也分为外置插件和内置插件。我们文章示例的是外置插件。详细看插件的管理
1.添加 RePlugin Plugin Gradle 依赖
在项目根目录的 build.gradle(注意:不是 app/build.gradle) 中添加 replugin-plugin-gradle 依赖:
buildscript {
    dependencies {
        classpath 'com.qihoo360.replugin:replugin-plugin-gradle:2.2.4'
        ...
    }
}
2.添加 RePlugin Plugin Library 依赖
在 app/build.gradle 中应用 replugin-plugin-gradle 插件,并添加 replugin-plugin-lib 依赖
apply plugin: 'replugin-plugin-gradle'
dependencies {
    compile 'com.qihoo360.replugin:replugin-plugin-lib:2.2.4'
    ...
}
三、外置插件准备工作
通常我们下发插件是把插件放在服务器上通过网络请求下发,开启服务下载apk到sdcard。但我们自己测试练习的时候没有服务端支持,可以将apk直接放到本地存储。(我就是直接在电脑端qq发送给手机,在手机端查看apk地址为【/storage/emulated/0/tencent/qqfile_recv/xxx.apk】)
四、主程序调起插件
1.sd卡权限
如果插件APK放到了SD卡上,则请务必确保主程序中拥有SD卡权限(主程序Manifest要声明,且ROM允许),否则会出现权限问题,当然,放入应用的files目录则不受影响。
2. 在Application中配置签名信息
没有签名的apk可能会携带病毒,所以说,一旦不做校验,则不排除恶意人会劫持DNS或网络,并通过网络来下发恶意插件,对您的应用造成很不好的影响。所以首先我们要打开签名校验setVerifySign(true) 即可,对于debug包的不进行签名校验,最后把需要release包的签名加入白名单.
   @Override
public class MyApplication extends RePluginApplication
{
    @Override
    public void onCreate() {

        super.onCreate();
     //不会自动将“主程序签名”加入进来。如有需要,建议您自行加入。
        RePlugin.addCertSignature("379C790B7B726B51AC58E8FCBCFE4567");

    }
    @Override
    protected RePluginConfig createConfig() {
        RePluginConfig c = new RePluginConfig();
        //若为Debug环境下则无需校验签名,只有Release才会校验
        //打开签名校验
        c.setVerifySign(!BuildConfig.DEBUG);
        return c;
    }

}
3.调起方法
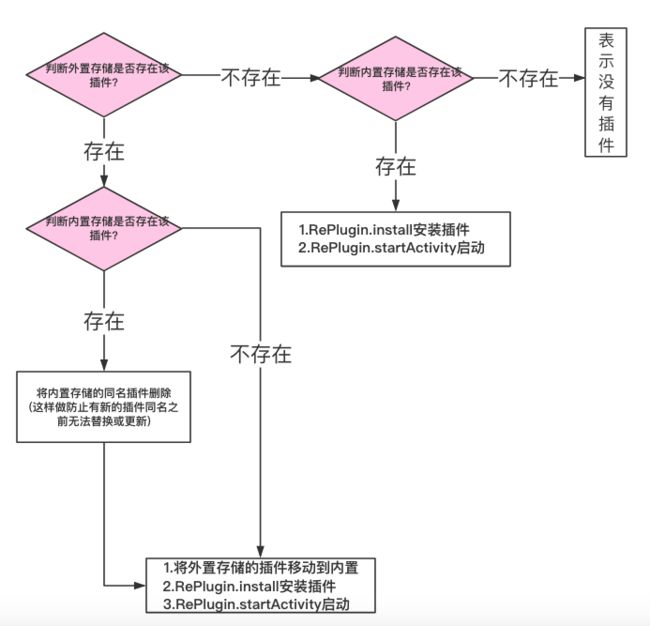
/**
     * 模拟安装或升级(覆盖安装)外置插件
     * 注意:本demo将外置插件放置到/storage/emulated/0/tencent/qqfile_recv/xxx.apk目录下
     */
    private void simulateInstallExternalPlugin() {
        //sd卡路径
        //获取外部存储的路径返回绝对路径的,就是你的设备SD卡的文件路径
        String pluginName = "plugin_test.apk";
        String externalPluginPath = Environment.getExternalStorageDirectory().getAbsolutePath() + "/tencent/qqfile_recv/" + pluginName;
        String internalPluginPath = getFilesDir() + "/" + pluginName;
        File externalPluginFile = new File(externalPluginPath);
        File internalPluginFile = new File(internalPluginPath);

        if (externalPluginFile.exists()) {
            if (internalPluginFile.exists()) {
                FileUtils.deleteQuietly(internalPluginFile);
            }
            //复制文件 更新操作
            copyFile(externalPluginPath, internalPluginPath);
            PluginInfo info = RePlugin.install(externalPluginPath);
            if (info != null) {
                RePlugin.startActivity(this, RePlugin.createIntent(info.getName(), "com.plugin.demo.MainActivity"));
            } else {
                Toast.makeText(this, "加载插件失败", Toast.LENGTH_SHORT).show();
            }
        } else {
            if (internalPluginFile.exists()) {
                PluginInfo info = null;
                if (internalPluginFile.exists()) {
                    info = RePlugin.install(internalPluginPath);
                }
                if (info != null) {
                    RePlugin.startActivity(this, RePlugin.createIntent(info.getName(), "com.plugin.demo.MainActivity"));
                } else {
                    Toast.makeText(this, "加载插件失败", Toast.LENGTH_SHORT).show();
                }
            } else {
                Toast.makeText(this, "没有插件", Toast.LENGTH_SHORT).show();

            }
        }
    }
/**
     * 复制单个文件
     *
     * @param oldPath String 原文件路径
     * @param newPath String 复制后路径
     * @return boolean
     */
    public void copyFile(String oldPath, String newPath) {
        try {
            int bytesum = 0;
            int byteread = 0;
            File oldfile = new File(oldPath);
            if (oldfile.exists()) { //文件存在时
                InputStream inStream = new FileInputStream(oldPath); //读入原文件
                FileOutputStream fs = new FileOutputStream(newPath);
                byte[] buffer = new byte[1444];
                while ((byteread = inStream.read(buffer)) != -1) {
                    bytesum += byteread; //字节数 文件大小
                    System.out.println(bytesum);
                    fs.write(buffer, 0, byteread);
                }
                inStream.close();
            }
        } catch (Exception e) {
            System.out.println("复制单个文件操作出错");
            e.printStackTrace();

        }

    }
到这里我们就已经实现了在一个app中直接打开一个插件apk了,文章不长,集成replugin并不复杂,主要在于学习深层的原理,现在大家可以动手配置测试一下了。