一、什么是宏函数?通过宏定义的函数是宏函数。如下,编译器在预处理阶段会将Add(x,y)替换为((x)*(y))#defineAdd(x,y)((x)*(y))#defineAdd(x,y)((x)*(y))intmain(){inta=10;intb=20;intd=10;intc=Add(a+d,b)*2;cout<
地推话术,如何应对地推过程中家长的拒绝
校师学
相信校长们在做地推的时候经常遇到这种情况:市场专员反馈家长不接单,咨询师反馈难以邀约这些家长上门,校区地推疲软,招生难。为什么?仅从地推层面分析,一方面因为家长受到的信息轰炸越来越多,对信息越来越“免疫”;而另一方面地推人员的专业能力和营销话术没有提高,无法应对家长的拒绝,对有意向的家长也不知如何跟进,眼睁睁看着家长走远;对于家长的疑问,更不知道如何有技巧地回答,机会白白流失。由于回答没技巧和专业
谢谢你们,爱你们!
鹿游儿
昨天家人去泡温泉,二个孩子也带着去,出发前一晚,匆匆下班,赶回家和孩子一起收拾。饭后,我拿出笔和本子(上次去澳门时做手帐的本子)写下了1\2\3\4\5\6\7\8\9,让后让小壹去思考,带什么出发去旅游呢?她在对应的数字旁边画上了,泳衣、泳圈、肖恩、内衣内裤、tapuy、拖鞋……画完后,就让她自己对着这个本子,将要带的,一一带上,没想到这次带的书还是这本《便便工厂》(晚上姑婆发照片过来,妹妹累得
C语言如何定义宏函数?
小九格物
c语言
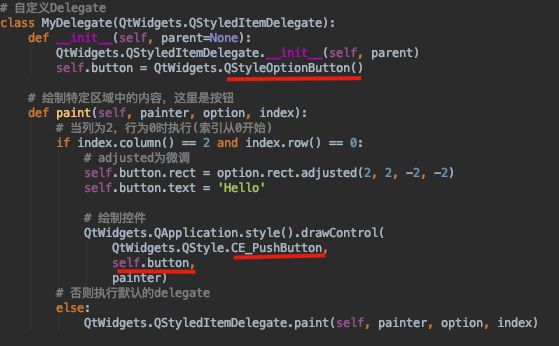
在C语言中,宏函数是通过预处理器定义的,它在编译之前替换代码中的宏调用。宏函数可以模拟函数的行为,但它们不是真正的函数,因为它们在编译时不会进行类型检查,也不会分配存储空间。宏函数的定义通常使用#define指令,后面跟着宏的名称和参数列表,以及宏展开后的代码。宏函数的定义方式:1.基本宏函数:这是最简单的宏函数形式,它直接定义一个表达式。#defineSQUARE(x)((x)*(x))2.带参
微服务下功能权限与数据权限的设计与实现
nbsaas-boot
微服务java架构
在微服务架构下,系统的功能权限和数据权限控制显得尤为重要。随着系统规模的扩大和微服务数量的增加,如何保证不同用户和服务之间的访问权限准确、细粒度地控制,成为设计安全策略的关键。本文将讨论如何在微服务体系中设计和实现功能权限与数据权限控制。1.功能权限与数据权限的定义功能权限:指用户或系统角色对特定功能的访问权限。通常是某个用户角色能否执行某个操作,比如查看订单、创建订单、修改用户资料等。数据权限:
理解Gunicorn:Python WSGI服务器的基石
范范0825
ipythonlinux运维
理解Gunicorn:PythonWSGI服务器的基石介绍Gunicorn,全称GreenUnicorn,是一个为PythonWSGI(WebServerGatewayInterface)应用设计的高效、轻量级HTTP服务器。作为PythonWeb应用部署的常用工具,Gunicorn以其高性能和易用性著称。本文将介绍Gunicorn的基本概念、安装和配置,帮助初学者快速上手。1.什么是Gunico
小丽成长记(四十三)
玲玲54321
小丽发现,即使她好不容易调整好自己的心态下一秒总会有不确定的伤脑筋的事出现,一个接一个的问题,人生就没有停下的时候,小问题不断出现。不过她今天看的书,她接受了人生就是不确定的,厉害的人就是不断创造确定性,在Ta的领域比别人多的确定性就能让自己脱颖而出,显示价值从而获得的比别人多的利益。正是这样的原因,因为从前修炼自己太少,使得她现在在人生道路上打怪起来困难重重,她似乎永远摆脱不了那种无力感,有种习
学点心理知识,呵护孩子健康
静候花开_7090
昨天听了华中师范大学教育管理学系副教授张玲老师的《哪里才是学生心理健康的最后庇护所,超越教育与技术的思考》的讲座。今天又重新学习了一遍,收获匪浅。张玲博士也注意到了当今社会上的孩子由于心理问题导致的自残、自杀及伤害他人等恶性事件。她向我们普及了一个重要的命题,她说心理健康的一些基本命题,我们与我们通常的一些教育命题是不同的,她还举了几个例子,让我们明白我们原来以为的健康并非心理学上的健康。比如如果
2021年12月19日,春蕾教育集团团建活动感受——黄晓丹
黄错错加油
感受:1.从陌生到熟悉的过程。游戏环节让我们在轻松的氛围中得到了锻炼,也增长了不少知识。2.游戏过程中,我们贡献的是个人力量,展现的是团队的力量。它磨合的往往不止是工作的熟悉,更是观念上契合度的贴近。3.这和工作是一样的道理。在各自的岗位上,每个人摆正自己的位置、各司其职充分发挥才能,并团结一致劲往一处使,才能实现最大的成功。新知:1.团队精神需要不断地创新。过去,人们把创新看作是冒风险,现在人们
Cell Insight | 单细胞测序技术又一新发现,可用于HIV-1和Mtb共感染个体诊断
尐尐呅
结核病是艾滋病合并其他疾病中导致患者死亡的主要原因。其中结核病由结核分枝杆菌(Mycobacteriumtuberculosis,Mtb)感染引起,获得性免疫缺陷综合症(艾滋病)由人免疫缺陷病毒(Humanimmunodeficiencyvirustype1,HIV-1)感染引起。国家感染性疾病临床医学研究中心/深圳市第三人民医院张国良团队携手深圳华大生命科学研究院吴靓团队,共同研究得出单细胞测序
c++ 的iostream 和 c++的stdio的区别和联系
黄卷青灯77
c++算法开发语言iostreamstdio
在C++中,iostream和C语言的stdio.h都是用于处理输入输出的库,但它们在设计、用法和功能上有许多不同。以下是两者的区别和联系:区别1.编程风格iostream(C++风格):C++标准库中的输入输出流类库,支持面向对象的输入输出操作。典型用法是cin(输入)和cout(输出),使用>操作符来处理数据。更加类型安全,支持用户自定义类型的输入输出。#includeintmain(){in
瑶池防线
谜影梦蝶
冥华虽然逃过了影梦的军队,但他是一个忠臣,他选择上报战况。败给影梦后成逃兵,高层亡尔还活着,七重天失守......随便一条,即可处死冥华。冥华自然是知道以仙界高层的习性此信一发自己必死无疑,但他还选择上报实情,因为责任。同样此信送到仙宫后,知道此事的人,大多数人都认定冥华要完了,所以上到仙界高层,下到扫大街的,包括冥华自己,全都准备好迎接冥华之死。如果仙界现在还属于两方之争的话,冥华必死无疑。然而
爬山后遗症
璃绛
爬山,攀登,一步一步走向制高点,是一种挑战。成功抵达是一种无法言语的快乐,在山顶吹吹风,看看风景,这是从未有过的体验。然而,爬山一时爽,下山腿打颤,颠簸的路,一路向下走,腿部力量不够,走起来抖到不行,停不下来了!第二天必定腿疼,浑身酸痛,坐立难安!
jsonp 常用util方法
hw1287789687
jsonpjsonp常用方法jsonp callback
jsonp 常用java方法
(1)以jsonp的形式返回:函数名(json字符串)
/***
* 用于jsonp调用
* @param map : 用于构造json数据
* @param callback : 回调的javascript方法名
* @param filters : <code>SimpleBeanPropertyFilter theFilt
多线程场景
alafqq
多线程
0
能不能简单描述一下你在java web开发中需要用到多线程编程的场景?0
对多线程有些了解,但是不太清楚具体的应用场景,能简单说一下你遇到的多线程编程的场景吗?
Java多线程
2012年11月23日 15:41 Young9007 Young9007
4
0 0 4
Comment添加评论关注(2)
3个答案 按时间排序 按投票排序
0
0
最典型的如:
1、
Maven学习——修改Maven的本地仓库路径
Kai_Ge
maven
安装Maven后我们会在用户目录下发现.m2 文件夹。默认情况下,该文件夹下放置了Maven本地仓库.m2/repository。所有的Maven构件(artifact)都被存储到该仓库中,以方便重用。但是windows用户的操作系统都安装在C盘,把Maven仓库放到C盘是很危险的,为此我们需要修改Maven的本地仓库路径。
placeholder的浏览器兼容
120153216
placeholder
【前言】
自从html5引入placeholder后,问题就来了,
不支持html5的浏览器也先有这样的效果,
各种兼容,之前考虑,今天测试人员逮住不放,
想了个解决办法,看样子还行,记录一下。
【原理】
不使用placeholder,而是模拟placeholder的效果,
大概就是用focus和focusout效果。
【代码】
<scrip
debian_用iso文件创建本地apt源
2002wmj
Debian
1.将N个debian-506-amd64-DVD-N.iso存放于本地或其他媒介内,本例是放在本机/iso/目录下
2.创建N个挂载点目录
如下:
debian:~#mkdir –r /media/dvd1
debian:~#mkdir –r /media/dvd2
debian:~#mkdir –r /media/dvd3
….
debian:~#mkdir –r /media
SQLSERVER耗时最长的SQL
357029540
SQL Server
对于DBA来说,经常要知道存储过程的某些信息:
1. 执行了多少次
2. 执行的执行计划如何
3. 执行的平均读写如何
4. 执行平均需要多少时间
列名 &
com/genuitec/eclipse/j2eedt/core/J2EEProjectUtil
7454103
eclipse
今天eclipse突然报了com/genuitec/eclipse/j2eedt/core/J2EEProjectUtil 错误,并且工程文件打不开了,在网上找了一下资料,然后按照方法操作了一遍,好了,解决方法如下:
错误提示信息:
An error has occurred.See error log for more details.
Reason:
com/genuitec/
用正则删除文本中的html标签
adminjun
javahtml正则表达式去掉html标签
使用文本编辑器录入文章存入数据中的文本是HTML标签格式,由于业务需要对HTML标签进行去除只保留纯净的文本内容,于是乎Java实现自动过滤。
如下:
public static String Html2Text(String inputString) {
String htmlStr = inputString; // 含html标签的字符串
String textSt
嵌入式系统设计中常用总线和接口
aijuans
linux 基础
嵌入式系统设计中常用总线和接口
任何一个微处理器都要与一定数量的部件和外围设备连接,但如果将各部件和每一种外围设备都分别用一组线路与CPU直接连接,那么连线
Java函数调用方式——按值传递
ayaoxinchao
java按值传递对象基础数据类型
Java使用按值传递的函数调用方式,这往往使我感到迷惑。因为在基础数据类型和对象的传递上,我就会纠结于到底是按值传递,还是按引用传递。其实经过学习,Java在任何地方,都一直发挥着按值传递的本色。
首先,让我们看一看基础数据类型是如何按值传递的。
public static void main(String[] args) {
int a = 2;
ios音量线性下降
bewithme
ios音量
直接上代码吧
//second 几秒内下降为0
- (void)reduceVolume:(int)second {
KGVoicePlayer *player = [KGVoicePlayer defaultPlayer];
if (!_flag) {
_tempVolume = player.volume;
与其怨它不如爱它
bijian1013
选择理想职业规划
抱怨工作是年轻人的常态,但爱工作才是积极的心态,与其怨它不如爱它。
一般来说,在公司干了一两年后,不少年轻人容易产生怨言,除了具体的埋怨公司“扭门”,埋怨上司无能以外,也有许多人是因为根本不爱自已的那份工作,工作完全成了谋生的手段,跟自已的性格、专业、爱好都相差甚远。
一边时间不够用一边浪费时间
bingyingao
工作时间浪费
一方面感觉时间严重不够用,另一方面又在不停的浪费时间。
每一个周末,晚上熬夜看电影到凌晨一点,早上起不来一直睡到10点钟,10点钟起床,吃饭后玩手机到下午一点。
精神还是很差,下午像一直野鬼在城市里晃荡。
为何不尝试晚上10点钟就睡,早上7点就起,时间完全是一样的,把看电影的时间换到早上,精神好,气色好,一天好状态。
控制让自己周末早睡早起,你就成功了一半。
有多少个工作
【Scala八】Scala核心二:隐式转换
bit1129
scala
Implicits work like this: if you call a method on a Scala object, and the Scala compiler does not see a definition for that method in the class definition for that object, the compiler will try to con
sudoku slover in Haskell (2)
bookjovi
haskellsudoku
继续精简haskell版的sudoku程序,稍微改了一下,这次用了8行,同时性能也提高了很多,对每个空格的所有解不是通过尝试算出来的,而是直接得出。
board = [0,3,4,1,7,0,5,0,0,
0,6,0,0,0,8,3,0,1,
7,0,0,3,0,0,0,0,6,
5,0,0,6,4,0,8,0,7,
Java-Collections Framework学习与总结-HashSet和LinkedHashSet
BrokenDreams
linkedhashset
本篇总结一下两个常用的集合类HashSet和LinkedHashSet。
它们都实现了相同接口java.util.Set。Set表示一种元素无序且不可重复的集合;之前总结过的java.util.List表示一种元素可重复且有序
读《研磨设计模式》-代码笔记-备忘录模式-Memento
bylijinnan
java设计模式
声明: 本文只为方便我个人查阅和理解,详细的分析以及源代码请移步 原作者的博客http://chjavach.iteye.com/
import java.util.ArrayList;
import java.util.List;
/*
* 备忘录模式的功能是,在不破坏封装性的前提下,捕获一个对象的内部状态,并在对象之外保存这个状态,为以后的状态恢复作“备忘”
《RAW格式照片处理专业技法》笔记
cherishLC
PS
注意,这不是教程!仅记录楼主之前不太了解的
一、色彩(空间)管理
作者建议采用ProRGB(色域最广),但camera raw中设为ProRGB,而PS中则在ProRGB的基础上,将gamma值设为了1.8(更符合人眼)
注意:bridge、camera raw怎么设置显示、输出的颜色都是正确的(会读取文件内的颜色配置文件),但用PS输出jpg文件时,必须先用Edit->conv
使用 Git 下载 Spring 源码 编译 for Eclipse
crabdave
eclipse
使用 Git 下载 Spring 源码 编译 for Eclipse
1、安装gradle,下载 http://www.gradle.org/downloads
配置环境变量GRADLE_HOME,配置PATH %GRADLE_HOME%/bin,cmd,gradle -v
2、spring4 用jdk8 下载 https://jdk8.java.
mysql连接拒绝问题
daizj
mysql登录权限
mysql中在其它机器连接mysql服务器时报错问题汇总
一、[running]
[email protected]:~$mysql -uroot -h 192.168.9.108 -p //带-p参数,在下一步进行密码输入
Enter password: //无字符串输入
ERROR 1045 (28000): Access
Google 今天在 Chromium 官方博客宣布由于 H.264 编解码器并非开放标准,Chrome 将在几个月后正式停止对 H.264 视频解码的支持,全面采用开放的 WebM 和 Theora 格式。
Google 在博客上表示,自从 WebM 视频编解码器推出以后,在性能、厂商支持以及独立性方面已经取得了很大的进步,为了与 Chromium 现有支持的編解码器保持一致,Chrome
yii 获取控制器名 和方法名
dcj3sjt126com
yiiframework
1. 获取控制器名
在控制器中获取控制器名: $name = $this->getId();
在视图中获取控制器名: $name = Yii::app()->controller->id;
2. 获取动作名
在控制器beforeAction()回调函数中获取动作名: $name =
Android知识总结(二)
come_for_dream
android
明天要考试了,速速总结如下
1、Activity的启动模式
standard:每次调用Activity的时候都创建一个(可以有多个相同的实例,也允许多个相同Activity叠加。)
singleTop:可以有多个实例,但是不允许多个相同Activity叠加。即,如果Ac
高洛峰收徒第二期:寻找未来的“技术大牛” ——折腾一年,奖励20万元
gcq511120594
工作项目管理
高洛峰,兄弟连IT教育合伙人、猿代码创始人、PHP培训第一人、《细说PHP》作者、软件开发工程师、《IT峰播》主创人、PHP讲师的鼻祖!
首期现在的进程刚刚过半,徒弟们真的很棒,人品都没的说,团结互助,学习刻苦,工作认真积极,灵活上进。我几乎会把他们全部留下来,现在已有一多半安排了实际的工作,并取得了很好的成绩。等他们出徒之日,凭他们的能力一定能够拿到高薪,而且我还承诺过一个徒弟,当他拿到大学毕
linux expect
heipark
expect
1. 创建、编辑文件go.sh
#!/usr/bin/expect
spawn sudo su admin
expect "*password*" { send "13456\r\n" }
interact
2. 设置权限
chmod u+x go.sh 3.
Spring4.1新特性——静态资源处理增强
jinnianshilongnian
spring 4.1
目录
Spring4.1新特性——综述
Spring4.1新特性——Spring核心部分及其他
Spring4.1新特性——Spring缓存框架增强
Spring4.1新特性——异步调用和事件机制的异常处理
Spring4.1新特性——数据库集成测试脚本初始化
Spring4.1新特性——Spring MVC增强
Spring4.1新特性——页面自动化测试框架Spring MVC T
idea ubuntuxia 乱码
liyonghui160com
1.首先需要在windows字体目录下或者其它地方找到simsun.ttf 这个 字体文件。
2.在ubuntu 下可以执行下面操作安装该字体:
sudo mkdir /usr/share/fonts/truetype/simsun
sudo cp simsun.ttf /usr/share/fonts/truetype/simsun
fc-cache -f -v
改良程序的11技巧
pda158
技巧
有很多理由都能说明为什么我们应该写出清晰、可读性好的程序。最重要的一点,程序你只写一次,但以后会无数次的阅读。当你第二天回头来看你的代码 时,你就要开始阅读它了。当你把代码拿给其他人看时,他必须阅读你的代码。因此,在编写时多花一点时间,你会在阅读它时节省大量的时间。
让我们看一些基本的编程技巧:
尽量保持方法简短
永远永远不要把同一个变量用于多个不同的
300个涵盖IT各方面的免费资源(下)——工作与学习篇
shoothao
创业免费资源学习课程远程工作
工作与生产效率:
A. 背景声音
Noisli:背景噪音与颜色生成器。
Noizio:环境声均衡器。
Defonic:世界上任何的声响都可混合成美丽的旋律。
Designers.mx:设计者为设计者所准备的播放列表。
Coffitivity:这里的声音就像咖啡馆里放的一样。
B. 避免注意力分散
Self Co
深入浅出RPC
uule
rpc
深入浅出RPC-浅出篇
深入浅出RPC-深入篇
RPC
Remote Procedure Call Protocol
远程过程调用协议
它是一种通过网络从远程计算机程序上请求服务,而不需要了解底层网络技术的协议。RPC协议假定某些传输协议的存在,如TCP或UDP,为通信程序之间携带信息数据。在OSI网络通信模型中,RPC跨越了传输层和应用层。RPC使得开发