Nginx+Keepalived实现反代负载均衡高可用(HA)配置
Nginx+Keepalived实现反代负载均衡高可用配置
OS |
IP |
子网掩码 |
路由网关 |
Centos6.6 nginx Keepalived |
Eth0:192.168.26.210 |
255.255.252.0 |
192.168.25.3 |
VIP:192.168.27.210 |
|||
Centos6.6 Nginx Keepalived |
Eth0:192.168.26.211 |
255.255.252.0 |
192.168.25.3 |
VIP:192.168.27.210 |
|||
Centos6.6(WEB) (nginx/apache) |
Eth0:192.168.26.212 |
255.255.252.0 |
192.168.25.3 |
Centos6.6(WEB) (nginx/apache) |
Eth0:192.168.26.218 |
255.255.252.0 |
192.168.25.3 |
后端:192.168.26.212和192.168.26.218服务器配置安装这里略过。
192.168.26.210和192.168.26.211安装Keepalived 和Nginx:
Yum install nginx
编辑配置文件:vim /usr/local/nginx/conf/nginx.conf
#user nobody;
worker_processes 1;
#error_log logs/error.log;
#error_log logs/error.log notice;
#error_log logs/error.log info;
#pid logs/nginx.pid;
events {
worker_connections 1024;
}
http {
include mime.types;
default_type application/octet-stream;
#log_format main '$remote_addr - $remote_user [$time_local] "$request" '
# '$status $body_bytes_sent "$http_referer" '
# '"$http_user_agent" "$http_x_forwarded_for"';
#access_log logs/access.log main;
sendfile on;
#tcp_nopush on;
#keepalive_timeout 0;
keepalive_timeout 65;
upstream nginx.jerry.com {
# ip_hash;
server 192.168.26.212:80;
server 192.168.26.218:80;
}
#gzip on;
server {
listen 80;
server_name nginx.jerry.com;
#charset koi8-r;
#access_log logs/host.access.log main;
location / {
root html;
index index.html index.htm;
proxy_pass http://nginx.jerry.com;
}
#error_page 404 /404.html;
# redirect server error pages to the static page /50x.html
#
error_page 500 502 503 504 /50x.html;
location = /50x.html {
root html;
}
# proxy the PHP scripts to Apache listening on 127.0.0.1:80
#
#location ~ \.php$ {
# proxy_pass http://127.0.0.1;
#}
# pass the PHP scripts to FastCGI server listening on 127.0.0.1:9000
#
#location ~ \.php$ {
# root html;
# fastcgi_pass 127.0.0.1:9000;
# fastcgi_index index.php;
# fastcgi_param SCRIPT_FILENAME /scripts$fastcgi_script_name;
# include fastcgi_params;
#}
# deny access to .htaccess files, if Apache's document root
# concurs with nginx's one
#
#location ~ /\.ht {
# deny all;
#}
}
# another virtual host using mix of IP-, name-, and port-based configuration
#
#server {
# listen 8000;
# listen somename:8080;
# server_name somename alias another.alias;
# location / {
# root html;
# index index.html index.htm;
# }
#}
# HTTPS server
#
#server {
# listen 443 ssl;
# server_name localhost;
# ssl_certificate cert.pem;
# ssl_certificate_key cert.key;
# ssl_session_cache shared:SSL:1m;
# ssl_session_timeout 5m;
# ssl_ciphers HIGH:!aNULL:!MD5;
# ssl_prefer_server_ciphers on;
# location / {
# root html;
# index index.html index.htm;
# }
#}
}
注意:192.168.26.211安装nginx配置完全相同这里略过。
192.168.26.210安装keepalived。
yum install -y keepalived
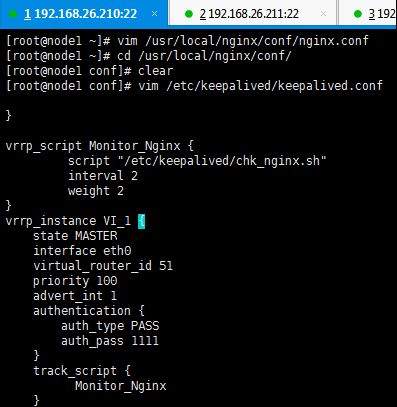
安装成功后编辑配置文件:vim /etc/keepalived/keepalived.conf
Keepalived配置文件:keepalived.conf
! Configuration File for keepalived
global_defs {
notification_email {
}
notification_email_from [email protected]
smtp_server smtp.hysec.com
smtp_connect_timeout 30
router_id nginx
}
vrrp_script Monitor_Nginx {
script "/etc/keepalived/chk_nginx.sh"
interval 2
weight 2
}
vrrp_instance VI_1 {
state MASTER
interface eth0
virtual_router_id 51
priority 100
advert_int 1
authentication {
auth_type PASS
auth_pass 1111
}
track_script {
Monitor_Nginx
}
virtual_ipaddress {
192.168.27.210
}
}
Nginx状态检测脚本:vim /etc/keepalived/chk_nginx.sh
#!/bin/bash
A=`ps -C nginx --no-header |wc -l`
if [ $A -eq 0 ];then
echo 'nginx server is died'
/etc/init.d/keepalived stop
fi
192.168.26.211keepalived配置文件基本相同:
! Configuration File for keepalived
global_defs {
notification_email {
}
notification_email_from [email protected]
smtp_server smtp.hysec.com
smtp_connect_timeout 30
router_id nginx
}
vrrp_script Monitor_Nginx {
script "/etc/keepalived/chk_nginx.sh"
interval 2
weight 2
}
vrrp_instance VI_1 {
state BACKUP
interface eth0
virtual_router_id 51
priority 99
advert_int 1
authentication {
auth_type PASS
auth_pass 1111
}
track_script {
Monitor_Nginx
}
virtual_ipaddress {
192.168.27.210
}
}
Nginx状态检测脚本:vim /etc/keepalived/chk_nginx.sh
#!/bin/bash
A=`ps -C nginx --no-header |wc -l`
if [ $A -eq 0 ];then
echo 'nginx server is died'
/etc/init.d/keepalived stop
fi
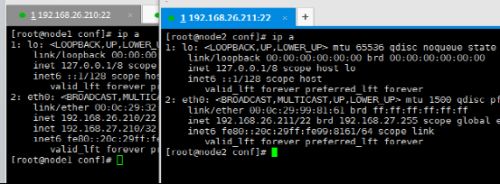
安装完成后启动NGINX和keepalived服务。
通过vip:192.168.27.210访问网站:
http://192.168.27.210
访问成功实现了RR负载均衡。
测试通过域名访问网站:http://nginx.jerry.com
同样实现了RR负载均衡。
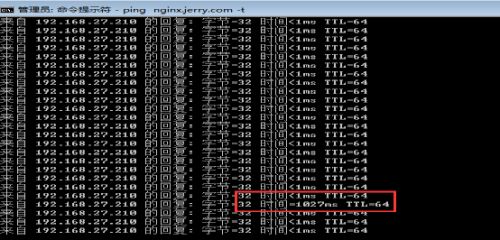
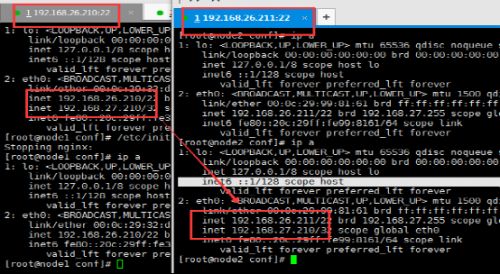
再把192.168.26.210上的NGINX关闭,测试能否实现vip转移(ha)
仍然可以访问:
测试成功
基于ip_hash访问效果(配置前端NGINX参数)


