一步步创建异步Python Web框架+Vue的网站(1)
关键字:异步 Python Web框架 Sanic Vue
在第一篇,我们已经准备好前端界面。大家已经可以在http://localhost:8080 访问了。
本篇则来准备后端的API接口。

Sanic后端
- 创建第一个Sanic Web服务器
安装:
pipenv install sanic
touch run.py
run.py文件内容:
# /run.py
from sanic import Sanic
from sanic.response import json

app = Sanic()

@app.route("/")
async def test(request):
    return json({"hello": "sanic"})

if __name__ == "__main__":
    app.run(host="0.0.0.0", port=5000)
运行:python run.py
打开浏览器,输入http://localhost:5000,确认sanic已经工作了!
-
项目结构优化
良好的项目目录结构很重要,我们把后端的source文件,全部放到/app下
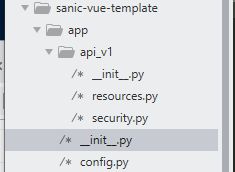 image.png
 各文件详细介绍:
- 根目录下,只保留
run.py,程序启动文件:
# /run.py
import os
from app import app, Config

app.run(host='0.0.0.0', port=5000, debug=Config.DEBUG)
- app的配置文件
/app/config.py:
通过环境变量,设置后端用到的一些参数,比如调试模式、数据库路径、加密签名等等
import os

class Config(object):
    # If not set fall back to production for safety
    SANIC_ENV =  os.getenv('SANIC_ENV', 'production')
    DEBUG = bool(os.getenv('DEBUG', False))
    # Set SANIC_SECRET on your production Environment
    SECRET_KEY = os.getenv('SANIC_SECRET', 'Secret')

    APP_DIR = os.path.dirname(__file__)
    ROOT_DIR = os.path.dirname(APP_DIR)
    DIST_DIR = os.path.join(ROOT_DIR, 'dist')

    if not os.path.exists(DIST_DIR):
        raise Exception(
            'DIST_DIR not found: {}'.format(DIST_DIR))
环境变量,开发时存放在/.env文件里,用pipenv shell启动时,会自动加载。
对于生产环境,则在生产服务器上设置环境变量。
因为.env里面会有机密信息,所以大家要放到.gitignore里面!!
- app的初始化文件
/__init__.py:- 创建
sanic app实例 - 指定静态文件目录为:
'dist/static' - 根路由,指向主页文件:
'dist/index.html'
- 创建
# /app/__init__.py
from pathlib import Path
from datetime import datetime, timedelta

from sanic import Sanic, response
from sanic.exceptions import NotFound
from sanic.log import logger

from .config import Config
from .api_v1 import api_bp


app = Sanic(__name__)
app.config.from_object(config)
logger.info(f'>>> Current env:{Config.SANIC_ENV} DEBUG:{Config.DEBUG}')
app.static('/static', 'dist/static')

@app.exception(NotFound)
async def ignore_404s(request, exception):
    return response.text("404. Oops, That page couldn't found.")


async def server_error_handler(request, exception):
    return response.text('Oops, Sanic Server Error! Please contact the blog owner',
                status=500)

# serve index.html, built by "yarn build"
@app.route('/')
async def handle_request(request):
    return await response.file('dist/index.html')

if __name__ == '__main__':
    app.run(host='0.0.0.0', port=5000, debug=Config.DEBUG)
-
API蓝图Blueprint
蓝图是用于统一组织views,把不同的功能模块,放到不同的蓝图里,方便管理和维护。- 创建目录
/app/api_v1/,专门存放跟前端通讯的API接口 - 初始化文件里,定义API接口的路由为
/api/v1' - 所有详细api操作,由
resources.py引入 - 如果后期api版本升级,可以方便地创建第二版本路由,比如
/api/v2'
- 创建目录
蓝图初始化文件
__init__.py:
# /app/api_v1/__init__.py
""" API Blueprint Application """

from sanic import Blueprint, response
from sanic.log import logger

from datetime import datetime

# --> '/api/v1/'
api_bp = Blueprint('api_bp_v1', url_prefix='/api/v1')

# @api_bp.route('/')
# async def bp_root(request):
#     return response.json({'api_bp_v1 blueprint': 'root'})

# Import resources to ensure view is registered
from .resources import *
然后,在/app/__init__.py里,注册api蓝图:
from .api_v1 import api_bp

app.register_blueprint(api_bp)
- API View路由
API具体的处理,全部放到resource.py文件。
由于最常用的是数据库CRUD操作,可以方便地用View路由来实现:- HTTP不同的模式,对应不同的数据库操作
- 读取 => 使用格式 GET
/api_v1/resource?id=xxx - 创建 => 使用格式 POST
/api_v1/resource + json_data - 修改 => 使用格式 PUT
/api_v1/resource - 删除 => 使用格式 DELETE
/api_v1/resource?id=xxx
# /app/api_v1/resource.py
"""
REST API Resource Routing
"""

from sanic import response
from sanic.views import HTTPMethodView
from sanic.log import logger

from datetime import datetime

from . import api_bp

class SimpleAsyncView(HTTPMethodView):

    async def get(self, request):
        logger.debug(f'>>> view.get method. resource_id: {request.args.get("id")}')
        return response.json({'timestamp': datetime.utcnow().isoformat()})

    async def post(self, request):
        logger.debug(f'>>> view.post method. resource_id: {request.json}')
        return response.json({'timestamp': datetime.utcnow().isoformat()})

    async def put(self, request):
        return response.text('I am async put method')

    async def delete(self, request):
        return response.text('I am delete method')

api_bp.add_route(SimpleAsyncView.as_view(), '/resource')
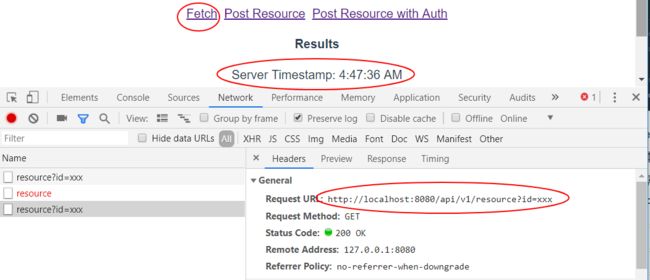
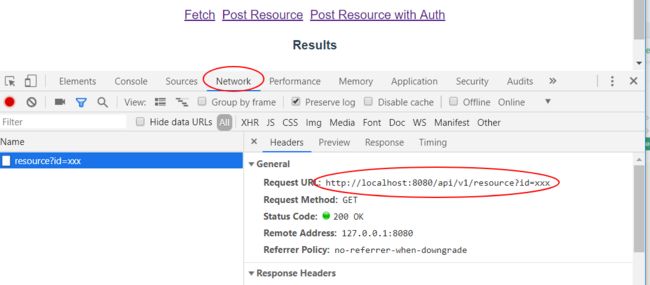
试一下GET:
前端页面,点击“Fetch”,查看路径和返回值:
如果不想用View路由,可以在/app/api_v1/__init__.py里直接创建路由:
@api_bp.route('/')
async def bp_root(request):
   return response.json({'api_bp_v1 blueprint': 'root'})
- 鉴权
可以自由定义,使用sanic_auth,sanic_jwt等模块。
对于起步来讲,就简单地用个装饰器吧:
# /app/api_v1/security.py
""" Security Related things """

from sanic.response import json
from sanic.log import logger

from functools import wraps

def check_request_for_authorization_status(request):
    # Verify if User is Authenticated
    # Authentication logic goes here, for instance cookie, session.
    flag = request.headers.get('Authorization') == 'Correct Token'
    logger.debug(f'authorization_status: {flag} for {request}')
    return flag


def authorized():
    def decorator(f):
        @wraps(f)
        async def decorated_function(request, *args, **kwargs):
            # run some method that checks the request
            # for the client's authorization status
            is_authorized = check_request_for_authorization_status(request)

            if is_authorized:
                # the user is authorized.
                # run the handler method and return the response
                response = await f(None, request, *args, **kwargs)
                return response
            else:
                # the user is not authorized.
                return json({'status': 'not_authorized'}, 403)
        return decorated_function
    return decorator
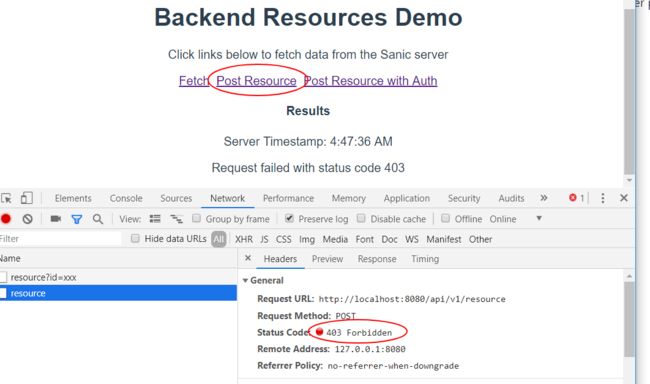
修改一下api路由,对需要认证的路由,加上装饰器:
这样,POST时,就必须提供正确的Header,否则访问拒绝!
# /app/api_v1/resource.py
from .security import authorized

class SimpleAsyncView(HTTPMethodView):

    @staticmethod
    @authorized()
    async def post(self, request):
        logger.debug(f'>>> view.post method. resource_id: {request.json}')
        return response.json({'timestamp': datetime.utcnow().isoformat()})
拒绝的例子:前端页面,点击“Post Resource”
- 运行
运行:python run.py,然后打开·http://localhost:5000·,就能测试了。
前后端同步开发
前端通过代理,链接到后端开发服务器。只需要前、后端分别运行:
yarn serve-
python run.py
然后打开·http://localhost:8080·,就能同时看到前端Vue和后端Sanic的代码更新了!
调试
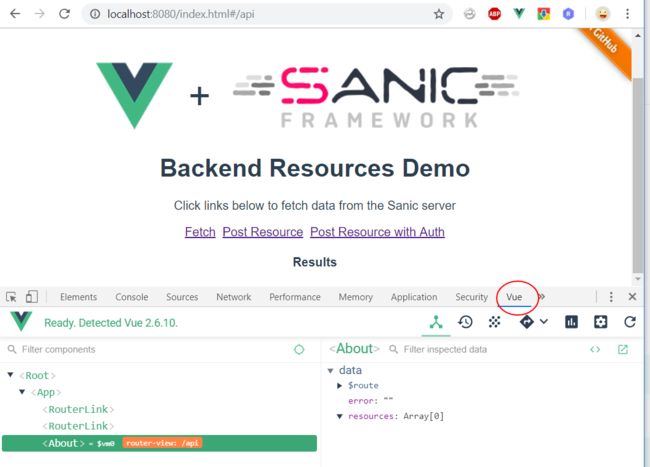
浏览器端,F12,安装Vue插件,方便地调试Vue.js
F12 => Network,可以方便地查看跟后端的API交互:
包括路径,参数,返回值
NEXT:
以下功能,会在sanic-vue-template-advanced讨论到哦,敬请期待!
- admin dashboard:后台管理系统
- database: asyncpg + peewee:数据库,异步连接
- aioredis/cache:缓存
- Sanic-Auth:鉴权
- sanic-jwt: RESTful鉴权
- sanic-session:session
- aiotask_context or contextvar(python3.7):协程间数据共享
- sanic-sentry:异常tracking
- sanic-zipkin:接口调用关系
- arq: async job queue:任务队列
- aiofiles:异步文件访问
- websocket: Sanic原生支持
点赞走一个,大家的鼓励才让我写更好的文章哦!
源码 https://github.com/kevinqqnj/sanic-vue-template
DEMO:https://sanic-vue-template.herokuapp.com/