原文地址: http://www.zhoujiping.com/notes/mnmp.html
2011年的MacBook Pro(机械硬盘,8G内存),之前升级到Mac 10.11,但会经常的卡顿,所以一直使用的是Mac 10.10系统,最近不知道怎么了,浏览器在后台会自动播放广告声音,现在mac 10.12出来了,该系统除了添加Siri,基本上就是10.11的一个升级,尝试下载安装,很好,竟然跑的很流畅,在mac 10.11上出现的卡顿现象也没有了,嗯,还是不错的。
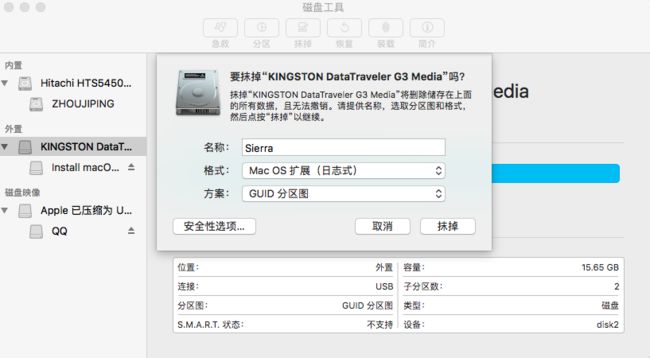
我是在App Store上下载系统后,然后做成U盘启动盘后,电脑格盘重新安装的,制作U盘启动盘很简单,首先要使用Mac磁盘工具把你的U盘或者移动硬盘进行格式化,最好用移动硬盘,速度会快点:
然后打开终端,执行下面的命令就可以了:
sudo /Applications/Install\ macOS\ Sierra.app/Contents/Resources/createinstallmedia --volume /Volumes/Sierra --applicationpath /Applications/Install\ macOS\ Sierra.app
上面这个代码应该是能看懂它的意思的,如果看不懂的话,那也没有关系,那么你在格式化U盘的时候,一定要注意取名叫
Sierra,然后拷贝上面的代码到终端执行就可以了。就是那么的简单,你的U盘启动盘就做好了。然后备份你电脑的资料(应该也没啥资料,代码都在github或者coding,别的东西放网盘,这年头电脑上谁还放东西呢),重启电脑,按住option选择U盘的盘符安装就行了。
安装HomeBrew
Brew是Mac下面的包管理工具,就像centos下面的yum一样。HomeBrew可以通过ruby来安装,mac系统是自带ruby的,所以只要在终端运行下面的代码即可安装HomeBrew
/usr/bin/ruby -e "$(curl -fsSL https://raw.githubusercontent.com/Homebrew/install/master/install)"
在安装的时候会有下面的提示,你应该仔细看下,要清楚知道HomeBrew给你安装了哪些脚本,给你创建了哪些文件夹,路径是在哪里的。仔细的看下安装时出现的说明信息,这样即使没有用过的软件,你根本不用看文档,都是能够使用它的最基础功能的。如果你一定要研究下细致的,可以看HomeBrew的官网:http://brew.sh
==> This script will install:
/usr/local/bin/brew
/usr/local/share/doc/homebrew
/usr/local/share/man/man1/brew.1
/usr/local/share/zsh/site-functions/_brew
/usr/local/etc/bash_completion.d/brew
/usr/local/Homebrew
==> The following new directories will be created:
/usr/local/Cellar
/usr/local/Homebrew
/usr/local/Frameworks
/usr/local/bin
/usr/local/etc
/usr/local/include
/usr/local/lib
/usr/local/opt
/usr/local/sbin
/usr/local/share
/usr/local/share/zsh
/usr/local/share/zsh/site-functions
/usr/local/var
现在我们已经安装完HomeBrew了,其实你只要运行brew help就能知道该怎么用这个软件了。
自检Brew
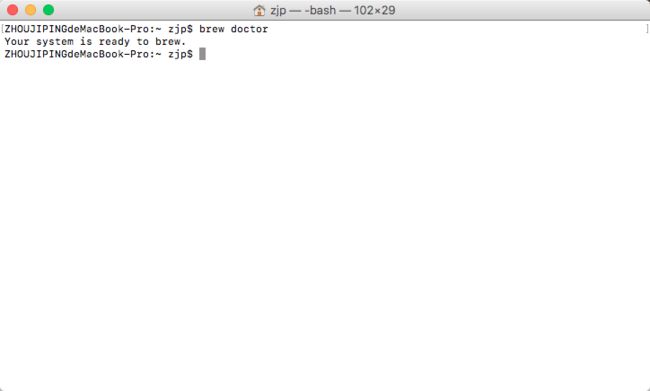
安装完成之后,建议执行一下自检,brew doctor如果看到Your system is ready to brew. 那么你的brew已经可以开始使用。
美化下终端
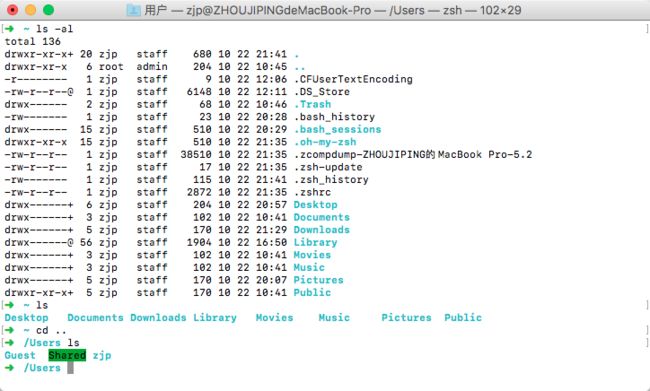
brew我们已经安装好了,现在已经可以使用了,但是看上面的图,我们的终端太他妈的丑了,mac默认使用的shell是bash,如果把它换成zsh,并安装zsh的插件oh-my-zsh,那就会好很多了,mac系统已经自带了zsh,我们就不用去安装了,执行zsh --version可以查看zsh的版本,我们需要安装个zsh的插件oh-my-zsh
安装oh-my-zsh
sh -c "$(curl -fsSL https://raw.githubusercontent.com/robbyrussell/oh-my-zsh/master/tools/install.sh)"
终端执行上面的代码即可,程序安装完oh-my-zsh后会自动帮我们把shell切换为zsh,现在我们的终端就变成这样了,注:oh-my-zsh还可以更换主题和装插件的,具体访问:http://ohmyz.sh
安装FiraCode字体
嗯,上面的差不多了,我们再安装个比较流行的编程字体FireCode,可以进入:https://github.com/tonsky/FiraCode点击下载,上面的地址可能会下载失败,我也把这个字体放在百度网盘上了,你也可以点击这里下载, 下载后解压然后双击字体就可以安装上了。
现在我们打开终端,点击终端->偏好设置,我们在这里按自己的喜欢设置一下背景,字体,颜色,行间距等即可,我设置完就成为下面这样了,嗯,这样就好看多了
安装终端的命令自动提示
在终端下操作会经常需要输入一些常用的命令,要不出错的输入这些命令也不是件容易的事,zsh还有一个很好用的补全命令的插件zsh-autosuggestions, 我们通过下面命令安装下:
brew install zsh-autosuggestions
我记得以前只要这么安装完就可以的,但是这次我安装完还是没有出现自动提示,不去想这个原因了,我们自己设置下就行了,先找到zsh-autosuggestions.zsh文件的安装路径,在/usr/local/Cellar/zsh-autosuggestions/0.3.3/share/zsh-autosuggestions里面(这里就是前面我为什么要大家看brew的安装提示了,我们知道brew将程序安装在什么文件夹,那就很容易的找到我们要的文件),我们把zsh-autosuggestions.zsh放入~/.zshrc文件中,就是加入下面这句话:
source /usr/local/Cellar/zsh-autosuggestions/0.3.3/share/zsh-autosuggestions/zsh-autosuggestions.zsh
好了,然后你可以执行source ~/.zshrc或者重新打开终端,看下效果:
如上图,我输入一个
b就会自动提示我之前输入过的命令,然后按一下右方向键就能自动补全了。
使用homebrew-cask安装sublime
先安装cask, 使用cask可以安装一些应用程序,如QQ,迅雷,谷歌浏览器等,功能和App stroe差不多,个人觉得这个更好管理
# 网上大部分方法都是用brew tap添加源再安装的,其实不用那么麻烦,只要输入brew cask即可,brew会自动帮我们完成cask安装。
brew cask # 没有安装cask会自动安装,已经安装cask的,会跳出cask命令列表
# Cask 常用命令
brew cask search        #列出所有可以被安装的软件
brew cask search sublime    #查找所有和sublime相关的应用
brew cask list          #列出所有通过cask安装的软件
brew cask info sublime-text  #查看 sublime 的信息
brew cask install sublime-text  # 安装sublime
brew cask uninstall sublime-text   #卸载sublime
通常我们是不知道软件的全称的,比如安装sublime,我们可以先使用brew cask serach搜索:
brew cask search sublime
==> Exact match
caskroom/cask/sublime
==> Partial matches
caskroom/cask/sublime-text               caskroom/cask/sublime-text
从上面我们可以看出,要安装的sublime全称是sublime-text,我们使用brew cask install sublime-text来安装它
brew cask install sublime-text
我们安装好的sublime text 3如下:
总体来说,字体和样式都挺不错了,不过大多数人都会换一个自己喜欢的主题的。
给sublime换主题
先给sublime text 3安装Package Control, 按住control + `,在弹出的命令行输入:
import urllib.request,os; pf = 'Package Control.sublime-package'; ipp = sublime.installed_packages_path(); urllib.request.install_opener( urllib.request.build_opener( urllib.request.ProxyHandler()) ); open(os.path.join(ipp, pf), 'wb').write(urllib.request.urlopen( 'http://sublime.wbond.net/' + pf.replace(' ','%20')).read())
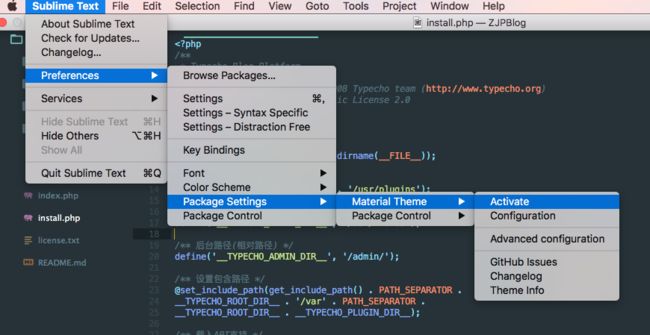
然后command + shift + p,打开Package Control,输入install,选择Package Control:Install Package回车,在跳出的命令行输入选择Material Theme安装,然后按下图启用
好了,然后鼠标移到菜单栏Sublime Text -> Preferences > Settings在右边的窗口(user)中输入你自己要的配置,我的配置如下:
{
    "always_show_minimap_viewport": false,
    "color_scheme": "Packages/Material Theme/schemes/OLD/Material-Theme.tmTheme",
    "font_face": "Fira Code",
    "font_size": 15,
    "ignored_packages":
    [
        "Vintage"
    ],
    "line_padding_bottom": 4,
    "line_padding_top": 4,
    "theme": "Material-Theme.sublime-theme",
    "translate_tabs_to_spaces": true,
    "tab_size": 4,

}
最后来看下效果,嗯,好看多了
安装Mysql
先查找下mysql
➜  ~ brew search mysql
automysqlbackup            mysql-cluster              mysql-sandbox
mysql                      mysql-connector-c          mysql-search-replace
mysql++                    mysql-connector-c++        mysqltuner
homebrew/php/php53-mysqlnd_ms            homebrew/versions/mysql56
homebrew/php/php54-mysqlnd_ms            Caskroom/cask/mysql-connector-python
homebrew/php/php55-mysqlnd_ms            Caskroom/cask/mysqlworkbench
homebrew/php/php56-mysqlnd_ms            Caskroom/cask/navicat-for-mysql
homebrew/versions/mysql55                Caskroom/cask/sqlpro-for-mysql
看一下mysql的版本信息
➜  ~ brew info mysql
mysql: stable 5.7.16 (bottled)
Open source relational database management system
# 下面信息省略
下面就用brew install mysql安装下吧,安装时的消息有这么一句话We've installed your MySQL database without a root password. To secure it run:mysql_secure_installation,那就来设置下root的密码
# 第一步:打开mysql服务
mysql.server start
# 第二步:执行mysql_secure_installation
mysql_secure_installation # 执行后按照提示信息进行设置,慢慢看下英文,都能看懂的
好了,进入mysql看下
➜  ~ mysql -u root -p
Enter password:
Welcome to the MySQL monitor.  Commands end with ; or \g.
Your MySQL connection id is 4
Server version: 5.7.16 Homebrew

Copyright (c) 2000, 2016, Oracle and/or its affiliates. All rights reserved.

Oracle is a registered trademark of Oracle Corporation and/or its
affiliates. Other names may be trademarks of their respective
owners.

Type 'help;' or '\h' for help. Type '\c' to clear the current input statement.

mysql> show databases;
+--------------------+
| Database           |
+--------------------+
| information_schema |
| mysql              |
| performance_schema |
| sys                |
+--------------------+
4 rows in set (0.00 sec)

mysql>
安装php
直接brew search php 莫有用,你可以试下看看提示信息,要先添加php扩展
brew update # 安装软件前都要习惯的更新下brew源
brew tap homebrew/dupes
brew tap josegonzalez/homebrew-php
现在brew search php就可以了,出来一堆版本的php,我们就安装php7.0版本吧,我用php7.1版本在跑laravel的时候,出现过错误,我那时候没有解决掉,装回php7.0没有问题。
可以先brew options ph70看看你安装的时候要哪些选项,我选择了下面这些,因为后面我们会用nginx作为反向代理,所以就不要用--with-apache选项了,也不要添加--without-fpm选项
brew install php70 --with-debug --with-gmp --with-homebrew-curl --with-homebrew-libressl --with-homebrew-libxml2 --with-homebrew-libxslt --with-imap --with-libmysql --with-mssql
由于Mac自带了php和php-fpm,因此需要添加系统环境变量PATH来替代自带PHP版本,我们用的是zsh,所以放进.zshrc中,如果你用的shell是bash,那么可以把下面的信息写入到~/.bash_profile文件中,如果这个文件没有,你自己建一个就行。
echo 'export PATH="$(brew --prefix php70)/bin:$PATH"' >> ~/.zshrc  #for php
echo 'export PATH="$(brew --prefix php70)/sbin:$PATH"' >> ~/.zshrc  #for php-fpm
echo 'export PATH="/usr/local/bin:/usr/local/sbib:$PATH"' >> ~/.zshrc #for other brew install soft
source ~/.zshrc
测试下效果
# brew安装的php
➜  ~ php -v
PHP 7.0.12 (cli) (built: Oct 24 2016 00:06:38) ( NTS DEBUG )
Copyright (c) 1997-2016 The PHP Group
Zend Engine v3.0.0, Copyright (c) 1998-2016 Zend Technologies

# brew安装的php-fpm
➜  ~ php-fpm -v
PHP 7.0.12 (fpm-fcgi) (built: Oct 24 2016 00:06:45) (DEBUG)
Copyright (c) 1997-2016 The PHP Group
Zend Engine v3.0.0, Copyright (c) 1998-2016 Zend Technologies

# Mac自带的php, 我以前的项目有些依赖不支持php7,所以这个我是留着的,随时切换使用
➜  ~ /usr/bin/php -v
PHP 5.6.24 (cli) (built: Aug  8 2016 16:58:37)
Copyright (c) 1997-2016 The PHP Group
Zend Engine v2.6.0, Copyright (c) 1998-2016 Zend Technologies

# Mac自带php-fpm
➜  ~ /usr/sbin/php-fpm -v
PHP 5.6.24 (fpm-fcgi) (built: Aug  8 2016 16:58:54)
Copyright (c) 1997-2016 The PHP Group
Zend Engine v2.6.0, Copyright (c) 1998-2016 Zend Technologies
➜  ~
下面先来看下php-fpm的配置文件,路径在/usr/local/etc/php/7.0/php-fpm.conf, 大家应该都猜的到。我们主要看下pid和log文件会放在哪里
 13 [global]
 14 ; Pid file
 15 ; Note: the default prefix is /usr/local/var
 16 ; Default Value: none
 17 ;pid = run/php-fpm.pid
 18
 19 ; Error log file
 20 ; If it's set to "syslog", log is sent to syslogd instead of being written
 21 ; in a local file.
 22 ; Note: the default prefix is /usr/local/var
 23 ; Default Value: log/php-fpm.log
 24 ;error_log = log/php-fpm.log
自己看下上面的信息,去掉17行和24行前面的分号,使用php-fpm -t测试下配置是否正确,按提示信息是不管它也可以,默认就是在/usr/local/var路径下的,不过还是设置下吧;
➜  7.0 php-fpm -t
[24-Oct-2016 11:20:31] NOTICE: configuration file /usr/local/etc/php/7.0/php-fpm.conf test is successful
php-fpm的一些管理:
#测试php-fpm配置
php-fpm -t

#启动php-fpm
php-fpm -D

#关闭php-fpm
kill -INT `cat /usr/local/var/run/php-fpm.pid`

#重启php-fpm
kill -USR2 `cat /usr/local/var/run/php-fpm.pid`

#也可以用上文提到的brew命令来管理php-fpm
brew services start|stop|restart php70

#还可以用这个命令来管理php-fpm
php70-fpm start|stop|restart
启动php-fpm之后,确保它正常运行监听9000端口:
➜  ~ lsof -Pni4 | grep LISTEN | grep php
php-fpm   18381  zjp    8u  IPv4 0xbca78421d968b30f      0t0  TCP 127.0.0.1:9000 (LISTEN)
php-fpm   18382  zjp    0u  IPv4 0xbca78421d968b30f      0t0  TCP 127.0.0.1:9000 (LISTEN)
php-fpm   18383  zjp    0u  IPv4 0xbca78421d968b30f      0t0  TCP 127.0.0.1:9000 (LISTEN)
安装Nginx
和前面一样先brew search nginx查找nginx, 看下信息brew info nginx
然后安装brew install nginx
安装信息记录下,用的到:
➜  ~ brew install nginx
==> Auto-updated Homebrew!
Updated 1 tap (homebrew/core).
==> New Formulae
gitless
==> Updated Formulae
fzf                                                                                    gammu

==> Downloading https://homebrew.bintray.com/bottles/nginx-1.10.2.sierra.bottle.tar.gz
######################################################################## 100.0%
==> Pouring nginx-1.10.2.sierra.bottle.tar.gz
==> Using the sandbox
==> Caveats
Docroot is: /usr/local/var/www

The default port has been set in /usr/local/etc/nginx/nginx.conf to 8080 so that
nginx can run without sudo.

nginx will load all files in /usr/local/etc/nginx/servers/.

To have launchd start nginx now and restart at login:
  brew services start nginx
Or, if you don't want/need a background service you can just run:
  nginx
==> Summary
Nginx启动关闭命令:
#测试配置是否有语法错误
nginx -t

#打开 nginx
sudo nginx

#重新加载配置|重启|停止|退出 nginx
nginx -s reload|reopen|stop|quit
好了,来跑下nginx
sudo nginx
到这里为止,我们已经安装完了mysql php nginx, 在安装php的时候添加了--with-mysql, 所以php操作mysql是没有问题的,现在我们就要配置nginx,让它监听php-fpm的进程,这样当用户打开浏览器访问的时候,身为反向代理的nignx就能把东西让php去执行了。
接下来,我们要配置nginx.conf文件,创建一个php-fpm文件(监听php-fpm), 还要约定下将nginx.pid文件,log日志,以及以后我们要配置的站点.conf的路径,我们的路径约定还是按照brew默认的目录来设置,如下:
# nginx.conf,已经被创建好了,我们一会要更改下
/usr/local/etc/nginx/nginx.conf

# php-fpm,这个我们就放在和nginx.conf一样的路径下吧,这个要我们自己创建
/usr/local/etc/nginx/php-fpm

# 日志文件放在/usr/local/var/log/nginx中,默认已经有了access.log和error.log文件了
/usr/local/var/log/nginx/

# nginx.pid文件,放在/usr/local/var/run/下面,和php-fpm.pid放一堆
/usr/local/var/run/

# 以后要配置的站点.conf, 我们就放在/usr/local/etc/nginx/servers/下面,这个servers文件夹本身就存在的
/usr/local/etc/nginx/servers/

# 站点的根目录,也就用brew给我们设置的吧
/usr/local/var/www/
我不知道大家是怎么来定义路径的,我的智商不咋的,记性非常的差,一般我都用brew安装软件,所以用brew默认的路径,我能方便的找到我的文件。
下面我们先来修改nginx.conf, 用vim打开,把下面的信息覆盖nginx.conf, vim /usr/local/etc/nginx/nginx.conf, 如果你不习惯vim, 那就用sublime打开吧subl /usr/local/etc/nginx/nginx.conf
worker_processes  1;

error_log   /usr/local/var/log/nginx/error.log debug;
pid        /usr/local/var/run/nginx.pid;

events {
    worker_connections  256;
}


http {
    include       mime.types;
    default_type  application/octet-stream;

    log_format  main  '$remote_addr - $remote_user [$time_local] "$request" '
                      '$status $body_bytes_sent "$http_referer" '
                      '"$http_user_agent" "$http_x_forwarded_for"';

    access_log  /usr/local/var/log/nginx/access.log  main;

    sendfile        on;
    keepalive_timeout  65;
    port_in_redirect off;

    include /usr/local/etc/nginx/servers/*;
}
接下来,将下面的信息放入到php-fpm文件中,vim /usr/local/etc/nginx/php-fpm
ok, 下面就能配置站点了,先到```/usr/local/var/www```目录下建立站点根目录,就叫做default吧,然后在里面建立个info.php,内容就放phpinfo()函数就行.
```bash
mkdir /usr/local/var/www/default
vi /usr/local/var/www/default/info.php #输入
最后,去创建站点.conf文件
/usr/local/etc/nginx/servers/default.conf
输入下面的内容
server {
    listen       80;
    server_name  localhost;
    root         /usr/local/var/www/default;

    access_log  /usr/local/var/log/nginx/default.access.log  main;

    location / {
        index  index.html index.htm index.php;
        autoindex   on;
        include     /usr/local/etc/nginx/php-fpm;
    }

    error_page  404     /404.html;
    error_page  403     /403.html;
}

测试下配置文件
```bash
➜  servers sudo nginx -t
nginx: the configuration file /usr/local/etc/nginx/nginx.conf syntax is ok
nginx: configuration file /usr/local/etc/nginx/nginx.conf test is successful
然后开启php-fpm,已经开启的就不用开了
php-fpm -D
开启nginx服务
sudo nginx # 已经开启的用sudo nginx -s reload 重启下
浏览器打开http://localhost/info.php测试下
别名
上面的php-fpm关闭和重启的命令有点长,我们给它做个别名,在你的个人主目录下先建立一个.aliases文件,然后放入下面的内容
alias fpm.start='php-fpm -D'
alias fpm.stop='kill -INT `cat /usr/local/var/run/php-fpm.pid`'
alias fpm.restart='kill -USR2 `cat /usr/local/var/run/php-fpm.pid`'
alias fpm.status='lsof -Pni4 | grep LISTEN | grep php-fpm'
然后
echo 'source ~/.aliases' >> ~/.zshrc
source ~/.zshrc
本文结束。


