这是一篇对webpack的使用介绍,里面的内容多是依据官网例子写出的,如有问题,欢迎指出。
参考:
https://segmentfault.com/a/1190000008159877
http://webpack.github.io/docs/
1、webpack介绍:
webpack是一种模块加载器兼打包工具,它能把各种资源,例如JS(含JSX)、coffee、样式(含less/sass)、图片等都作为模块来使用和处理。
- 优势是:
- webpack 是以 commonJS 的形式来书写脚本滴,但对 AMD/CMD 的支持也很全面,方
便旧项目进行代码迁移。 - 能被模块化的不仅仅是 JS 了。
- 开发便捷,能替代部分 grunt/gulp 的工作,比如打包、压缩混淆、图片转base64等。
- 扩展性强,插件机制完善
更多信息,请访问webpack官网

2、webpack的使用
a、安装webpack
npm i -g webpack
b-1、直接使用CommonJS规范来打包模块
这里我们使用官网的一个栗子
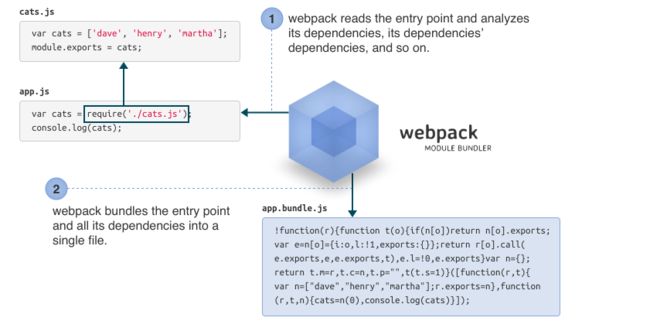
cats.js
var cats = ['dave', 'henry', 'martha'];
module.exports = cats;
app.js (Entry Point)
cats = require('./cats.js');
console.log(cats);
简单使用方式:
进入所在目录,直接在命令行输入:
webpack 需要打包的文件 打包后的文件名

b-2 复杂使用
前面的例子是对webpack最简单的使用介绍,接下来开始介绍webpack真正强大的功能,可以转换代码,设置捷径,添加插件等等。
- 一、真实目录
正如官网所言,真实项目中,我们会把不同功能的文件分文件夹放置,以便更好地管理。
Project structure
In real-world webpack projects, we’ll separate the source files from the bundled files by organizing them in folders. For example, we’ll put the source files in src, and bundled files in bin.
Our final project structure will look like this:
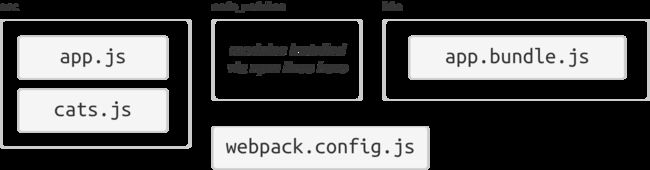
当然,结构不是固定的,这个根据我们实际项目而定。
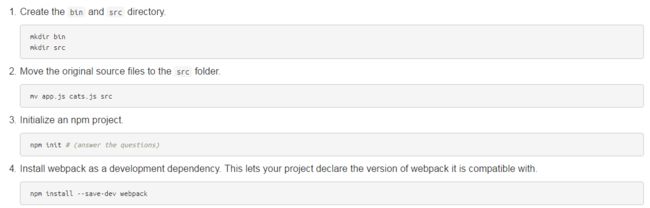
接下来我们把各个文件移到相应目录。
- 二、配置文件
随着我们文件结构,功能要求的复杂化,不可能所有功能都在command line完成,这时我们就需要一个配置表。
1、新建配置表文件webpack.config.js,一般格式如下:
module.exports = {
     entry: './src/app.js',//入口文件
     output: {//输出文件
         path: './bin',
         filename: 'app.bundle.js'
     }
 };
2、接下来我们开始运行,直接在command line输入 webpack即可,这样系统会自动从webpack.config.js开始运行。
然后我们运行后发现报错了。。。

这个错误是什么问题呢?
xxx is not a absolute path!
说明不是绝对路径, 原因是webpack更新以后,写法不同了,官网并没有更新...
---我们稍作修改一下:
const path = require('path');
module.exports = {
    entry: './src/app.js',//入口文件
    output: {//输出文件
        path: path.resolve(__dirname, './bin'),
        filename: 'app.bundle.js'
    }
};
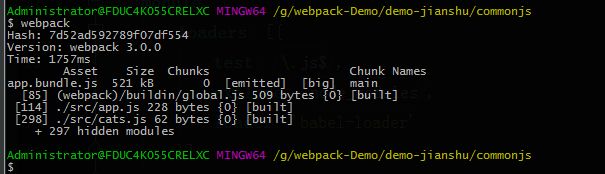
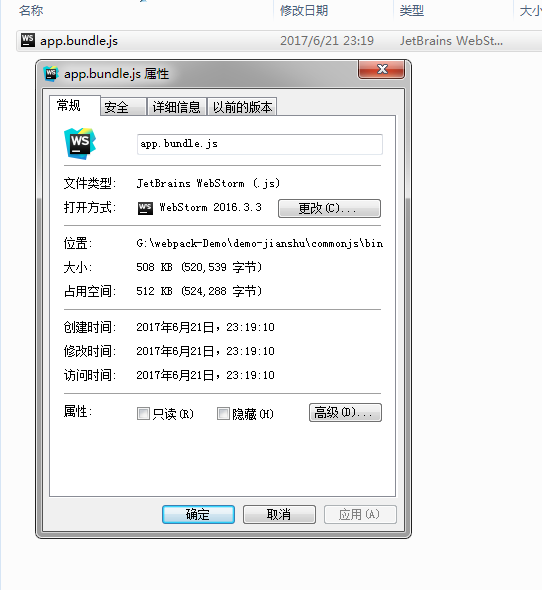
这次终于编译成功了。

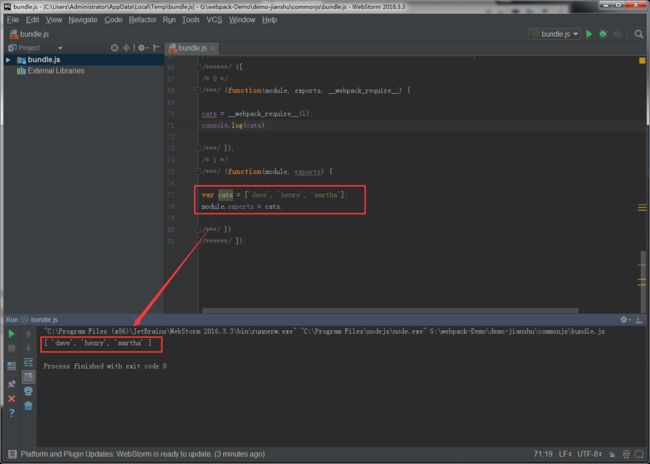
打开app.bundle.js,我们看看到底webpack做了什么。
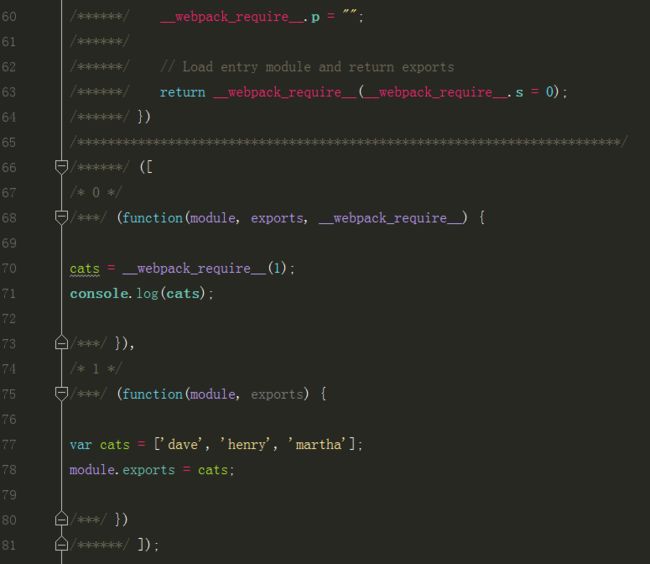
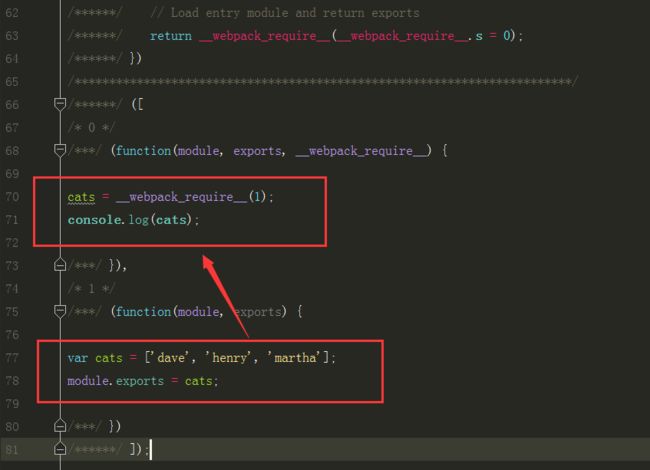
我们发现webpack是把所有依赖包的源文件都导入,再在模块里引用这些依赖包。这就是我们导入一个entry文件发生的事。
- 三、Loaders
Loaders是webpack一个很强大的功能,可以把浏览器原生不支持的代码格式( ES2015, CoffeeScript, TypeScript, etc.)转换成浏览器支持的格式,这样浏览器就可以直接拿来用了。
概括来说有两个目的:
- 1、Identify what files should be transformed by a certain loader. (test property)
- 2、Transform that file so that it can be added to your
dependency graph (and eventually your bundle). (use property)
下面我们以一个es6的简单例子来看看webpack是怎么转换的。
开始使用:
1.Install Babel and the presets:
 npm install --save-dev babel-core
/*babel-core 的作用是把 js 代码分析成 ast ,方便各个插件分析语法进行相应的处理。
有些新语法在低版本 js 中是不存在的,如箭头函数,rest 参数,函数默认值等,
这种语言层面的不兼容只能通过将代码转为 ast,分析其语法后再转为低版本 js。
首先安装 babel-core。*/
你或许已经注意到了,目前为止通过运行 Babel 自己我们并没能“翻译”代码,而仅仅是把代码从一处拷贝到了另一处。
这是因为我们还没告诉 Babel 要做什么。
你可以通过安装插件(plugins)或预设(presets,也就是一组插件)来指示 Babel 去做什么事情。
npm install --save-dev babel-preset-es2015
预设 babel-preset 系列打包了一组插件,类似于餐厅的套餐。如 babel-preset-es2015 打包了 es6 的特性,babel-preset-stage-0 打包处于 strawman 阶段的语法
2.Install babel-loader:
npm install --save-dev babel-loader
3.Configure Babel to use these presets by adding .babelrc
{ "presets": [ "es2015" ] }//告诉webpack转码规则是es2015
4.Modify webpack.config.js to process all .js files using babel-loader.
const path = require('path');
module.exports = {
    entry: './src/app.js',
    output: {
        path: path.resolve(__dirname, './bin'),
        filename: 'app.bundle.js',
    },
    module: {
        loaders: [{
            test: /\.js$/,
            exclude: /node_modules/,
            loader: 'babel-loader'
        }]
    }
We are excluding node_modules here because otherwise all external libraries will also go through Babel, slowing down compilation.
5.Install the libraries you want to use (in this example, jQuery):
npm install --save jquery babel-polyfill
We are using --save instead of --save-dev this time, as these libraries will be used in runtime. We also use babel-polyfill so that ES2015 APIs are available in older browsers.
6.Edit src/app.js:
import 'babel-polyfill';//import是es6语法
import cats from './cats';
import $ from 'jquery';//jquery是我们在polyfill导进来的
$('Cats
').appendTo('body');
const ul = $('
').appendTo('body');
for (const cat of cats) {
$('').text(cat).appendTo(ul);
}
7.Bundle the modules using webpack:
webpack
8.Add index.html so this app can be run in browser:
运行结果,登登登登

- 四、plugin
webpack的功能可不止转换代码这么简单,还可以通过plugin实现各种各样的功能,下面演示一下通过plugin来压缩代码
这是我们刚刚创建的文件。
配置webpack.config.js
const path = require('path');
const webpack = require('webpack');

module.exports = {
    entry: './src/app.js',
    output: {
        path: path.resolve(__dirname, './bin'),
        filename: 'app.bundle.js',
    },
    module: {
        loaders: [{
            test: /\.js?$/,
            exclude: /node_modules/,
            loader: 'babel-loader',
        }]
    },
    plugins: [
        new webpack.optimize.UglifyJsPlugin({
            compress: {
                warnings: false,
            },
            output: {
                comments: false,
            },
        }),
    ]
}
The Uglify plugin 是webpack内置的,不需要另外添加模块
压缩后,deng、deng、deng、deng~!!
