一、沙盒机制
沙盒机制
- 每一个应用程序都会拥有一个应用程序沙盒
- 应用程序沙盒就是一个文件系统目录
iOS中的沙盒机制
- 沙盒是一种安全体系
- TA规定了应用程序只能在为该程序创建的文件夹(沙盒)内访问文件,不可以访问其他沙盒内的内容(iOS8已经部分开放访问)
- 所有的非代码文件都保存在这个地方,比如图片、音乐、属性列表(plist)、sqlite数据库和文本文件等
沙盒机制的特点
- 每个应用程序的活动范围都限定在自己的沙盒里面
- 不能随意跨越自己的沙盒去访问别的应用程序沙盒中的内容(iOS已经部分开放访问)
- 应用程序向外请求或接受数据都需要经过权限认证
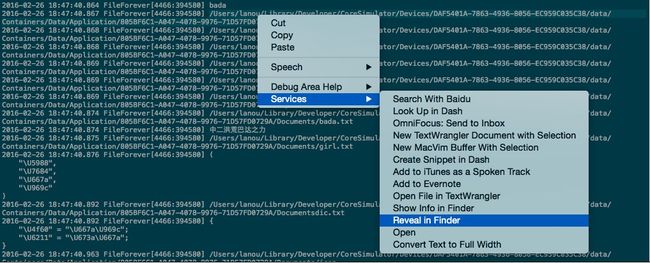
前往沙盒路径方法
- 选中要前往的路径,右键
- 选中Services选项
-
点击Reveal in Finder
沙盒中的文件夹
- Documents:保存应用运行时生成的需要持久化的数据,iTunes会自动备份该目录
- Library:存储程序的默认设置和其他状态信息,iTunes会自动备份该目录。
- Library/Caches:存放缓存文件,iTunes不会备份此目录,次目录下文件不会在应用退出删除。
- Library/Preferences:保存应用的所有偏好设置,iOS的Settings(设置)应用会在该目录中查找应用的设置信息,iTunes会自动备份该目录。注意:你不会直接创建偏好设置文件,二十应该使用NSUserDefaults类来获得和设置应用程序的偏好
- tmp:保存应用运行时所需的临时数据,使用完毕后再将相应的文件从该目录删除。应用没有运行时,系统也有可能会清楚该目录下的文件,iTunes不会同步该目录。iphone重启时,该目录下的文件会被删除
获取Documents目录
NSString *path = [[NSString NSSearchPathForDirectoriesInDomains(NSDocumentDirectory, NSUserDomainMask, YES) firstObject];
获取tmp目录
NSString *tmpPath = NSTemporaryDirectory();
获取Library目录
NSString *libPath = [[NSSearchPathForDirectoriesInDomains(NSLibraryDirectory, NSUserDomainMask, YES) firstObject];
获取Library/Caches目录
NSString *cachePath = [[NSSearchPathForDirectoriesInDomains(NSCachesDirectory,NSUserDomainMask, YES) firstObject];
获取Library/Preferences目录
NSString *libPath = [[NSSeachForPathDirectoriesInDomains(NSLibraryDirectory, NSUserDomainMask, YES) firstObject];
NSString *prePath = [libPath stringByAppendingPathComponent:@"Preferences"];
应用程序包所在位置
NSString *path = [NSBundle mainBundle].resourcePth;
二、简单对象的读写(I/O)操作
iOS中提供4种类型可以直接进行文件存取
NSString、NSArray、NSDictionary、NSData
以上类型包含子类
字符串写入沙盒
// 在Documents下面创建一个文本路径,假设文本名称为bada.txt
NSString *txtPath = [docPath stringByAppendingPathComponent:@"bada.txt"];// 此时仅存在路径,文件并没有真实存在
NSString *string = @"中二洪荒巴达之力";
[string writeToFile:txtPath atomically:YES encoding:NSUTF8StringEncoding error:nil];// 字符串写入时执行的代码
NSLog(@"%@", txtPath);
从文件中读取字符串的方法
NSString *resultString = [NSString stringWithContentsOfFile:txtPath encoding:NSUTF8StringEncoding error:nil];
NSLog(@"%@", resultString);
数组写入文件
// 创建一个存储数组的文件路径
NSString *filePath = [docPath stringByAppendingPathComponent:@"girl.txt"];
NSArray *arr = @[@"妈", @"的", @"智", @"障"];
[arr writeToFile:filePath atomically:YES];
NSLog(@"%@", filePath);
从文件中读取数组的方法
NSArray *resultArr = [NSArray arrayWithContentsOfFile:filePath];
NSLog(@"%@", resultArr);
字典写入文件
NSString *dicPath = [docPath stringByAppendingString:@"dic.txt"];
NSDictionary *dic = @{@"你" : @"智障", @"我" : @"机智"};
[dic writeToFile:dicPath atomically:YES];
NSLog(@"%@", dicPath);
从文件中读取字典
NSDictionary *resultDic = [NSDictionary dictionaryWithContentsOfFile:dicPath];
NSLog(@"%@", resultDic);
NSData写入文件
NSString *dataPath = [docPath stringByAppendingPathComponent:@"icon"];
// 得到一个UIImage对象
UIImage *image = [UIImage imageNamed:@"icon.jpg"];
// 将UIImage对象转换成NSData对象
NSData *data = UIImageJPEGRepresentation(image, 1.0);
[data writeToFile:dataPath atomically:YES];
NSLog(@"%@", dataPath);
从文件中读取NSData文件
NSData *resultData = [NSData dataWithContentsOfFile:dataPath];
// 将得到的NSData数据转换为原有的图片对象
UIImage *resultImage = [UIImage imageWithData:resultData];
// 显示图片
UIImageView *imageView = [[UIImageView alloc ] initWithFrame:CGRectMake(0, 0, self.view.frame.size.width, self.view.frame.size.height)];
imageView.image = resultImage;
[self.view addSubview:imageView];
以上的运行结果都可以从沙盒路径中的文件夹中看到
三、文件管理器与文件对接器
- 文件管理器(NSFileManager):此类主要是对文件进行的操作(创建/从删除/改名等)以及文件信息的获取
- 文件连接器(NSFileHandle):此类主要是对内容进行读取和写入操作
文件管理器的使用
创建文件夹
- (IBAction)createDirectory:(UIButton *)sender
{
    // 1.找到Caches的路径
    NSString *cachePath = [NSSearchPathForDirectoriesInDomains(NSCachesDirectory, NSUserDomainMask, YES) firstObject];
    // 2.获取创建的文件夹的路径
    NSString *directoryPath = [cachePath stringByAppendingPathComponent:@"downloadImages"];
    // 3.创建文件夹需要一个文件管理对象(单例)
    NSFileManager *fileManager = [NSFileManager defaultManager];
    // 4.创建文件夹
    [fileManager createDirectoryAtPath:directoryPath withIntermediateDirectories:YES attributes:nil error:nil];

    NSLog(@"%@", directoryPath);
}
创建文件以及获取文件信息
- (IBAction)createFile:(UIButton *)sender
{
    // 1.得到Documents的路径
    NSString *docPath = [NSSearchPathForDirectoriesInDomains(NSDocumentDirectory, NSUserDomainMask, YES) firstObject];
    // 2.创建一个文件路径
    NSString *filePath = [docPath stringByAppendingPathComponent:@"qiuxiang.txt"];
    // 3.创建文件首先需要一个文件管理对象
    NSFileManager *fileManager = [NSFileManager defaultManager];
    // 4.创建文件
    [fileManager createFileAtPath:filePath contents:[@"badaas;ldkjf;alskdjf;akjdsf;lakjsdflakjsd;flkajsdlfkjasdlfkjasldfkja;lsdfkjasldkjf;asldkfj;asfjas;ldkfjasldkfjasldkfja;lsdkfjasl;dkjfs;ladkfja;sdkfjalsdkfjalsdfkja;sdfkja;dfkja;slfkdjsalkfja;slfkja;slkdfj" dataUsingEncoding:NSUTF8StringEncoding] attributes:nil];

    NSLog(@"%@", filePath);

    // 获取默认文件或者某个文件夹的大小
    NSDictionary *dic = [fileManager attributesOfItemAtPath:filePath error:nil];
    NSLog(@"%@", dic);
    NSNumber *number = [dic objectForKey:NSFileSize];
    NSLog(@"%@", number);
}
文件移动
/**
    在Documents文件夹下,创建一个文件夹(path),在该文件夹下创建一个文件(test.txt),将一个图片对象存入到该文件中,然后在Caches文件夹下创建一个文件夹名为"testDirectroy",将test.txt文件移动到这个文件夹下.
 */


// 创建文件夹
NSString *docPath = [NSSearchPathForDirectoriesInDomains(NSDocumentDirectory, NSUserDomainMask, YES) firstObject];
NSString *dirPath = [docPath stringByAppendingPathComponent:@"path"];
NSFileManager *fileManager = [NSFileManager defaultManager];
[fileManager createDirectoryAtPath:dirPath withIntermediateDirectories:YES attributes:nil error:nil];

// 创建文件
NSString *filePath = [dirPath stringByAppendingPathComponent:@"test.txt"];
[fileManager createFileAtPath:filePath contents:nil attributes:nil];

// 将图片对象存入到该文件中
UIImage *image = [UIImage imageNamed:@"icon.jpg"];
NSData *data = UIImageJPEGRepresentation(image, 1.0);
[data writeToFile:filePath atomically:YES];
NSLog(@"%@", filePath);

// 移动文件
NSString *desPath = [docPath stringByAppendingPathComponent:@"test.txt"];
[fileManager moveItemAtPath:filePath toPath:desPath error:nil];
文件对接器的使用
/**
     练习要求:从一个文件中指定的位置开始追加内容
     提示:
     1、在documents目录下创建一个test.txt文件,文件中的内容为"abcdefg"
     2、从文件偏移量为3那个位置开始追加内容"1234"
 */

- (void)change
{
    // 1.获取Documents路径
    NSString *docPath = [NSSearchPathForDirectoriesInDomains(NSDocumentDirectory, NSUserDomainMask, YES) lastObject];
    // 2.创建文件路径
    NSString *filePath = [docPath stringByAppendingPathComponent:@"text.txt"];
    // 3.使用文件管理对象创建文件
    NSFileManager *fileManager = [NSFileManager defaultManager];
    [fileManager createFileAtPath:filePath contents:[@"abcdefg" dataUsingEncoding:NSUTF8StringEncoding] attributes:nil];
    // 4.创建文件对接对象
    NSFileHandle *handle = [NSFileHandle fileHandleForUpdatingAtPath:filePath];// 文件对象此时针对文件,可读可写
    // 5.将偏移量移动到3的位置
    [handle seekToFileOffset:3];
    // 6.写入数据
    [handle writeData:[@"1234" dataUsingEncoding:NSUTF8StringEncoding]];
    // 7.执行完操作后,关闭文件
    [handle closeFile];

    NSLog(@"%@", filePath);
}
PS:这个题目有点坑爹,说是追加,其实是把defg替换成1234.
四、复杂对象的读写(I/O)操作
复杂对象:在Foundation框架内不存在的数据类,如自定义的Person类无法在程序内通过writeToFile:这个方法写入到文件内
- 如何将复杂对象写入文件
- 归档:只能通过将复杂对象转换为NSData,然后写入文件。
- 如何从文件中读取复杂对象
- 反归档(又称解档):将NSData转换为复杂对象
①.复杂对象写入文件的过程:复杂对象->归档->NSData->writeToFile
②.从文件中读取出复杂对象过程:读取文件->NSData->反归档->复杂对象
归档与反归档
首先,复杂对象所属的类要遵守
@interface Person : NSObject

@property (copy, nonatomic) NSString *name;
@property (copy, nonatomic) NSString *age;
@property (copy, nonatomic) NSString *gender;

- (instancetype)initWithName:(NSString *)name age:(NSString *)age gender:(NSString *)gender;

@end
然后实现其中的两个方法
// NSCoder是iOS中的编码解码类
// 归档时调用
- (void)encodeWithCoder:(NSCoder *)aCoder
{
    [aCoder encodeObject:self.name forKey:@"name"];
    [aCoder encodeObject:self.age forKey:@"age"];
    [aCoder encodeObject:self.gender forKey:@"gender"];
}

// 解档时调用
- (id)initWithCoder:(NSCoder *)aDecoder
{
    NSString *name = [aDecoder decodeObjectForKey:@"name"];
    NSString *age = [aDecoder decodeObjectForKey:@"age"];
    NSString *gender = [aDecoder decodeObjectForKey:@"gender"];
    return [self initWithName:name age:age gender:gender];
}
进行归档或者反归档
// 归档
- (IBAction)archiver:(id)sender {
    // 创建两个人
    Person *bada = [[Person alloc] initWithName:@"bada" age:@"18" gender:@"男"];
    Person *qiuxiang = [[Person alloc] initWithName:@"qiuxiang" age:@"18" gender:@"女"];

    // 获取到Documents路径
    NSString *docPath = [NSSearchPathForDirectoriesInDomains(NSDocumentDirectory, NSUserDomainMask, YES) firstObject];

    // iOS中的归档类是NSKeyeArchiver,作用是:将复杂对象转换为NSData对象
    // 创建一个可变数据对象
    NSMutableData *mData = [NSMutableData data];
    NSKeyedArchiver *archiver = [[NSKeyedArchiver alloc] initForWritingWithMutableData:mData];
    // 归档时要给归档对象添加标记
    [archiver encodeObject:bada forKey:@"bada"];
    [archiver encodeObject:qiuxiang forKey:@"qiuxiang"];
    // 结束归档,不管还有多少未归档的对象,都不会执行归档操作
    [archiver finishEncoding];

    // 将数据写入文件
    // 创建文件路径
    NSString *filePath = [docPath stringByAppendingPathComponent:@"bada.qiuxiang"];
    [mData writeToFile:filePath atomically:YES];

    NSLog(@"归档");
}

// 反归档
- (IBAction)unarchiver:(id)sender {
    // 获取存放数据的路径
    NSString *docPath = [NSSearchPathForDirectoriesInDomains(NSDocumentDirectory, NSUserDomainMask, YES) firstObject];
    NSString *filePath = [docPath stringByAppendingPathComponent:@"bada.qiuxiang"];
    // 从路径中获取NSData对象
    NSData *data = [NSData dataWithContentsOfFile:filePath];

    // iOS中的解档类是NSKeyedUnarchiver,作用是:将NSData对象还原成原本的复杂对象
    NSKeyedUnarchiver *unarchiver = [[NSKeyedUnarchiver alloc] initForReadingWithData:data];

    // 解档
    Person *bada = [unarchiver decodeObjectForKey:@"bada"];
    NSLog(@"name is %@, age is %@, gender is %@ 解档成功", bada.name, bada.age, bada.gender);
}
