源码
GitHub:https://github.com/iamoldli/NetModular
演示地址
地址:https://nm.iamoldli.com
账户:admin
密码:admin
前端框架演示地址(临时)
地址:http://nm.demo.iamoldli.com/index.html
账户:admin
密码:admin
目录
1、开篇
2、快速创建一个业务模块
3、数据访问模块介绍
4、模块化实现思路
获取官方源码
为了方便查看源码,我们先获取下官方的源码
下载 AspNetCore 源码
git clone --recursive https://github.com/aspnet/AspNetCore
下载 Extensions 源码
git clone https://github.com/aspnet/Extensions.git
ASP.NET Core控制器的加载机制
参考文档:ASP.NET Core 中的应用程序部件
在ASP.NET Core中通过应用程序部件ApplicationPart来发现控制器、视图组件或标记帮助程序等 MVC 功能,应用程序部件是由ApplicationPartManager类来管理。当调用AddMvc或者AddMvcCore方法添加MVC相关功能时,ASP.NET Core内部会创建ApplicationPartManager的实例,然后以入口程序集为起点,查找其依赖项树中的所有非官方包的程序集,并添加到它的ApplicationParts属性中,最后将ApplicationPartManager的实例以单例模式注入到容器中。下面是相关的源码:
源码路径:AspNetCore\src\Mvc.Core\src\DependencyInjection\MvcCoreServiceCollectionExtensions.cs
public static IMvcCoreBuilder AddMvcCore(this IServiceCollection services)
{
    if (services == null)
    {
        throw new ArgumentNullException(nameof(services));
    }

    var partManager = GetApplicationPartManager(services);
    //单例模式注入ApplicationPartManager
    services.TryAddSingleton(partManager);

    ConfigureDefaultFeatureProviders(partManager);
    ConfigureDefaultServices(services);
    AddMvcCoreServices(services);

    var builder = new MvcCoreBuilder(services, partManager);

    return builder;
}

//获取ApplicationPartManager实例
private static ApplicationPartManager GetApplicationPartManager(IServiceCollection services)
{
    var manager = GetServiceFromCollection(services);
    if (manager == null)
    {
        manager = new ApplicationPartManager();

        var environment = GetServiceFromCollection(services);
        var entryAssemblyName = environment?.ApplicationName;
        if (string.IsNullOrEmpty(entryAssemblyName))
        {
            return manager;
        }


        manager.PopulateDefaultParts(entryAssemblyName);
    }

    return manager;
}
源码路径:AspNetCore\src\Mvc.Core\src\ApplicationParts\ApplicationPartManager.cs
internal void PopulateDefaultParts(string entryAssemblyName)
{
    var entryAssembly = Assembly.Load(new AssemblyName(entryAssemblyName));
    var assembliesProvider = new ApplicationAssembliesProvider();

    //加载入口程序集的依赖项树中的所有非官方包的依赖程序集
    var applicationAssemblies = assembliesProvider.ResolveAssemblies(entryAssembly);

    foreach (var assembly in applicationAssemblies)
    {
        var partFactory = ApplicationPartFactory.GetApplicationPartFactory(assembly);
        foreach (var part in partFactory.GetApplicationParts(assembly))
        {
            ApplicationParts.Add(part);
        }
    }
}
因为我们的所有模块都是通过nuget包安装的,所以在编译时会自动引入到依赖项树中,也就是说,我们不需要手动加载模块中的程序集。
对于在编译时未引用的程序集,我们可以通过应用程序部件来手动加载
// create an assembly part from a class's assembly
var assembly = typeof(Startup).GetTypeInfo().Assembly;
services.AddMvc()
    .AddApplicationPart(assembly);

// OR
var assembly = typeof(Startup).GetTypeInfo().Assembly;
var part = new AssemblyPart(assembly);
services.AddMvc()
    .ConfigureApplicationPartManager(apm => apm.ApplicationParts.Add(part));
模块的加载机制
NetModular的规则是在项目启动时,查找程序根目录下的modules目录,该目录专门用于保存所有模块的信息,它的结构如下:
modules目录下的每个子目录表示一个模块,每个子目录里面都有一个module.json文件,该文件用于描述模块信息,其结构如下:
{"Id": "Admin","Name":"权限管理","Version":"1.0.0"}- Note:
module.json文件是在模块编译的时候自动生成并打包进Nuget包,当安装模块时会自动包含在项目中。这里用到了MSBuild,有兴趣的可以看看。 *
以下是生成module.json文件对应的配置信息
    modules\$(Id)
    {"Id": "$(Id)","Name":"$(Name)","Version":"$(Version)"}


      true
      contentFiles\any\any\$(ModulesDir)
      true
      PreserveNewest
      Modules\$(Id)\%(RecursiveDir)%(FileName)%(Extension)
NetModular定义了一个描述模块信息的ModuleInfo.cs类和一个保存模块信息的IModuleCollection.cs接口
///
/// 模块信息
///
public class ModuleInfo
{
    ///
    /// 编号
    ///
    public string Id { get; set; }

    ///
    /// 名称
    ///
    public string Name { get; set; }

    ///
    /// 版本
    ///
    public string Version { get; set; }

    ///
    /// 模块初始化器
    ///
    public IModuleInitializer Initializer { get; set; }

    ///
    /// 程序集信息
    ///
    public ModuleAssembliesInfo AssembliesInfo { get; set; }
}

///
/// 模块集合
///
public interface IModuleCollection : IList
{

} IModuleCollection有一个实现类ModuleCollection.cs,在该类的构造函数中执行加载模块列表的操作:
public ModuleCollection()
{
    var moduleJsonFiles = Directory.GetFiles(Path.Combine(AppContext.BaseDirectory, "modules"), "module.json", SearchOption.AllDirectories);

    foreach (var file in moduleJsonFiles)
    {
        var moduleInfo = JsonConvert.DeserializeObject(File.ReadAllText(file));
        if (moduleInfo != null)
        {
            //判断是否已存在
            if (_moduleInfos.Any(m => m.Name.Equals(moduleInfo.Name)))
                continue;
            var assemblyHelper = new AssemblyHelper();
            //此处默认模块命名空间前缀与当前项目相同
            moduleInfo.AssembliesInfo = new ModuleAssembliesInfo
            {
                Domain = assemblyHelper.Load(m => m.Name.EndsWith("Module." + moduleInfo.Id + ".Domain")).FirstOrDefault(),
                Infrastructure = assemblyHelper.Load(m => m.Name.EndsWith("Module." + moduleInfo.Id + ".Infrastructure")).FirstOrDefault(),
                Application = assemblyHelper.Load(m => m.Name.EndsWith("Module." + moduleInfo.Id + ".Application")).FirstOrDefault(),
                Web = assemblyHelper.Load(m => m.Name.EndsWith("Module." + moduleInfo.Id + ".Web")).FirstOrDefault(),
            };

            Check.NotNull(moduleInfo.AssembliesInfo.Domain, moduleInfo.Id + "模块的Domain程序集未发现");
            Check.NotNull(moduleInfo.AssembliesInfo.Infrastructure, moduleInfo.Id + "模块的Infrastructure程序集未发现");
            Check.NotNull(moduleInfo.AssembliesInfo.Application, moduleInfo.Id + "模块的Application程序集未发现");
            Check.NotNull(moduleInfo.AssembliesInfo.Web, moduleInfo.Id + "模块的Web程序集未发现");

            //加载模块初始化器
            var moduleInitializerType = moduleInfo.AssembliesInfo.Web.GetTypes().FirstOrDefault(t => typeof(IModuleInitializer).IsAssignableFrom(t));
            if (moduleInitializerType != null && (moduleInitializerType != typeof(IModuleInitializer)))
            {
                moduleInfo.Initializer = (IModuleInitializer)Activator.CreateInstance(moduleInitializerType);
            }

            Add(moduleInfo);
        }
    }
} 当项目启动时,首先创建ModuleCollection的实例,在它的构造函数中会加载所有模块信息,然后使用单例模式注入,这样就可以在系统中随时取用模块信息了。
///
/// 添加模块
///
///
///
/// (modules);
var cfgHelper = new ConfigurationHelper();
var cfg = cfgHelper.Load("module", env.EnvironmentName, true);
//通用配置
services.Configure(cfg);
foreach (var module in modules)
{
if (module == null)
continue;
services.AddApplicationServices(module);
if (module.Initializer != null)
{
module.Initializer.ConfigureServices(services);
module.Initializer.ConfigOptions(services, cfg.GetSection(module.Id));
services.AddSingleton(module);
}
}
return modules;
} 模块中的依赖注入和中间件处理
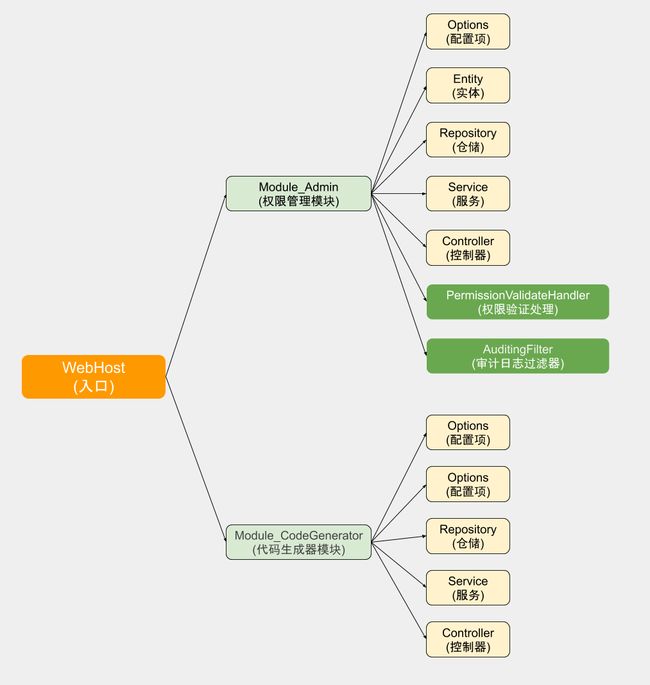
先看一下一个模块中包含哪些信息:
模块中的注入分为两类:
1、约定的
每个模块中都有配置项(Options)、实体(Entity)、仓储(Repository)、数据库上下文(DbContext)、工作单元(UnitOfWork)、服务(Service),他们都是约定好的,包括命名、目录、用法等,所以使用者只需要按照规则去使用即可,不需要关心注入的事情,它们在系统中是自动注入的。
以数据访问为例,数据访问相关的仓储(Repository)、数据库上下文(DbContext)、工作单元(UnitOfWork)是根据配置信息和模块来自动进行注入的,同时都是以Scoped方式注入。具体代码查看Data.AspNetCore项目。
2、自定义的
每个模块都可能会有一些独有的需要注入的服务,那么这些服务是属于自定义的,需要开发者自己手动注入。比如
权限管理(Admin)模块中的权限验证处理(PermissionValidateHandler.cs),该类实现IPermissionValidateHandler接口,专门用于做权限验证功能。
除了注入以外,每个模块还有独有的中间件以及对某些功能的特殊配置,为了把这些信息一起集成到项目中,NetModular抽象了一个IModuleInitializer接口,该接口包括以下四个方法:
///
/// 模块初始化器接口
///
public interface IModuleInitializer
{
    ///
    /// 注入服务
    ///
    ///
    void ConfigureServices(IServiceCollection services);

    ///
    /// 配置中间件
    ///
    ///
    ///
    void Configure(IApplicationBuilder app, IHostingEnvironment env);

    ///
    /// 配置MVC
    ///
    ///
    void ConfigureMvc(MvcOptions mvcOptions);

    ///
    /// 配置选项
    ///
    ///
    ///
    void ConfigOptions(IServiceCollection services, IConfiguration configuration);
}
方法说明:
1、ConfigureServices:用于注入服务
2、Configure:用于配置中间件
3、ConfigureMvc:用于配置MVC相关功能
4、ConfigOptions:用于配置模块的配置项
在每个模块中,都必须包含一个IModuleInitializer的实现ModuleInitializer,已权限管理(Admin)模块为例:
public class ModuleInitializer : IModuleInitializer
{
    public void ConfigureServices(IServiceCollection services)
    {
        //权限验证服务
        services.AddScoped();
    }

    public void Configure(IApplicationBuilder app, IHostingEnvironment env)
    {
    }

    public void ConfigureMvc(MvcOptions mvcOptions)
    {
        // 审计日志过滤器
        mvcOptions.Filters.Add(typeof(AuditingFilter));
    }

    public void ConfigOptions(IServiceCollection services, IConfiguration configuration)
    {
        // Admin配置项
        services.Configure(configuration);
    }
} 当系统在启动的时候,会在指定的步骤,调用所有模块的对应方法,比如当调用service.AddModules方法时,会遍历模块并注入自定义服务和配置项,
public static IModuleCollection AddModules(this IServiceCollection services, IHostingEnvironment env)
{
    var modules = new ModuleCollection();
    services.AddSingleton(modules);

    var cfgHelper = new ConfigurationHelper();
    var cfg = cfgHelper.Load("module", env.EnvironmentName, true);

    services.Configure(cfg);

    // 遍历模块
    foreach (var module in modules)
    {
        if (module == null)
            continue;

        services.AddApplicationServices(module);

        // 判断IModuleInitializer实现是否存在
        if (module.Initializer != null)
        {
            // 注入服务
            module.Initializer.ConfigureServices(services);

            //配置配置项
            module.Initializer.ConfigOptions(services, cfg.GetSection(module.Id));

            services.AddSingleton(module);
        }
    }

    return modules;
}
至此,模块的所有信息都已集成到了系统当中~
原文首发:ASP.NET Core模块化前后端分离快速开发框架介绍之4、模块化实现思路

