状态
- Idle 闲置状态
- pulling 松开就可以进行刷新的状态
- refreshing 正在刷新状态
初始状态:
![Uploading 屏幕快照 2016-12-02 15.22.13_456523.png . . .]
](http://upload-images.jianshu.io/upload_images/548793-14a0d8a493818200.png?imageMogr2/auto-orient/strip%7CimageView2/2/w/1240)
header:Idle
footer:Idle
header的状态变化
header在拖动中显示出来:
拖拽下拉时使header 开始出现在屏幕上
header 开始出现 -> header 完全出现在屏幕上:Idle -> Pulling
header 完全出现 -> header 部分出现在屏幕上:Pulling -> Idle
拖曳结束时(松手时):
这时是在Pulling状态松手,所以状态由:Pulling -> Refreshing
如果是在Idle状态下松手,状态不改变。
footer的状态变化
将要出现footer,此时footer状态为Idle
footer由开始出现 -> footer完全出现:Idle -> Pulling
footer由完全出现 -> footer部分出现:Pulling -> Idle
拖曳结束时(松手时):
这是在Pulling状态下松的手,所以状态由:Pulling -> Refreshing
如果是在Idle状态下松的手,状态不变。
header和footer的实现
初始位置确定:
从原始状态可以看出:
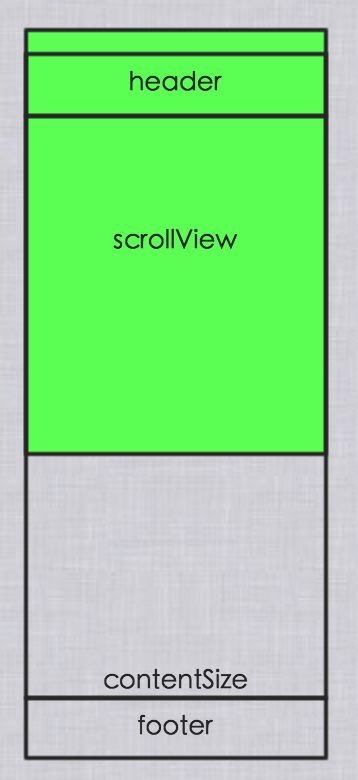
header是scrollView的subView,它的frame.y为-header.frame.height。
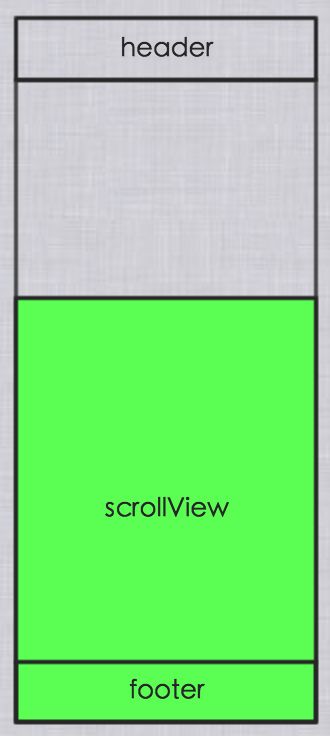
footer也是scrollView的subView,它的frame.y分为两种情况:
- 当
contentSize.height > scrollView.frame.height时,footer.frame.y为contentSize.height - 当
contentSize.height < scrollView.frame.height时,footer.frame.y为scrollView.frame.height
总而言之footer一定在scrollView的下方。
上面是最简单的情况分析,可是现实中往往是下面这样:
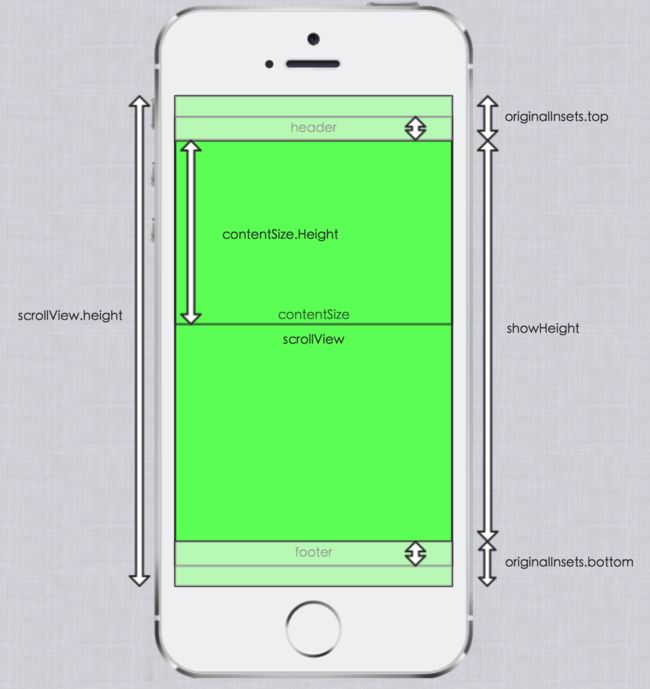
以上的示意图可以设想一下,一个tableViewController嵌入在navigationController中,navigationController又嵌入在tabbarController中。此时tableViewController的tableView的contentInset属性为(64,0,49,0),contentOffset为(0,-64)。64是状态栏加导航栏的高度,49是tabbar的高度。这是tableViewController默认设的一些值。
因此添加footer时要考虑oringinalInsets,把
- 当
contentSize.height < scrollView.frame.height时,footer.frame.y为scrollView.frame.height
改为: - 当
contentSize.height < scrollView.frame.height时,footer.frame.y为scrollView.frame.height - originalInsets.top - originalInsets.bottom
下面临界值的确定都要考虑originalInsets
临界值确定
确定了初始的位置后,要确定状态之间变换的临界线,通过KVO,监听scrollView的contentOffset的变化。
header临界值:
-
contentOffset.y < -originalInsets.top时,才开始显示header -
contentOffset.y <= -originalInsets.top - header.frame.size.height时,才完全显示header
footer的临界值:
当contentSize.height大于showHeight时:
-
contentOffset.y > contentSize.height- showHeight - originalInsets.top时才开始显示footer。 -
contentOffset.y > contentSize.height - showHeight - originalInsets.top + footer.frame.size.height时才完全显示footer
当contentSize.height小于showHeight时:
-
contentOffset.y > -originalInsets.top时就开始显示footer。 -
contentOffset.y > -originalInsets.top + footer.frame.size.height时才完全显示footer。
悬浮状态的实现
header的悬浮
scrollView.contentInsets.top = header.frame.size.height + originalInsets.top
scrollView.contentOffset.y = - (scrollView.contentInsets.top)
header的隐藏
scrollView.contentInset.top = originalInsets.top
scrollView.contentOffset.y = -(scrollView.contentInsets.top)
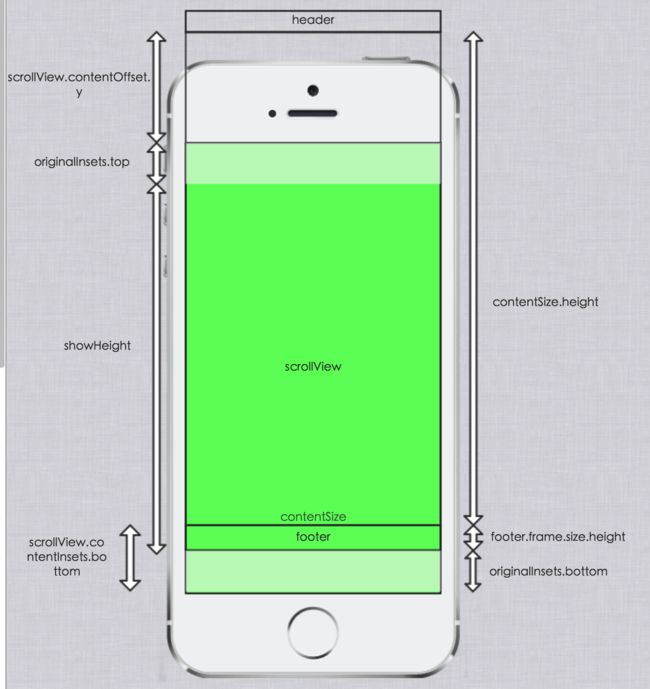
footer的悬浮
当contentSize.height大于showHeight时:
scrollView.contentInsets.bottom = footer.frame.size.height + originalInsets.bottom
scrollView.contentOffset.y = contentSize.height - showHeight - originalInsets.top + footer.frame.size.height
当contentSize.height小于showHeight时:
scrollView.contentInsets.bottom = bottom + showHeight - contentSize.height
可以理解成初始的contentOffset.y为-originalInsets.top,然后向上移动了footer.frame.size.height:
scrollView.contentOffset.y = -originalInsets.top + footer.frame.size.height
```
#####footer的隐藏
```
scrollVIew.contentInsets.bottom = originalInsets.bottom
```
当contentSize.height > showHeight时:
```
scrollView.contentOffset.y = contentSize.height - showHeight - originalInsets.top
```
当contentSize.height < showHeight时:
```
scrollView.conentOffset.y = -originalInsets.top
```
###UIScrollView属性详解:
####坐标系正方向:

####ContentOffset的表示:


####ContentInsets的表示:
contentInsets并不影响contentSize:

contentInsets影响contentOffset:

上图的contentOffset为
```
(0, 0)
```

上图的contentOffset为
```
(-contentInsets.left, -contentInsets.top)
```

上图的contentOffset为
```
(contentSize.width - scrollView.frame.size.width + contentInsets.right, contentSize.height - scrollView.frame.size.height + contentInsets.bottom)
```
其实contentInsets就是为scrollView提供了更多的可停留空间,切记要把弹簧效果开启,否则在contentSize小于scrollView.frame时scrollView无法拉动。
```
scrollView.alwaysBounceVertical = YES;
self.scrollView.alwaysBounceHorizontal = YES;
```
在没有设置contentInsets的情况下,scrollView的停留范围为:
```
contentOffset.x: 0 -> max(contentSize.width - scrollView.frame.width, 0)
contentOffset.y: 0 -> max(contentSize.height - scrollView.frame.height, 0)
```
在有contentInsets的情况下,scrollView的停留范围为:
```
contentOffset.x: -contentInsets.left -> max(contentSIze.width - scrollView.frame.size.width) + contentInsets.right
contentOffset.y: -contentInsets.top -> max(contentSIze.height - scrollView.frame.size.height) + contentInsets.bottom
```
[demo地址](https://github.com/lyxia/LYXRefreshProject)


