大纲:
1、为什么要进行搭建,以及搭建的好处
2、prometheus 的搭建
3、grafana 的搭建
4、cadvisor 的搭建
5、elasticsearch 的搭建
6、filebeat 的搭建
7、elasticsearch_exporter 的搭建
8、node-exporter 的搭建
1、为什么要进行搭建,以及搭建的好处
这次的搭建主要是为了解决数据监控的问题,顺便解决机器的日常维护以及容器的监控。
其实监控系统公司已经存在一套zabbix监控了,那我为什么还要重搭一套呢?答:(1)、zabbix监控的报警我现在邮箱有上千封;(2)、容器的监控,如果有可能会去监控kubernetes集群;(3)、体验目前比较流行的监控。
这次搭建主要是利用docker容器进行,好处就不用我多说了,大家都知道。这篇文章会让你用最快的速度入门体验到pormetheus监控,如果有可能我会在接下来的文章中更新一些自己自定义的监控方案(当然了,也是一些比较基础的)。
本篇不会涉及到报警的设置
如果在启动容器时报错,最有可能的是挂载进容器的目录权限不够,最简单的方法,给777所有权限即可
2、prometheus 的搭建
prometheus以及相关的大部分组件都是采用go语言进行编写的,所以安装配置及其简单。这里采用官方提供的镜像进行搭建。
prometheus我主要是用这个时序数据库进行采集分析的,不做告警处理。
备注:prometheus.yml 这个配置文件,你可以先从镜像里复制一份出来,然后进行修改,也可以直接复制我下面的配置文件进行修改。
因为我是单台机器进行部署的,如果你需要监测多台机器,只需要在数组中配置多个ip即可,形式如;['10.16.88.44:9090','10.16.88.45:9090']。
目前这个配置文件中配置了这次搭建所需要的所有的组件,如果你以后还要增加组件,只需修改这个配置文件,然后重启prometheus这个服务即可。
[root@tag config]# cat prometheus.yml
# my global config
global:
  scrape_interval:     15s # Set the scrape interval to every 15 seconds. Default is every 1 minute.
  evaluation_interval: 15s # Evaluate rules every 15 seconds. The default is every 1 minute.
  # scrape_timeout is set to the global default (10s).

# Alertmanager configuration
#alerting:
#  alertmanagers:
#  - static_configs:
#    - targets:
#      - alertmanager:9093

# Load rules once and periodically evaluate them according to the global 'evaluation_interval'.
#rule_files:
  # - "first_rules.yml"
  # - "second_rules.yml"

# A scrape configuration containing exactly one endpoint to scrape:
# Here it's Prometheus itself.
scrape_configs:
  # The job name is added as a label `job=` to any timeseries scraped from this config.
  - job_name: 'prometheus'
    # metrics_path defaults to '/metrics'
    # scheme defaults to 'http'.
    static_configs:
      - targets: ['10.16.88.44:9090']

  - job_name: 'cadvisor'
    static_configs:
      - targets: ['10.16.88.44:8084'] # 本地 cadvisor 访问地址

  - job_name: 'node-exporter'
    static_configs:
      - targets: ['10.16.88.44:9100']
  - job_name: 'elasticsearch'
    static_configs:
      - targets: ['10.16.88.44:9108']
[root@tag yaml]#
[root@tag yaml]#
[root@tag yaml]# cat prometheus.yaml
version: '3.1'

services:
  prometheus:
    image: prom/prometheus:v2.9.2
    container_name: monitor_prometheus
    restart: always
    ports:
      - 9090:9090
    volumes:
      - /data/prometheus/prometheus/data:/prometheus/data   #prometheus数据目录
      - /data/prometheus/prometheus/config/prometheus.yml:/etc/prometheus/prometheus.yml   #prometheus数据采集的配置文件
[root@tag yaml]#
[root@tag yaml]#
[root@tag yaml]# docker-compose -f prometheus.yaml up -d              #启动容器
http://ip地址:9090
3、grafana 的搭建(效果图的展示以后再写)
这个服务主要是将pormetheus采集过来的数据做可视化的界面展示的,虽然pormetheus也带有界面展示,但是它的界面展示太单一了,没有grafana的好看。
[root@tag yaml]# cat grafana.yaml
version: '3.1'

services:
  grafana:
    image: grafana/grafana:6.1.4
    container_name: monitor_grafana
    restart: always
    ports:
      - 3000:3000
    volumes:
      - /data/prometheus/grafana/data:/var/lib/grafana   #prometheus数据目录
[root@tagyaml]#
[root@tagyaml]#
[root@tagyaml]#docker-compose -f grafana.yaml up -d              #启动容器
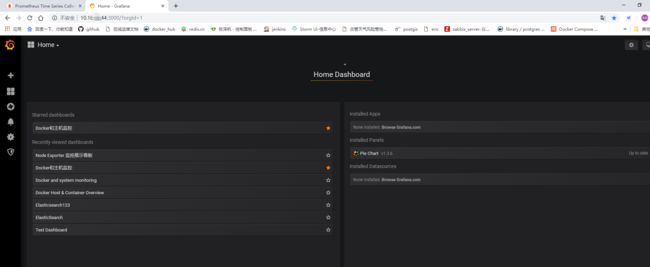
出现类似下面的界面就算成功,我这里放出来的是我已经搭建好的界面了。
http://ip地址:3000
4、cadvisor 的搭建
这个服务主要是将容器的各种信息采集过来,主要是为了解决docker stats的问题(存储、展示),然后传到prometheus。有关容器日志的相关知识,请自行去学习补充,目前只需要知道,当你采用docker的默认的日志配置时,采用cadvisor是可以采到日志信息的。
注意:privileged 这个配置选项,必须配置,否则会出现各种报错,如果你想自行折腾了,可以尝试着不去配置
[root@tag yaml]# cat cadvisor.yaml
version: '3.1'

services:
  cadvisor:
    image: google/cadvisor:v0.33.0
    container_name: monitor_cadvisor
    restart: always
    volumes:
       - /:/rootfs:ro
       - /var/run:/var/run:rw
       - /sys:/sys:ro
       - /var/lib/docker/:/var/lib/docker:ro
    ports:
      - 8084:8080
    privileged: true
[root@tagyaml]#
[root@tagyaml]#
[root@tagyaml]#docker-compose -f cadvisor.yaml up -d              #启动容器
http://ip地址:8084
5、elasticsearch 搭建
elasticsearch 我这里采用的也是官方提供的镜像,并没有采用第三方的镜像。官方这里提供 的docker-compose安装的配置是采用了集群的形式,我这里就直接拿来使用了。
注意:elasticsearch 采集到的数据是无法直接交给prometheus进行直接的使用的,需要通过一个中转的 elasticsearch_exporter 插件服务(后面也会进行安装),才能让prometheus采集到。
[root@tag yaml]# cat elasticsearch.yaml
version: '3.1'
services:
  elasticsearch:
    image: elasticsearch:6.4.3
    container_name: elasticsearch
    environment:
      - cluster.name=docker-cluster
      - bootstrap.memory_lock=true
      - "ES_JAVA_OPTS=-Xms512m -Xmx512m"
    ulimits:
      memlock:
        soft: -1
        hard: -1
    volumes:
      - /data/prometheus/elk/data/1:/usr/share/elasticsearch/data
    ports:
      - 9200:9200
    networks:
      - esnet
  elasticsearch2:
    image: elasticsearch:6.4.3
    container_name: elasticsearch2
    environment:
      - cluster.name=docker-cluster
      - bootstrap.memory_lock=true
      - "ES_JAVA_OPTS=-Xms512m -Xmx512m"
      - "discovery.zen.ping.unicast.hosts=elasticsearch"
    ulimits:
      memlock:
        soft: -1
        hard: -1
    volumes:
      - /data/prometheus/elk/data/2:/usr/share/elasticsearch/data
    networks:
      - esnet

#volumes:          #我这里是直接采用的本机目录的形式,当然了,你也可以替换成这种数据卷的形式
#  esdata1:
#    driver: local
#  esdata2:
#    driver: local

networks:
  esnet:
[root@tagyaml]#
[root@tagyaml]#
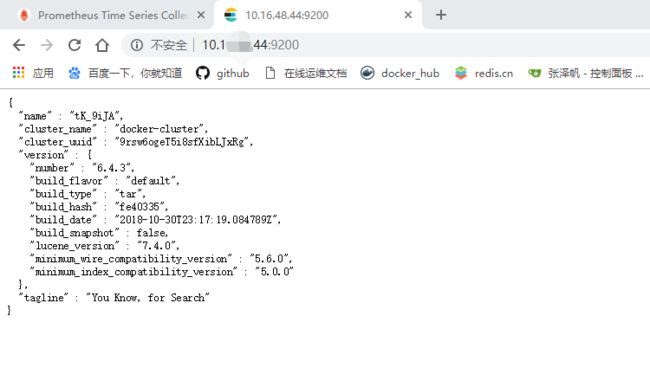
[root@tagyaml]#docker-compose -f elasticsearch.yaml up -d              #启动容器
http://ip地址:9200
6、filebeat 的搭建
filebeat 的作用主要是将采集到的日志文件发送给刚刚上面搭建的 elasticsearch。
[root@tag config]# cat filebeat.docker.yml
filebeat.inputs:
- type: log
  enabled: true
  paths:            # 这里配置所需要进行采集的日志目录
    - /var/log/syslog          #这里是采集的系统的一些日志
    - /var/lib/docker/containers/*/*.log        # 这里是采集的docker的一下日志文件

filebeat.config.modules:
  path: ${path.config}/modules.d/*.yml
  reload.enabled: false

setup.template.settings:
  index.number_of_shards: 1
setup.kibana:

output.elasticsearch:
  hosts: ["10.16.88.44:9200"]            将采集到的日志发送到刚刚上面搭建的 elasticsearch 中

processors:
  - add_host_metadata: ~
  - add_cloud_metadata: ~

filebeat.autodiscover:
  providers:
    - type: docker
      hints.enabled: true
[root@tag config]#
[root@tag config]#
[root@tag yaml]# cat filebeat.yaml
version: '3.1'
services:
  filebeat:
    image: store/elastic/filebeat:7.0.0
    restart: always
    container_name: monitor_filebeat
    user: root
    volumes:
      - /data/prometheus/filebeat/config/filebeat.docker.yml:/usr/share/filebeat/filebeat.yml:ro
      - /var/lib/docker/containers:/var/lib/docker/containers:ro
      - /var/run/docker.sock:/var/run/docker.sock:ro
#    command: filebeat -e -strict.perms=false -E output.elasticsearch.hosts=["10.16.88.44:9200"]
[root@tagyaml]#
[root@tagyaml]#
[root@tagyaml]#docker-compose -f filebeat.yaml up -d              #启动容器
如果采集到数据,可以在这个界面看到:http://ip地址:9200/_search?pretty
7、elasticsearch_exporter 的搭建
filebeat 已经将日志采集到 elasticsearch 中了,那么prometheus怎么才能拿到elasticsearch 中的日志呢?通过刚刚暴露的9200端口?你可以自己尝试着这样配置一下,看看是否可以取到相关的日志信息,顺便看看prometheus默认取的是elasticsearch 9200端口的哪个页面的日志信息。
elasticsearch_exporter 的作用是将elasticsearch 9200端口的日志文件,处理成prometheus 可以直接采集的数据。然后交给9108进行暴露。(这一段纯属博主猜测,并未去看真正的源代码,如有解读错误,还请各位指出)。
[root@tag yaml]# cat elasticsearch_exporter.yaml
version: '3.1'

services:
  elasticsearch_exporter:
    image: justwatch/elasticsearch_exporter:1.0.2
    container_name: monitor_elasticsearch_exporter
    command:
      - '-es.uri=http://10.16.48.44:9200'
    restart: always
    ports:
      - 9108:9108
[root@tagyaml]#
[root@tagyaml]#
[root@tagyaml]#docker-compose -f elasticsearch_exporter.yaml up -d              #启动容器
http://ip地址:9108/
这是转发后的页面: http://ip地址:9108/metrics
8、node-exporter 的搭建
上面采集了容器的信息、容器的日志信息,那么服务器自己本身的信息怎么办?prometheus 官方提供了 node-exporter 这个组件进行服务器底层信息的采集。
[root@tag yaml]# cat node-exporter.yaml
version: '3.1'

services:
  node-exporter:
    image: prom/node-exporter:v0.17.0
    container_name: monitor_node-exporter
    restart: always
    ports:
      - 9100:9100
[root@tagyaml]#
[root@tagyaml]#
[root@tagyaml]#docker-compose -f node-exporter.yaml up -d              #启动容器
http://ip地址:9100/metrics
通过这个页面:http://10.16.88.44:9090/targets,可以看到四个数据源到已经连接到了。


