根据上的几位大咖整理并备注下,方便日后调用。
Hinsverson的文章:http://www.jianshu.com/p/356e4329f562
航歌页面segue跳转:http://www.hangge.com/blog/cache/detail_720.html
一、Storyboard 上通过Cell直接拉线传值,在 prepare(for segue: UIStoryboardSegue, sender: Any?)传值
1)//Mark: - CustomCell.swift
struct CustomCell {
var title = ""
var finished:Bool = false
}
2)//Mark: - CustomTableViewController.swift
class CustomTableViewController: UITableViewController {
var customCells:[CustomCell] = [] //初始化数组
override func viewDidLoad() {
super.viewDidLoad()
loadData()
}
func loadData() {
for i in 0..<50 {
var c = CustomCell()
c.title = "CustomerCell \(i)"
c.finished = i % 2 == 0 ? true : false
customCells.append(c)
}
}
// MARK:- Storyboard之间通过Cell拉线
// MARK: - 单个CELL的值在下面这个方法进行传递
override func prepare(for segue: UIStoryboardSegue, sender: Any?) {
self.navigationController?.setNavigationBarHidden(true, animated: false)
let destinationView = segue.destination as! GoalViewController
destinationView.customCell = self.customCells[(tableView.indexPathForSelectedRow?.row)!]
}
}
3)//Mark: - GoalViewController
class GoalViewController: UIViewController {
var customCell:CustomCell! //只有一条数据,所以不是 [CustomCell],这个是从 CustomCell.swift的MODEL
@IBOutlet weak var showLabel: UILabel!
@IBAction func backButton(_ sender:Any){
navigationController?.popViewController(animated: true)
navigationController?.setNavigationBarHidden(false, animated:true)
}
override func viewDidLoad() {
super.viewDidLoad()
showLabel.text = customCell.title
}
}
二、在Storyboard利用 sender进行传值,传的值直接写在 didSelectRowAt 方法
//: http://www.hangge.com/blog/cache/detail_720.html
var ctrlnames:[String] = ["任务1","任务2","任务3"]
var tableView:UITableView?
//返回表格行数(也就是返回控件数)
func tableView(_ tableView: UITableView, numberOfRowsInSection section: Int) -> Int {
return self.ctrlnames.count
}
//创建各单元显示内容(创建参数indexPath指定的单元)
func tableView(_ tableView: UITableView, cellForRowAt indexPath: IndexPath)
-> UITableViewCell {
//为了提供表格显示性能,已创建完成的单元需重复使用
let identify:String = "cell1"
//同一形式的单元格重复使用,在声明时已注册
let cell = tableView.dequeueReusableCell(withIdentifier: identify,
for: indexPath) as UITableViewCell
cell.accessoryType = .disclosureIndicator
cell.textLabel?.text = self.ctrlnames[indexPath.row]
return cell
}
// UITableViewDelegate 方法,处理列表项的选中事件
func tableView(_ tableView: UITableView, didSelectRowAt indexPath: IndexPath) {
self.tableView!.deselectRow(at: indexPath, animated: true)
let itemString = self.ctrlnames[indexPath.row]
self.performSegue(withIdentifier: "ShowDetailView", sender: itemString)
}
//在这个方法中给新页面传递参数
override func prepare(for segue: UIStoryboardSegue, sender: Any?) {
if segue.identifier == "ShowDetailView"{
let controller = segue.destination as! DetailViewController
controller.itemString = sender as? String
}
}
三、用StoryBoard连线跳转实现传值(分别为设置 segue连接的名字和story board id)
// 使用连接线的名称
override func prepareForSegue(segue: UIStoryboardSegue, sender: AnyObject?) {
if(segue.identifier == "segue跳转名字")
let firstVC = segue.destinationViewController as FirstVC
firstVC.value = textField.text
}
//代码跳传到storyboard界面使用StoryBoard中视图的Identifier (须设置 storyboard id )进行跳转( http://www.jianshu.com/p/356e4329f562)
var firstVC = UIStoryboard(name: "Main", bundle: nil).instantiateViewController(withIdentifier:”FirstViewController") as! FirstViewController
present(firstVC, animated: true, completion: nil)
//CVC为NewViewController的storyboard id
let vcView = UIStoryboard(name: "Main", bundle: nil)
.instantiateViewController(withIdentifier: "CVC")
self.present(vcView, animated: true, completion: nil)
//多个StoryBoard时 可以类比xib的实例对象获取方式 let firstVC = FirstVC(nibName:"FirstVC",bundle: nil)
var storyboard = UIStoryboard(name: "New", bundle: nil)
var newVC = storyboard?.instantiateViewController(withIdentifier: "NewViewControllerID”) as! NewViewController
present(newVC, animated: true, completion: nil)
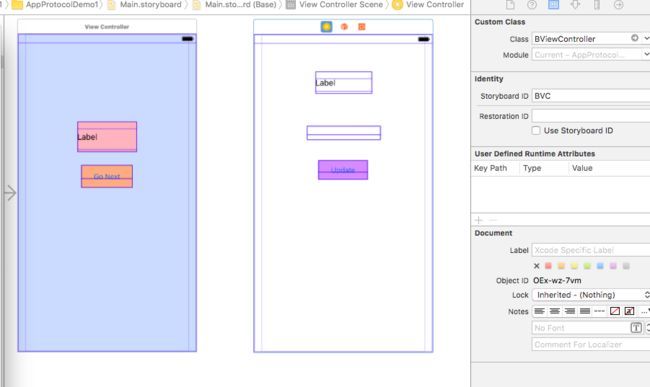
四、protocol Delegate 传值(Story board Segue布局)
原理: ReceivingVC.swift 跳转至 SendingVC.swift,SendingVC.swift输入值,Receiving再接收值
//MARK: - ReceivingVC.swift
class ReceivingVC:ViewController,DataSentDelegate {
@IBOutlet weak var receivingLabel:UILabel!
// sendingVC.swift里的协议方法
func userDidEnterData(data: String) {
self.receivingLabel.text = data
}
/// Mark: - segue
if segue.identifier == “showSendingVC” {
let sendingVC:SendingVC = segue.destination as! SendingVC
sendingVC.delegate = self ////设置secondVC代理为自己
}
}
//MARK: - SendingVC.swift
protocol DataSentDelegate(){ /// 定义协议
func userDidEnterData(data:String)
}
class SendingVC:UIViewController{
@IBOutlet weak var userTextField:UITextField!
var delegate:DataSentDelegate?
if delegate != nil {
delegate?.userDidEnterData(data: userTextField.text!)
dismiss(animated:true, completion:nil)
}
}
}
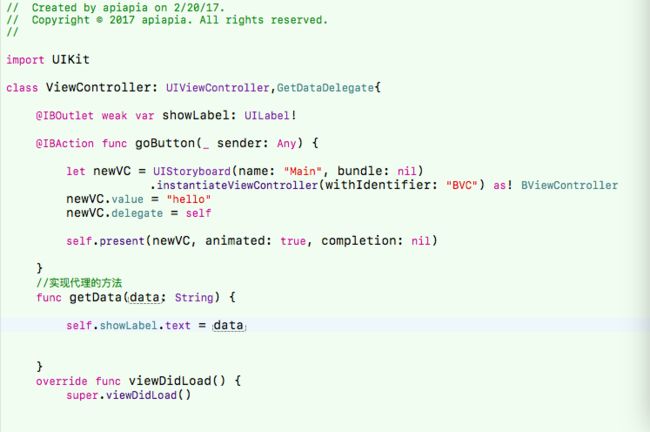
五、protocol Delegate 传值(纯代码传值)
系统命名协议的规则(类名+Delegate)
AVC.swift 视图跳转到-> BVC.swift (BVC输入值,关闭视图,返回AVC,AVC 获得BVC输入的值)
AVC .swift 首先继承SecondVCDelegate协议
class ViewController: UIViewController,BVCDelegate {
func buttonAction2(){
let BVC = BVC(nibName:”BVC",bundle: nil)
//请BVC.SWIFT 遵照 BVCDelegate()协义
BVC.delegate = self
present(BVC, animated: true, completion: nil)
}
func passOnInformation(value: String) {
//接收数据
self.textField.text = value
}
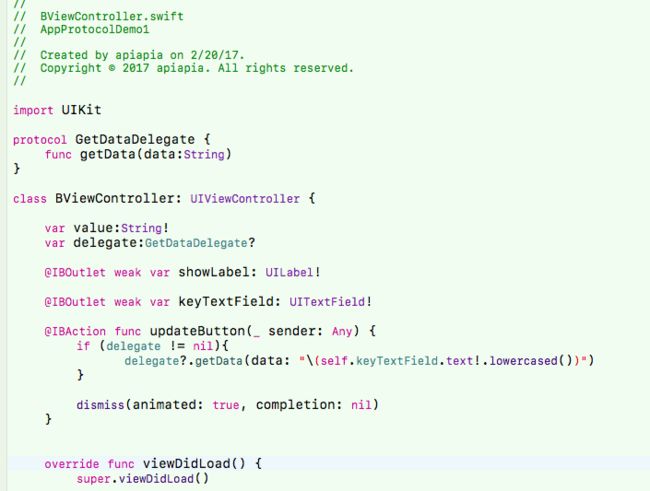
// BVC.swift 定义一个delegate
protocol BVCDelegate(){
// 自定义一个func
func passOnInformation(value:String)
}
在bVC类中添加代理属性
var delegate:BVCDelegate?
func closeVC(){
//判断代理是否为空
if (self.delegate != nil) {
//传值
self.delegate?.passOnInformation(value: textField.text!)
}
self.dismiss(animated:true, completion: nil)
}
六、Mark: - 纯代码正向传值 AVC.swift -> BVC.swift
AVC.swift
let goToVC = BVC()
goToVC.city = "处理传值:\(indexPath.row)"
self.present(goToVC, animated: true, completion: nil)
BVC.swift
var city:String!
// nib形式
func buttonAction1(){
let firstVC = FirstVC(nibName:"FirstVC",bundle: nil)
firstVC.value = textField.text
presentViewController(firstVC, animated: true, completion: nil)
}