今天跟大家聊一聊Autolayout第二小节的内容,在阅读之前希望你能先了解一下叫做 "Anchor" (锚点) 的东东,老实说,我对这个东西的了解也是浮于表面,所以希望通过这篇文章能先把自己讲懂,其次希望能给屏幕前的你带来一些帮助。老规矩,如果在阅读过程中遇到什么问题请及时纠正,共同进步
Anchor notation(锚点标记法)
在 Autolayout(I) 中我们使用的的是 NSLayoutConstraint 的initializer 方法可以初始化任意约束,但是 Anchor notation 更注重于约束间属性的关系,而不是约束。下面列举一些 UIView 中anchor 的属性:
 - topAnchor, bottomAnchor
 - leftAnchor, rightAnchor,  leadingAnchor,trailingAnchor
 - centerXAnchor, centerYAnchor
 - firstBaselineAnchor,lastBaselineAnchor
anchor 的值都是 NSLayoutAnchor 的实例对象,NSLayoutAnchor 的对象方法有很多,选择使用哪种方法要看你的约束是否需要指定另一个 Anchor的 constant 或 multiplier 或者两者都需要使用,下面是一些方法:
constraintEqualToConstant:
constraintGreaterThanOrEqualToConstant:
constraintLessThanOrEqualToConstant:
constraintEqualToAnchor:
constraintGreaterThanOrEqualToAnchor:
constraintLessThanOrEqualToAnchor:
constraintEqualToAnchor:constant:
constraintGreaterThanOrEqualToAnchor: constant:
constraintLessThanOrEqualToAnchor: constant:
constraintEqualToAnchor: multiplier:
constraintGreaterThanOrEqualToAnchor: multiplier:
constraintLessThanOrEqualToAnchor: multiplier:
constraintEqualToAnchor: multiplier: constant:
constraintGreaterThanOrEqualToAnchor: multiplier: constant:
constraintLessThanOrEqualToAnchor: multiplier: constant:
看上去这些方法好像很复杂,其实在使用的时候你会发现这种方法的便利,因为它易读写,并容易维护。新的方法还非常方便的与activateConstraints 相结合使用,并且我们不必担心应该给哪个视图指定哪个constraint,举个例子:
NSLayoutConstraint.activateConstraints([
            v2.leadingAnchor.constraintEqualToAnchor(v1.leadingAnchor),
            v2.trailingAnchor.constraintEqualToAnchor(v1.trailingAnchor),
            v2.topAnchor.constraintEqualToAnchor(v1.topAnchor),
            v2.heightAnchor.constraintEqualToConstant(10),
            v3.widthAnchor.constraintEqualToConstant(20),
            v3.heightAnchor.constraintEqualToConstant(20),
            v3.trailingAnchor.constraintEqualToAnchor(v1.trailingAnchor),
            v3.bottomAnchor.constraintEqualToAnchor(v1.bottomAnchor),
            ])
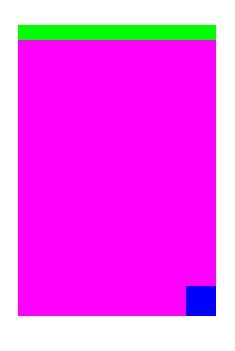
运行一下得到下图:
Visual format notation
Visual format 方法是一种实用一组使用文本的简单表达方式来创建约束。它的好处是可以很快捷的构造出许多 constraints,当你需要布局一系列的 view 在竖直或水平方向的时候该就显得尤其合适。举个例子
V:| v2(10)
这个例子中的 V:代表竖直方向,那么要表示水平方向就是用 H:, 默认情况下是水平方向。 | 代表的是 superview ,上述表达式的意思是 竖直方向上 v2 和 superview 的上边界对接起来,也就是说顶部位置重合,括号中的数字是设置 v2 的高为 10。
在使用 visual format 方法的时候,你需要提供一个字典,这个字典里面包含你所有需要涉及到的的 view 的名字。比如上述例子中你可以这样定义一个字典 ["v2":v2] ,下面我来用visual format 的方式来重现上图的效果:
let d = ["v2":v2 ,"v3":v3];
        NSLayoutConstraint.activateConstraints([
            NSLayoutConstraint.constraintsWithVisualFormat("H:|[v2]", options: [], metrics: nil, views: d),
            NSLayoutConstraint.constraintsWithVisualFormat("V:|[v2(10)]", options: [], metrics: nil, views: d),
            NSLayoutConstraint.constraintsWithVisualFormat("H:|[v3](20)", options: [], metrics: nil, views: d),
            NSLayoutConstraint.constraintsWithVisualFormat("V:|[v3](20)", options: [], metrics: nil, views: d),
            ].flatten().map{$0})
这里我们只有了四个约束而不是八个就可以达到效果。
下面我们解释一下方法中每个参数的意思:
metrics: 是一个数值类型的字典,当在format中使用了动态数据比如上现这句:@"H:|-[button(==width)]-|",表示这个button的宽度为width,那么这个参数去哪里找呢?就是在这个字典里面找到key对应的值,如果没有找到这个值,app就会crash.
opts:枚举参数,默认写0,具体跟据你所实现的需求去选择你想要的枚举
描述两个view之间的距离,[v1]-20-[v2],表示 v1 与 v2 之间间距为 20。
| 功能 | 表达式 |
|---|---|
| 水平方向 | H: |
| 竖直方向 | V: |
| Views | [View] |
| superview | | |
| 关系 | >=, <=, == |
| 间距 | - |
| 优先级 | @value |
Constraints as objects
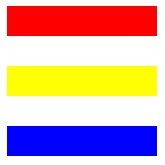
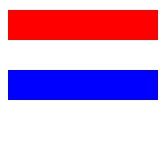
有些时候你可能会从根本上改变用户界面,比如插入或者移除一个 view ,你会发现将许多组约束置于手边是非常方便的,每一个约束都会作用于界面上的一个configuration。这个听起来会比较抽象下面我们举个例子来理解一下:在我们的 mainview 里面有三个 view 分别是 v1, v2, v3, v1 为红色, v2 为黄色, v3 为蓝色,并且我们对三个view都是强引用。在 app 运行的时候我们动态的将黄色 v2 先移除,然后将 蓝色的 v3 置于 v2 原来的位置,最后我们再将黄色的 view 插入。好的,现在我初始化两组 constraints ,一组用来描述 v1, v2, v3 这个顺序的展示, 另外一组来描述 v1,v3,v2 的展示顺序。因此我们初始化两组数组用来存储 NSLayoutConstraints 分别是 contraintsWith 和 constraintsWithout,下面我们一起看看代码吧!
先声明属性:
    var v1: UIView?
    var v2: UIView?
    var v3: UIView?

    var constraintsWith = [NSLayoutConstraint]()
    var constraintsWithout = [NSLayoutConstraint]()
        let v1 = UIView()
        v1.backgroundColor = UIColor.redColor()
        v1.translatesAutoresizingMaskIntoConstraints = false

        let v2 = UIView()
        v2.backgroundColor = UIColor.yellowColor()
        v2.translatesAutoresizingMaskIntoConstraints = false

        let v3 = UIView()
        v3.backgroundColor = UIColor.blueColor()
        v3.translatesAutoresizingMaskIntoConstraints = false

        self.view.addSubview(v1)
        self.view.addSubview(v2)
        self.view.addSubview(v3)

        self.v1 = v1
        self.v2 = v2
        self.v3 = v3

        let c1 = NSLayoutConstraint.constraintsWithVisualFormat("H:|-(20)-[v(100)]", options: [], metrics: nil, views: ["v":v1])
        let c2 = NSLayoutConstraint.constraintsWithVisualFormat("H:|-(20)-[v(100)]", options: [], metrics: nil, views: ["v":v2])
        let c3 = NSLayoutConstraint.constraintsWithVisualFormat("H:|-(20)-[v(100)]", options: [], metrics: nil, views: ["v":v3])
        let c4 = NSLayoutConstraint.constraintsWithVisualFormat("V:|-(100)-[v(20)]", options: [], metrics: nil, views: ["v":v1])
        let c5with = NSLayoutConstraint.constraintsWithVisualFormat("V:[v1]-(20)-[v2(20)]-(20)-[v3(20)]", options: [], metrics: nil, views: ["v1":v1,"v2":v2,"v3":v3])
        let c5Without = NSLayoutConstraint.constraintsWithVisualFormat("V:[v1]-(20)-[v3(20)]", options: [], metrics: nil, views: ["v1":v1,"v3":v3])

        self.constraintsWith.appendContentsOf(c1)
        self.constraintsWith.appendContentsOf(c2)
        self.constraintsWith.appendContentsOf(c3)
        self.constraintsWith.appendContentsOf(c4)
        self.constraintsWith.appendContentsOf(c5with)

        self.constraintsWithout.appendContentsOf(c1)
        self.constraintsWithout.appendContentsOf(c3)
        self.constraintsWithout.appendContentsOf(c4)
        self.constraintsWithout.appendContentsOf(c5Without)

        NSLayoutConstraint.activateConstraints(self.constraintsWith)

        if self.v2?.superview != nil {
            self.v2?.removeFromSuperview()
            NSLayoutConstraint.deactivateConstraints(self.constraintsWith)
            NSLayoutConstraint.activateConstraints(self.constraintsWithout)
        }else {
            self.view.addSubview(v2)
            NSLayoutConstraint.deactivateConstraints(self.constraintsWithout)
            NSLayoutConstraint.activateConstraints(self.constraintsWith)
        }
结果:
Guides and margins
大多数情况下 view 都是有明确的边界和中心,并且他们会一直存在在那个地方,但有些时候,你想让一个 view 有其他的锚点一种 secondary anchor,可以约束其他view。你希望这个锚点可以移动时 view 的constraints 也会随着锚点的移动而移动,截止到现在有很多种方法可以实现这种需求。考虑 mainview 的 subviews 会固定在顶部或底部,并且有些时候,mainview 的 上面或者下面会被 navigation bar ,status bar, tool bar, tab bar 占据,这时你只能在这些 bars 的中间布局你的 subviews 。从 iOS7 开始,mainview在那些bar的背后可以在竖直方向上延伸至 window 的边界,并且这些bar可以动态的添加或移除,还可以改变他们的高度,比如iOS8开始当屏幕置于横屏时,status bar将会自动消失,navigation bar 竖屏时的高度要高于横屏时的高度。因此当你的 bars 消失或者显示的时候你的竖直方向上的约束都要移动,否则你的界面在一些情况下可能看起来是错误的。举个例子,一个view与mainview顶部对齐
let arr = NSLayoutConstraint.constraintsWithVisualFormat( "V:|-0-[v]", options: [],metrics: nil,views: ["v":v])
当屏幕置于横屏时状态栏会自动消失,该view还是会在屏幕的顶部,一切正常。然后在讲屏幕翻转成竖屏时,这个view还是会在屏幕的顶部,但这时status bar 却没有显示被 view 挡住了
为了解决这个问题,UIViewController 提供了两个不可见的 view(他们并不是真正的view,便于理解可以将它们想象成view) 一个时 top layout guide 和 bottom layout guide
它将作为子视图添加到 main view 的视图层级结构中去。这下你竖直方向上顶部和底部的约束不会再main view 的顶部和底部 和 subview 之间,而是在 subview 和 top layout guide 底部之间,或者是 subview 与 bottom layout guide 的顶部之间,top layout guide 的底部和 bar的最底部相重合,如果mainview 的顶部没有bar 的话就和 mianview 的顶部重合。相反,bottom layout guide 的顶部将和底部的bar的顶部重合,如果mainview 没有底部的 bar 则会和mainview 的最底部重合。重要的是,这些layout guides 将会随着不同的情况而改变他们的size,比如顶部或者底部的 bar 高度发生改变或完全消失时,因此你的view将会沿着 main view 的可见区域移动
下面我们用代码来演示一下UIViewController 的 topLayoutGuide 和 bottomLayoutGuide 这两个属性的用法。
let arr = NSLayoutConstraint.constraintsWithVisualFormat("V:[tlg]-0-[v]", options: [], metrics: nil, views: ["tlg":self.topLayoutGuide, "v":v])
在iOS9中,topLayoutGuide 有一个 bottomAnchor,bottomLayoutGuide 有一个 topAnchor:
let tlg = self.topLayoutGuide
let c = v.topAnchor.constraintEqualToAnchor(tlg.bottomAnchor)
在iOS8中,view会有页边空白,这样你可以将约束建在view的内框中。最常见的可能是你将 subview 放在离 superview 边框最近的标准距离。因此 UIView 有一个类型为 UIEdgeInsets 的属性 layoutMargins
这个 struct 包含了四个浮点值,这个四个值依次代表了在边框逆时针方向的值 —— 上,左,下,右。view controller的 main view的默认值是顶部和底部边距为 0,左右边距为 16 对于其它的 view,上下左右边距都是 8 你可以在view在这些边距上建立约束。一个可视化格式(visual format)字符串用管道字符'|'来将 subview 的边固定到superview 的边上,加上一个横杠'-'并且不显式指定距离,这样就会将这个约束指定到superview的
边距上。例如这里有一个view与superview的左边边距抵笼:
let arr1 = NSLayoutConstraint.constraintsWithVisualFormat("H:|-[v]", options: [], metrics: nil, views: ["v":v])
下面是 NSLayoutAttribute 的值:
- .TopMargin, .BottomMargin
- .LeftMargin, .RightMargin, .LeadingMargin, .TrailingMargin
- .CenterXWithinMargins, .CenterYWithinMargins
还有另外一种方法实现相同的约束,view 和 superview 的左边边距对齐
let a = NSLayoutConstraint(item: v, attribute: .Leading, relatedBy: .Equal, toItem: self.view, attribute: .LeadingMargin, multiplier: 1, constant: 0)
用iOS9新特性 layoutMarginGuide属性来实现:
let b = v.leadingAnchor.constraintEqualToAnchor(self.view.layoutMarginsGuide.leadingAnchor)
这一小节的内容平时我们都不怎么用到可能不是很好理解,通过总结笔记很高兴我把自己讲懂了,你呢?有兴趣的话可以自己敲下代码帮助理解。讲道理iOS9 中真的有很多新特性,也的确给我们工程师带来了很多便利。


