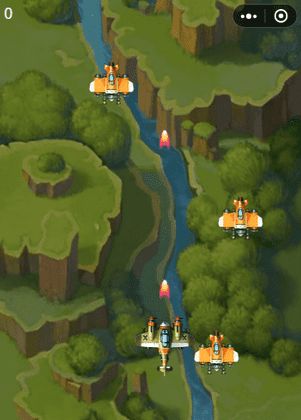
借着今年开新人培训的机会改装了几个微信小程序、小游戏,尤其是其中的飞机大战游戏为大家所喜闻乐见,便于加入一些系统设计开发的基本元素做讲解。看懂本例程只需了解JavaScript基本语法,甚至连HTML/CSS知识都并不需要。
目次
微信小程序:公众号+豆瓣电影
微信小游戏:全民飞机大战
0.准备
1.官方版源代码解构
2.增强版目标一览
3.游戏设定类、数据更新主循环与渲染主循环的改造
4.玩家操控处理的改造
5.游戏设定界面(ES6 Proxy实现Observable模式)
6.子弹的增强
7.敌机的改造(即动画类改造)
8.漂浮物(未切片Atlas行走图加载+Promise/async/await)
9.运输机
小结
微信小程序:公众号+豆瓣电影
小程序非本文重点,先简要带过:使用了《微信小程序入门与实践》一书中的范例OrangeCan,借实体书可作系统理解。不过因为WeApp发展较快,一些未被包括的功能(如自定义组件)还需自行调查替换。
另外,豆瓣API已不能直接调用,需写一个代理服务替代,给个Python版的:
import urllib2
from flask import request

@app.route('/forwardreq//', methods=['GET'])
def forwardreq(protocol, append):
    url = protocol + '://' + append
        + ('?' + request.query_string if len(request.query_string)>0 else '')
    headers = {
        .....
        'Referer' : url,
        .....
        }
    forward_req = urllib2.Request(url, headers = headers)
    //省略异常处理
    forward_res = urllib2.urlopen(forward_req)
    response_content = forward_res.read()
    content_type = forward_res.info().get('Content-Type')
    return response_content, 200, {'Content-Type': content_type}
微信小游戏:全民飞机大战
本文的重点:分九步走,改造微信小游戏的官方范例GameDemo。
0. 准备
如果还未搭建起开发环境,参照这篇官方文档就能很方便的完成准备。
注意事项:
- 小游戏与小程序使用同一个IDE开发工具,只是项目模板不同
- 如需做更正式的分享、发布,小程序的开发者需另行申请一个“小游戏”的开发者账号,即在新账号的设置中将"服务类目"选为"游戏",从而获得一个小游戏用的AppId
小游戏的HelloWorld模板,竟然直接就是一个“全民飞机大战”游戏(把audio目录下的BGM拖入腾讯QQ音乐就能看到它的出处了),这对初学者还是有些惊喜的。
1. 官方版源代码解构
一般代码文件级别的梳理,可以自己先做一下,或是快速过一遍一些别人做过的笔记。
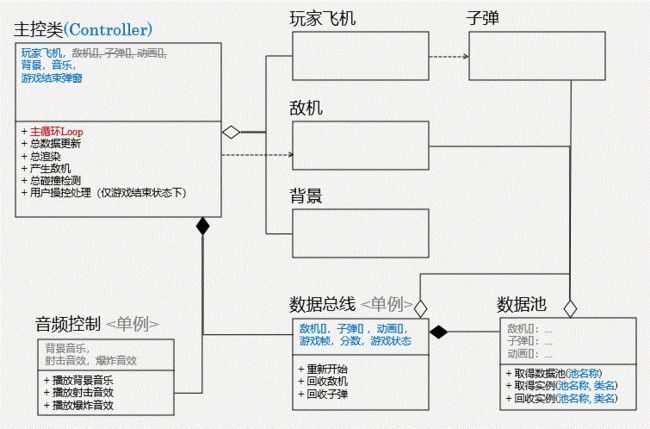
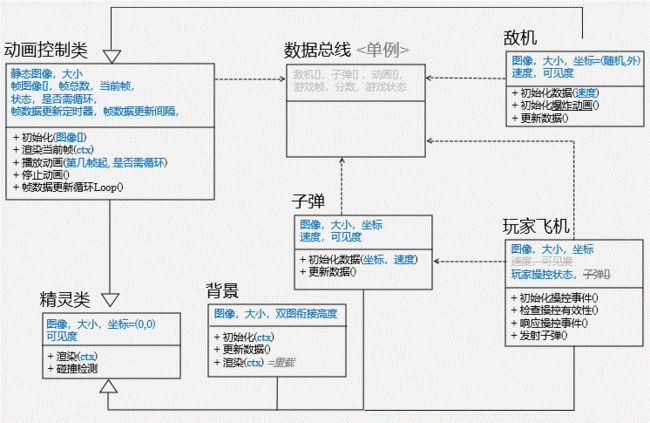
给出两张静态类图,理清以下几点就足够:
- Main类(位于
main.js):真正的入口与主控类,包括了总数据更新、总数据渲染、总玩家操控处理- 总数据更新:包括了调用背景、子弹和敌机的数据更新(主要也就是坐标更新),以及敌机实例生成、总碰撞检测
- 总数据渲染:包括了调用背景、子弹和敌机的数据渲染,还有玩家飞机、敌机爆炸动画的渲染,以及游戏结束弹窗的渲染
为什么玩家飞机只需渲染不需数据更新?因为玩家飞机的数据(目前只有坐标),是由用户操控处理逻辑在决定着
- 总玩家操控处理:官方版本的Main,仅负责处理对游戏界面层的操控(目前只有游戏结束弹窗),而把对玩家飞机操控事件的注册与处理、留给了玩家飞机类
- 玩家飞机类(
player\index.js):包括了用户操控处理(含数据更新)、数据渲染,以及子弹实例生成- 玩家操控处理:主要是飞机周边30像素内的触摸都算作有效操控、改变坐标,及阻止超越地图边界的移动
- 数据渲染:在当前坐标上渲染图片,通过继承精灵类(Sprite)实现
- 敌机类(
npc\enemy.js):包括了数据更新、数据渲染,以及初始化敌机爆炸动画- 数据更新:y坐标由上至下改变、及越过边界时回收自己
- 数据渲染:同样,通过继承精灵类(Sprite)实现
可能只是Demo,官方版的敌机类错误地继承了动画类(动画类再继承了精灵类。按照OO基本原理,继承关系等于“是什么”的关系,而敌机其实并不是动画,仅仅是其爆炸效果需要动画),这点会在增强版中予以改正
- 子弹类(
player\bullet.js):包括了数据更新、数据渲染- 数据更新:y坐标由下至上改变、及越过边界时回收自己
- 数据渲染:同样,通过继承精灵类(Sprite)实现
- 背景类(
runtime\background.js):次要,采用一张无缝衔接背景图实现无限滚动,包括了数据更新、数据渲染- 数据更新:将图片衔接位置的y坐标由上至下改变
- 数据渲染:重载了精灵类的渲染方法,使得图片能沿着衔接位置上下渲染两次
- 精灵类(
base\sprite.js):所有功能层面实体类的基类,维护着图片、大小、坐标。包括了数据更新、碰撞检测- 数据渲染:将图片按照大小、坐标,渲染到给定的画布(ctx是画布的上下文句柄)
- 碰撞检测:根据大小、坐标,判断两个精灵是否碰撞
- 动画类(
base\animation.js):继承了精灵类,为此维护着一张静态图片、大小、坐标,同时还维护着动画所需的帧图片数组、当前帧、动画播放状态等数据。包括了静态图数据渲染、动画数据渲染(渲染当前帧+播放+停止)官方版的动画类继承了精灵类,导致了动画的初始化还需传入一个静态图片、以及动画播放或停止时究竟是否需显隐静态图等问题。从功能/责任分割角度看,动画并不一定是精灵(至少爆炸动画不是)。同时,每个动画实例都启动了一个时钟也并无必要。因此后续将对此做较大的修改。
- 数据总线类与数据池类(
databus.js, base\pool.js):为了避免不必要的实例创建/销毁开销,敌机、子弹的所有实例,将只会存在于数据总线或数据池队列的任何一个中,即,已经失效的实例、会被回收到数据池、而不是真正引发系统的垃圾回收(GC),再次需要实例时、会优先从数据池中取、而不是引发内存申请。除此之外,数据总线还维护着其他游戏全局数据,如游戏状态、得分、动画数组、甚至是“当前游戏帧”(并非动画帧)- (数据池)申请实例:从相关队列头部取出,如已为空则创建实例
- (数据池)回收实例:实例排回到相关队列尾部
- (数据总线)回收子弹、敌机:通过调用自己的数据池实现
官方版假定了每一次动画时钟触发时
(requestAnimationFrame)、都应由一个当前游戏帧(databus.frame)来记录当前次数,然后据此来决定游戏数据的变更(如敌机的产生,是每30个游戏帧一架);然而requestAnimationFrame并不能保证以均匀时间间隔被调用、比如画布被遮盖时就并不触发(这篇文章讲得很好),增强版将修改成数据更新与数据渲染各自采用不同的时钟机制。
2. 增强版目标一览
这个小游戏原型门槛不高趣味性不低,正适合做一些有趣的增强:
- 游戏设定类、数据更新主循环与渲染主循环的改造
- 游戏设定类(
Config):为方便调试各种增强,例如切换高速弹、调整数据更新频率(UpdateRate),最好把相关变量交给一个设定类统一管理,先用静态变量即可。 - 数据更新主循环与渲染主循环的改造:不再使得实体类自己激活更新循环(如官方版的
Animation类),而是在Main类中、就有一套数据更新主循环与一套渲染主循环,调用各游戏实体的更新与渲染,条理清晰。
- 游戏设定类(
- 玩家操控处理的改造
在官方版中主画面与玩家飞机的操控处理层次较为散乱,增强版将设计成界面层、实体层、背景层三层事件响应。-
addEventListener()的顺序或回调处理可区分层次的优先级
-
- 游戏设定界面
为了能在游戏中实时修改各种设定最好有一个简易的交互界面。- 界面激活:在主界面增加一个设定图标(前置:需先完成“玩家操控处理的改造”)
- 界面显示:
wx.showActionSheet(itemList)按钮列表即够用 - 游戏设定类升级:升级为简化版的Observable模式,当玩家通过设定界面改变了设定时,可分发事件消息给订阅过的Observer们、或者直接调用其回调方法
- 子弹的增强:新的子弹类型。高速弹、双排弹,先通过设定界面来切换,后面通过拾取漂浮物来变更。
- 敌机的改造:修改误配的OO关联,敌机不再是继承动画类,动画类也不再继承精灵类。
- 敌机应该依赖于动画类,被击毁时生成一个爆炸动画实例
- 动画类无需每个实例启动一个时钟,改为在Main类中启动总数据更新循环
- 漂浮物:新的实体,具体可以是弹药包,与玩家飞机碰撞后触发设定值的变更。先按随机概率产生。
- 数据更新逻辑将改变(移动轨迹不同)
- 运输机:新的实体,可以被玩家子弹击毁,掉落漂浮物。
接下来就正式开始打造!——
3. 游戏设定类、数据更新主循环与渲染主循环的改造
—— 本轮增强后的代码下载地址(v0.1) ——
- 新建Config类,先只使用静态变量,在Main类的构造函数中引用
//声明:common/config.js
export default class Config {
}
Config.UpdateRate = 60  //每秒总数据更新次数

//引用:main.js
import Config from './common/config'
//...
    this.updateInterval = 1000 / Config.UpdateRate
- 拆分出数据更新主循环与渲染主循环
//main.js
export default class Main {
  constructor() {
    //1.两个主循环
    this.renderLoopId = 0
    this.bindloopRender = this.loopRender.bind(this)
    this.updateInterval = 1000 / Config.UpdateRate
    this.bindloopUpdate = this.loopUpdate.bind(this)
    //...
  }

  restart() {
    //...
    //3.两个主循环
    if (this.updateTimer)
      clearInterval(this.updateTimer)
    this.updateTimer = setInterval(
      this.bindloopUpdate,
      this.updateInterval
    )
    if (this.renderLoopId != 0)
      window.cancelAnimationFrame(this.renderLoopId);
    this.renderLoopId = window.requestAnimationFrame(
      this.bindloopRender,
      canvas
    )
  }

  //-- 游戏数据【更新】主函数 ----
  update(timeElapsed) {
    //...
    databus.frame++  //IMPROVE
  }
  //-- 游戏数据【渲染】主函数 ----
  render() {
    //...
  }

  //-- 游戏数据【更新】主循环 ----
  loopUpdate() {
    let timeElapsed = new Date().getTime() - this.lastUpdateTime
    this.lastUpdateTime = new Date().getTime()
    this.update(timeElapsed)
  }
  //-- 游戏数据【渲染】主循环 ----
  loopRender() {
    this.render()
    this.renderLoopId = window.requestAnimationFrame(
      this.bindloopRender,
      canvas
    )
  }
数据更新与渲染各一套主循环,会更为清晰。原本Main类中只有一个主循环,更新和渲染都在其中触发。而由requestAnimationFrame实现的主循环其实并非真正匀速的(参考此文),对渲染影响不大,但对需要匀速的游戏数据更新来说会带来问题。因此对单独采用setInterval()来维护一套更新主循环更为清晰、合理,尽管由于JavaScript的单线程本质真正的匀速仍需借助外部时钟。
如果把
Config.UpdateRate设成6,猜猜会发生什么。
4. 玩家操控处理的改造
—— 本轮增强后的代码下载地址(v0.2) ——
- 新建一个简易的控制层类
ControlLayer,仅用来收纳可响应玩家操控的元素,以便分界面层、实体层、背景层三层来响应操控事件,背景层缺省沉默(active = false)。
//main.js
import ControlLayer from './base/controllayer'
//...
  restart() {
    //...
    this.ctrlLayerUI = new ControlLayer('UI', [this.gameinfo])
    this.ctrlLayerSprites = new ControlLayer('Sprites', [this.player])
    this.ctrlLayerBackground = new ControlLayer('Background', [this.bg], false)
    //...
  }
- 统一
canvas.addEventListener()的位置。整个游戏只在Main类的构造函数中做一次绑定即能满足需求。
//main.js
  constructor() {
    ['touchstart', 'touchmove', 'touchend'].forEach((type) => {
      canvas.addEventListener(type, this.touchEventHandler.bind(this))
    })
  }
- 具体的玩家操控处理:对三个控制层依次处理,规则定为:
- 上位的层如果处理过下位的层就不再处理,同一层中有一个元素处理过(队首优先)其他元素即不再处理
- 每个元素类都要有一个
onTouchEvent()处理接口,具体包括GameInfo类、Player类、Background类。
//main.js
  touchEventHandler(e){
    //...
    let upperLayerHandled = false
    for (let ctrlLayer of [this.ctrlLayerUI, this.ctrlLayerSprites,
        this.ctrlLayerBackground]) {
      if (upperLayerHandled)
        break //stop handling
      if (!ctrlLayer.active)
        continue //next layer
      ctrlLayer.elements.some((element) => {
        element.onTouchEvent(e.type, x, y, ((res) => {
          switch (res.message) {
            case 'restart':
              this.restart()
              break
          }
          if (res.message && res.message.length > 0){
            upperLayerHandled = true
            return true //if any element handled the event, stop iteration
          }
        }).bind(this))
      })
    }
  }
- 以Player类的
onTouchEvent()处理接口为例。将官方版的initEvent()中的逻辑提取出来即可。当需要阻止后续元素或控制层处理事件时,可以调用callback({message: 'xxx'}),发送任意非空消息。
//player/index.js
  onTouchEvent(type, x, y, callback) {
    switch (type){
      case 'touchstart':
        if (this.checkIsFingerOnAir(x, y)) {
          this.touched = true
          this.setAirPosAcrossFingerPosZ(x, y)
        }
        break;
      case 'touchmove':
        if (this.touched)
          this.setAirPosAcrossFingerPosZ(x, y)
        break;
      case 'touchend':
        this.touched = false
        break;
    }
  }
- 其他修补。在官方版中,游戏结束时玩家飞机仍可被操控,这是由于官方版仅仅用
addEventListener()叠加了对操控事件的处理,而未能禁止之前已有效的操控处理。
我们只需在游戏结束时,禁止界面层之外的层,就能解决这一问题。
//main.js
  update(timeElapsed) {
    if (databus.gameOver) {
      this.ctrlLayerSprites.active = false
      this.ctrlLayerBackground.active = false
    }
  }
请确保每一轮增强修改后游戏的主要特性都运作正常,调试器的Console窗口中也没有异常信息!
5. 游戏设定界面
—— 本轮增强后的代码下载地址(v0.3) ——
- 界面激活:在主画面分数的左侧新增一个“”作隐藏设定图标,并使得GameInfo类在处理Restart按钮之外、也处理设定图标的触摸事件。
//runtime/gameinfo.js
  renderGameScore(ctx, score) {
    ctx.fillText(
      ' ' + score, //设定图标
      10, 10 + 20
    )

    this.areaSetting = {
      startX: 10,
      startY: 10,
      endX: 10 + 28,
      endY: 10 + 25
    }
  }
  onTouchEvent(type, x, y, callback) {
        if (Util.inArea({ x, y }, this.areaSetting)){
          //...
        } else if (this.showGameOver
                   && Util.inArea({ x, y }, this.btnRestart)) {
          //...
        }
  }
- 界面显示:
wx.showActionSheet(itemList)即够用,会从屏幕底部升起一排按钮。根据这个方法的接口定义一套SettingCommands,其textList用于显示,commandList和optionList用于带参数的消息发送、经callback回调给事件注册者(Main类)。
//runtime/gameinfo.js
const SettingCommands = {
  textList: ['每秒数据更新频率切换',  ..., '无敌模式切换'],
  commandList: ['switchUpdateRate', ..., 'youAreGod'],
  optionListList: [[60, 6], ..., [false, true]]
}
//...
  onTouchEvent(type, x, y, callback) {
    //...
        if (Util.inArea({ x, y }, this.areaSetting)){
          callback({ message: 'pause' })
          let commandIndex
          wx.showActionSheet({
            itemList: SettingCommands.textList,
            success: function (res) {
              commandIndex = res.tapIndex
            },
            complete: function () {
              if (commandIndex !== undefined){
                callback({
                  message: SettingCommands.commandList[commandIndex],
                  option: SettingCommands.optionListList[commandIndex]
                })
              }
              callback({ message: 'resume' })
            }
          })
        }
  }
- 游戏的暂停与继续:设定界面被显示/关闭时,游戏需要被暂停/继续。主要只需把布尔量型
databus.gameOver相关的代码、修改成有3个值的databus.gameStatus的逻辑,在pause()、resume()中,对restart()中的大多数变量都无需修改,只需变更databus.gameStatus和控制层的有效性。
//databus.js
export default class DataBus {
  //...
  reset() {
    //this.gameOver = false
    this.gameStatus = DataBus.GameRunning
  }
}
DataBus.GameRunning = 0
DataBus.GameOver = 1
DataBus.GamePaused = 2

//main.js
export default class Main {
  pause() {
    databus.gameStatus = DataBus.GamePaused
    this.ctrlLayerSprites.active = false
    this.ctrlLayerBackground.active = false
  }
  resume() {
    databus.gameStatus = DataBus.GameRunning
    this.ctrlLayerSprites.active = true
    this.ctrlLayerBackground.active =
        Config.CtrlLayers.Background.DefaultActive
  }
  // 全局碰撞检测
  collisionDetection() {
      //...
      if (this.player.isCollideWith(enemy)) {
        databus.gameStatus = DataBus.GameOver
      }
  }
  //-- 游戏数据【更新】主函数 ----
  update(timeElapsed) {
    if ([DataBus.GameOver, DataBus.GamePaused]
          .indexOf(databus.gameStatus) > -1)
      return
    //...
  }
当然我们还需在玩家操控处理中接收GameInfo类发来的'pause'、'resume'回调消息:
//main.js
  touchEventHandler(e){
  //...
        element.onTouchEvent(e.type, x, y, ((res) => {
          switch (res.message) {
            //--- Game Status Switch ---
            case 'restart':
              this.restart()
              break
            case 'pause':
              this.pause()
              break
            case 'resume':
              this.resume()
              break
            //--- Setting Commands ---
            case 'switchUpdateRate':
              wx.showToast({title: 'not implemented'})
              break
            case 'youAreGod':
              wx.showToast({ title: 'not implemented' })
              break
          }
        }).bind(this))
      })
  }
- 游戏设定类升级:升级为简化版的Observable模式,当玩家通过设定界面改变了设定时,可分发事件消息给订阅过的Observer们(通过EventBus)、或者直接调用其回调方法。
技术层面将采用ES6的Proxy拦截器来实现。MobX对于数据(或状态)响应式编程有更为系统的设计实现,包括可使用装饰器声明(如
@observable)、自定义Reactions事件等,感兴趣可自行参考。
首先把Config修改成一个单例类,允许被实例化,
//common/config.js
let instance
class Config {
  constructor() {
    if (instance)
      return instance
    instance = this
    //----------------------------
    this.UpdateRate = 60
    this.CtrlLayers = {   //玩家操控层
      Background: {
        DefaultActive: false
      }
    }
    this.GodMode = false
    //----------------------------
  }
}
然后定义一个observable方法,其实现是针对Config单例实例、架设一层Proxy拦截,从而当Config的属性被读取、修改时,能够执行Proxy中设定的逻辑,主要就是:
- 使得Config多出一个
subscribe()方法,接受属性变更事件的订阅 - 当Config有属性发生变更时,调用有过订阅的回调方法
//common/config.js
const subscription = new Map()  //propName --> callbackSet
const observable = obj => {
  return new Proxy(obj, {
      get(target, key, receiver) {
        if (key === 'subscribe') //Proxy public function
          return this.subscribe
        return Reflect.get(target, key, receiver)
      },
      set(target, key, value, receiver) {
        if (target[key] != value){
          Reflect.set(target, key, value, receiver)
          this.onPropertyChanged(key, value) //调用注册过的回调方法
        }
      },
      subscribe(propName, callback) {  //注册Observer
        let callbackSet = subscription.get(propName)
          || subscription.set(propName, new Set()).get(propName)
        callbackSet.add(callback)
      },
      onPropertyChanged(name, value) {
        let callbackSet = subscription.get(name)
        if (callbackSet !== undefined)
          for (let callback of callbackSet) {
            callback(name, value)
          }
      }
    })
}
const configProxy = observable(new Config())
module.exports = {
  Config: configProxy
}
对其他类来说,只需引用Config单例实例,订阅其特定属性的变更事件即可。
//main.js
const Config = require('./common/config.js').Config
//...
    ['UpdateRate', 'CtrlLayers.Background.DefaultActive']
    .forEach(propName => {
      Config.subscribe(propName, this.onConfigChanged.bind(this))
    })
//...
  onConfigChanged(key, value){
    switch (key){
      case 'UpdateRate':
        this.updateInterval = 1000 / Config.UpdateRate
        if (this.updateTimer)
          clearInterval(this.updateTimer)
        this.updateTimer = setInterval(
          this.bindloopUpdate,
          this.updateInterval
        )
        break
      case 'CtrlLayers.Background.DefaultActive':
        wx.showToast({
          title: `Active=${Config.CtrlLayers.Background.DefaultActive}`,
        })
        break
    }
  }
这样,当Config属性发生变更时,比如玩家点击图标、并按了第一个命令后,只需改变Config.UpdateRate的值,onConfigChanged()就会被触发,游戏数据更新主循环会被重启而使得游戏变慢、或恢复正常。
//main.js
  touchEventHandler(e){
    //...
          switch (res.message) {
            //--- Setting Commands ---
            case 'switchUpdateRate':
              Config.UpdateRate = Util.findNext(res.optionList,
                             Config.UpdateRate)
              break
            case 'backgroundActive':
              Config.CtrlLayers.Background.DefaultActive
                = Util.findNext(res.optionList,
                             Config.CtrlLayers.Background.DefaultActive)
              break
          }
  }
但当更新深层的属性时你会发现(如Config.CtrlLayers.Background.DefaultActive)由于其父对象(如Background)仍只是普通Object并未被Proxy拦截,所以无法发现变更。而解决方法,就是在拦截get时动态将这些Object也都替换成Proxy拦截器。为了节省开销,需对该属性是否已经是Proxy做判断,为了订阅“属性链”(以'.'分隔),则还需保存所经过的属性轨迹(如'CtrlLayers.Background')。
//common/config.js
      get(target, key, receiver) {
        //...
        if (typeof result === 'object' && !result.__isProxy) {
          const observableResult = observable(result)
          Reflect.set(target, key, observableResult, receiver)
          observableResult.keyStroke = (target.keyStroke === undefined) ?
                    key : target.keyStroke + '.' + key
          return observableResult
        }
      set(target, key, value, receiver) {
          //...
          if (!value.__isProxy){
            let propName = (target.keyStroke === undefined) ?
                    key : target.keyStroke + '.' + key
            this.onPropertyChanged(propName, value)
          }
      },
这样,当Config的深层属性发生变更时,有过订阅的回调方法就也会被触发了。
6. 子弹的增强
—— 本轮增强后的代码下载地址(v0.4) ——
- 新的子弹类型:高速弹。十分简单,增加一个
Config.Bullet.Speed属性,在玩家飞机Player类的shoot()中将固定的子弹速度(10)替换成该设定值即可。无需注册变更响应,因为每次发射子弹时都会使用最新的速度值。
//player/index.js
  shoot() {
    //...
    bullet.init(
      this.x + this.width / 2 - bullet.width / 2,
      this.y - 10,
      Config.Bullet.Speed
    )
  }
但测试发现,切换2次子弹速度后,在发射普通弹时竟会夹杂着高速弹…最终找出这是官方版简化的Databus回收机制所造成(无脑回收数组头部的资源,使得真正需要被回收的残留在数组中),修改后问题消失。
//databus.js
  removeBullets(bullet) {
    //let temp = this.bullets.shift()  //原版的简化处理
    let temp = (bullet === undefined) ? this.bullets.shift()
      : this.bullets.splice(this.bullets.indexOf(bullet), 1)
    temp.visible = false
    this.pool.recover('bullet', bullet)
  }

//main.js
  collisionDetection() {
    //...
        if (!enemy.isPlaying && enemy.isCollideWith(bullet)) {
          //bullet.visible = false
          databus.removeBullets(bullet)
          databus.score += 1
          break
        }
  }
- 新的子弹类型:双排弹。也比较简单。增加
Config.Bullet.Type属性,将Player类的shoot()修改成能初始化两颗子弹即可。三发弹,双排高速弹,都可以自己调试。
  shoot() {
    let bullets = []
    let bulletNum = (Config.Bullet.Type === 'single') ? 1 : 2
    for (let i = 0; i < bulletNum; i++)
      bullets.push(databus.pool.getItemByClass('bullet', Bullet))

    bullets.forEach( (bullet, index) => {
      bullet.init(
        this.x + this.width * (index+1) / (bulletNum+1) - bullet.width / 2,
        this.y - 10,
        Config.Bullet.Speed
      )
      databus.bullets.push(bullet)
    })
  }
这一轮先通过设定界面来切换子弹,后续将通过拾取漂浮物来实现。
7. 敌机的改造(即动画类改造)
—— 本轮增强后的代码下载地址(v0.5) ——
- 创建Constants类来管理敌机的产生频率等常量,并改了Main类中敌机生成方法(用更通用的表达式、而非
'% 30 === 0'来判断产生时机)
//common/constants.js
export default class Constants {}
Constants.Enemy = {
  SpawnRate: 2  //per second
}
//main.js
  enemyGenerate() {
    //if (databus.frame % 30 === 0) {
    if ((this.updateTimes * Constants.Enemy.SpawnRate) % Config.UpdateRate
      < Constants.Enemy.SpawnRate) {
      //...
    }
  }
- 敌机不再继承动画类,而是直接继承精灵类,并在炸毁时产生一个爆炸动画实例,动画结束时添加回收敌机和动画实例的处理(官方版其实仅在敌机或子弹飞出边界时才进行回收)。
值得注意的是,动画实例一旦关联过回调函数(bind到敌机实例的),就不能简单地从Pool里取出直接重用了;否则动画结束时会突然把前一次与之关联过的敌机实例回收掉,上演“百慕大之谜”。
//npc/enemy.js
export default class Enemy extends Sprite {
  constructor() {
    super(ENEMY_IMG_SRC, ENEMY_WIDTH, ENEMY_HEIGHT)
  }
  destroy(){
    this.visible = false
    let explosionAnim = databus.pool.getItemByClass('animation',
            Animation, Enemy.frames)
    //NOTE: 回调函数必须被重新设置,否则会有玄妙的后果
    explosionAnim.onFinished = () => {  //对象回收
      databus.removeAnimation(explosionAnim)
      databus.removeEnemey(this)
    }
    explosionAnim.start()
    this[__.explosionAnim] = explosionAnim
  }
  //...
}
- 大刀阔斧修改Animation类,它不再继承精灵类(因为并不是精灵类),其单一职责(Single Responsibility)应该就是关联动画帧序列、更新当前帧索引、渲染当前帧。
- 关联动画帧序列:所有敌机实例其实用同一套动画帧。所以新建
AnimationResources类,用以初始化静态资源Enemy.frames - 更新当前帧索引:应该允许动画有自己的播放帧率(
frameRate),不过也因此当前帧的更新将不再于总数据更新频率同步,而需要根据已经过的时间(timeElapsed)来计算 - 渲染:动画并非精灵,不带坐标。只需按指定的坐标渲染当前帧即可
- 关联动画帧序列:所有敌机实例其实用同一套动画帧。所以新建
//base/animresource.js
  static initImageListFrames(imagePathList) {
    let frames = []
    imagePathList.forEach((imageSrc) => {
      //...每帧初始化:
      //{image, srcX=0, srcY=0, width, height, offsetX=0, offsetY=0}
    })
    return frames
  }

//base/animation.js
export default class Animation {
  constructor(frames, onFinished, frameRate = Config.UpdateRate) {
    this.frames = frames  //关联到动画帧序列
    this.frameRate = frameRate
    this[__.age] = undefined
    this.currIndex = undefined
    this.onFinished = onFinished
    this.MAX_AGE = frames.length * 1000 / frameRate
    this.frameIntervalRecipcal = frameRate / 1000
  }

  start() {
    this[__.age] = 0
    this.currIndex = 0
  }

  // 更新当前帧索引
  update(timeElapsed) {
    this[__.age] += timeElapsed
    if (this[__.age] >= this.MAX_AGE) {
      this.currIndex = this.frames.length - 1
      if (this.onFinished !== undefined)
        this.onFinished(this)
    }
    else {
      this.currIndex = Math.floor(this[__.age] * this.frameIntervalRecipcal)
    }
  }

  // 渲染当前帧
  render(ctx, x, y, width = 0, height = 0, alignMode = 'topleft') {
    let currFrame = this.frames[this.currIndex]
    //根据渲染对齐方式,修正渲染位置
    width = width == 0 ? currFrame.width : width,
    height = height == 0 ? currFrame.height : height
    if (alignMode === 'center'){
      x -= width / 2
      y -= height / 2
    }

    ctx.drawImage(
      currFrame.image,
      currFrame.srcX,
      currFrame.srcY,
      currFrame.width,
      currFrame.height,
      x + currFrame.offsetX,
      y + currFrame.offsetY,
      width,
      height
    )
  }

//main.js
  update(timeElapsed) {
    //...
    databus.bullets
      .concat(databus.enemys)
      .forEach((item) => {
        item.update(timeElapsed)
      })
  }
- 动画类也无需每个实例启动一个时钟了,每个游戏元素都会在两个主循环中更新、渲染自己,爆炸动画将作为敌机的一部分,由敌机负责其更新(根据已经过时间)、渲染。
databus.animations相关逻辑被废弃。
//npc.enemy.js
export default class Enemy extends Sprite {
  //...
  update(timeElapsed) {
    if (this.isAlive()) {
      this.y += this[__.speed]
      if (this.y > window.innerHeight + this.height)
        databus.removeEnemey(this)  //对象回收
    }
    else {  //destroyed
      this.y += this[__.speed]  //即便炸毁了还有惯性
      this[__.explosionAnim].update(timeElapsed)
    }
  }

  render(ctx){
    if (this.isAlive())
      super.render(ctx)
    else
      this[__.explosionAnim].render(ctx, this.x, this.y)
  }
}
8. 漂浮物
—— 本轮增强后的代码下载地址(v0.6) ——
漂浮物是新的游戏实体,具体可以是弹药包。与玩家飞机碰撞后触发设定值的变更。先按随机概率产生。
- 新建Floatage类,与增强版的敌机一样继承Sprite类。不同之处在于,Floatage本身就以动画的方式来渲染,而不是平时静态图片、爆炸后才有动画。动画的
start、update、render时机不同。
//npc/floatage.js
export default class Floatage extends Sprite {
  constructor() {
    super(FLOATAGE_IMG_SRC, FLOATAGE_WIDTH, FLOATAGE_HEIGHT)
    this[__.animation] = new Animation(Floatage.frames, ...)
  }

  init(speed) {
    //...
    this[__.animation].start()
  }

  update(timeElapsed) {
    if (this.isActive()) {
      this.y += this[__.speed]
      if (this.y >= window.innerHeight + this.height)
        this.dispose()  //对象回收
      this[__.animation].update(timeElapsed)
    }

  render(ctx) {
    if (this.isActive()){
      //super.render(ctx)   //不做静态图的渲染
      this[__.animation].render(ctx, this.x, this.y)
    }
  }
}
- 同时,漂浮物的动画帧加载还改用了行走图,可渲染不同方向上的行走动画(支持四向或八向)。具体在
AnimationBuilder类中(即v0.4版的AnimationResources类改名),atlasTexture中主要是Atlas(未切片大图)中各个帧的位置,将其转换成渲染时要用的frame结构体即可。
微信小程序已支持主流的异步处理方式。这里仅做示例,先使用了ES6的Promise进行图片的异步加载(
Util.promiseImageLoad),再使用E7的async/await实现对该异步加载的等待。请注意,await只负责固定在async方法的内部的执行顺序,在async方法外部获得的仍是一个Promise对象(以真正的帧集合(frames)作为其resolve时返回的参数),仍需自行等待其执行完毕,更多请参考相关文章。
(注:目前为在小程序中支持async/await,需导入regenerator库)
//common/util.js
  static promiseImageLoad(imagePath) {
    let promise = new Promise((resolve, reject) => {
      let img = new Image()
      img.onload = () => resolve(img)
      img.onerror = (e) => reject(e)
      img.src = imagePath
    })
    return promise
  }

//base/animbuilder.js
const regeneratorRuntime = require('../libs/regenerator/runtime-module')
//...
  //去除asyn和await就是同步的版本
  static async asyncInitFramesFromAtlas(atlasTexture, frameNames = null) {
    let frames = []
    let convertAndPush = (atlasImage, atlasFrame) => {
      if (atlasFrame) {
        frames.push({
          image: atlasImage,
          srcX: atlasFrame.x,
          srcY: atlasFrame.y,
          width: atlasFrame.width,
          height: atlasFrame.height,
          offsetX: atlasFrame.offsetX,
          offsetY: atlasFrame.offsetY
        })
      }
    }

    await Util.promiseImageLoad(atlasTexture.imagePath)
    .then( (img) => {
      if (Array.isArray(frameNames))
        frameNames.forEach(name => convertAndPush(img,
          atlasTexture.frames[name]))
      else{
        (Array.isArray(atlasTexture.frames) ? atlasTexture.frames
          : Object.values(atlasTexture.frames)).forEach(atlasFrame
          => convertAndPush(img, atlasFrame))
      }
      console.log('promiseImageLoad().then()(也是一个Promise)也完成了')
    })
    .catch( (e) => {
      console.error(`initFramesFromAtlas failed: ${e}`)
    })
    console.log('才执行到这一句')
    return frames  //返回的是以frames为resolve参数的Promise
  }

//npc/floatage.js
//返回的是Promise,需以异步方式获取frames
AnimationBuilder.asyncInitFramesFromAtlas(FLOATAGE_ATLAS_TEXTURE)
.then(frames => Floatage.frames = frames)
异步处理还涉及JavaScript单线程架构的本质,可专门花时间做扩展了解。
- Main类中加入与敌机类类似的逻辑(随机生成、碰撞检测、更新、渲染)来处理漂浮物,Databus类中也照搬Pool管理逻辑。
以碰撞检测为例:
//main.js
//collisionDetection()
    databus.floatages.forEach( floatage => {
      if (this.player.isCollideWith(floatage)) {
        floatage.dispose()
        Config.Bullet.Type = Util.findNext(Constants.Bullet.Types,
                Config.Bullet.Type)
        Config.Bullet.Speed = Constants.Bullet.SpeedBase
                * (Constants.Bullet.Types.indexOf(Config.Bullet.Type) + 1)
        wx.showToast({
          title: '捕获未知漂浮物'
        })
      }
    }
- 碰撞漂浮物之后的增益效果:扩充了三排、四排、甚至五排弹,碰撞后改变
Config.Bullet.Type设定值即可生效
//common/constants.js
Constants.Bullet = {
  //Speed: configurable = true
  SpawnRate: 3,
  Types: ['single', 'double', 'triple', 'quadruple', 'quintuple'],
  SpeedBase: 10
}
//player/index.js
  shoot() {
    let bullets = []
    let bulletNum = Constants.Bullet.Types.indexOf(Config.Bullet.Type) + 1
    //...
  }
- 值得注意的是,在上一节中使得动画实例有自己的播放帧率(
frameRate)在这里获得了好处;当漂浮物的动画只有4帧时,如果按60帧/秒的总数据更新频率播放就会过于快,设为4帧/秒才刚刚好。
//common/constants.js
Constants.Floatage = {
  AnimUpdateRate: 4,
  SpawnRate: 0.2
}

//npc/floatage.js
export default class Floatage extends Sprite {
  constructor() {
    super(FLOATAGE_IMG_SRC, FLOATAGE_WIDTH, FLOATAGE_HEIGHT)
    this[__.animation] = new Animation(Floatage.frames,
        Constants.Floatage.AnimUpdateRate, 0.75,
        true, undefined, FLOATAGE_ATLAS_TEXTURE.maxFrameHeight)
  }
  //...
}
- 最后,漂浮物的移动轨迹应该也与敌机不同。为了对轨迹建模,新建了MotionTrack类,最简单的就是Linear直线型的轨迹,如下实现
plan()、nextStep()接口后,即可在Floatage类中替换原有的update()逻辑。
改用MotionTrack类后即可发现,官方版中的各种“Speed”,其实都是就每一次总数据更新而言的位移值、而非单位时间位移值,因此当
Config.UpdateRate减慢10倍时移动速度也会变慢。统一将Speed改成以秒为单位,并采用MotionCheck类的方式计算步进值即可“恒速”。
//common/constants.js
Constants.Floatage = {
  Speed: 3 * 60,  //以秒为单位,而非以每一次总数据更新为单位
}

//base/motiontrack.js
export default class MotionTrack {
  constructor(type, options = {}){
    this.type = type
    this.options = options
    this.data = {}
  }

  plan(src, dest, degree = undefined) {
    if (src === undefined) {
      src = this.data.curr
    }
    let delta = {
      x: dest.x - src.x,
      y: dest.y - src.y,
      degree: getDegree(dest.x - src.x, dest.y - src.y),
      value: Math.hypot(dest.x - src.x, dest.y - src.y)
    }
    let updateRequired = Math.ceil(Config.UpdateRate
        * delta.value / this.options.speed)  //aka.stepRequired
    this.data.step = {
      x: delta.x / updateRequired,
      y: delta.y / updateRequired,
      index: 0,
      count: updateRequired
    }
    this.data.direction = getDirection(delta.degree)
    this.data.curr = src
    this.data.dest = dest
  }

  nextStep(){
    if (!this.completed()){
      this.data.step.index++
      if (this.type === MotionTrack.Types.Linear) {
        if (this.data.step.index == this.data.step.count){
          this.data.curr = this.data.dest
        }
        else {
          this.data.curr.x += this.data.step.x
          this.data.curr.y += this.data.step.y
        }
      }
    }
    return {
      x: Math.round(this.data.curr.x),
      y: Math.round(this.data.curr.y),
      direction: this.data.direction
    }
  }
}

//npc/floatage.js
  constructor() {
    //...
    this.motiontrack = new MotionTrack(MotionTrack.Types.Linear)
  }

  init(speed) {
    //...
    this.motiontrack.options.speed = speed
    this.motiontrack.plan({ x: this.x, y: this.y },
        { x: this.x, y: window.innerHeight + this.height })
  }

  update(timeElapsed) {
    if (this.isActive()) {
      //this.y += this[__.speed]
      let {x, y} = this.motiontrack.nextStep()
      ;[this.x, this.y] = [x, y]
      //...
    }
  }
- 带移动方向的动画的实现:行走图的每一行,即代表一个方向,根据移动的角度得出方向后(四方向时为“下左右上”)传递给Animation类的
render()即可以正确的方向素材渲染了。
现将漂浮物的移动轨迹从垂直下降改为随机,当其平移或向上移动时,就能发现动画素材的方向随之改变了。
这一修改后会发现漂浮物向上时的速度会比向下时“更快”,而这其实是地图滚动(即玩家飞机向上飞)使得“感受位移”会比像素位移更长所造成。读者可在
MotionTrack.plan()中抵消“相对速度”后再计算delta看看效果。
//npc/floatage.js
  init(speed) {
    //...
    this.motiontrack.options.boundary = {
      startX: 0, startY: 0,
      endX: window.innerWidth - this.width,
      endY: window.innerHeight + this.height
    }
    this.motiontrack.plan({ x: this.x, y: this.y },
            this.motiontrack.rndPosition())
  }
  update(timeElapsed) {
    if (this.isActive()) {
      //随机直线移动,直到被捕获
      if (this.motiontrack.completed()){
        this.motiontrack.plan(undefined, this.motiontrack.rndPosition())
      }
      let {x, y, direction} = this.motiontrack.nextStep()
      ;[this.x, this.y, this.direction] = [x, y, direction]
      this[__.animation].update(timeElapsed)
    }
  }
9. 运输机
—— 本轮增强后的代码下载地址(v0.7) ——
-
最后添加“运输机”Freighter类!可被玩家击毁,并掉落漂浮物。这个可作为面向对象继承&覆盖的简单练习。
由运输机特性可见,运输机“是一个”敌机,与敌机唯一的不同在于它在被击毁后会产生一个漂浮物(保留全场最多3个的规则),于是其代码就非常简短。
//npc/freighter.js
export default class Freighter extends Enemy {
  constructor() {
    super(FREIGHTER_IMG_SRC, FREIGHTER_WIDTH, FREIGHTER_HEIGHT)
  }

  destroy() {
    super.destroy()
    //spawn a floatage. 把Main类中代码照搬过来即可。
    if (databus.floatages.length < Constants.Floatage.SpawnMax) {
      let floatage = databus.pool.getItemByClass('floatage', Floatage)
      floatage.init(Constants.Floatage.Speed,
        this.x + this.width / 2 - floatage.width / 2,
        this.y + this.height / 2 - floatage.height / 2)
      databus.floatages.push(floatage)
    }
  }
}
因为运输机“就是”一个敌机,我们甚至可以直接让databus.enemys[]来维护运输机,只需在回收到数据池时根据其实际的类选择正确的池即可,object.constructor.name可以做到这点。
//main.js
  //运输机生成逻辑
  freighterGenerate() {
    if ((this.updateTimes * Constants.Freighter.SpawnRate) % Config.UpdateRate
      < Constants.Freighter.SpawnRate) {
      let freighter = databus.pool.getItemByClass('freighter', Freighter)
      freighter.init(Constants.Freighter.Speed)
      databus.enemys.push(freighter)  //freighter is an enemy
    }
  }

//databus.js
  removeEnemey(enemy) {
    //...
    this.pool.recover(enemy.constructor.name, enemy)
  }
- 顺便,解决掉上一轮漂浮物向上时会比向下时“更快”的问题。
首先将地图滚动速度设为常量Constants.Background.Speed,这个速度其实是玩家飞机的缺省速度。可以发现,其实其他实体、如果与地图同向移动、其真实速度应该是扣除地图滚动速度的,以敌机为例就是6-2等于4,当设定速度为2时其真实速度是静止的。
别忘了由于漂浮物已经采用MotionTrack来计算步进值,其设定速度已经独立于总数据更新频率之外、真正是以秒为单位,因此需乘以
60,而且经过这次修改后,该设定速度将是真实速度、而非相对速度。
//common/constants.js
module.exports = {
  Enemy: {
    Speed: 6,  //以一次更新为单位,且实际速度为4(扣除地图速度)
    SpawnRate: 2  //per second
  },

  Floatage:{
    Speed: 3 * 60,  //用MotionTrack类的实体,其速度是真正以秒为单位,且是真实速度!
    SpawnRate: 0.2  //per second
  },

  Freighter:{
    Speed: 3,  //以一次更新为单位,且实际速度为1(扣除地图速度)
    SpawnRate: 0.2  //per second
  },

  Background:{
    Speed: 2
  },
}
然后修改MotionTrack,只需在速度的Y轴方向上,抵扣掉相对于玩家飞机速度的部分即可。假设漂浮物速度与玩家飞机一样为2,当其向上时,它的相对速度、或者说“渲染速度”应该是静止不动的;而向下时,渲染速度应该是2+2=4才会感觉自然,所以算式如下。
//base.motiontrack.js
export default class MotionTrack {
  plan(src, dest, degree = undefined) {
    //...
    this.data.speed = Math.hypot(
        this.options.speed * Math.cos(delta.degree * Math.PI / 180),
        this.options.speed * Math.sin(delta.degree * Math.PI / 180)
            + Constants.Background.Speed * Config.UpdateRate)
    let updateRequired = Math.ceil(Config.UpdateRate * delta.value
            / this.data.speed)
    //...
  }
}
—— 我们这次的“飞机大战”增强之旅也就告一段落了 ——
小结
这次对“飞机大战”小游戏模版的改造涵盖了以下内容,
【技术层面】
- 用ES6 Proxy实现Observable模式(有兴趣的也可使用MobX),以实时响应设定值的变化;并支持深层属性的变更
- 新增动画帧集合的加载类,支持切片图片列表和未切片的Atlas图(含四向、八向行走图)
- 异步处理ES6 Promise、ES7 async/await 在小程序中的支持
【系统分析设计层面】
- 拆分出数据更新循环(用
setInterval)与渲染循环(用requestAnimationFrame) - 划分成三个层依次响应玩家操控(界面、实体、背景)
- 修正数据总线回收方法不精确(
Databus.removeXxx())导致子弹敌机离奇错位问题 - 对从数据池重用的动画实例(
Pool.getItemByClass())重置其回调方法以解决敌机离奇消失问题 - 修正实体类、动画类、精灵类之间的静态关系
- 动画类根据已经过时间来精确计算当前帧、并持有自己的播放帧率
- 新增MotionTrack类管理移动轨迹,实现相对于单位时间而非相对于数据更新频率的移速,以及区分(非静止画面下的)真实速度与相对速度,并实现了方向(四向或八向)与动画类配合渲染
【功能层面】
- 增加设定功能
- 增加游戏的暂停与继续
- 增加新的子弹类型
- 增加漂浮物
- 增加运输机
告一段落后如果意犹未尽,可以优先加入敌机发射子弹、更多移动轨迹、更逼真子弹包素材、关卡设计、道具购买,使游戏更接近雷电等经典的模样!当然,这次改造的真正目标,是借一个难得的规模合适、主题与技术新鲜度也令多数人感兴趣的项目,实践体验到开发中的常见元素,真正能投入精力做更大型游戏的话,weapp-adapter这套入门级适配器力有不足,如官网所推荐,Cocos、Egret、Laya等第三方适配器会更适合。
