学习Mac开发第四节 学习NSSlider
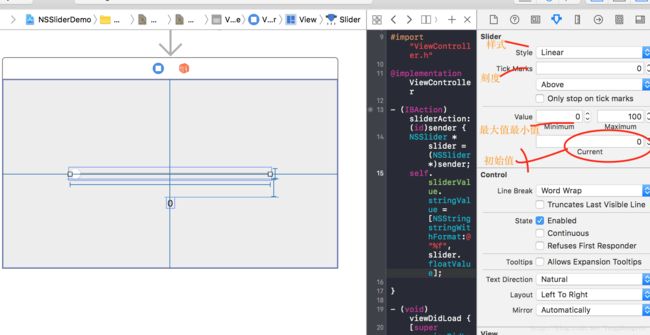
认识NSSlider
层级结构 Inherits From: NSControl -> NSView -> NSResponder -> NSObject
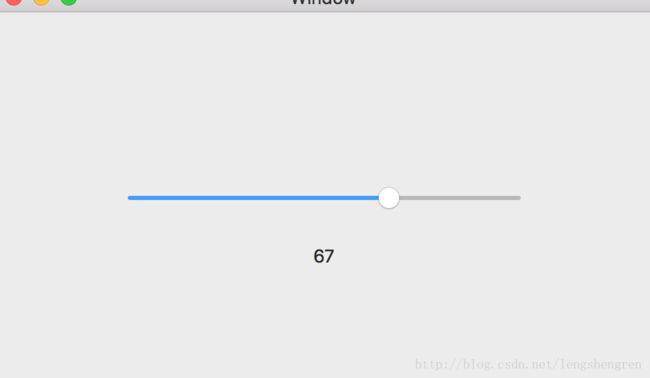
获取NSSlider滑动后的值
拖拽到.m文件一个Action,可以获取浮点型和整数型的值
- (IBAction)sliderAction:(id)sender {
NSSlider *slider = (NSSlider *)sender;
//self.sliderValue.stringValue = [NSString stringWithFormat:@"%f",slider.floatValue];
slider.stringValue = [NSString stringWithFormat:@"%ld",(long)slider.integerValue];
}
修改背景颜色
#import "MyCustomSlider.h"
@implementation MyCustomSlider
- (void)drawBarInside:(NSRect)rect flipped:(BOOL)flipped {
// [super drawBarInside:rect flipped:flipped];
rect.size.height = 5.0;
// Bar radius
CGFloat barRadius = 2.5;
// Knob position depending on control min/max value and current control value.
CGFloat value = ([self doubleValue] - [self minValue]) / ([self maxValue] - [self minValue]);
// Final Left Part Width
CGFloat finalWidth = value * ([[self controlView] frame].size.width - 8);
// Left Part Rect
NSRect leftRect = rect;
leftRect.size.width = finalWidth;
NSLog(@"- Current Rect:%@ \n- Value:%f \n- Final Width:%f", NSStringFromRect(rect), value, finalWidth);
// Draw Left Part
NSBezierPath* bg = [NSBezierPath bezierPathWithRoundedRect: rect xRadius: barRadius yRadius: barRadius];
[NSColor.orangeColor setFill];
[bg fill];
// Draw Right Part
NSBezierPath* active = [NSBezierPath bezierPathWithRoundedRect: leftRect xRadius: barRadius yRadius: barRadius];
[NSColor.purpleColor setFill];
[active fill];
}
@end
自定义Slider go to download custom slider
学习Mac开发第五节 学习objective-c 调用shell 脚本
NSString* shellPath = @"/Users/主机名/Desktop/tool/LSUnusedResources-master/simian/bin";
NSString* path =[shellPaht stringByAppendingString:@"/aksimian.sh"];
NSTask *task = [[NSTask alloc] init];
[task setLaunchPath: @"/bin/sh"];
//数组index 0 shell路径, 如果shell 脚本有输入参数,可以加入数组里,index 1 可以输入$1 @[path,@"$1"],依次延后。
NSArray *arguments =@[path];
[task setArguments: arguments];
[task launch];
学习Mac开发第六节 学习NSOpenPanel 选择路径和创建文件夹
NSOpenPanel* panel = [NSOpenPanel openPanel];
__weak typeof(self)weakSelf = self;
//是否可以创建文件夹
panel.canCreateDirectories = YES;
//是否可以选择文件夹
panel.canChooseDirectories = YES;
//是否可以选择文件
panel.canChooseFiles = YES;
//是否可以多选
[panel setAllowsMultipleSelection:NO];
//显示
[panel beginSheetModalForWindow:self.view.window completionHandler:^(NSInteger result) {
//是否点击open 按钮
if (result == NSModalResponseOK) {
//NSURL *pathUrl = [panel URL];
NSString *pathString = [panel.URLs.firstObject path];
weakSelf.urlTextField.stringValue = pathString;
}
}];
// 悬浮电脑主屏幕上
// [panel beginWithCompletionHandler:^(NSInteger result) {
//
// }];
学习Mac开发第七节 学习NSTableView Cell Base
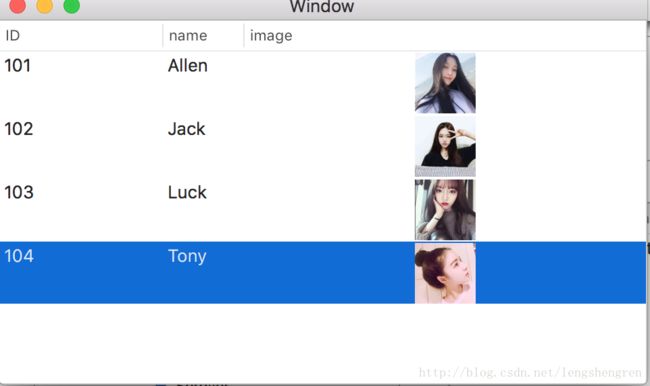
创建列表
1.在故事版上的ViewContoller 上面拖拽个tablview 并且把列表代理拖拽到控制器上。
2.设置3个栏目如下图
3.分别设置3个栏目名称为ID ,name image
4.指定每个栏目对象cell的唯一标识符
对应如下
ID->userid name->username image->useravatar
把image下面的TextCell 修改为imageCell 用来显示图片
1.创建个UserDetailDataModel 数据Model 属性名称要和上面的标识符对应
#import@interface UserDetailDataModel : NSObject
@property (strong, nonatomic)NSString *userid;
@property (strong, nonatomic)NSString *username;
@property (strong, nonatomic)NSImage *useravatar;
@end
设置tablview delegate 和datasource
// ViewController.m
// NSTablviewDemo//
// Created by wufeng on 17/05/28.// Copyright © 2017年 zhule.com. All rights reserved.
//#import "ViewController.h"
#import "UserDetailDataModel.h"
@interface ViewController ()@property (strong, nonatomic)NSMutableArray *dataSource;
@end
@implementation ViewController
- (void)viewDidLoad {
[super viewDidLoad];
self.dataSource = [NSMutableArray new];
//设置Cell 高度
[self.tablview setRowHeight:45];
//创建数据Model
NSArray *userIdArray = @[@"101",@"102",@"103",@"104"];
NSArray *userNameArray = @[@"Allen",@"Jack",@"Luck",@"Tony"];
NSArray *userAvatarArray = @[[NSImage imageNamed:@"tag_1.png"],[NSImage imageNamed:@"tag_2.jpg"],[NSImage imageNamed:@"tag_3.jpg"],[NSImage imageNamed:@"tag_4.jpeg"]];
for (NSInteger i = 0; i < userNameArray.count; i++) {
UserDetailDataModel *detail = [[UserDetailDataModel alloc]init];
detail.userid = userIdArray[i];
detail.username = userNameArray[i];
detail.useravatar = userAvatarArray[i];
[self.dataSource addObject:detail];
}
[self.tablview reloadData];
// Do any additional setup after loading the view.
}
#pragma mark TablviewDataSource
//cell 个数
- (NSInteger)numberOfRowsInTableView:(NSTableView *)tableView {
return self.dataSource.count;
}
//设置列表Value
- (nullable id)tableView:(NSTableView *)tableView objectValueForTableColumn:(nullable NSTableColumn *)tableColumn row:(NSInteger)row{
if([self.dataSource count] <= 0){
return nil;
}
UserDetailDataModel *detail = self.dataSource[row];
return [detail valueForKey: [tableColumn identifier]];
}
//cell绑定对象模型
- (void)tableView:(NSTableView *)tableView setObjectValue:(nullable id)object forTableColumn:(nullable NSTableColumn *)tableColumn row:(NSInteger)row {
UserDetailDataModel *detail = self.dataSource[row];
[detail setValue:object forKey: [tableColumn identifier]];
}
- (void)setRepresentedObject:(id)representedObject {
[super setRepresentedObject:representedObject];
// Update the view, if already loaded.
}
列表高度设置
[self.tablview setRowHeight:45];
//或者
- (CGFloat)tableView:(NSTableView *)tableView heightOfRow:(NSInteger)row{
return 45;
}
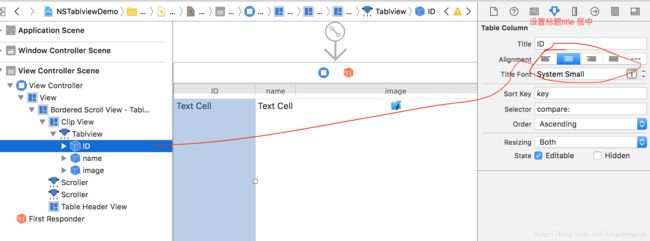
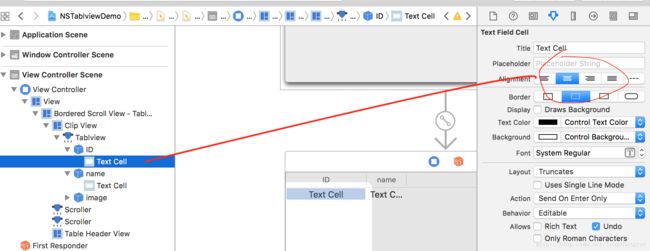
设置标题居中
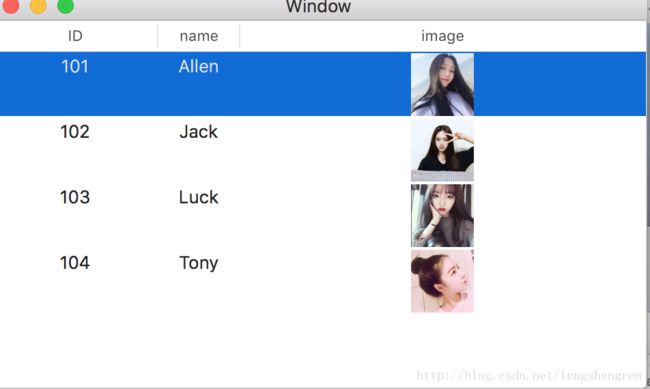
设置列表文字居中
设置Text Cell 居中模式
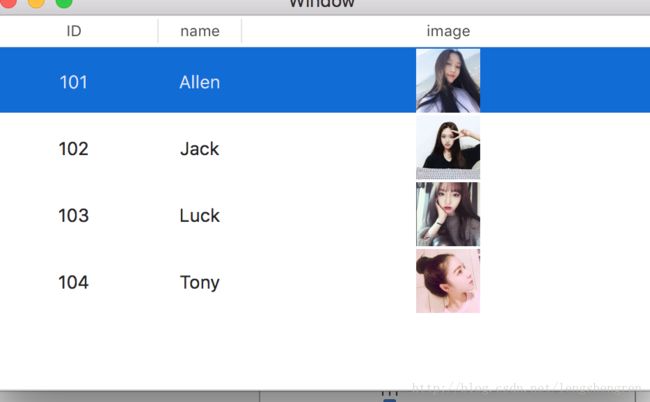
总觉得怪怪的,居然没有上下居中这么能忍 Google 下,解决方案重写NSTextFieldCell
代码来自
#import
@interface RSVerticallyCenteredTextFieldCell : NSTextFieldCell{
BOOL mIsEditingOrSelecting;
}
@end
#import "RSVerticallyCenteredTextFieldCell.h"
@implementation RSVerticallyCenteredTextFieldCell
- (NSRect)drawingRectForBounds:(NSRect)theRect{
// Get the parent's idea of where we should draw
NSRect newRect = [super drawingRectForBounds:theRect];
// When the text field is being
// edited or selected, we have to turn off the magic because it screws up
// the configuration of the field editor. We sneak around this by
// intercepting selectWithFrame and editWithFrame and sneaking a
// reduced, centered rect in at the last minute.
if (mIsEditingOrSelecting == NO){
// Get our ideal size for current text
NSSize textSize = [self cellSizeForBounds:theRect];
// Center that in the proposed rect
float heightDelta = newRect.size.height - textSize.height;
if (heightDelta > 0){
newRect.size.height -= heightDelta;
newRect.origin.y += (heightDelta / 2);
}
}
return newRect;
}
- (void)selectWithFrame:(NSRect)rect inView:(NSView *)controlView editor:(NSText *)textObj delegate:(nullable id)delegate start:(NSInteger)selStart length:(NSInteger)selLength{
rect = [self drawingRectForBounds:rect];
mIsEditingOrSelecting = YES;
[super selectWithFrame:rect inView:controlView editor:textObj delegate:delegate start:selStart length:selLength];
mIsEditingOrSelecting = NO;
}
- (void)editWithFrame:(NSRect)aRect inView:(NSView *)controlView editor:(NSText *)textObj delegate:(id)anObject event:(NSEvent *)theEvent{
aRect = [self drawingRectForBounds:aRect];
mIsEditingOrSelecting = YES;
[super editWithFrame:aRect inView:controlView editor:textObj delegate:anObject event:theEvent];
mIsEditingOrSelecting = NO;
}
@end
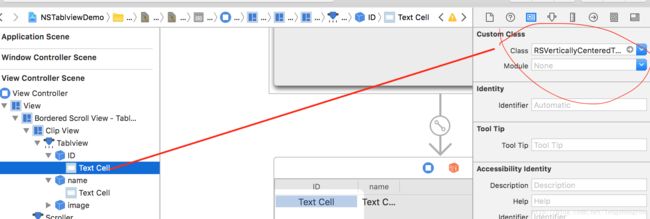
修改成重写的类
监听单击事件
- (void)tableViewSelectionDidChange:(NSNotification *)aNotification{
NSInteger currenSelectRow = [self.tablview selectedRow];
NSLog(@"selectRow=========%ld",(long)currenSelectRow);
}
添加双击事件
在viewDidLoad里面添加如下代码
[self.tablview setDoubleAction:@selector(tableViewDoubleClicked)];
self.tablview.allowsEmptySelection = YES;
学习mac开发第八节 10分钟学会数据库简单操作
简单介绍下我们将用什么数据库,能在10分钟就能会。 它就是Realm,在之前我从来没用他开发。只是传说听过他的强大,居然在我简单的看了一眼文档居然就上手操作,我不在这里过分介绍他了,网上很多了,官网也有中文介绍。下面会总结我遇到的一些问题吧。realm 本身有很多强大的功能,本文只是花10分钟在mac 开发中实践了简单的增删改查
他的优点很明显:简单、live objec、线程安全、懒加载、离线优先
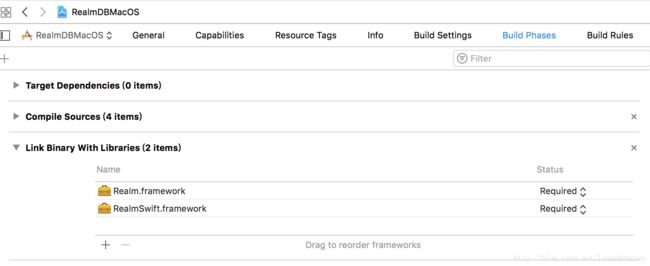
接入realm库 采用了最简单的方法下载后把库拖到工程里,当然你也可以采用cocoapods 方式
拖拽后确认是否成功引入 如下图
如果需要上传AppStroe 需要创建RunScript 添加 下面。
bash "${BUILT_PRODUCTS_DIR}/${FRAMEWORKS_FOLDER_PATH}/Realm.framework/strip-frameworks.sh"
要实现一个能够录入学生姓名,年龄,性别,地址,当然还有一个唯一的学号
首先我们来创建一个学生对象
import Cocoa
import RealmSwift
class StudentModel: Object {
dynamic var studentName = ""
dynamic var studentAge = 0
dynamic var studentID = 1
dynamic var studentSex = ""
dynamic var studentAddress = ""
//主键
override static func primaryKey() -> String? {
return "studentID"
}
}
用学生的学号当做唯一的主键,方便我们快速查询。
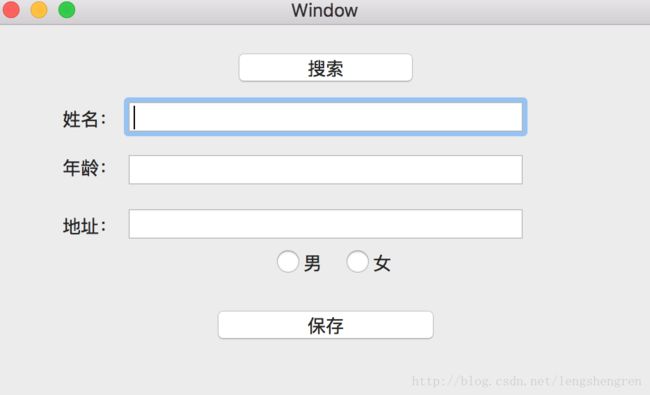
下面搭建个简单的页面
下面是简单的添加方法
//把数据添加Realm 数据库中
func addStudent() {
//没有自增主键
let lastStudent = realm.objects(StudentModel.self).sorted(byKeyPath:"studentID", ascending: true).last
let studentModel = StudentModel()
studentModel.studentAge = Int(self.ageTextField.intValue)
studentModel.studentSex = self.sex!
studentModel.studentAddress = self.addressTextField.stringValue
studentModel.studentName = self.nameTextField.stringValue
if lastStudent?.studentID != nil {
studentModel.studentID = lastStudent!.studentID + 1
}else {
studentModel.studentID = 1;
}
weak var weakSelf = self
try! realm.write {
realm.add(studentModel)
weakSelf?.hintLable.stringValue = "添加成功"
}
}
我最初的想法是主键自增,后来没有发现相对应的Api.只能排序后去找最后一个学生的学号加一当前学生的学号。因为 Realm 是一个 MVCC 数据库 ,底层用 C++ 编写。MVCC 指的是多版本并发控制。这样的机制导致没法自增主键。如果敢兴趣可以看其他文章详情介绍。
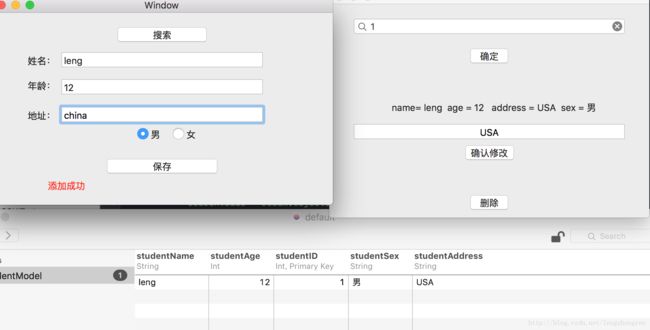
官网提供了Realm Browse 工具,方便查看数据库的改变。 我们可以通过下面代码找到数据库的位置
print(("Path to realm file: " + realm.configuration.fileURL!.absoluteString))
增加
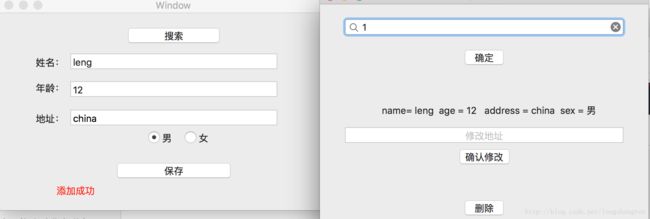
下面我们添加一名学生吧 学生studentID 为 1
下面通过学生studentID = 1 条件查询这个学生的信息
//全局变量lazy var realm = try! Realm()
//查询学生的modelvar item:StudentModel! = nil
//搜索结果集合var searchValue:Results?
查询
searchValue = realm.objects(StudentModel.self).filter("studentID = %d",studentValue!)
self.item = searchValue![0]
或者 也可以用NSPredicate 方式查询
let predicate = NSPredicate(format: "studentID = %d",studentValue)
searchValue = realm.objects(StudentModel.self).filter(predicate)
查询的核心代码就一句。但是很遗憾我没有发现可以到直接返回对象而不是集合的方法.如何你发现了留言告诉我一声,有时间我在查查资料。
修改
修改下查询后人员的地址把china 改成USA 代码如下
try! realm.write {
self.item.studentAddress = self.changAddressTextField.stringValue;
}
删除
try! realm.write {
if self.item != nil {
realm.delete(self.item)
}
}
// Delete all objects from the realm
try! realm.write {
realm.deleteAll()
}
下载地址
学习Mac开发第十节 Image Well
简单翻译的一下:以允许用户拖拽一张图片放到这个图片视图上。
如果你用一个图片压缩软件就会发现,用户可以直接拖拽一张图片放上去就显示的功能。
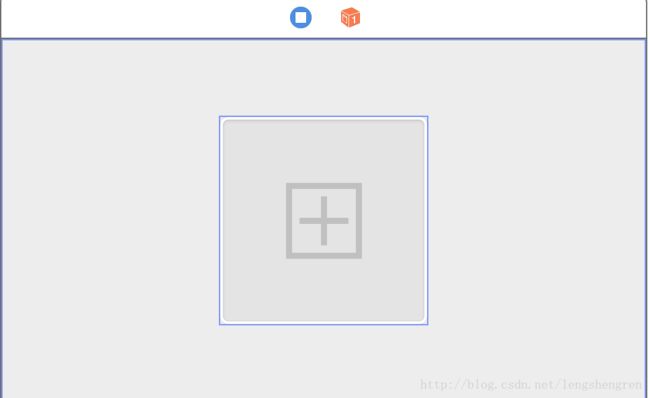
下面我们在storyboard 拖拽一个吧,居中显示,并且设置一个默认的图片吧,来表示用户可以添加图片。
运行起来发现拖拽图片没有效果,那就查看下API。
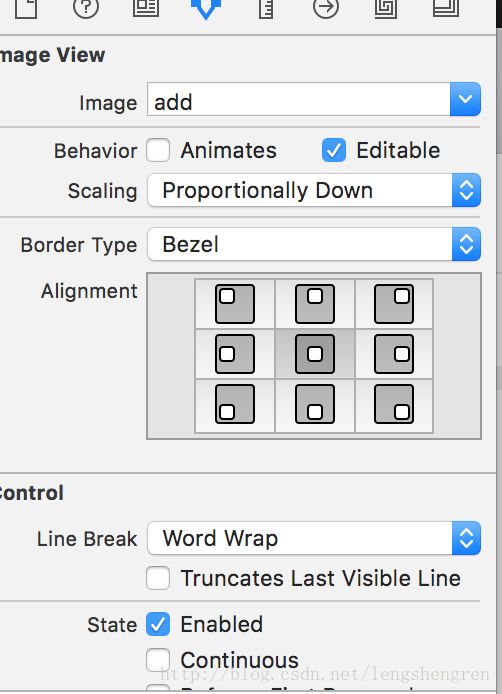
已经说的很清楚了 editable = Yes 时候才可以拖拽。
在属性面板上就有这个属性,点下勾就可以。
这时候我们发现就可以轻松的拖拽个图片到上面去了。
当我选中后点击delete键 后删除图片,后现默认图片也消失了。如果想保留默认图片可以判读是否为空,空的时候在添加上去就可以了。
- (IBAction)touchImageView:(id)sender {
NSImage *defaultImage = [NSImage imageNamed:@"add"];
if (!self.imageWell.image) {
self.imageWell.image = defaultImage;
}
}
当然你也可以通过这个事件添加图片。
