1.前言#
我觉得要弄清楚事件分发前,还是要先大致了解一下几个概念。
Window,WindowManager,WindowMangerService,ViewRoot,DecorView他们之间是如何协同工作的。
2.Activity和Window的关系#
我们知道Activity是支持显示UI的,那么它是否直接管理view树或者ViewRoot呢?答案时否定的,Activity并没有与这两者产生直接的联系,因为这中间还有一个被称为“Window”的对象。大家可以在Activity的源码中找到如下代码:
public class Activity extends ContextThemeWrapper
        implements LayoutInflater.Factory2,
        Window.Callback, KeyEvent.Callback,
        OnCreateContextMenuListener, ComponentCallbacks2,
        Window.OnWindowDismissedCallback {
...
private Window window;
Window的字面意思是"窗口",这很好地解释了它存在的意义。Window是基类,根据不同的产品可以衍生出不同的子类——具体则是由系统在Activity.attach中调用PolicyManager.makeNewWindow决定的,目前版本的Android系统默认生成的都是PhoneWindow。
3.Window和WindowManagerImpl的关系#
在Android源码中以“Window”开头的类有不少,如Window,WindowManager,WindowManagerImpl等,为什么需要这么多相似的类呢?
先来看Window,它是面向Activity的,表示"UI界面的外框";而“框里面”具体的东西包括布局和内容等,是由具体的Window子类,如PhoneWindow来规划的。
Window的另一层含义是要与WindowManagerService进行通信,但它并没有直接在自身实现这一功能。原因是:一个应用程序中很可能存在多个Window。如果它们都单独与WMS通信,那么既浪费资源,又会造成管理的混乱。换句话说,它们需要统一的管理。于是就有了WindowManager,它作为Window的成员变量mWindowManager存在。这个WindowManager是一个接口类,其真正的实现是WindowManagerImpl,后者同时也是整个应用程序中所有Window的管理者。因而WindowManager与WindowManagerImpl的关系有点类似于“地方与中央”:地方为实施中央的“政策”提供了一个接口,然后汇总到中央进行管理。
在Window的源码中与mWindowMager有关的代码有如下几句:
   public void setWindowManager(WindowManager wm, IBinder appToken, String appName,
            boolean hardwareAccelerated) {
        mAppToken = appToken;
        mAppName = appName;
        mHardwareAccelerated = hardwareAccelerated
                || SystemProperties.getBoolean(PROPERTY_HARDWARE_UI, false);
        if (wm == null) {
            wm = (WindowManager)mContext.getSystemService(Context.WINDOW_SERVICE);
        }
        mWindowManager = ((WindowManagerImpl)wm).createLocalWindowManager(this);
    }
public WindowManager getWindowManager() {
        return mWindowManager;
    }
然后我们去WindowManagerImpl的代码中去查看createLocalWindowManager方法的代码,代码如下:
    public WindowManagerImpl createLocalWindowManager(Window parentWindow) {
        return new WindowManagerImpl(mDisplay, parentWindow);
    }
从这几处代码,大家可以看到Window类中的mWindowManger引用的其实是WindowManagerImpl的实例。
4.ViewRoot和WindowManagerImpl的关系#
由于每个Activity都有自己的窗口“Window”,每个Window都有一个WindowManagerImpl实例的引用。即每个Activity都对应一个WindowManagerImpl。
在早期的版本中在WindowMangerImpl内部,存在3个全局变量:
public final class WindowManagerImpl implements WindowManager {
    private [View] [] mViews;//树的根节点
    private [ViewRoot][] mRoots;//ViewRoot
    private [WindowManager][] mParams;//Window的属性
由此也可以看出,一个进程中不仅有一个ViewRoot;而Activity与ViewRoot则是一对一的关系。
自Android4.3开始对此做了修改,WindowManagerImpl不再直接存储上述三个数组变量,而是由一个称为“WindowMangerGlobal”的类统一管理。
public final class WindowManagerImpl implements WindowManager {
    private final WindowManagerGlobal mGlobal = WindowManagerGlobal.getInstance();
    private final Display mDisplay;
    private final Window mParentWindow;
public final class WindowManagerGlobal {
    private final ArrayList mViews = new ArrayList();
    private final ArrayList mRoots = new ArrayList();
    private final ArrayList mParams =
            new ArrayList();
5.DecorView与ViewRootImpl#
从setContentView说起##
一般地,我们在Activity中,会在onCreate()方法中写下这样一句:
    @Override
    protected void onCreate(Bundle savedInstanceState) {
        super.onCreate(savedInstanceState);
        setContentView(R.layout.activity_main);
显然,这是为activity设置一个我们定义好的main.xml布局,我们跟踪一下源码,看看这个方法是怎样做的,Activity#setContentView:
    public void setContentView(int layoutResID) {
        getWindow().setContentView(layoutResID);
        initWindowDecorActionBar();
    }
    public Window getWindow() {
        return mWindow;
    }
以上代码我们可以看出,Activity的setContentView,其实是调用的window的setContentView方法。上面我们了解到Window是基类,我们要找到它的实现类。
final void attach(Context context, ActivityThread aThread,
           Instrumentation instr, IBinder token, int ident,
           Application application, Intent intent, ActivityInfo info,
           CharSequence title, Activity parent, String id,
           NonConfigurationInstances lastNonConfigurationInstances,
           Configuration config, String referrer, IVoiceInteractor voiceInteractor) {
       ...
       //创建Window对象
       mWindow = PolicyManager.makeNewWindow(this);
      ...
   }
我们只看关键部分,在Activity里面有一个attach方法,在这个方法中创建了Window对象,下面看PolicyManager里面的makeNewWindow方法。
public final class PolicyManager {
    ......
    private static final IPolicy sPolicy;

    public static Window makeNewWindow(Context context) {
        return sPolicy.makeNewWindow(context);
    }
}
在这个代码里面调用的是IPolicy里面的makeNewWindow方法,一看IPolicy就知道它是一个接口,真正的实现是在它的实现类Policy中完成的,直接看代码。
public class Policy implements IPolicy {
    ......
    public Window makeNewWindow(Context context) {
        //看到没有,是一个PhoneWindow对象
        return new PhoneWindow(context);
    }
    ......
}
这就看到了创建的是一个PhoneWindow对象,也就是说Activity里面的Window属性引用的就是PhoneWindow对象,调用Window的方法实质调用的就是PhoneWindow的方法,都在这里实现了。
总结:
1.在启动Activity的过程中会调用一个attach函数
2.在attach函数中会执行PolicyManager.makeNewWindow(this)
3.进一步深入,真正执行makeNewWindow的其实是IPolicy,它只是被 PolicyManager进行了包装。
4.IPolicy是一个接口,所以makeNewWindow的执行是由它的实现类Policy来执行的。
5.可以看到执行创建了一个PhoneWindow对象并且返回,最终也是将这个对象赋值给mWindow。
至此我们知道PhoneWindow是Window的实现类,那么我们在PhoneWindow类里面找到它的setContentView方法,看看它又实现了什么,PhoneWindow#setContentView:
 @Override
    public void setContentView(int layoutResID) {
        // Note: FEATURE_CONTENT_TRANSITIONS may be set in the process of installing the window
        // decor, when theme attributes and the like are crystalized. Do not check the feature
        // before this happens.
        if (mContentParent == null) {//1
            installDecor();
        } else if (!hasFeature(FEATURE_CONTENT_TRANSITIONS)) {
            mContentParent.removeAllViews();
        }

        if (hasFeature(FEATURE_CONTENT_TRANSITIONS)) {
            final Scene newScene = Scene.getSceneForLayout(mContentParent, layoutResID,
                    getContext());
            transitionTo(newScene);
        } else {
            mLayoutInflater.inflate(layoutResID, mContentParent);//2
        }
        mContentParent.requestApplyInsets();
        final Callback cb = getCallback();
        if (cb != null && !isDestroyed()) {
            cb.onContentChanged();
        }
    }
首先判断了mContentParent是否为null,如果为空则执行installDecor()方法,那么这个mContentParent又是什么呢?我们看一下它的注释:
    // This is the view in which the window contents are placed. It is either
    // mDecor itself, or a child of mDecor where the contents go.
    private ViewGroup mContentParent;
它是一个ViewGroup类型,结合2号代码处,可以得知,这个mContentParent是我们设置的布局(即main.xml)的父布局。注释还提到了,这个mContentParent是mDecor本身或者是mDecor的一个子元素
这里先梳理一下以上的内容:Activity通过PhoneWindow的setContentView方法来设置布局,而设置布局之前,会先判断是否存在mContentParent,而我们设置的布局文件则是mContentParent的子元素。
DecorView的创建##
我们接着看下 installDecor();的源码 PhoneWindow#installDecor:
private void installDecor() {
        if (mDecor == null) {
            mDecor = generateDecor();
            mDecor.setDescendantFocusability(ViewGroup.FOCUS_AFTER_DESCENDANTS);
            mDecor.setIsRootNamespace(true);
            if (!mInvalidatePanelMenuPosted && mInvalidatePanelMenuFeatures != 0) {
                mDecor.postOnAnimation(mInvalidatePanelMenuRunnable);
            }
        }
        if (mContentParent == null) {
            mContentParent = generateLayout(mDecor);
            ...
        }
    }
首先,如果mDecor为空的时候会执行generateDecor()代码,调用PhoneWindow#generateDecor方法:
protected DecorView generateDecor() {
        return new DecorView(getContext(), -1);
    }
可以看出,这里实例化了DecorView,在源码中我们看到DecorView是PhoneWindow的内部类,
private final class DecorView extends FrameLayout implements RootViewSurfaceTaker {
它继承的是FrameLayout,由此可知它也是一个ViewGroup。
那么,DecroView到底充当了什么样的角色呢?
其实,DecorView是整个ViewTree的最顶层View,它是一个FrameLayout布局,代表了整个应用的界面。在该布局下面,有标题view和内容view这两个子元素,而内容view则是上面提到的mContentParent。我们接着看generateLayout(mDecor)代码,PhoneWindow#generateLayout方法
protected ViewGroup generateLayout(DecorView decor) {
        // Apply data from current theme.
        // 从主题文件中获取样式信息
        TypedArray a = getWindowStyle();

         ...

        if (a.getBoolean(R.styleable.Window_windowNoTitle, false)) {
            requestFeature(FEATURE_NO_TITLE);
        } else if (a.getBoolean(R.styleable.Window_windowActionBar, false)) {
            // Don't allow an action bar if there is no title.
            requestFeature(FEATURE_ACTION_BAR);
        }
        ...
        if (...) {
           ...
        }

          ....

        // Inflate the window decor.
        // 加载窗口布局
        int layoutResource;
        int features = getLocalFeatures();
        // System.out.println("Features: 0x" + Integer.toHexString(features));
        if ((features & (1 << FEATURE_SWIPE_TO_DISMISS)) != 0) {
            layoutResource = R.layout.screen_swipe_dismiss;
        } else if (...) {
           ....
        }

        mDecor.startChanging();
        //加载layoutResource
        View in = mLayoutInflater.inflate(layoutResource, null);
        //往DecorView中添加子View,即mContentParent
        decor.addView(in, new ViewGroup.LayoutParams(MATCH_PARENT, MATCH_PARENT));
        mContentRoot = (ViewGroup) in;
        // 这里获取的就是mContentParent
        ViewGroup contentParent = (ViewGroup)findViewById(ID_ANDROID_CONTENT);
        if (contentParent == null) {
            throw new RuntimeException("Window couldn't find content container view");
        }

        if ((features & (1 << FEATURE_INDETERMINATE_PROGRESS)) != 0) {
            ProgressBar progress = getCircularProgressBar(false);
            if (progress != null) {
                progress.setIndeterminate(true);
            }
        }

        if ((features & (1 << FEATURE_SWIPE_TO_DISMISS)) != 0) {
            registerSwipeCallbacks();
        }

        // Remaining setup -- of background and title -- that only applies
        // to top-level windows.
       ...

        mDecor.finishChanging();

        return contentParent;
    }
由以上代码可以看出,该方法还是做了相当多的工作的,首先根据设置的主题样式来设置DecorView的风格,比如说有没有titlebar之类的,接着为DecorView添加子View,而这里的子View则是上面提到的mContentParent,如果上面设置了FEATURE_NO_ACTIONBAR,那么DecorView就只有mContentParent一个子View,
小结:DecorView是顶级View,内部有titlebar和contentParent两个子元素,contentParent的id是content,而我们设置的main.xml布局则是contentParent里面的一个子元素。
在DecorView创建完毕后,让我们回到PhoneWindow#setContentView方法,直接看代码: mLayoutInflater.inflate(layoutResID, mContentParent);这里加载了我们设置的main.xml布局文件,并且设置mContentParent为main.xml的父布局,至于它怎么加载的,这里就不展开来说了。
到目前为止,通过setContentView方法,创建了DecorView和加载了我们提供的布局,但是这时,我们的View还是不可见的,因为我们仅仅是加载了布局,并没有对View进行任何的测量、布局、绘制工作。在View进行测量流程之前,还要进行一个步骤,那就是把DecorView添加至window中,然后经过一系列过程触发ViewRootImpl#performTraversals方法,在该方法内部会正式开始测量、布局、绘制这三大流程。至于该一系列过程是怎样的,因为涉及到了很多机制,这里简单说明一下:
将DecorView添加至Window##
每一个Activity组件都有一个关联的Window对象,用来描述一个应用程序窗口。每一个应用程序窗口内部又包含有一个View对象,用来描述应用程序窗口的视图。上文分析了创建DecorView的过程,现在则要把DecorView添加到Window对象中。而要了解这个过程,我们首先要简单先了解一下Activity的创建过程:
首先,在ActivityThread#handleLaunchActivity中启动Activity,在这里面会调用到Activity#onCreate方法,从而完成上面所述的DecorView创建动作,当onCreate()方法执行完毕,在handleLaunchActivity方法会继续调用到ActivityThread#handleResumeActivity方法,我们看看这个方法的源码:
 final void handleResumeActivity(IBinder token,
            boolean clearHide, boolean isForward, boolean reallyResume) {
        // If we are getting ready to gc after going to the background, well
        // we are back active so skip it.
        ...

        // TODO Push resumeArgs into the activity for consideration
        // 这里会调用到Activity的onResume()方法
        ActivityClientRecord r = performResumeActivity(token, clearHide);

            ...
            if (r.window == null && !a.mFinished && willBeVisible) {
                r.window = r.activity.getWindow();
                View decor = r.window.getDecorView();
                decor.setVisibility(View.INVISIBLE);
                ViewManager wm = a.getWindowManager();
                WindowManager.LayoutParams l = r.window.getAttributes();
                a.mDecor = decor;
                l.type = WindowManager.LayoutParams.TYPE_BASE_APPLICATION;
                l.softInputMode |= forwardBit;
                if (a.mVisibleFromClient) {
                    a.mWindowAdded = true;
                    wm.addView(decor, l);// 调用addView方法
                }

            // If the window has already been added, but during resume
            // we started another activity, then don't yet make the
            // window visible.
            ...
        }
    }
在该方法内部,获取该activity所关联的window对象,DecorView对象,以及windowManager对象,而WindowManager是抽象类,它的实现类是WindowManagerImpl,所以后面调用的是WindowManagerImpl#addView方法,我们看看源码:
public final class WindowManagerImpl implements WindowManager {
private final WindowManagerGlobal mGlobal = WindowManagerGlobal.getInstance();
    ...
    @Override
    public void addView(@NonNull View view, @NonNull ViewGroup.LayoutParams params) {
        applyDefaultToken(params);
        mGlobal.addView(view, params, mDisplay, mParentWindow);
    }
接着调用了mGlobal的成员函数,而mGlobal则是WindowManagerGlobal的一个实例,那么我们接着看WindowManagerGlobal#addView方法:
public void addView(View view, ViewGroup.LayoutParams params,
            Display display, Window parentWindow) {
        ...
        ViewRootImpl root;
        View panelParentView = null;

        synchronized (mLock) {
            // Start watching for system property changes.
           ...
            root = new ViewRootImpl(view.getContext(), display);//1

            view.setLayoutParams(wparams);

            mViews.add(view);
            mRoots.add(root);
            mParams.add(wparams);
        }

        // do this last because it fires off messages to start doing things
        try {
            root.setView(view, wparams, panelParentView);//2
        } catch (RuntimeException e) {
            // BadTokenException or InvalidDisplayException, clean up.
            synchronized (mLock) {
                final int index = findViewLocked(view, false);
                if (index >= 0) {
                    removeViewLocked(index, true);
                }
            }
            throw e;
        }
    }
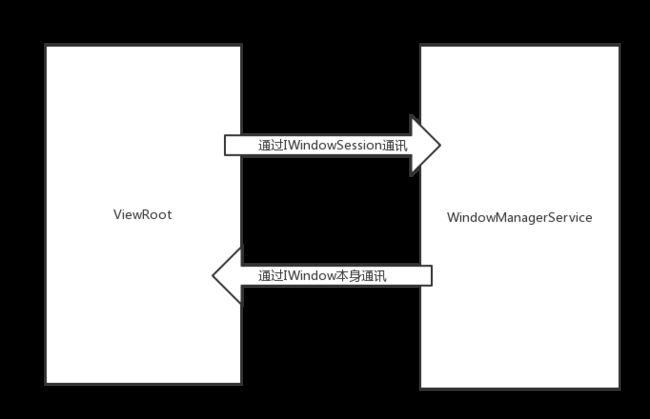
先看1号代码处,实例化了ViewRootImpl类,接着,在2号代码处,调用ViewRootImpl#setView方法,并把DecorView作为参数传递进去,在这个方法内部,会通过跨进程的方式向WMS(WindowManagerService)发起一个调用,从而将DecorView最终添加到Window上,在这个过程中,ViewRootImpl、DecorView和WMS会彼此关联,最终通过WMS调用ViewRootImpl#performTraverals方法开始View的测量、布局、绘制流程
总结:
Window,它是"UI界面的外框",而里面具体内容是有其子类,如PhoneWindow来规划的。
WindowManager,是统一管理Window而诞生的。其实现是WindowManagerImpl
WindowManagerImpl,直接或间接的存储DecorView,ViewRoot,WindowManager;
DecorView,是整个ViewTree的最顶层View,它是一个FrameLayout布局,代表了整个应用的界面,我们setContentView添加的视图是被mContentParent"包裹"着添加到DecorView 中的。
ViewRoot是GUI管理系统与GUI呈现系统之间的桥梁,根据ViewRoot的定义,我们发现它并不是一个View类型,而是一个Handler。
它的主要作用如下:
- 向DecorView分发收到的用户发起的event事件,如按键,触屏,轨迹球等事件;
-
与WindowManagerService交互,完成整个Activity的GUI的绘制。
