苹果在iOS2中引入了Autoresizing技术用于屏幕适配, 其用于指定当父视图的bounds发生改变时如何自动调整子视图的布局
通过Code使用Autoresizing技术
Autoresizing技术涉及到两个UIView的属性: autoresizesSubviews属性用于标识当自身的bounds发生改变时是否自动调整子视图的布局; autoresizingMask属性用于标识当父视图的bounds发生改变时如何自动调整自身的布局
// 默认为YES
@property(nonatomic) BOOL autoresizesSubviews;
// 默认为UIViewAutoresizingNone
@property(nonatomic) UIViewAutoresizing autoresizingMask;
autoresizingMask属性的取值为UIViewAutoresizing枚举, 可以采用位运算(按位或)同时设置多个值
UIViewAutoresizingNone                 = 0,      不执行任何调整
UIViewAutoresizingFlexibleLeftMargin   = 1 << 0, 自动调整与父视图的左边距
UIViewAutoresizingFlexibleWidth        = 1 << 1, 自动调整自身的宽度
UIViewAutoresizingFlexibleRightMargin  = 1 << 2, 自动调整与父视图的右边距
UIViewAutoresizingFlexibleTopMargin    = 1 << 3, 自动调整与父视图的上边距
UIViewAutoresizingFlexibleHeight       = 1 << 4, 自动调整自身的高度
UIViewAutoresizingFlexibleBottomMargin = 1 << 5, 自动调整与父视图的下边距
注: 每个值仅用于标识子视图如何调整指定维度的布局. 例如:
UIViewAutoresizingFlexibleLeftMargin仅用于标识子视图自动调整与父视图的左边距, 并不影响如何调整自身的宽度和与父视图的右边距
如果UIView的autoresizesSubviews属性设置为YES, 当它的bounds发生改变时, 它会根据每个子视图的autoresizingMask属性设置自动为其调整布局
// 示例: 让子视图的宽度和高度保持不变, 且与父视图的右边距和下边距均固定为20pt

CGFloat width = [[UIScreen mainScreen] bounds].size.width;
CGFloat height = [[UIScreen mainScreen] bounds].size.height;

UIView *redView = [[UIView alloc] initWithFrame:CGRectMake(width-120, height-120, 100, 100)];
redView.backgroundColor = [UIColor redColor];
redView.autoresizingMask = UIViewAutoresizingFlexibleTopMargin | UIViewAutoresizingFlexibleLeftMargin;
[self.view addSubview:redView];
如果UIView的autoresizingMask属性在同一个轴线上同时设置了多个值, 默认行为是根据各自维度的可调整部分按照比例来分配调整部分. 例如: 如果UIView的autoresizingMask属性设置在x轴上包含UIViewAutoresizingFlexibleWidth和UIViewAutoresizingFlexibleRightMargin, 而不包含UIViewAutoresizingFlexibleLeftMargin, 则代表与父视图的左边距是固定的, 而自身的宽度和与父视图右边距会根据各自维度的可调整部分按照比例发生变化
// 示例: 让子视图与父视图的右边距和下边距均固定为20pt, 且与父视图的左边距和自身的宽度按照比例自动调整

CGFloat width = [[UIScreen mainScreen] bounds].size.width;
CGFloat height = [[UIScreen mainScreen] bounds].size.height;

UIView *redView = [[UIView alloc] initWithFrame:CGRectMake(width-120, height-120, 100, 100)];
redView.backgroundColor = [UIColor redColor];
redView.autoresizingMask = UIViewAutoresizingFlexibleTopMargin | UIViewAutoresizingFlexibleLeftMargin | UIViewAutoresizingFlexibleWidth;
[self.view addSubview:redView];
通过IB使用Autoresizing技术
IB中的设置最终都会转化为Code运行, 所以我们在这部分只需要了解如何设置autoresizesSubviews属性和autoresizingMask属性即可
我们在父视图的Attributes inspector中设置autoresizesSubviews属性, 用于标识当自身的bounds发生改变时是否自动调整子视图的布局
我们在子视图的中设置autoresizingMask属性, 用于标识当父视图的bounds发生改变时如何自动调整自身的布局
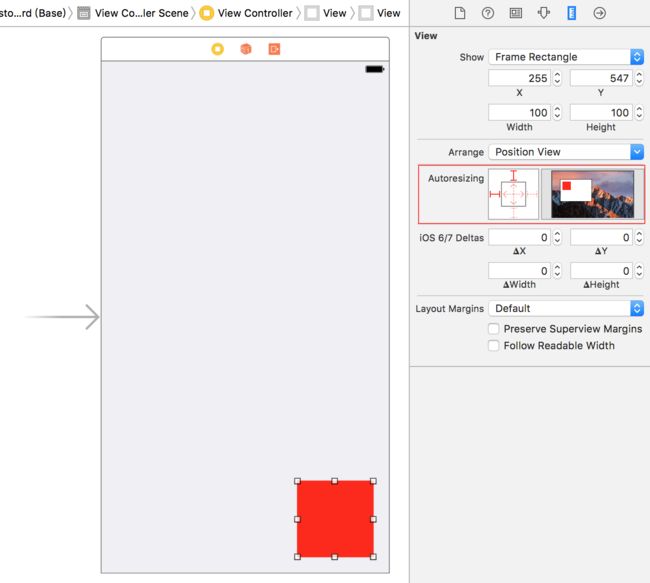
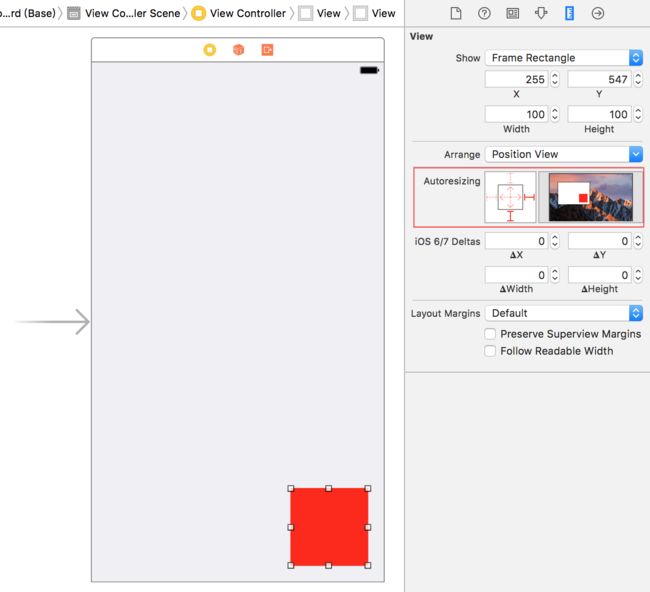
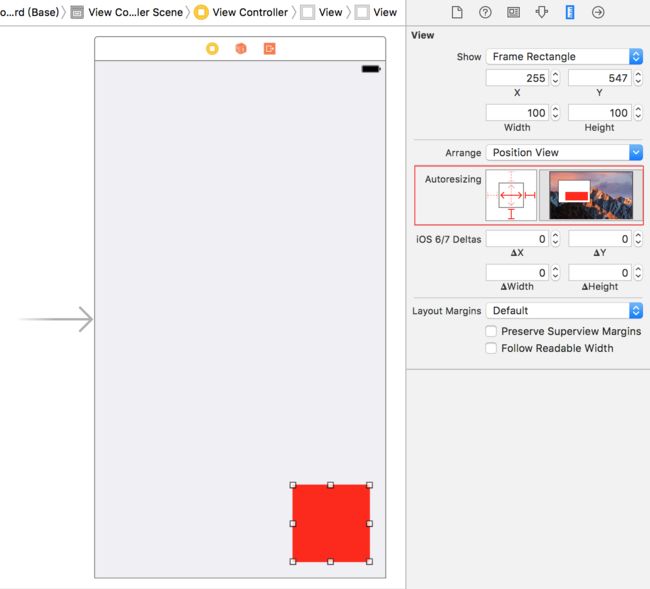
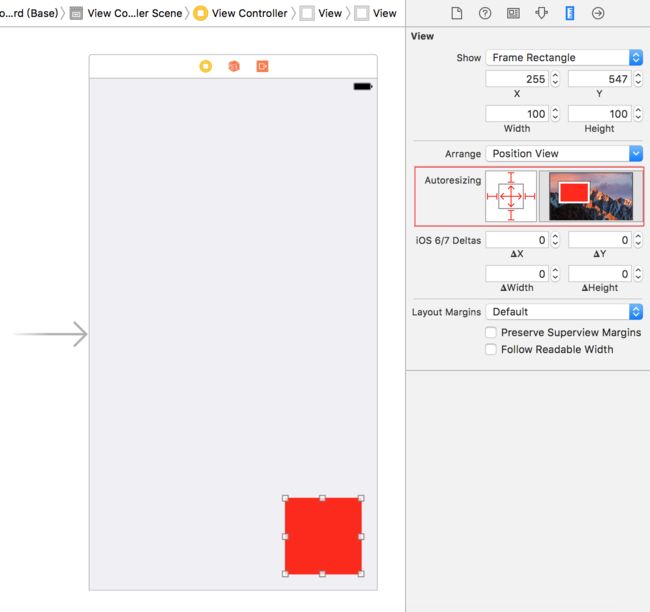
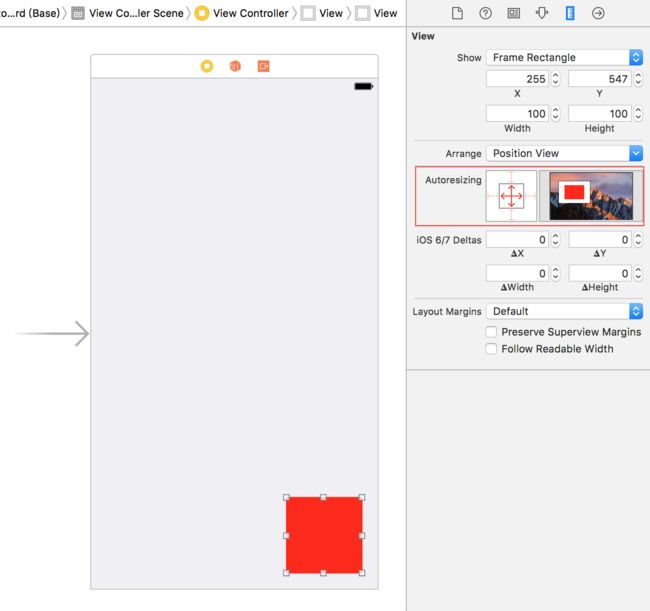
autoresizingMask属性的设置由六根线标识, 其中位于外部的四根线分别用于标识如何自动调整与父视图的上、下、左、右边距; 位于内部的两根线分别用于标识如何自动调整自身的宽度和高度
注: 位于外部的四根线(柱状线段), 如果是实线即代表不自动调整; 位于内部的两根线(箭头线段), 如果是实线即代表自动调整
下面再次通过IB的方式实现Code方式的两个示例
示例: 让子视图的宽度和高度保持不变, 且与父视图的右边距和下边距均固定为20pt
示例: 让子视图与父视图的右边距和下边距均固定为20pt, 且与父视图的左边距和自身的宽度按照比例自动调整
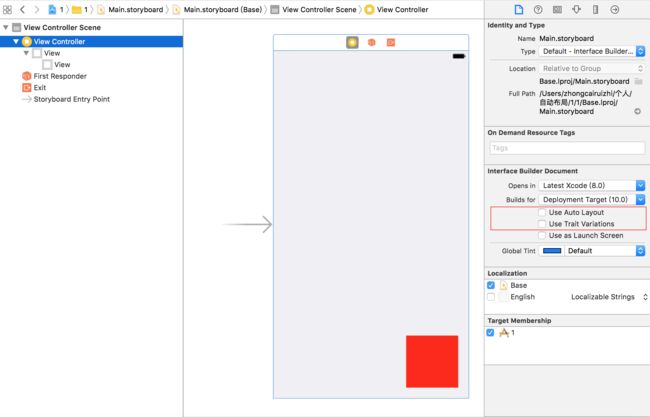
注: 如果
Xcode中默认开启了Autolayout技术, 在使用Autoresizing技术前需要手动将其关闭
两种方式的区别
IB中的设置最终都会转化为Code运行, 所以二者在本质上没有任何区别. 但是在设置autoresizingMask属性时, 二者的思考方式不同
在Code中, autoresizingMask属性显式设置的值即代表自动调整, 未设置的值即代表不自动调整
在IB中, autoresizingMask属性位于外部的四根线(柱状线段), 如果是实线即代表不自动调整; 位于内部的两根线(箭头线段), 如果是实线即代表自动调整
下面通过两个示例对比说明
示例: 让子视图与父视图的上、下、左、右边距保持不变, 且自身的宽度和高度自动调整
redView.autoresizingMask = UIViewAutoresizingFlexibleWidth | UIViewAutoresizingFlexibleHeight;
示例: 让子视图与父视图的上、下、左、右边距以及自身的宽度和高度按照比例自动调整
redView.autoresizingMask = UIViewContentModeLeft | UIViewAutoresizingFlexibleWidth | UIViewAutoresizingFlexibleRightMargin | UIViewAutoresizingFlexibleTopMargin | UIViewAutoresizingFlexibleHeight | UIViewAutoresizingFlexibleBottomMargin;
注: 如果
Autoresizing技术不能满足你对界面的精确布局需求, 你可以使用一个自定义视图作为容器, 并通过重写其layoutSubviews方法来精确地布局其子视图, 或者使用iOS6新引入的Autolayout技术来进行精确布局


