UICollectionView自定义布局实现风火轮(Ray wenderlich上的教程
具体过程请看 Ray Wenderlich上的教程,网上也能找到其他开发者翻译。这里只记录几个我觉得比较重要的
对于自定义布局,最主要的有三个函数:
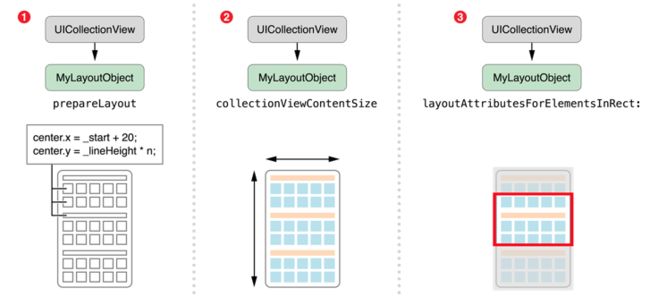
- (void)prepareLayout
用于排列cell前,计算各个cell位置信息,避免将cell加到 collectionview 上时临时计算:
- 在collectionview第一次展现内容时调用
- 布局更新时,调用此函数来准备好下一次的布局
- (CGSize)collectionViewContentSize
collectionView可滑动的区间
- (NSArray *)layoutAttributesForElementsInRect:(CGRect)rect
返回一个可视rect范围内被显示cell的UICollectionViewLayoutAttributes
UICollectionViewLayoutAttributes类管理了布局相关的属性,如cell的frame、transform、bounds、zIndex、center等。它们的定义与用法与UIView中各自属性一致。
环形布局
环形布局最重要的一点就是,让所有cell围绕一个点转起来。
关于view的旋转,可以设定transform,让view旋转一定的角度。但是这样,所有的view都是绕其center旋转,不能达到我们的效果。
我们也可以设定anchorPoint,因为所有关于view的几何运算都与其有关。关于anchorPoint,看这篇文章
关于anchorPoint DEMO

import UIKit

class ViewController: UIViewController {

    @IBOutlet weak var anchorPointView: UIView!
    var viewArray : [UIView] = []
    var isMoved = true

    override func viewDidLoad() {
        super.viewDidLoad()
        // Do any additional setup after loading the view, typically from a nib.

        let tapGesture = UITapGestureRecognizer(target: self, action: "tap")
        self.view.addGestureRecognizer(tapGesture)
    }

    override func viewDidAppear(animated: Bool) {
        super.viewDidAppear(animated)
        for i in (1...5) {
            let eView = UIView(frame: self.anchorPointView.frame)
            eView.backgroundColor = UIColor.blueColor()
            viewArray.append(eView)
            self.view.addSubview(eView)
        }

    }

    func tap() {
            //修改anchorPoint
            self.anchorPointView.layer.anchorPoint = CGPointMake(0.5, 0.5 + 3.0)
            //旋转
            anchorPointView.transform = CGAffineTransformMakeRotation(CGFloat(M_PI / 10) * 0)
            //修正view的位置
            //因为修改了anchorPoint,而position不变,从而导致view上移300个点(anchorPointView 宽高都为100)
            //300根据 (高100)*(anchorPoint在y上增加值3)
            var center = self.anchorPointView.center
            center.y += 300
            self.anchorPointView.center = center
            var i = 1.0
            for view in viewArray {
                view.layer.anchorPoint = CGPointMake(0.5, 0.5 + 3.0)
                view.transform = CGAffineTransformMakeRotation(CGFloat(M_PI / 10 * i))
                i += 1.0 * 1
                var center = view.center
                center.y += 300
                view.center = center
            }

    }
}
自定义UICollectionViewLayoutAttributes
根据上面环形布局,想要让cell环形排列,必须知道cell的anchorPoint与 旋转角度angle。
旋转角度angle对应 UICollectionViewLayoutAttributes 的 transform,而anchorPoint作为一个CALayer的属性,在UICollectionViewLayoutAttributes没有对应的属性,但这里需要让cell知道自己的anchorPoint,才能让其正确旋转。这里就需要自定义UICollectionViewLayoutAttributes。
使用自定义子类,与使用UICollectionViewLayoutAttributes相比,你需要增加一些代码。
- 在自定义布局的相关实现中:
- (Class)layoutAttributesClass {
//返回自定义UICollectionViewLayoutAttributes子类
return [CircularCollectionViewLayoutAttributes class];
}
这样每当需要生成一个新的LayoutAttributes object时就会调用此函数

2.  在需要显示的 UICollectionViewCell的实现中
-
(void)applyLayoutAttributes:(UICollectionViewLayoutAttributes *)layoutAttributes {
[super applyLayoutAttributes:layoutAttributes];
if ([layoutAttributes isKindOfClass:[CircularCollectionViewLayoutAttributes class]]) {
CircularCollectionViewLayoutAttributes *attributes = (CircularCollectionViewLayoutAttributes *)layoutAttributes;CGPoint centerPoint = self.center; self.layer.anchorPoint = attributes.anchorPoint; centerPoint.y += self.selected? (attributes.anchorPoint.y - 0.5) * CGRectGetHeight(self.bounds) - 50: (attributes.anchorPoint.y - 0.5) * CGRectGetHeight(self.bounds); self.center = centerPoint;}
}
这样新增加的UICollectionViewLayoutAttributes属性,才有机会作用在cell上

###布局核心过程代码
-
(void)prepareLayout {
[super prepareLayout];
CGFloat centerX = self.collectionView.contentOffset.x + CGRectGetWidth(self.collectionView.bounds) / 2.0;
CGFloat anchorPointY = ((_itemSize.height / 2) + _radius ) / _itemSize.height;int startIndex = 0;
int endIndex = (int)[self itemCount] - 1;
// CGFloat theta = atan2(CGRectGetWidth(self.collectionView.bounds) / 2.0,
// _radius + (_itemSize.height / 2.0) - CGRectGetHeight(self.collectionView.bounds) / 2.0);
// if ([self angle] < -theta) {
//
// startIndex = (int)(floor( (-[self angle] - theta) / [self anglePerItem]));
//
// }
//
// endIndex = MIN(endIndex, (int)ceil((-[self angle] + theta) / [self anglePerItem]) );
//
// if (endIndex < startIndex) {
//
// startIndex = 0;
// endIndex = 0;
//
// }for (int i = startIndex; i <= endIndex; i++) {
  CircularCollectionViewLayoutAttributes *attribute = [CircularCollectionViewLayoutAttributes layoutAttributesForCellWithIndexPath:[NSIndexPath indexPathForItem:i inSection:0]];
  attribute.size = _itemSize;
  attribute.center = CGPointMake(centerX, CGRectGetMidY(self.collectionView.bounds));
  attribute.anchorPoint = CGPointMake(0.5, anchorPointY);
  attribute.angle = [self angle] + [self anglePerItem]*i;
  [_layoutAttributes addObject:attribute];
}
}
- (NSArray
*)layoutAttributesForElementsInRect:(CGRect)rect {
//返回prepareLayout计算好的布局
return _layoutAttributes;
}
- (UICollectionViewLayoutAttributes *)layoutAttributesForItemAtIndexPath:(NSIndexPath *)indexPath {
//
return _layoutAttributes[indexPath.row];
}
-
(CGSize)collectionViewContentSize {
return CGSizeMake([self.collectionView numberOfItemsInSection:0] * _itemSize.width, CGRectGetHeight(self.collectionView.bounds));
}
-
(Class)layoutAttributesClass {
return [CircularCollectionViewLayoutAttributes class];
}
- (BOOL)shouldInvalidateLayoutForBoundsChange:(CGRect)newBounds {
//每次滑动,都触发新的布局
return true;
}