前言
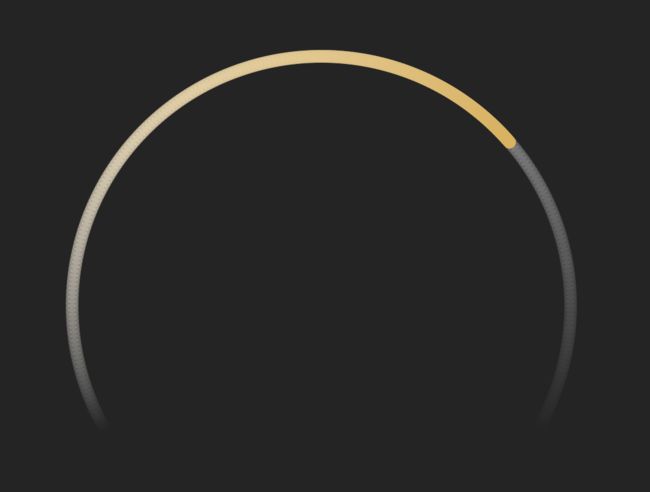
这两天做的页面中有一个比较有意思的积分环,采用的是渐变形式,具体如下图所示。

真实效果图如下所示,
下面就让我们来一步步实现它。
对自定义View还不了解的可以参考我之前写的三篇文章:
自定义View(一)(Android群英传)
自定义View(二)(Android群英传)
自定义View(三)(Android群英传)
实现
首先,我们要明确我们要控制这个自定义View的哪些属性,可以分析出,我们需要控制环的粗细,环的进度,进度环的起始和结束色,背景环的起始和结束色,环的起始角度,环扫过的角度,有了这些参数,那么也就确定了其样式,顺便,我们再加一个是否显示动画的参数,具体attrs.xml文件内容如下所示。
下一步新建一个类ProgressRing,继承自View,我们实现其第二个构造函数
public ProgressRing(Context context, @Nullable AttributeSet attrs) {
    super(context, attrs);
}
既然我们定义了那么多属性,那么在这个构造函数中我们就需要用到那些属性了,具体操作如下所示。
TypedArray ta = context.obtainStyledAttributes(attrs, R.styleable.ProgressRing);
progressStartColor = ta.getColor(R.styleable.ProgressRing_pr_progress_start_color, Color.YELLOW);
progressEndColor = ta.getColor(R.styleable.ProgressRing_pr_progress_end_color, progressStartColor);
bgStartColor = ta.getColor(R.styleable.ProgressRing_pr_bg_start_color, Color.LTGRAY);
bgMidColor = ta.getColor(R.styleable.ProgressRing_pr_bg_mid_color, bgStartColor);
bgEndColor = ta.getColor(R.styleable.ProgressRing_pr_bg_end_color, bgStartColor);
progress = ta.getInt(R.styleable.ProgressRing_pr_progress, 0);
progressWidth = ta.getDimension(R.styleable.ProgressRing_pr_progress_width, 8f);
startAngle = ta.getInt(R.styleable.ProgressRing_pr_start_angle, 150);
sweepAngle = ta.getInt(R.styleable.ProgressRing_pr_sweep_angle, 240);
showAnim = ta.getBoolean(R.styleable.ProgressRing_pr_show_anim, true);
ta.recycle();
这里startAngle为何为150呢,也就是起始角度为150度,这150代表什么呢?因为我之后画圆环调用的是drawArc函数,我们跳转进去查看一下便可发现如下说明The arc is drawn clockwise. An angle of 0 degrees correspond to the geometric angle of 0 degrees (3 o'clock on a watch.),也就是说,零度角是在时钟三点钟方向,沿着顺时针方向角度依次增大,如果还不懂的话,那就看我下面这张图的分析。

所以sweepAngle为240大家也都知道了吧。
当然这都是默认值,具体数值你们可以自己定义,从而实现不同的圆弧。
我们进度最大为100,我们可以得到单位角度unitAngle = (float) (sweepAngle / 100.0);
我们分别设置两支画笔,bgPaint和progressPaint,一支画背景,一支画进度,并对他们设置样式,具体如下所示。
private Paint bgPaint = new Paint(Paint.ANTI_ALIAS_FLAG | Paint.DITHER_FLAG);
private Paint progressPaint = new Paint(Paint.ANTI_ALIAS_FLAG | Paint.DITHER_FLAG);

bgPaint.setStyle(Paint.Style.STROKE);
bgPaint.setStrokeCap(Paint.Cap.ROUND);
bgPaint.setStrokeWidth(progressWidth);
progressPaint.setStyle(Paint.Style.STROKE);
progressPaint.setStrokeCap(Paint.Cap.ROUND);
progressPaint.setStrokeWidth(progressWidth);
现在,我们最初的准备工作都做完了,下面就是来确定画的大小和画的东西了,画的位置,我们需要在onMeasure中确定画的大小,代码比较简单,如下所示。
@Override
protected void onMeasure(int widthMeasureSpec, int heightMeasureSpec) {
    super.onMeasure(widthMeasureSpec, heightMeasureSpec);
    mMeasureWidth = getMeasuredWidth();
    mMeasureHeight = getMeasuredHeight();
    if (pRectF == null) {
        float halfProgressWidth = progressWidth / 2;
        pRectF = new RectF(halfProgressWidth + getPaddingLeft(),
                halfProgressWidth + getPaddingTop(),
                mMeasureWidth - halfProgressWidth - getPaddingRight(),
                mMeasureHeight - halfProgressWidth - getPaddingBottom());
    }
}
接下来就是最重要的怎么画了,当然是在我们的onDraw函数中了。我们先画不支持动画显示的,从简单的开始,我们先画进度部分,由于涉及到渐变,我们需要在起始色和结束色中间获取过渡色,我们调用如下函数即可。
public int getGradient(float fraction, int startColor, int endColor) {
    if (fraction > 1) fraction = 1;
    int alphaStart = Color.alpha(startColor);
    int redStart = Color.red(startColor);
    int blueStart = Color.blue(startColor);
    int greenStart = Color.green(startColor);
    int alphaEnd = Color.alpha(endColor);
    int redEnd = Color.red(endColor);
    int blueEnd = Color.blue(endColor);
    int greenEnd = Color.green(endColor);
    int alphaDifference = alphaEnd - alphaStart;
    int redDifference = redEnd - redStart;
    int blueDifference = blueEnd - blueStart;
    int greenDifference = greenEnd - greenStart;
    int alphaCurrent = (int) (alphaStart + fraction * alphaDifference);
    int redCurrent = (int) (redStart + fraction * redDifference);
    int blueCurrent = (int) (blueStart + fraction * blueDifference);
    int greenCurrent = (int) (greenStart + fraction * greenDifference);
    return Color.argb(alphaCurrent, redCurrent, greenCurrent, blueCurrent);
}
这里可能有小伙伴要说安卓API中就有渐变,比如LinearGradient、SweepGradient、RadialGrdient,不过其局限性比较大,所以我还是选择如上的方式获取渐变色。
我们从起始角startAngle开始画,画到startAngle + progress * unitAngle即可,每次增加1弧度即可,相关代码如下所示。
for (int i = 0, end = (int) (progress * unitAngle); i <= end; i++) {
    progressPaint.setColor(getGradient(i / (float) end, progressStartColor, progressEndColor));
    canvas.drawArc(pRectF,
            startAngle + i,
            1,
            false,
            progressPaint);
}
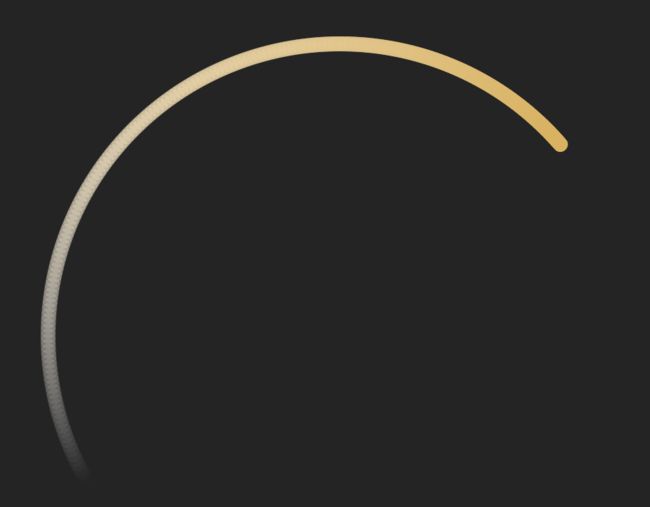
下图显示了进度为70的进度样子。
画完了进度后,我们把进度相关代码注释掉,现在我们只关心画背景色,背景色我们只需要画能看到部分即可,不需要画进度后面的背景色,这样还提升了绘制效率。由于我们背景色还包含一个中间色,所以还需要区分下左面和右面。相关代码如下所示。
float halfSweep = sweepAngle / 2;
for (int i = sweepAngle, st = (int) (progress * unitAngle); i > st; --i) {
    if (i - halfSweep > 0) {
        bgPaint.setColor(getGradient((i - halfSweep) / halfSweep, bgMidColor, bgEndColor));
    } else {
        bgPaint.setColor(getGradient((halfSweep - i) / halfSweep, bgMidColor, bgStartColor));
    }
    canvas.drawArc(pRectF,
            startAngle + i,
            1,
            false,
            bgPaint);
}
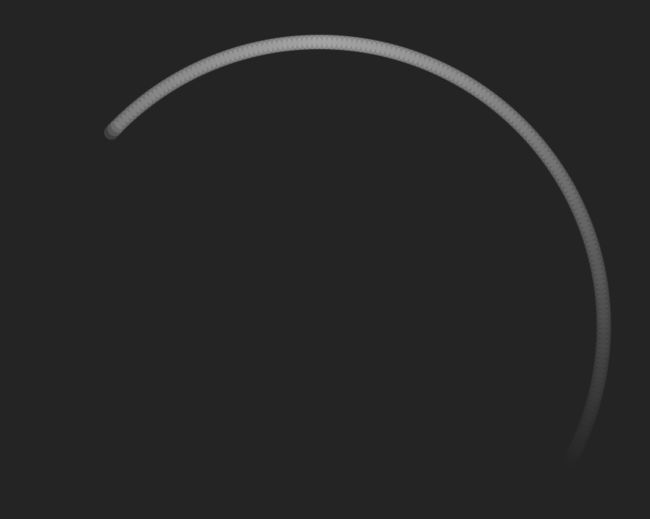
下图显示了进度为30的背景色样子。
好了,我们把进度相关代码取消注释,再运行一遍便可得到最终效果。
下面我们来为其加上动画,所谓动画,就是让其从进度为0开始画,一点点画到progress即可,我们设置一个变量curProgress来表示当前进度,当curProgress < progress时,curProgress自增,再调用postInvalidate()即可,具体完整代码如下所示。
import android.content.Context;
import android.content.res.TypedArray;
import android.graphics.Canvas;
import android.graphics.Color;
import android.graphics.Paint;
import android.graphics.RectF;
import android.support.annotation.IntRange;
import android.support.annotation.Nullable;
import android.util.AttributeSet;
import android.view.View;

/**
 *
 *     author: Blankj
 *     blog  : http://blankj.com
 *     time  : 2017/07/10
 *     desc  :
 *
 */
public class ProgressRing extends View {

    private int progressStartColor;
    private int progressEndColor;
    private int bgStartColor;
    private int bgMidColor;
    private int bgEndColor;
    private int progress;
    private float progressWidth;
    private int startAngle;
    private int sweepAngle;
    private boolean showAnim;

    private int mMeasureHeight;
    private int mMeasureWidth;

    private Paint bgPaint = new Paint(Paint.ANTI_ALIAS_FLAG | Paint.DITHER_FLAG);
    private Paint progressPaint = new Paint(Paint.ANTI_ALIAS_FLAG | Paint.DITHER_FLAG);

    private RectF pRectF;

    private float unitAngle;

    private int curProgress = 0;

    public ProgressRing(Context context, @Nullable AttributeSet attrs) {
        super(context, attrs);
        TypedArray ta = context.obtainStyledAttributes(attrs, R.styleable.ProgressRing);
        progressStartColor = ta.getColor(R.styleable.ProgressRing_pr_progress_start_color, Color.YELLOW);
        progressEndColor = ta.getColor(R.styleable.ProgressRing_pr_progress_end_color, progressStartColor);
        bgStartColor = ta.getColor(R.styleable.ProgressRing_pr_bg_start_color, Color.LTGRAY);
        bgMidColor = ta.getColor(R.styleable.ProgressRing_pr_bg_mid_color, bgStartColor);
        bgEndColor = ta.getColor(R.styleable.ProgressRing_pr_bg_end_color, bgStartColor);
        progress = ta.getInt(R.styleable.ProgressRing_pr_progress, 0);
        progressWidth = ta.getDimension(R.styleable.ProgressRing_pr_progress_width, 8f);
        startAngle = ta.getInt(R.styleable.ProgressRing_pr_start_angle, 150);
        sweepAngle = ta.getInt(R.styleable.ProgressRing_pr_sweep_angle, 240);
        showAnim = ta.getBoolean(R.styleable.ProgressRing_pr_show_anim, true);
        ta.recycle();

        unitAngle = (float) (sweepAngle / 100.0);

        bgPaint.setStyle(Paint.Style.STROKE);
        bgPaint.setStrokeCap(Paint.Cap.ROUND);
        bgPaint.setStrokeWidth(progressWidth);

        progressPaint.setStyle(Paint.Style.STROKE);
        progressPaint.setStrokeCap(Paint.Cap.ROUND);
        progressPaint.setStrokeWidth(progressWidth);

    }

    @Override
    protected void onMeasure(int widthMeasureSpec, int heightMeasureSpec) {
        super.onMeasure(widthMeasureSpec, heightMeasureSpec);
        mMeasureWidth = getMeasuredWidth();
        mMeasureHeight = getMeasuredHeight();
        if (pRectF == null) {
            float halfProgressWidth = progressWidth / 2;
            pRectF = new RectF(halfProgressWidth + getPaddingLeft(),
                    halfProgressWidth + getPaddingTop(),
                    mMeasureWidth - halfProgressWidth - getPaddingRight(),
                    mMeasureHeight - halfProgressWidth - getPaddingBottom());
        }
    }

    @Override
    protected void onDraw(Canvas canvas) {
        super.onDraw(canvas);

        if (!showAnim) {
            curProgress = progress;
        }

        drawBg(canvas);
        drawProgress(canvas);

        if (curProgress < progress) {
            curProgress++;
            postInvalidate();
        }

    }

    // 只需要画进度之外的背景即可
    private void drawBg(Canvas canvas) {
        float halfSweep = sweepAngle / 2;
        for (int i = sweepAngle, st = (int) (curProgress * unitAngle); i > st; --i) {
            if (i - halfSweep > 0) {
                bgPaint.setColor(getGradient((i - halfSweep) / halfSweep, bgMidColor, bgEndColor));
            } else {
                bgPaint.setColor(getGradient((halfSweep - i) / halfSweep, bgMidColor, bgStartColor));
            }
            canvas.drawArc(pRectF,
                    startAngle + i,
                    1,
                    false,
                    bgPaint);
        }
    }

    private void drawProgress(Canvas canvas) {
        for (int i = 0, end = (int) (curProgress * unitAngle); i <= end; i++) {
            progressPaint.setColor(getGradient(i / (float) end, progressStartColor, progressEndColor));
            canvas.drawArc(pRectF,
                    startAngle + i,
                    1,
                    false,
                    progressPaint);
        }
    }

    public void setProgress(@IntRange(from = 0, to = 100) int progress) {
        this.progress = progress;
        invalidate();
    }

    public int getProgress() {
        return progress;
    }

    public int getGradient(float fraction, int startColor, int endColor) {
        if (fraction > 1) fraction = 1;
        int alphaStart = Color.alpha(startColor);
        int redStart = Color.red(startColor);
        int blueStart = Color.blue(startColor);
        int greenStart = Color.green(startColor);
        int alphaEnd = Color.alpha(endColor);
        int redEnd = Color.red(endColor);
        int blueEnd = Color.blue(endColor);
        int greenEnd = Color.green(endColor);
        int alphaDifference = alphaEnd - alphaStart;
        int redDifference = redEnd - redStart;
        int blueDifference = blueEnd - blueStart;
        int greenDifference = greenEnd - greenStart;
        int alphaCurrent = (int) (alphaStart + fraction * alphaDifference);
        int redCurrent = (int) (redStart + fraction * redDifference);
        int blueCurrent = (int) (blueStart + fraction * blueDifference);
        int greenCurrent = (int) (greenStart + fraction * greenDifference);
        return Color.argb(alphaCurrent, redCurrent, greenCurrent, blueCurrent);
    }
}
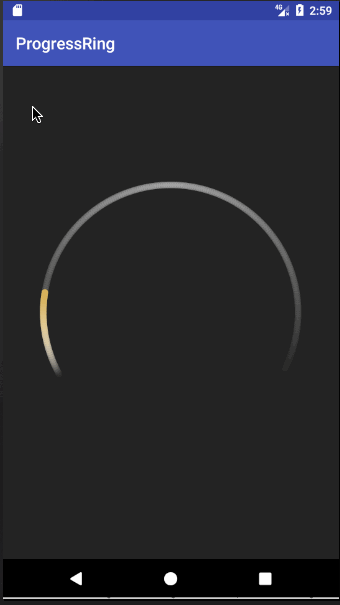
最后我们在布局中如下引用
最终效果如下所示。
结语
这次自定义View的实战讲解还是很具体细致的,希望大家能学到些什么,比如如何一步步分析问题,解决问题的。还有就是能把初始化放在onDraw之外的就都放onDraw外,在onDraw中只做onDraw相关的,还有一些小细节就自己去发现吧。代码已上传GitHub,喜欢的记得star哦。