1.UITableView初始化方法
- (instancetype)initWithFrame:(CGRect)frame style:(UITableViewStyle)style;
UITableViewStyle是一个枚举:
typedef NS_ENUM(NSInteger, UITableViewStyle) {
UITableViewStylePlain, // 标准的表视图风格
UITableViewStyleGrouped // 分组的表视图风格
};
2.UITableView表视图的数据源简介
UITableView依赖外部资源为表格单元格cell填写相关内容,因此把提供数据的外部资源成为数据源,也是符合iOS开发遵循的mvc设计模式。
· 数据源(一般为控制器)根据索引路径(indexpath:定位到唯一的一个单元格)为某一个单元格提供数据。
· 索引路径是NSIndexpath对象,拥有两个属性section(段)、row(行),通过这两个属性定位UITableView中的唯一一个单元格cell
3.UITableView表视图的数据源方法
在UIKit框架下对UITableViewDataSource协议进行了详细的描述:
@required(必须实现的)
返回每个段有多少单元格:
- (NSInteger)tableView:(UITableView *)tableView numberOfRowsInSection:(NSInteger)section;
根据indexpath属性,返回该单元格的具体样式和内容:
- (UITableViewCell *)tableView:(UITableView *)tableView cellForRowAtIndexPath:(NSIndexPath *)indexPath;
@optional(可选则实现)
返回整个tableview有多少段,默认值为1:
- (NSInteger)numberOfSectionsInTableView:(UITableView *)tableView;
4.代理方法之点击单元格
- (void)tableView:(UITableView *)tableView didSelectRowAtIndexPath:(NSIndexPath *)indexPath;//点击cell方法
5.代理方法之编辑单元格
单元格cell编辑:常用方法 - (nullable NSArray*)tableView:(UITableView *)tableView editActionsForRowAtIndexPath:(NSIndexPath *)indexPath; //iOS8开始使用
开始编辑前调用:
- (void)tableView:(UITableView*)tableView willBeginEditingRowAtIndexPath:(NSIndexPath *)indexPath;
完成编辑后调用:
- (void)tableView:(UITableView*)tableView didEndEditingRowAtIndexPath:(NSIndexPath *)indexPath;
单元格cell编辑的实现步骤:
1.实现editActionsForRowAtIndexPath:方法
2.创建UITableViewRowAction对象
3.刷新表格:对tableview的cell进行操作后,一定记得需要重新刷新表格,更新样式
6.了解系统自带单元格
系统自带单元格(UITableViewCell类型)主要有4中常用属性
1.imageView:显示在左边的一张图片logo
2.textLabel:主要文字,黑色字体显示
3.detailTextLabel:详细说明文字,字体小
4.accessaryView:附件视图,可以使用自定义view,也可以使用自带的一些标准按钮
系统自带单元格样式:
typedef NS_ENUM(NSInteger, UITableViewCellStyle) {
UITableViewCellStyleDefault, //标准样式
UITableViewCellStyleValue1,
UITableViewCellStyleValue2,
UITableViewCellStyleSubtitle//带子标题的样式
};
系统自带单元格accessaryView样式:
typedef NS_ENUM(NSInteger, UITableViewCellAccessoryType) {
UITableViewCellAccessoryNone, //没有视图
UITableViewCellAccessoryDisclosureIndicator, //箭头
UITableViewCellAccessoryDetailDisclosureButton, //button和箭头
UITableViewCellAccessoryCheckmark, //对勾
UITableViewCellAccessoryDetailButton
};
选中cell的颜色
typedef enum {
UITableViewCellSelectionStyleNone,
UITableViewCellSelectionStyleBlue,
UITableViewCellSelectionStyleGray
} UITableViewCellSelectionStyle
6.UITableViewCell性能优化
在UITableView内部有一个缓存池,初始化时使用initWithStyle:(UITableViewCellStyle) reuseIdentifier:(NSString*)方法置顶一个可重用标识,就可以将这个cell放到缓存池,然后在使用时使用指定的标识去缓存池中取得对应的cell然后修改cell内容
7.分段section
在tableview中可以设置多个section,每一个section中可以包含若干个单元格cell,同时每个section还包括一个headerView以及一个footerView
1.section的数据源方法
在tableview的代理方法中,如果涉及到多个section的配置,需要实现如下方法
- (NSInteger)numberOfSectionsInTableView:(UITableView *)tableView;//不实现默认1;
2.section的header/footer的title设置
如果section的header/footer仅仅需要显示一些文字提示,则可以直接调用tableview的代理方法来设置
- (nullable NSString *)tableView:(UITableView *)tableView titleForHeaderInSection:(NSInteger)section;//设置header文字
- (nullable NSString *)tableView:(UITableView *)tableView titleForFooterInSection:(NSInteger)section;//设置footer文字
3.section的header/footer的样式定制 见下文(8.自定义section的header、footer)
4.section的索引
在tableview的右侧,可以定制每个section的索引,可以通过如下方法以及属性设置
- (nullable NSArray*)sectionIndexTitlesForTableView:(UITableView *)tableView;//显示索引内容
- (NSInteger)tableView:(UITableView *)tableView sectionForSectionIndexTitle:(NSString *)title atIndex:(NSInteger)index; //按照index索引
@property (nonatomic, strong, nullable) UIColor *sectionIndexColor; //索引文字颜色
@property (nonatomic, strong, nullable) UIColor *sectionIndexBackgroundColor; //索引背景颜色
@property (nonatomic, strong, nullable) UIColor *sectionIndexTrackingBackgroundColor;//索引点击时的背景颜色
8.自定义section的header、footer
一般情况下,section的header和footer通常不仅仅是文字,还需要添加一些UI控件或者定制样式,这就需要通过tableview的代理方法进行制定
制定header样式:
- (UIView *)tableView:(UITableView *)tableView viewForHeaderInSection:(NSInteger)section;
制定footer样式:
- (UIView *)tableView:(UITableView *)tableView viewForFooterInSection:(NSInteger)section;
9.自定义cell
自定义cell步骤
1.新建一个继承自UITableViewCell的类。
2.先重写这个自定义cell 类的initWithStyle:(UITableViewCellStyle)style reuseIdentifier:方法,在这个方法中将所有有可能需要显示的子控件都加进去。其中有些可能不显示的控件用hidden属性来控制。这些子控件必须加到ContentView中。这里不需要设置子控件的数据和frame。有些属性可能只需要设置一次,那么在这里设置(考虑性能)
3.提供两个模型,一个数据模型,一个frame模型。
4.重写这个属性的set方法,在这个set方法中完成对子控件内容和frame的设置。
10.cell的高度设置
单元格cell的高度设置是tableview的一个难点,开发中会需要每个cell的高度必须根据其中展示的内容的多少进行动态的调整
cell的高度设置方法:
1.修改rowHeight属性,这个属性是针对全局cell的高度
2.实现heightForRowAtIndexpath:代理方法
3.使用self-sizing(iOS8以上)见下文(11.动态调整cell高度(self-sizing))
4.使用代码计算cell高度(通用)见下文(12.动态调整cell高度(通用))
11.动态调整cell高度(self-sizing)
在iOS8中苹果引入了self-sizing,在iOS8之前,想要表视图中展示可变高度的动态内容时,需要手动计算行高,而self-sizing为展示动态内容提供了解决方法
1.设置约束
对于需要动态调整高度的控件,在使用自动布局设置约束的时候,一定不要设置其绝对高度,其高度要根据控件与周边其他控件的位置约束来决定
2.编写代码
使用代码设置tableview的两个属性
self.tableView.estimatedRowHeight = 67;
self.tableView.rowHeight = UITableViewAutomaticDimension;
3.注意事项
对于需要动态改变高度的label,需要取消其行数的限制
12.动态调整cell高度(通用)
在iOS8之前,如果涉及到cell高度的动态调整,则需要通过代码来实现,动态计算出需要的高度。这就需要在数据模型中增加一个cell高度属性,同时把这个高度属性返回给tableview的代理方法中
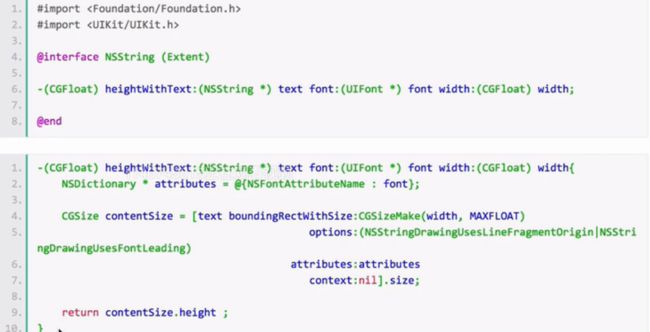
1.添加一个NSString的分类,计算文字所需的高度
新增一个NSString类型的分类,并添加一个方法,该方法根据输入文字内容的text,以及字体大小font,以及所需的宽度width,计算出所需的高度(该方法适用于动态调整显示文字类型的控件)
2.在数据模型中,增加一个高度属性
3.实现tableview的heightForRowAtIndexPath方法,取出数据模型对象中的cellLabelHeight属性,并作为cell的高度返回
4.如果cell是通过xib方式创建的,并且使用了自动布局,对于需要动态调整报读的控件,不要设置高度相关的约束
13.改变cell的位置
1.设置tableview调整cell位置的属性
需要设置tableview的editing属性为YES(默认为NO)
2.实现调整cell位置的代理方法
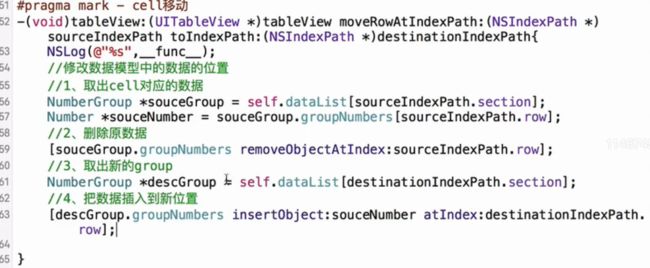
- (void)tableView:(UITableView *)tableView moveRowAtIndexPath:(NSIndexPath *)sourceIndexPath toIndexPath:(NSIndexPath *)destinationIndexPath;
如果需要实现修改数据源中cell对应数据源在数组中的位置则需要的流程为:取出cell的数据源-->>取出对应的cell-->>删除cell对应的数据源-->>取出新的group-->>插入新位置
14.tableView的优化方案总结:
1.提前计算并缓存好高度(布局),因为heightForRowAtIndexPath:是调用最频繁的方法;
2.异步绘制,遇到复杂界面,遇到性能瓶颈时,可能就是突破口;
3.滑动时按需加载,这个在大量图片展示,网络加载的时候很管用!(SDWebImage已经实现异步加载)。
4.正确使用reuseIdentifier来重用Cells
5.尽量使所有的view opaque,包括Cell自身
6.尽量少用或不用透明图层
7.如果Cell内现实的内容来自web,使用异步加载,缓存请求结果
8.减少subviews的数量
9.在heightForRowAtIndexPath:中尽量不使用cellForRowAtIndexPath:,如果你需要用到它,只用一次然后缓存结果
10.尽量少用addView给Cell动态添加View,可以初始化时就添加,然后通过hide来控制是否显示


