连接池
在实际的开发当中,我们很多的对数据库的操作的时候都是用到连接池的,数据库的连接池它可以减少我们获取数据库连接的时间。
MyBatis连接池
在mybatis中给我们提供了三种数据库的连接方式
POOLED 用的是DataSource规范的连接池
UNPOOLED 使用的传统的获取连接的方式,没有使用池子的思想
JNDI 使用的是服务器提供的技术,来获取datasource对象,不同的服务器拿到的对象是不一样的,只能使用在web和maven的工程
在配置文件中配置数据库连接池的位置:
在主配置文件中的datasource标签中,type属性就是让你设置用那一种连接池
POOLED和UNPOOLED的区别
想必在家可以在名子上看的出来,一个是使用了连接池一个是没有使用连接池的。
那我就通过运行程序后来让大家看不这两者的区别
这里可以很好的看出使用了连接池的日志最后关闭的时候,系统都会将获取到的连接放回到连接池中,而使用了UNPOOLED方式的只会有一个创建连接的过程,并没有放回连接池。
这样就表示使用UNPOOLED每次都会创建一新的连接,使用POOLED时如果池子里面有连接那么便直接在池子里取出,在样大大的接省了创建连接的时间
UNPOOLED源码分析
我们可以看下这个的源码:
1  public Connection getConnection() throws SQLException {
2         return this.doGetConnection(this.username, this.password);
3  }
这个是调用了获取连接的方法,在它的源码中是直接调用了一个方法,并把在构造中传过来的用户名和密码放进了参看数里
 1 private Connection doGetConnection(String username, String password) throws SQLException {
 2            Properties props = new Properties();
 3            if (this.driverProperties != null) {
 4             props.putAll(this.driverProperties);
 5         }
 6
 7         if (username != null) {
 8             props.setProperty("user", username);
 9         }
10
11         if (password != null) {
12            props.setProperty("password", password);
13         }
14
15        return this.doGetConnection(props);
16 }
这里看代码的意思是将用户名和密码放到一个配置文件的对象里面(这里我的表述可能存在错误,如果有错请在下方评论),然后通过参数的方式将它传递到另外一个方法内
1 private Connection doGetConnection(Properties properties) throws SQLException {
2       this.initializeDriver();
3       Connection connection = DriverManager.getConnection(this.url, properties);
4       this.configureConnection(connection);
5       return connection;
6 }
首先看到这个的方法的返回值的类型,是一个Connection类型的返回值,这个就是返回的一个数据库的连接对象,Connection connection = DriverManager.getConnection(this.url, properties);这行代码获取的数据库的连接 ,在这个方法的第一行代码中还调用了一个initializeDriver这个就是我们在自已写数据库的配置的时候的那个通过反射创建的对象。这里我就把代码贴出来,有兴趣的可以看下。
 1 private synchronized void initializeDriver() throws SQLException {
 2         if (!registeredDrivers.containsKey(this.driver)) {
 3             try {
 4                 Class driverType;
 5                 if (this.driverClassLoader != null) {
 6                     driverType = Class.forName(this.driver, true, this.driverClassLoader);
 7                 } else {
 8                     driverType = Resources.classForName(this.driver);
 9                 }
10
11                 Driver driverInstance = (Driver)driverType.newInstance();
12                 DriverManager.registerDriver(new UnpooledDataSource.DriverProxy(driverInstance));
13                 registeredDrivers.put(this.driver, driverInstance);
14             } catch (Exception var3) {
15                 throw new SQLException("Error setting driver on UnpooledDataSource. Cause: " + var3);
16             }
17         }
18
19     }
POOLED源码分析
在使用POOLED的时候和UNPOOLED一样都是在获取连接的方法中开始分析,这里为啥都会有一个getConnection方法呢,因为他们都是继承了DataSource这个接口。
1 public Connection getConnection() throws SQLException {
2         return this.popConnection(this.dataSource.getUsername(), this.dataSource.getPassword()).getProxyConnection();
3     }
刚刚看到这些代码的时候我也是有些懵逼的,怎么突然出来一个UNPOOLEDDATASOURCE的对象呢?在家可以看下面的这个图片,这些是POOLEDDATASOURCE的属性。发现并没有关于数据库的一些基本的配置信息(就是说的那些驱动还有数据库的帐号密码之类的信息),原来在这个类的构造中
都会创建一个unpooleddatasource的对象,将这些数据保存在这个对象中,就方便在下面取出
在unpooleddatasource的源码中,它的构造方法都是关于一些赋的操作并没有进行创建连接的操作所以这里的创建了unpooleddatasource只是为了保存一些数据
  1  private PooledConnection popConnection(String username, String password) throws SQLException {
  2         boolean countedWait = false;
  3         PooledConnection conn = null;
  4         long t = System.currentTimeMillis();
  5         int localBadConnectionCount = 0;
  6
  7         while(conn == null) {
  8             synchronized(this.state) {
  9                 PoolState var10000;
 10                 if (!this.state.idleConnections.isEmpty()) {
 11                     conn = (PooledConnection)this.state.idleConnections.remove(0);
 12                     if (log.isDebugEnabled()) {
 13                         log.debug("Checked out connection " + conn.getRealHashCode() + " from pool.");
 14                     }
 15                 } else if (this.state.activeConnections.size() < this.poolMaximumActiveConnections) {
 16                     conn = new PooledConnection(this.dataSource.getConnection(), this);
 17                     if (log.isDebugEnabled()) {
 18                         log.debug("Created connection " + conn.getRealHashCode() + ".");
 19                     }
 20                 } else {
 21                     PooledConnection oldestActiveConnection = (PooledConnection)this.state.activeConnections.get(0);
 22                     long longestCheckoutTime = oldestActiveConnection.getCheckoutTime();
 23                     if (longestCheckoutTime > (long)this.poolMaximumCheckoutTime) {
 24                         ++this.state.claimedOverdueConnectionCount;
 25                         var10000 = this.state;
 26                         var10000.accumulatedCheckoutTimeOfOverdueConnections += longestCheckoutTime;
 27                         var10000 = this.state;
 28                         var10000.accumulatedCheckoutTime += longestCheckoutTime;
 29                         this.state.activeConnections.remove(oldestActiveConnection);
 30                         if (!oldestActiveConnection.getRealConnection().getAutoCommit()) {
 31                             try {
 32                                 oldestActiveConnection.getRealConnection().rollback();
 33                             } catch (SQLException var16) {
 34                                 log.debug("Bad connection. Could not roll back");
 35                             }
 36                         }
 37
 38                         conn = new PooledConnection(oldestActiveConnection.getRealConnection(), this);
 39                         conn.setCreatedTimestamp(oldestActiveConnection.getCreatedTimestamp());
 40                         conn.setLastUsedTimestamp(oldestActiveConnection.getLastUsedTimestamp());
 41                         oldestActiveConnection.invalidate();
 42                         if (log.isDebugEnabled()) {
 43                             log.debug("Claimed overdue connection " + conn.getRealHashCode() + ".");
 44                         }
 45                     } else {
 46                         try {
 47                             if (!countedWait) {
 48                                 ++this.state.hadToWaitCount;
 49                                 countedWait = true;
 50                             }
 51
 52                             if (log.isDebugEnabled()) {
 53                                 log.debug("Waiting as long as " + this.poolTimeToWait + " milliseconds for connection.");
 54                             }
 55
 56                             long wt = System.currentTimeMillis();
 57                             this.state.wait((long)this.poolTimeToWait);
 58                             var10000 = this.state;
 59                             var10000.accumulatedWaitTime += System.currentTimeMillis() - wt;
 60                         } catch (InterruptedException var17) {
 61                             break;
 62                         }
 63                     }
 64                 }
 65
 66                 if (conn != null) {
 67                     if (conn.isValid()) {
 68                         if (!conn.getRealConnection().getAutoCommit()) {
 69                             conn.getRealConnection().rollback();
 70                         }
 71
 72                         conn.setConnectionTypeCode(this.assembleConnectionTypeCode(this.dataSource.getUrl(), username, password));
 73                         conn.setCheckoutTimestamp(System.currentTimeMillis());
 74                         conn.setLastUsedTimestamp(System.currentTimeMillis());
 75                         this.state.activeConnections.add(conn);
 76                         ++this.state.requestCount;
 77                         var10000 = this.state;
 78                         var10000.accumulatedRequestTime += System.currentTimeMillis() - t;
 79                     } else {
 80                         if (log.isDebugEnabled()) {
 81                             log.debug("A bad connection (" + conn.getRealHashCode() + ") was returned from the pool, getting another connection.");
 82                         }
 83
 84                         ++this.state.badConnectionCount;
 85                         ++localBadConnectionCount;
 86                         conn = null;
 87                         if (localBadConnectionCount > this.poolMaximumIdleConnections + this.poolMaximumLocalBadConnectionTolerance) {
 88                             if (log.isDebugEnabled()) {
 89                                 log.debug("PooledDataSource: Could not get a good connection to the database.");
 90                             }
 91
 92                             throw new SQLException("PooledDataSource: Could not get a good connection to the database.");
 93                         }
 94                     }
 95                 }
 96             }
 97         }
 98
 99         if (conn == null) {
100             if (log.isDebugEnabled()) {
101                 log.debug("PooledDataSource: Unknown severe error condition.  The connection pool returned a null connection.");
102             }
103
104             throw new SQLException("PooledDataSource: Unknown severe error condition.  The connection pool returned a null connection.");
105         } else {
106             return conn;
107         }
108     }
在我们到了getConnection这个方法中看到了一个调用了popConnection的方法,我们看下这个的源码,
首先它是判断的是连接是不是为空,就是while(conn == null) {这一行代码,如果不为空就会往下执行,
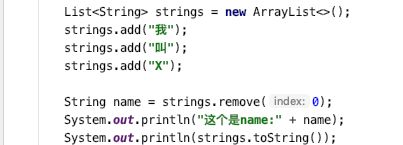
这里我们可以看到有一个同步锁,因为数据库的连接池中要保证每一个连接的使用同时被一个资源使用,所以这里是加了同步锁。在接下来的if判断中,首先判断了有没有空闲的连接,如果的有话就会移除第一个连接并取出,说到这里可能会有些小伙伴比较晕,这里说的是移除它是怎么限到的连接呢,下面请看下我准备好的代码这里使用List集合举例是因为idleConnections就是一个ArrayList集合
在家请看String name = string.remove(0);这行代码有一个赋值的操作,其实当我们在集合中移除了一个元素后,它是可以返回一个元素的值的。这样我输出name就是输出的我
所以在 我们上面看到的移除一个连接的时候其是就是将这个连接在连接池的空闲列表中移除,并将其赋值给一个变量。
接下来如果没有空闲的连接呢,就会判断活动连接的大小数时是不是小于池子最大的活动连接数量,条件成立就会调用unpooleddatasource对象中的getConnection来创建一个对象。
如果上面的连接都没有成立,那么就会拿出一个最老的一个连接出来,经过一系列的清理后确保这个连接是一个全新可以再次使用的连接投入使用。
以上就是mybatis的连接池创建的思想,如有不足请提出我以补充


