前面的准备工作已经做完,马上开始我们的第一站吧,游戏背景和游戏音乐的实现。
bg.gif
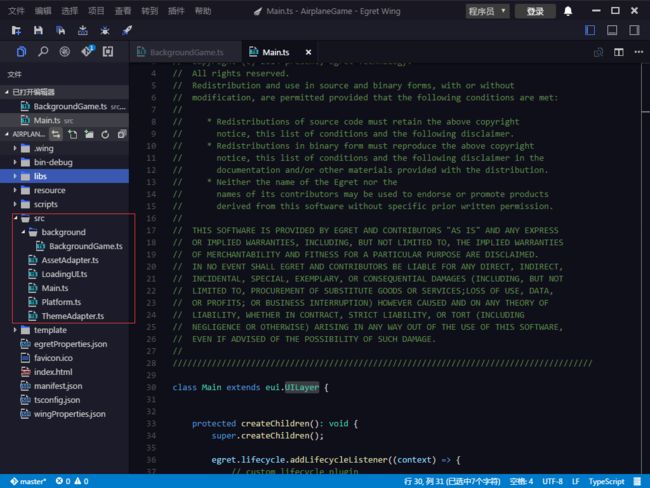
1.为了项目结构清晰和代码规范,我们把游戏拆解为层次结构来实现,在src文件夹下新建一个目录background,这个目录的内容就是本章实现的核心.
2.在目录下新建一个类BackgroundGame并且继承egret.DisplayObjectContainer,关于该类,自行查阅API,我的理解就是对象容器显示接口,每一个显示的对象都可以看做一个小模块,然后填充到eui.UILayer容器中,用于丰富我们的容器。
3.关于项目编译过程,查看官网文档
- eui.UILayer:游戏的入口类就是Main.ts类下,继承于eui.UILayer
- LoadingUI:游戏加载过程的进度显示,可以根据自己游戏风格更改
- ThemeAdapter:皮肤类,关于UI上面的逻辑和开发可以纯代码实现,也可以通过布局文件来实现,我比较喜欢纯代码风格,所以整个项目我都不会使用皮肤方式。
- 其他类都是项目自行生成,暂时没有用到,就不在多说,直接打开我们需要实现的类BackgroundGame。
- 每个类好像只能有一个构造方法,对于我这个java控来说有点诡异,如果有继承还需要在构造方法中实现super
class BackgroundGame extends egret.DisplayObjectContainer{
    public constructor() {
        super();
        this.addEventListener(egret.Event.ADDED_TO_STAGE,this.loadBackground,this);
    }
}
- 构造方法中有一行代码addEventListener,用于监听填充到容器中完成后的事件,这样可以获取到正确的容器高宽。
- addEventListener第一个参数是用于监听的事件,查看官方API;第二个参数是事件回调,这里就是填充容器完毕后执行改方法;第三个参数是事件作用域(当前类)。
4.实现背景逻辑
/**
    * 地图上半部分(隐藏)
     */
    private mBackgroundTop:egret.Bitmap;
    /**
     * 地图显示部分
     */
    private mBackgroundBottom:egret.Bitmap;
    /**
     * 屏幕的高度
     */
    private stageH:number;
    /**
     * 地图滚动速度,越小滚动越快。毫秒
     */
    private mBgSpeed = 4000;
- 实现回调方法loadBackground:
public loadBackground() : void{
        //游戏背景上半部分资源加载
        this.mBackgroundTop = ImageResUtils.createBitmapByName("background_jpg");
        this.addChild(this.mBackgroundTop);
        let stageW = this.stage.stageWidth;
        this.stageH = this.stage.stageHeight;
        this.mBackgroundTop.width = stageW;
        this.mBackgroundTop.height = this.stageH;
        this.mBackgroundTop.y = -this.stageH;
        /**
         * 游戏背景下半部分资源
         */
        this.mBackgroundBottom = ImageResUtils.createBitmapByName("background_jpg");
        this.mBackgroundBottom.width = stageW;
        this.mBackgroundBottom.height = this.stageH;
        this.addChild(this.mBackgroundBottom);
    }
- 图片工具类ImageResUtils
class ImageResUtils {
    public constructor() {
    }
     /**
     * 根据name关键字创建一个Bitmap对象。name属性请参考resources/resource.json配置文件的内容。
     * Create a Bitmap object according to name keyword.As for the property of name please refer to the configuration file of resources/resource.json.
     */
    public static createBitmapByName(name:string) : egret.Bitmap{
        let result = new egret.Bitmap();
        let texture: egret.Texture = RES.getRes(name);
        result.texture = texture;
        return result;
    }
}
-
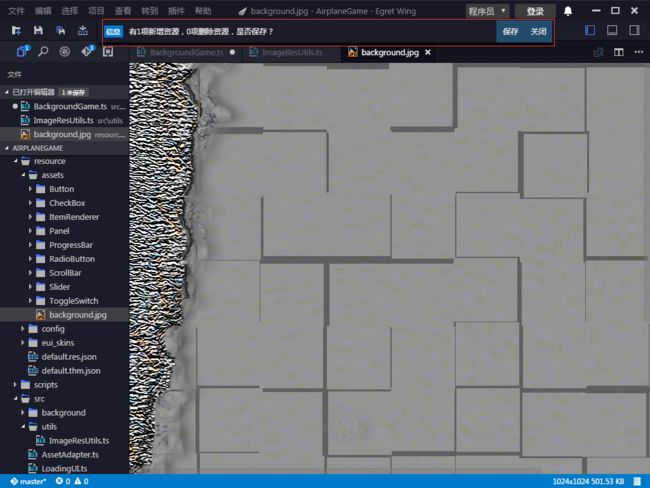
把游戏背景图片拖入到resource下的assets文件夹下,并且IDE顶部会有一个资源新增提示,点击保存后资源会刷新,这样你在代码中才能获取到图片文件
方法内容就是加载游戏背景资源,参数很容易理解,游戏背景是给玩家一种无限滚动的视觉差,说一下实现思路:
把同一张背景加载到模块中上下拼接起来做往下滚动,战机是往上飞行的。
如果难以理解不需要钻牛角尖,后面做多了自己就能顿悟。
5.新增一个背景动画开始的方法,提供给外部调用
/**
     * 游戏背景动画开始
     */
    public startAnimationBg(){
        egret.Tween.get(this.mBackgroundTop,{loop:true}).to({y:0},this.mBgSpeed);
        egret.Tween.get(this.mBackgroundBottom,{loop: true}).to({y:this.stageH},this.mBgSpeed);
    }
egret.Tween缓存动画库,也是项目中用得最多的方法,可以省下很多代码,唯一就是感觉灵动性不好,查看官网API
最顶部的图片最开始是不可见的,执行动画就是让第一张图片从不可见运动到可见,第二张图片从可见运行到最底部不可见状态,以此循环达到无限滚动效果。
6.设计一个关卡类来加载相关的模块。
- 新增父类
class Level {
    /**
     * 容器
     */
    private layour:eui.UILayer;
    /**
     * 游戏状态
     */
    public static GAME_READY:number = 1;
    public static GAME_ING:number = 2;
    public static GAME_PAUSE:number = 3;
    public static GAME_END:number = 4;
    public static GAME_STATE : number;

    public constructor(layour:eui.UILayer) {
        this.layour = layour;
        Level.GAME_STATE = Level.GAME_READY;
    }
    /**
     * 游戏开始
     */
    public startGame(){
        Level.GAME_STATE = Level.GAME_ING;
    }
    /**
     * 游戏暂停
     */
    public pauseGame(){
        Level.GAME_STATE = Level.GAME_PAUSE;
    }
    /**
     * 重新开始
     */
    public restartGame(){

    }
    /**
     * 游戏结束
     */
    public endGame(){
        Level.GAME_STATE = Level.GAME_END;
        this.layour.removeChildren();
    }
    /**
     * 添加元素
     */
    public addChild(child:egret.DisplayObject){
        this.layour.addChild(child);
    }
    public addChildAt(child:egret.DisplayObject,index:number){
        this.layour.addChildAt(child,index);
    }
    /**
     * 容器全局变量
     */
    public getContext():eui.UILayer{
        return this.layour;
    }
}
- 新增我们的第一关,新建一个类TheFirstPass(类名很随意)继承Level,并且实现startGame,endGame,restartGame方法
public startGame(){
        super.startGame();
        //加载背景
        this.mBgGame = new BackgroundGame();
        this.addChild(this.mBgGame);
        this.mBgGame.startAnimationBg();
        //游戏结束提示
        this.mGameTextMessage = new egret.TextField();
        this.mGameTextMessage.textColor = 0xfffffff;
        this.mGameTextMessage.size = 40;
        this.mGameTextMessage.textAlign = "center"
        this.mGameTextMessage.x = 0;
        //重新开始
        this.mGameRestart = new egret.TextField();
        this.mGameRestart.textColor = 0xfffffff;
        this.mGameRestart.size = 40;
        this.mGameRestart.textAlign = egret.HorizontalAlign.CENTER;
        this.mGameRestart.verticalAlign = egret.VerticalAlign.MIDDLE;
        this.mGameRestart.backgroundColor = 0x000000;
        this.mGameRestart.text = "再来一次"
        this.mGameRestart.touchEnabled = true;
        this.mGameRestart.stroke = 1;
        this.mGameRestart.strokeColor = 0xffffff;
    }
/**
     * 游戏结束
     */
    public endGame(){
        super.endGame();
        this.addChild(this.mBgGame);
        this.mBgGame.loadBackground();
        this.mGameTextMessage.text="游戏结束,你输了!";
        this.addChild(this.mGameTextMessage);
        this.addChild(this.mGameRestart);
        this.mGameRestart.addEventListener(egret.TouchEvent.TOUCH_TAP,this.restartGame,this);
    }
/**
     * 游戏重新开始
     */
    public restartGame(){
        this.mGameRestart.removeEventListener(egret.TouchEvent.TOUCH_TAP,this.restartGame,this);
        super.endGame();
        this.startGame();
    }
- 在startGame中加载游戏背景,调用背景类的startAnimationBg方法让我们的背景动起来。
7.打开入口类Main.ts,找到createGameScene方法,删除方法中原来的代码,新增自己的关卡代码。
/**
     * 创建场景界面
     * Create scene interface
     */
    protected createGameScene(): void {
        //第一关
        var mLevel = new TheFirstPass(this);
        mLevel.startGame();
    }
游戏关卡1中的逻辑就成功加载到容器中。
8.背景有了,音乐呢?
- 把背景音乐资源拖入到resource>assets文件夹下并保存。
- 新增一个音乐管理工具类BgSoundMusic
class BgSoundMusic {

    private mSoundChannel:egret.SoundChannel;

    public constructor() {

    }
    /**
     * 开始播放音乐
     */
    public playMusic(){
        var sound:egret.Sound = new egret.Sound();
        var url:string="resource/assets/gamemusic.mp3";
        sound.addEventListener(egret.Event.COMPLETE, this.onLoadComplete, this);
        sound.load(url);
    }
    private onLoadComplete(event:egret.Event):void {
        //获取加载到的 Sound 对象
        var sound:egret.Sound = event.target;
        //播放音乐
        this.mSoundChannel = sound.play(0,0);
    }
    /**
     * 停止
     */
    public stopMusic(){
        if(this.mSoundChannel){
            this.mSoundChannel.stop();
            this.mSoundChannel = null;
        }
    }
}
- 内容很少,也很简单,首先要加载资源,通过addEventListener来监听资源是否加载完成,加载完成后直接播放。
play参数解释:两个参数值,第一个是播放位置,第二个是播放次数,0表示循环播放,大于0就是指定播放次数。play方法可以得到一个新生成的对象SoundChannel ,通过它来控制音乐的播放/停止/进度等信息 - 回到关卡类TheFirstPass中startGame方法中调用背景音乐
//加载游戏音乐
this.mBgSoundMusic = new BgSoundMusic();
this.mBgSoundMusic.playMusic();
我这里实现的都是最基本的动画以及效果,便于新手理解和实现,只要跟着官网文档和自己的设计思路开发,基本上不是什么问题。如果喜欢追求自身不断地进化,请关注我的文章,将持续更新,也会有更多的惊喜。
下一篇是主角出场。
在线体验
如果是电脑端记得先把浏览器缩小后再打开地址,不然是横过来的。
源码地址

