简介
Node.js 是一个基于 Chrome V8 引擎的 JavaScript 运行环境。Node.js 使用了一个事件驱动、非阻塞式 I/O的模型,使其轻量又高效。Node.js 的包管理器 npm,是全球最大的开源库生态系统。
安装以及运行环境
Node.js最新版可在官网下载,傻瓜式安装后我们可打开命令行工具,输入node -v和npm -v后显示显示对应版本号后说明已经安装成功。在开发过程中我使用的是webstorm编辑器,该编辑器功能强大,是前端使用比较普遍的一类编辑器。为支持我们快捷开发,webstorm为我们提供了一系列快捷的设置选项,如点击webstotm中file -- Setting -- Languages -- JavaScript可设置编辑器支持最新语言版本为ES6,点击file -- Setting -- Node.js and NPM --Enable可设置node命令。设置完成后,我们在编辑器中输入
let a = 10 ;
console.log(a);
然后点击Run,结果就出来了。
Node.js基本知识
一、模块的使用
Node.js有一个简单的模块加载系统,在 Node.js 中,文件和模块是一一对应的(每个文件被视为一个独立的模块)。我们分别通过export和require来导出模块以及引用模块。
circle.js
let { PI } = Math;
exports.area = (r) => PI * r * r;
foo.js
const circle = require('./circle.js');
console.log(circle.area(4));
输出结果为 50.26548245743669;
值得注意的是,module.exports和exports都可以导出模块,他们有什么区别呢?用一句话来概括就是,require能看到的只有module.exports这个对象,它是看不到exports对象的,而我们在编写模块时用到的exports对象实际上只是对module.exports的引用。实际上如下:
var module = {
  exports:{
    name:"我是module的exports"属性
  }
};
var exports = module.exports;//exports是对module.exports的引用.
//他们是指向同一块内存下的数据
通常情况下,我们不会直接对exports赋值,而是把一个变量挂载到exports上,因为直接赋值exports会指向新的地址,和原来的地址没有了关系,起不到引用的作用了。
二、常用API
global -全局变量
全局变量是在所有变量均可以使用。下面介绍一些常用的变量。
__dirname 当前模块的文件夹名称;
__filename当前模块的文件夹名称解析后的绝对路径;
exports对于module.exports的更简短的引用形式;
module对当前模块的引用,module.exports用于指定一个模块所导出的内容;
require引入模块;
我们可以通过打印来查询全局变量里面的具体内容,例如 module,打印出为
Module {
  id: '.',
  exports: {},
  parent: null,
  filename: 'C:\\Users\\Administrator\\Desktop\\temporary\\node\\foo.js',
  loaded: false,
  children:
   [ Module {
       id: 'C:\\Users\\Administrator\\Desktop\\temporary\\node\\circle.js',
       exports: [Object],
       parent: [Circular],
       filename: 'C:\\Users\\Administrator\\Desktop\\temporary\\node\\circle.js',
       loaded: true,
       children: [],
       paths: [Object] } ],
  paths:
   [ 'C:\\Users\\Administrator\\Desktop\\temporary\\node\\node_modules',
     'C:\\Users\\Administrator\\Desktop\\temporary\\node_modules',
     'C:\\Users\\Administrator\\Desktop\\node_modules',
     'C:\\Users\\Administrator\\node_modules',
     'C:\\Users\\node_modules',
     'C:\\node_modules' ] }
node.js提供了path模块用于处理文件与目录路径;
const path = require('path');
具体使用见官网。
Buffer
JavaScript 语言自身只有字符串数据类型,没有二进制数据类型。Buffer 类,该类用来创建一个专门存放二进制数据的缓存区。一个 Buffer 类似于一个整数数组,但它对应于 V8 堆内存之外的一块原始内存。Buffer对象占用的内存空间是不计算在Node.js进程内存空间限制上的,因此,我们也常常会使用Buffer来存储需要占用大量内存的数据:
const buf = Buffer.from('hello world', 'ascii');
// 输出 68656c6c6f20776f726c64

console.log(buf.toString('hex'));
// 输出 aGVsbG8gd29ybGQ=
console.log(buf.toString('base64'));
我们可以用Buffer.alloc(size[,fill[,encoding])来初始化一个buffer类:
const buf = Buffer.alloc(5,'abcde');
console.log(buf);
//输出
当输入字符串长度大于Buffer指定长度,字符串会被按长度折断;当输入字符串长度不足Buffer指定长度,输出内容会按字符重复拼接。
const buf = Buffer.alloc(5,'abcdef');
console.log(buf);
console.log(buf.toString())
//输出
//输出 abcde
const buf = Buffer.alloc(5,'ab');
console.log(buf);
console.log(buf.toString())
//输出
//输出 ababa
注意一个汉字占有3个Buffer长度。
Buffer.concat(list[, totalLength])返回一个合并了list中所有Buffer实例的新建的Buffer。
fs
fs是node.js对文件以及文件夹进行操作的方法。
监听fs.watch:
const fs = require('fs');

fs.watch('./circle.js',function (eventType , filename) {
  if(eventType ==='rename'){
   ///
  }else if(eventType ==='change'){
  ///
  }
})
相对稳定一些的是watchFile()这个方法,文档中介绍原理是轮询(每隔一個固定的时间去检查文件是否改动)。而且这个时间间隔是可以通过参数设置的。watch()这个方法是通过监听操作系统提供的各种“事件”(内核发布的消息)实现的。这个不同的平台实现的细节不一致,导致这个方法不能保证在所有平台上可用(而且经过实验发现在Mac上行为不正常,内容的改动只能触发一次回调,再改动watch()就没动静了)。
读取fs.readFile(path[, options], callback):
const fs = require('fs');

fs.readFile('./circle.js',(err,data) =>{
  if(err) throw err;
  console.log(data.toString());
})
写入fs.writeFile(file, data[, options], callback):
const fs = require('fs');

fs.writeFile('./input.txt',"希望的田野上",function (err) {
  if(err) throw err ;
  console.log("写入成功!");
})
参数里面flag如果为w,则把原来内容抹去重写,如果为a,则是在内容后面追加。fs还包括同步写入读取文件,创建删除文件以及文件夹等操作。
自动化构建在前端非常普遍,我们可以用fs实现简单的自动化构建前端项目。代码如下:
const fs = require('fs');
const indexContent = '\r'+
'\r'+
'\r'+
'\t\r'+
'\t\r'+
'\t\r'+
'\tDocument \r'+
'\r'+
'\r'+
'\t这是首页
\r'+
'\r'+
'\r';
const projectData = {
name:"gallon",
fileData:[
{
name:"css",
type:"dir"
},
{
name:"image",
type:"dir"
},
{
name:"js",
type:"dir"
},
{
name:"index.html",
type:"file",
content:indexContent
},
]
};
if(projectData.name){
fs.mkdirSync(projectData.name)//生成项目文件夹
const fileData = projectData.fileData;
if(fileData && fileData.forEach){
fileData.forEach(function (f) {
f.path = projectData.name + '/' + f.name;
f.content = f.content || '';
if(f.type == "dir"){
fs.mkdirSync(f.path);
}else if(f.type == 'file'){
fs.writeFileSync(f.path, f.content);
}
})
}
}
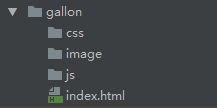
生成结构如下:
我们也可以通过
fs进行代码合并:
foo.js
const fs = require('fs');
const fileDir = './source';

fs.watch(fileDir,function (eventType,filename) {
  fs.readdir('./source',function (err,fileList) {
    if(err) throw err;
    let content = '';
    fileList.forEach(function (f) {
      content += fs.readFileSync(fileDir + '/' + f) + '\r';
    });
    fs.writeFile('./app.js',content ,function (err) {
      if(err) throw err ;
      console.log("合并完成");
    })
  })
});
当项目下文件发生变化的时候,即会生成app.js。
test1.js
window.onload = function () {
    alert(13);
};
test2.js
window.onload = function () {
    alert(2);
};
test3.js
window.onload = function () {
    alert(10);
};
生成app.js
window.onload = function () {
    alert(13);
};
window.onload = function () {
    alert(2);
};
window.onload = function () {
    alert(10);
};

