最近遇到一个识别图像后显示3D模型的需求,权衡再三选择了国内的easyAR SDK。Unity建模完成后,导出相应的iOS工程,由于Unity模块在我的工程中是作为一个功能模块存在的,因此需要将导出的Unity iOS工程集成到原生工程中。集成过程稍显复杂,也躺过一些坑,此处做一个记录以铭心志。另外关于Unity建模不是本文要探讨的内容,本人也纯属Unity小白,瞎折腾一番后模型勉强符合预期,惭愧~
【Unity版本】2017.1.1f1 【Xcode版本】8.3.3
导出Unity iOS工程
Unity模型搭建好之后,需要导出iOS工程。相关配置如下:
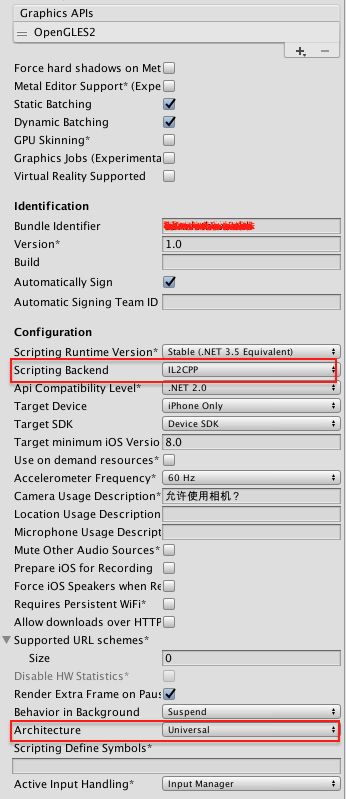
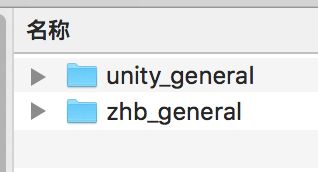
由于是easyAR unity工程,务必保证Bundle ID与easyAR中注册的一致。配置完成后点击build,即可导出unity iOS工程。本例中工程文件结构如下,其中 unity_general 为unity导出的iOS工程,zhb_general 为目标iOS工程。
unity文件引用
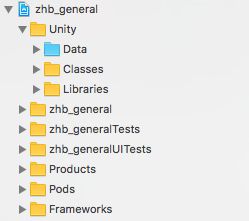
在目标iOS工程里引用unity iOS工程中的文件,主要就是三个目录,Classes,Libraries,Data。这里需要注意的是,Classes和Libraries目录作为Group引用,切记不要勾选copy,而Data目录不需要参与编译,作为folder引用进来即可。本例中统一引用到Unity group下,文件结构如下:
工程配置
-
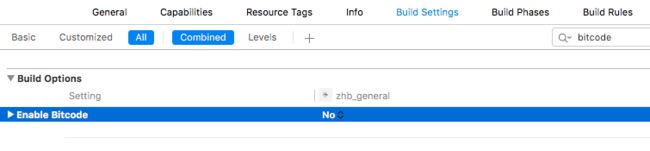
关闭bitcode。新版的Unity已经支持Bitcode但EasyAR并不支持,不关闭无法正常编译。
修改Linking -> Other Linker Flags选项,添加参数
-weak_framework CoreMotion -weak-lSystem。

- 修改头文件搜索目录

- 修改库搜索目录

- 修改LLVM - Custom Complier Flags -> Other C Flags选项,添加两个参数:
-DINIT_SCRIPTING_BACKEND=1和-DRUNTIME_IL2CPP=1。

- 修改LLVM - Language -> C Language Dialect选项,选择
C99。

- 修改LLVM - Language - C++ -> C++ Language Dialect选项,选择
C++11。

- 添加三项自定义设置
- MTL_ENABLE_DEBUG_INFO -> NO
- UNITY_RUNTIME_VERSION -> 2017.1.1f1(当前你的Unity3d版本号,请自行替换)
- UNITY_SCRIPTING_BACKEND -> il2cpp


- 新建一个PCH文件,并修改Precompile Prefix Header为YES,关联pch文件路径。此处新建文件名为 PrefixHeader.pch。

添加工程依赖

修改代码
找到unity工程的pch文件,完整复制内容到之前建好的PrefixHeader.pch文件中。
-
找到unity工程的main.m文件,复制其内容到新建工程的main.m文件中,将main.m修改为main.mm允许C++混编,并修改AppDelegate为工程代理类。
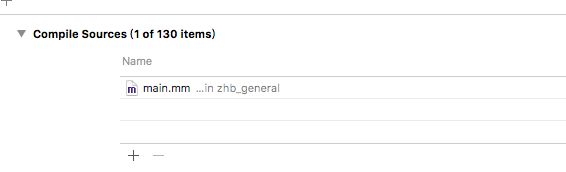
#include "RegisterMonoModules.h" #include "RegisterFeatures.h" #include// Hack to work around iOS SDK 4.3 linker problem // we need at least one __TEXT, __const section entry in main application .o files // to get this section emitted at right time and so avoid LC_ENCRYPTION_INFO size miscalculation static const int constsection = 0; void UnityInitTrampoline(); // WARNING: this MUST be c decl (NSString ctor will be called after +load, so we cant really change its value) const char* AppControllerClassName = "UnityAppController"; int main(int argc, char* argv[]) { UnityInitStartupTime(); @autoreleasepool { UnityInitTrampoline(); UnityInitRuntime(argc, argv); RegisterMonoModules(); NSLog(@"-> registered mono modules %p\n", &constsection); RegisterFeatures(); // iOS terminates open sockets when an application enters background mode. // The next write to any of such socket causes SIGPIPE signal being raised, // even if the request has been done from scripting side. This disables the // signal and allows Mono to throw a proper C# exception. std::signal(SIGPIPE, SIG_IGN); UIApplicationMain(argc, argv, nil, [NSString stringWithUTF8String:"AppDelegate"]); } return 0; } #if TARGET_IPHONE_SIMULATOR && TARGET_TVOS_SIMULATOR #include extern "C" int pthread_cond_init$UNIX2003(pthread_cond_t *cond, const pthread_condattr_t *attr) { return pthread_cond_init(cond, attr); } extern "C" int pthread_cond_destroy$UNIX2003(pthread_cond_t *cond) { return pthread_cond_destroy(cond); } extern "C" int pthread_cond_wait$UNIX2003(pthread_cond_t *cond, pthread_mutex_t *mutex) { return pthread_cond_wait(cond, mutex); } extern "C" int pthread_cond_timedwait$UNIX2003(pthread_cond_t *cond, pthread_mutex_t *mutex, const struct timespec *abstime) { return pthread_cond_timedwait(cond, mutex, abstime); } #endif // TARGET_IPHONE_SIMULATOR && TARGET_TVOS_SIMULATOR 同时在Build Phases -> Compier Sources 中删掉unity工程中的main.mm,只编译目标工程的main.mm。
-
修改UnityAppController.h,将其中的内联函数
GetAppController()修改如下:#import "AppDelegate.h" inline UnityAppController* GetAppController() { AppDelegate *delegate = (AppDelegate *)[UIApplication sharedApplication].delegate; return delegate.unityController; // return (UnityAppController*)[UIApplication sharedApplication].delegate; } -
新建EasyARAppController.h,因为原本的EasyARAppController是没有头文件的,是通过OC运行时初始化的,为了方便在代码中初始化和使用,单独建立它的头文件,并调整一下EasyARAppController.mm文件。
//EasyARAppController.h #import "UnityAppController.h" @interface EasyARAppController : UnityAppController @end //EasyARAppController.mm #import#import "EasyARAppController.h" extern "C" void ezarUnitySetGraphicsDevice(void* device, int deviceType, int eventType); extern "C" void ezarUnityRenderEvent(int marker); @interface EasyARAppController () - (void)shouldAttachRenderDelegate; @end @implementation EasyARAppController - (void)shouldAttachRenderDelegate; { UnityRegisterRenderingPlugin(&ezarUnitySetGraphicsDevice, &ezarUnityRenderEvent); } @end IMPL_APP_CONTROLLER_SUBCLASS(EasyARAppController) -
创建MyARAppController,继承自EasyARAppController,作为后续开发的交互controller。
//MyARAppController.h #import "EasyARAppController.h" @interface MyARAppController : EasyARAppController @end //MyARAppController.mm #import "MyARAppController.h" #import "AppDelegate.h" #import "UnityViewControllerListener.h" #define BackButtonTag 10000 extern "C" { void backToNative(){ AppDelegate* delegate = (AppDelegate *)[UIApplication sharedApplication].delegate; [delegate hideUnityWindow]; } } @interface MyARAppController () @property (nonatomic, strong) UIButton *backButton; @end @implementation MyARAppController - (instancetype)init{ self = [super init]; if (self) { [[NSNotificationCenter defaultCenter] addObserver:self selector:@selector(viewDidLoad) name:kUnityViewWillAppear object:self.rootViewController]; } return self; } -(void)viewDidLoad{ if (![self.rootViewController.view viewWithTag:BackButtonTag]) { [self.rootViewController.view addSubview:self.backButton]; [self.rootViewController.view bringSubviewToFront:self.backButton]; } } - (void)actionBack{ backToNative(); } - (UIButton *)backButton{ if (!_backButton) { _backButton = [UIButton buttonWithType:UIButtonTypeCustom]; _backButton.frame = CGRectMake(10, 10, 60, 44); _backButton.backgroundColor = [UIColor clearColor]; [_backButton setTitle:@"退出" forState:UIControlStateNormal]; [_backButton setTitleColor:[UIColor lightGrayColor] forState:UIControlStateNormal]; [_backButton addTarget:self action:@selector(actionBack) forControlEvents:UIControlEventTouchUpInside]; _backButton.tag = BackButtonTag; } return _backButton; } - (void)dealloc{ [[NSNotificationCenter defaultCenter] removeObserver:self]; } @end -
修改AppDelegate,将AppDelegate.m修改为AppDelegate.mm,并创建新的Unity3d入口。
//AppDelegate.h #import@class UnityAppController; @interface AppDelegate : UIResponder @property (strong, nonatomic) UIWindow *window; @property (strong, nonatomic) UIWindow *unityWindow; @property (strong, nonatomic) UnityAppController *unityController; -(void)showUnityWindow; -(void)hideUnityWindow; @end //AppDelegate.mm #import "AppDelegate.h" #import #import "MyARAppController.h" @interface AppDelegate () @property (nonatomic,strong) UINavigationController *navVC; @end @implementation AppDelegate -(UIWindow *)unityWindow{ return UnityGetMainWindow(); } -(void)showUnityWindow{ self.unityWindow.hidden = NO; UnitySendMessage("CameraDevice", "StartCapture", ""); } -(void)hideUnityWindow{ self.unityWindow.hidden = YES; UnitySendMessage("CameraDevice", "StopCapture", ""); } - (BOOL)application:(UIApplication *)application didFinishLaunchingWithOptions:(NSDictionary *)launchOptions { self.window = [[UIWindow alloc]initWithFrame:[UIScreen mainScreen].bounds]; self.window.backgroundColor = [UIColor whiteColor]; UIStoryboard *sb = [UIStoryboard storyboardWithName:@"Main" bundle:nil]; self.navVC = [sb instantiateInitialViewController]; self.window.rootViewController = self.navVC; [self.window makeKeyAndVisible]; self.unityController = [[MyARAppController alloc]init]; [self.unityController application:application didFinishLaunchingWithOptions:launchOptions]; [self hideUnityWindow]; return YES; } - (void)applicationWillResignActive:(UIApplication *)application { [self.unityController applicationWillResignActive:application]; } - (void)applicationDidEnterBackground:(UIApplication *)application { [self.unityController applicationDidEnterBackground:application]; } - (void)applicationWillEnterForeground:(UIApplication *)application { [self.unityController applicationWillEnterForeground:application]; } - (void)applicationDidBecomeActive:(UIApplication *)application { [self.unityController applicationDidBecomeActive:application]; } - (void)applicationWillTerminate:(UIApplication *)application { [self.unityController applicationWillTerminate:application]; } @end -
设置入口,此处以ViewController作为入口控制器。
#import "ViewController.h"
#import "AppDelegate.h"
@implementation ViewController
- (void)viewDidLoad {
    [super viewDidLoad];
    UIButton * enterBtn = [UIButton buttonWithType:UIButtonTypeSystem];
    enterBtn.frame = CGRectMake(0, 0, 100, 100);
    enterBtn.center = self.view.center;
    [enterBtn setTitle:@"进入" forState:UIControlStateNormal];
    [enterBtn addTarget:self action:@selector(didClickEnter:) forControlEvents:UIControlEventTouchUpInside];
    [self.view addSubview:enterBtn];
}

-(void)didClickEnter:(UIButton*)btn{
     //唤起unity界面
    AppDelegate * delegate = [UIApplication sharedApplication].delegate;
    [delegate showUnityWindow];
}
@end
躺过的坑
- 编译成功后,APP启动时crash:il2cpp::vm::MetadataCache::Initialize{}
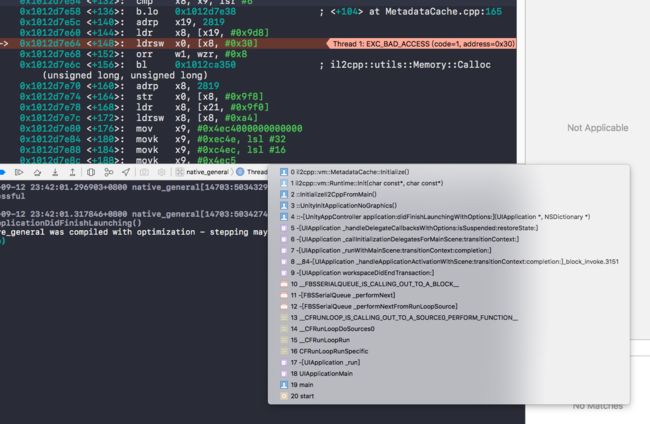
解决办法是在 Other C Flags选项中添加 -DRUNTIME_IL2CPP=1 参数。