1,引言
CocosCreator引擎为Cocos开发团队开发的一款游戏引擎。其前身基于Cocos2d-x,以及Ricardo Quesada早期为苹果公司iPhone平台开发的Cocos2D游戏引擎,其以内容创作为核心,实现了脚本化、组件化和数据驱动的游戏开发工具。 具备了易于上手的内容生产工作流,以及功能强大的开发者工具套件,可用于实现游戏逻辑和高性能游戏效果。
目前最新版本为 Cocos Creator V2.0.10
历史使用版本有 Cocos Creator V2.0.9/V1.9.3
本文就Cocos Creator V2.0.9 版本引擎集成IOS原生方法的流程及过程中遇到的一些问题做一些罗列及总结
2,Cocos官方网站及下载地址:
官方网站:https://www.cocos.com/creator
官方文档:https://www.cocos.com/docs
官方论坛:https://forum.cocos.com/
各版本下载地址:https://www.cocos.com/creator
注:IOS 开发请下载MAC 版,可同时安装多个版本的Cocos Creator 应用程序,但建议仅安装一个(如安装多个版本,执行命令行构建项目时需在命令中指定使用哪个版本)
3,Cocos 项目原工程及生成IOS原生工程
打开CocosCreator 应用程序,新建一个Hello World 工程或选择其他项目打开现有Cocos Creator 项目

-
手动生成原生工程
菜单栏选择项目->构建发布或使用快捷键:shift+command+B 打开构建面板
发布平台选择IOS平台
模板选择:default
开发环境可不勾选加密脚本(便于xCode 中直接修改js 文件调试)
点击构建生成xCode 工程

4,IOS 原生方法接入
- xCode 工程中 TARGETS -> Build Settings 中 启用ARC 选项

- main.mm 文件中修改如下:
#import
#import "AppController.h"

//int main(int argc, char *argv[]) {
//
//    NSAutoreleasePool * pool = [[NSAutoreleasePool alloc] init];
//    int retVal = UIApplicationMain(argc, argv, nil, @"AppController");
//    [pool release];
//    return retVal;
//}

int main(int argc, char * argv[]) {
    @autoreleasepool {
        return UIApplicationMain(argc, argv, nil, NSStringFromClass([AppController class]));
    }
}
接入Object C 原生方法、添加Pods 依赖、Other Linker Flags 添加: -ObjC $(inherited)
其中
Resources 文件夹为Cocos 游戏资源文件(js文件或jsc加密文件),Cocos 游戏js 部分代码更新时可直接替换该文件夹(特别注意,添加游戏资源文件时请选择 Create folder references ,请勿勾选 Copy items if needed )。
5,xCode 工程中引用的Cocos C++引擎文件 路径修改(移动 proj.ios_mac 文件夹)
proj.ios_mac 文件夹为Cocos 源工程生成的 xCode 工程根目录文件夹,其原始路径位于:

如需把proj.ios_mac 文件移动到其他位置(如:移动到Cocos js 仓库根目录便于Git仓库管理)需作如下更改:
以下操作在移动后的proj.ios_mac 文件夹里,重新打开xCode 工程后进行
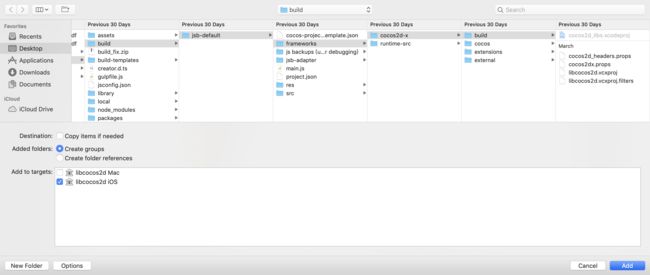
删除丢失的 cocos2d_libs.xcodeproj、script 文件夹 、Classes 文件
夹、以及Resources 目录下的jsb-adapter、project.json 、main.js 、res 、 src 文件或文件夹并重新添加上述文件(具体文件路
径可参考其他任何可编译的正常工程),注意 script 文件夹和Resources 目录下的project.json 、
main.js 、res 、 src 5个文件或文件夹需要以 “Create folder references” 方式引入,请勿勾选 Copy items if needed;重新编译下Cocos 的cocos2d_libs.xcodeproj 工程生成的libcocos2d iOS.a文件;
xCode 项目Targets->Build Phases 下 Link Binary With Libraries 中重新添加上一步生成的.a文件;
xCode 项目Targets->Build Phases 下 Target Dependencies 中重新添加
libcocos2d iOS 文件;xCode 项目TARGETS->Build Settings 和 PROJECT->Build Settings 下搜素"../../“路径并把所
有路径中包含的”../../“替换为”../Cocos 源码工程根目录文件夹/build/jsb-default/frameworks/“重新编译工程即可。
6,Cocos 引擎静态库制作(便于快速接入已有IOS原生工程,加快打包速度)
Cocos 引擎静态库的制作其目的在于单独剥离出引擎C++ 文件,封装Cocos 部分文件,作为SDK 快速接入原生工程,实现快速集成及打包
- Cocos 引擎静态库制作的主思路在于内部封装所有包含C++ 头文件的相关方法,并在头文件中公开外部需要调用的公共方法,
方法步骤:
-
新建 Classes 文件夹
拷贝原正常工程中的AppDelegate.h 、AppDelegate.cpp 、jsb_module_register.cpp 、RootViewController.h 、 RootViewController.mm 文件至该文件夹
把刚刚新建的 Classes 文件夹 添加至cocos2d_libs.xcodeproj 工程目录下
- Classes 文件夹下 新建CocosProjectManager.h 、CocosProjectManager.mm 文件,
代码如下:
//
//  CocosProjectManager.h
//  libcocos2d Mac
//
//  Created by ios_001 on 2018/8/20.
//

#import

@class RootViewController;

#define EXCEPTIONNOTIFICATION @"exceptionCallback_notification"

@interface CocosProjectManager : NSObject

+ (CocosProjectManager *)sharedManager;

@property (nonatomic, readonly) RootViewController* viewController;

-(void)startAPPLaunchConfigWithWindow:(UIWindow *) window; // didFinishLaunchingWithOptions 中调用

-(void)applicationDidBecomeActive; // applicationDidBecomeActive 中调用

-(void)applicationDidEnterBackground; // applicationDidEnterBackground 中调用

-(void)applicationWillEnterForeground; // applicationWillEnterForeground 中调用

-(void)applicationWillTerminate; // applicationWillTerminate 中调用

-(void)enterCocosRootViewController;

-(void)pushViewController:(UIViewController *) viewController;

#pragma mark Call JS

-(void)runJS:(NSString *) js;

#pragma mark C++ Call Native

-(void)exceptionCallbackLocation:(NSString *) location message:(NSString *) message stack:(NSString *) stack;

@end
//
//  CocosProjectManager.m
//  libcocos2d Mac
//
//  Created by ios_001 on 2018/8/20.
//

#import "CocosProjectManager.h"

#import "cocos2d.h"
#import "AppDelegate.h"
#import "RootViewController.h"
#import "platform/ios/CCEAGLView-ios.h"

#ifdef CC_FIX_ARTIFACTS_BY_STRECHING_TEXEL_TMX
#include "cocos/scripting/js-bindings/jswrapper/SeApi.h"
#else
#include "scripting/js-bindings/manual/ScriptingCore.h"
#endif
#ifndef HAVE_INSPECTOR
#include "ScriptingCore.h"
#endif

//#import "cocos-analytics/CAAgent.h"

@interface CocosProjectManager()

@property (strong, nonatomic) UIWindow *window;

@end

using namespace cocos2d;

Application* app = nullptr;

@implementation CocosProjectManager
// cocos2d application instance
//static AppDelegate* s_sharedApplication = nullptr;

+ (CocosProjectManager *)sharedManager {
   static CocosProjectManager *_sharedManager = nil;

   static dispatch_once_t onceToken;
   dispatch_once(&onceToken, ^{
       _sharedManager = [[self alloc] init];
   });

   return _sharedManager;
}

-(void)startAPPLaunchConfigWithWindow:(UIWindow *)window
{
   self.window = window;

   // Add the view controller's view to the window and display.
   float scale = [[UIScreen mainScreen] scale];
   CGRect bounds = [[UIScreen mainScreen] bounds];
   //window = [[UIWindow alloc] initWithFrame: bounds];

   // cocos2d application instance
   app = new AppDelegate(bounds.size.width * scale, bounds.size.height * scale);
   app->setMultitouch(true);

   // Use RootViewController to manage CCEAGLView
   _viewController = [[RootViewController alloc]init];
#ifdef NSFoundationVersionNumber_iOS_7_0
   _viewController.automaticallyAdjustsScrollViewInsets = NO;
   _viewController.extendedLayoutIncludesOpaqueBars = NO;
   _viewController.edgesForExtendedLayout = UIRectEdgeAll;
#else
   _viewController.wantsFullScreenLayout = YES;
#endif

   UINavigationController *rootNavigationController = [[UINavigationController alloc] initWithRootViewController:_viewController];

   ///*
    // Set RootViewController to window
    if ( [[UIDevice currentDevice].systemVersion floatValue] < 6.0)
    {
    // warning: addSubView doesn't work on iOS6
    [window addSubview: _viewController.view];
    }
    else
    {
    // use this method on ios6
    [window setRootViewController:rootNavigationController];
    }

    //*/
   [window makeKeyAndVisible];

   //run the cocos2d-x game scene
   app->start();
}

-(void)startAPPLaunchInfoConfigWithWindow:(UIWindow *)window
{
   self.window = window;

   // Add the view controller's view to the window and display.
   float scale = [[UIScreen mainScreen] scale];
   CGRect bounds = [[UIScreen mainScreen] bounds];
   //window = [[UIWindow alloc] initWithFrame: bounds];

   // cocos2d application instance
   app = new AppDelegate(bounds.size.width * scale, bounds.size.height * scale);
   app->setMultitouch(true);

   // Use RootViewController to manage CCEAGLView
   _viewController = [[RootViewController alloc]init];
#ifdef NSFoundationVersionNumber_iOS_7_0
   _viewController.automaticallyAdjustsScrollViewInsets = NO;
   _viewController.extendedLayoutIncludesOpaqueBars = NO;
   _viewController.edgesForExtendedLayout = UIRectEdgeAll;
#else
   _viewController.wantsFullScreenLayout = YES;
#endif
   /*
   // Set RootViewController to window
   if ( [[UIDevice currentDevice].systemVersion floatValue] < 6.0)
   {
       // warning: addSubView doesn't work on iOS6
       [window addSubview: _viewController.view];
   }
   else
   {
       // use this method on ios6
       [window setRootViewController:_viewController];
   }
   */

   //[window makeKeyAndVisible];

   //run the cocos2d-x game scene
   app->start();
}

-(void)enterCocosRootViewController
{
   UINavigationController *rootNavigationController = [[UINavigationController alloc] initWithRootViewController:_viewController];

   // Set RootViewController to window
   if ( [[UIDevice currentDevice].systemVersion floatValue] < 6.0)
   {
       // warning: addSubView doesn't work on iOS6
       [_window addSubview: _viewController.view];
   }
   else
   {
       // use this method on ios6
       //[window setRootViewController:_viewController];
       [_window setRootViewController:rootNavigationController];
   }

   [_window makeKeyAndVisible];
}

-(void)applicationWillResignActive
{
   NSLog(@"CocosProjectManager applicationWillResignActive");
}

-(void)applicationDidBecomeActive
{
   NSLog(@"CocosProjectManager applicationDidBecomeActive");
}

-(void)applicationDidEnterBackground
{
   app->applicationDidEnterBackground();
}

-(void)applicationWillEnterForeground
{

   app->applicationWillEnterForeground();
}

-(void)applicationWillTerminate
{

   delete app;
   app = nil;
}

-(void)pushViewController:(UIViewController *)viewController
{
   [_viewController.navigationController pushViewController:viewController animated:YES];
}

#pragma mark Call JS

-(void)runJS:(NSString *) js
{
   se::ScriptEngine::getInstance()->evalString([js UTF8String]);
}

#pragma mark C++ Call Native

-(void)exceptionCallbackLocation:(NSString *) location message:(NSString *) message stack:(NSString *) stack
{

   NSMutableDictionary *dic = [NSMutableDictionary dictionaryWithCapacity:3];
   [dic setObject:location?location:@"" forKey:@"location"];
   [dic setObject:message?message:@"" forKey:@"message"];
   [dic setObject:stack?stack:@"" forKey:@"stack"];

   [[NSNotificationCenter defaultCenter] postNotificationName:EXCEPTIONNOTIFICATION object:dic userInfo:nil];
}

@end
- 新建 CallObjCNative.h 、CallObjCNative.mm 文件用于接受js 异常报错输出
代码如下:
//
//  CallObjCNative.h
//  libcocos2d iOS
//
//  Created by ios_001 on 2019/5/3.
//

#include "cocos2d.h"
using namespace cocos2d;

int GetNetTypeIOS();

void ExceptionCallback(const char *location, const char *message,const char *stack);
//
//  CallObjCNative.m
//  libcocos2d iOS
//
//  Created by ios_001 on 2019/5/3.
//

#import "CallObjCNative.h"

#import
#import "CocosProjectManager.h"

void ExceptionCallback(const char *location, const char *message,const char *stack)
{
    [[CocosProjectManager sharedManager] exceptionCallbackLocation:[[NSString alloc] initWithUTF8String:location] message:[[NSString alloc] initWithUTF8String:message] stack:[[NSString alloc] initWithUTF8String:stack]];
}
CallObjCNative 类在 AppDelegate.cpp 文件中调用的地方示例如下:
// 引入CallObjCNative 头文件
#if (CC_TARGET_PLATFORM == CC_PLATFORM_IOS || CC_TARGET_PLATFORM == CC_PLATFORM_MAC)
#include "CallObjCNative.h"
#endif

bool AppDelegate::applicationDidFinishLaunching()
{
    se::ScriptEngine *se = se::ScriptEngine::getInstance();

    jsb_set_xxtea_key("f458ba60-42ad-41");
    jsb_init_file_operation_delegate();

#if defined(COCOS2D_DEBUG) && (COCOS2D_DEBUG > 0)
    // Enable debugger here
    jsb_enable_debugger("0.0.0.0", 6086, false);
#endif

    se->setExceptionCallback([](const char *location, const char *message, const char *stack) {
// Send exception information to server like Tencent Bugly.
#if (CC_TARGET_PLATFORM == CC_PLATFORM_IOS || CC_TARGET_PLATFORM == CC_PLATFORM_MAC)
        // IOS CallObjCNative.h 文件中声明的方法
        ExceptionCallback(location, message, stack);
#elif (CC_TARGET_PLATFORM == CC_PLATFORM_ANDROID)
        // 安卓端需要实现的方法
        JniMethodInfo m;
        if (JniHelper::getStaticMethodInfo(m, CLASS_NAME, "reportError", "(Ljava/lang/String;Ljava/lang/String;Ljava/lang/String;)V"))
        {
            jstring locationStr = m.env->NewStringUTF(location);
            jstring messageStr = m.env->NewStringUTF(message);
            jstring stackStr = m.env->NewStringUTF(stack);
            m.env->CallStaticVoidMethod(m.classID, m.methodID, locationStr, messageStr, stackStr);
            m.env->DeleteLocalRef(m.classID);
        }
#endif
    });

    jsb_register_all_modules();

    se->start();

    se::AutoHandleScope hs;
    jsb_run_script("jsb-adapter/jsb-builtin.js");
    jsb_run_script("main.js");

    se->addAfterCleanupHook([]() {
        JSBClassType::destroy();
    });

    return true;
}
编译 cocos2d_libs.xcodeproj 工程生成libcocos2d iOS.a 文件,制作出各armv7 i386 x86_64 arm64 类型静态库并合并。
CocosProjectManager.h 文件为静态库公开头文件。
7,Cocos 引擎静态库使用(集成至IOS原生工程)
将上一步制作出的 libcocos2d iOS.a 、CocosProjectManager.h 添加至需要接入的IOS原生工程中
原生项目 TARGETS -> Build Phases -> LInk Binary With Libraries 中添加以下依赖库

- AppController.mm 或 AppDelegate.mm 中作如下集成
#import "CocosProjectManager.h"

- (BOOL)application:(UIApplication *)application didFinishLaunchingWithOptions:(NSDictionary *)launchOptions
{

    [[CocosProjectManager sharedManager] startAPPLaunchConfigWithWindow:window];

    // do other somethings
}

- (void)applicationDidEnterBackground:(UIApplication *)application {

    [[CocosProjectManager sharedManager] applicationDidEnterBackground];

}

- (void)applicationWillEnterForeground:(UIApplication *)application {

    [[CocosProjectManager sharedManager] applicationWillEnterForeground];

}

- (void)applicationWillTerminate:(UIApplication *)application
{

    [[CocosProjectManager sharedManager] applicationWillTerminate];
}
- 编译项目,完成集成