Android架构组件-Navigation的使用(一)
Android架构组件-Navigation的使用(二)
在 Google I/O 2018 上新出现了一个导航组件(Navigation Architecture Component),导航组件类似iOS开发里的StoryBoard,可以可视化的编辑App页面的导航关系。
官方文档:The Navigation Architecture Component
官方教程:Navigation Codelab
学习Demo:navigation
Google实验室的Demo: android-navigation
导航(Navigation)规则
- App需要有确定的起始点
- 使用一个栈来代表App的导航状态
- 向上按钮从不会退出你的App
- 在App任务中向上和返回按钮是等价的
- 深度链接到目标或导航到相同的目标应产生相同的堆栈
Navigation的使用
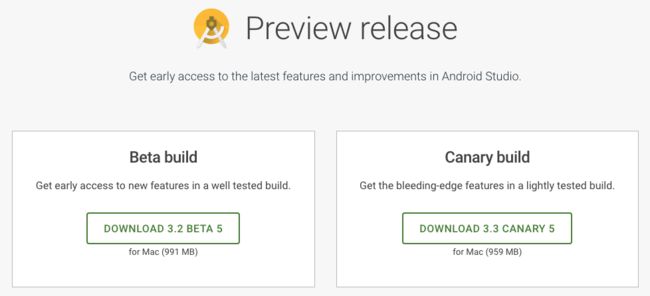
Navigation 是 Android Studio 3.2 才有的功能,所以要先下载 Android Studio 3.2, 目前 Android Studio 3.2 是预览版,正式版目前是 3.1.3,Android studio3.2/3.3下载页面
下载完 Android Studio 3.2 /3.3 后打开项目
在 app 下的 build.gradle 导入 Navigation:
dependencies {
    //...
    implementation "android.arch.navigation:navigation-fragment-ktx:1.0.0-alpha04"
    implementation "android.arch.navigation:navigation-ui-ktx:1.0.0-alpha04"
}
建立个Activity,需要用到 NavHost 来托管 Navigation,NavHost 是个接口,默认是用 NavHostFragment 来托管,NavHostFragment 是实现了 NavHost 接口的,查看 NavHostFragment 会看到,在注释里他已经提供了简单的activity布局写法
/**
 * NavHostFragment provides an area within your layout for self-contained navigation to occur.
 *
 * NavHostFragment is intended to be used as the content area within a layout resource
 * defining your app's chrome around it, e.g.:
 *
 *
 * <android.support.v4.widget.DrawerLayout
 *        xmlns:android="http://schemas.android.com/apk/res/android"
 *        xmlns:app="http://schemas.android.com/apk/res-auto"
 *        android:layout_width="match_parent"
 *        android:layout_height="match_parent">
 *    <fragment
 *            android:layout_width="match_parent"
 *            android:layout_height="match_parent"
 *            android:id="@+id/my_nav_host_fragment"
 *            android:name="androidx.navigation.fragment.NavHostFragment"
 *            app:navGraph="@xml/nav_sample"
 *            app:defaultNavHost="true" />
 *    <android.support.design.widget.NavigationView
 *            android:layout_width="wrap_content"
 *            android:layout_height="match_parent"
 *            android:layout_gravity="start"/>
 * </android.support.v4.widget.DrawerLayout>
 *
 *
 * Each NavHostFragment has a {@link NavController} that defines valid navigation within
 * the navigation host. This includes the {@link NavGraph navigation graph} as well as navigation
 * state such as current location and back stack that will be saved and restored along with the
 * NavHostFragment itself.
 *
 * NavHostFragments register their navigation controller at the root of their view subtree
 * such that any descendant can obtain the controller instance through the {@link Navigation}
 * helper class's methods such as {@link Navigation#findNavController(View)}. View event listener
 * implementations such as {@link android.view.View.OnClickListener} within navigation destination
 * fragments can use these helpers to navigate based on user interaction without creating a tight
 * coupling to the navigation host.
 */
public class NavHostFragment extends Fragment implements NavHost {
    //...
}
参考例子,我们的NavigationMainActivity布局:
AppBarLayout和Toolbar暂不做介绍
fragment会发现有2分属性:
app:navGraph: 属性赋值的是 nagation 文件
app:defaultNavHost: 这个是和返回键相关的
这个nagation文件是什么呢?我们先来建Fragment和activity:
Menu1Fragment:
class Menu1Fragment : Fragment() {
    override fun onCreateView(inflater: LayoutInflater, container: ViewGroup?,
                              savedInstanceState: Bundle?): View? {
        // Inflate the layout for this fragment
        return inflater.inflate(R.layout.fragment_menu1, container, false)
    }
}
xml:
Menu2Fragment:
class Menu2Fragment : Fragment() {
    lateinit var binding: FragmentMenu2Binding
    override fun onCreateView(inflater: LayoutInflater, container: ViewGroup?,
                              savedInstanceState: Bundle?): View? {
        // Inflate the layout for this fragment
        binding = DataBindingUtil.inflate(inflater, R.layout.fragment_menu2, container, false)
        return binding.root
    }
}

xml:
Menu2NextFragment此处先省略不写了。
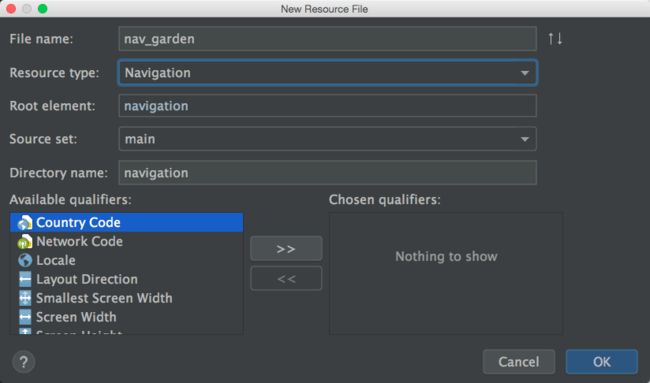
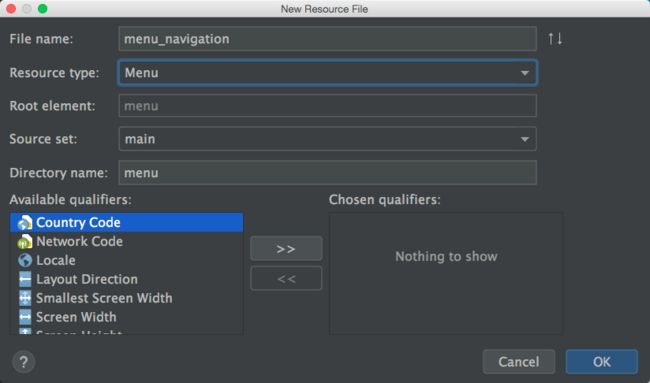
在res目录右键选择new -> Android Resource File
新建个navigation资源文件:
在res目录下会产生navigation文件夹:
会产生这样的文件:
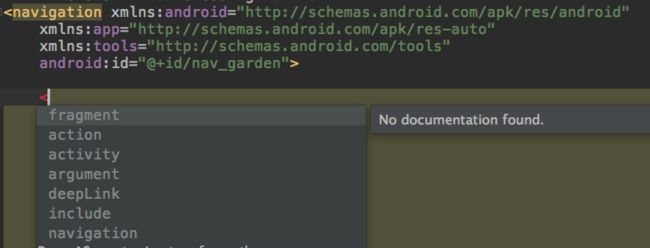
写<左尖括号的时候,会提示:
然后我们将fragment添加进去:
id: 就像写布局的 id 那样需要给个 id 才能找到它
name: 哪个 Fragment 类名
tools:layout: fragment的layout
就像下面写好的这样:
navigation -> nav_garden:
仔细查看代码的话,会发现在navigation下有个app:startDestination,这是给导航指定起始位置的,必须要设置,不然会奔溃报错。
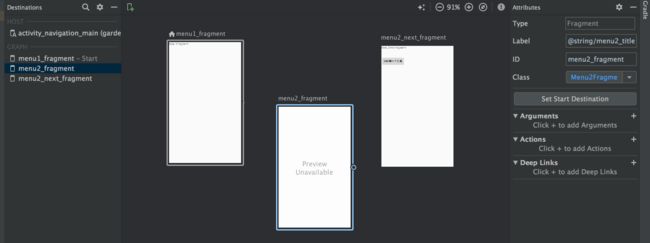
点击下面的Design查看下:
这样我们的app:navGraph="@navigation/nav_garden"就创建好了
结合ToolBar和navigationView
下面新建个menu文件:
这样NavigationView 的app:menu="@menu/menu_navigation"也创建好了。注意menu这里的id需要和navigation的id对应。
activity代码修改为:
class NavigationMainActivity : AppCompatActivity() {

    lateinit var binding: ActivityNavigationMainBinding
    lateinit var navController: NavController
    override fun onCreate(savedInstanceState: Bundle?) {
        super.onCreate(savedInstanceState)
        binding = DataBindingUtil.setContentView(this, R.layout.activity_navigation_main)
        // Set up ActionBar
        setSupportActionBar(binding.toolbar)
        navController = Navigation.findNavController(this, R.id.garden_nav_fragment)
        NavigationUI.setupActionBarWithNavController(this, navController, binding.drawerLayout)
        // Set up navigation menu
        binding?.navigationView.setupWithNavController(navController)
    }

    override fun onSupportNavigateUp(): Boolean {
        return NavigationUI.navigateUp(binding.drawerLayout, navController)
    }

    override fun onBackPressed() {
        if(binding.drawerLayout.isDrawerOpen(GravityCompat.START)) {
            binding.drawerLayout.closeDrawer(GravityCompat.START)
        } else {
            super.onBackPressed()
        }
    }
}
Navigation 可以和 Toolbar 相结合,Toolbar 左边会出现个返回的箭头,这样箭头的显示和隐藏控制都不用我们去写了。
用 Toolbar 的话 Activity 的 style 要设置 NoActionBar 的。
这里用到了 NavigationUI 的setupActionBarWithNavController(AppCompatActivity activity, NavController navController) 方法,还覆盖了 onSupportNavigateUp() 方法。是因为在宿主activity里需要重写onSupportNavigateUp方法去启动fragment。想了解更多的话,可以进入源码查看都做了什么
界面间跳转
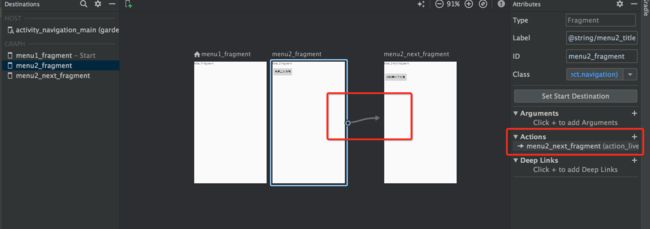
看上图右侧,可以添加Arguments(传参),Action(页面间跳转),我们在Menu2Fragment上添加跳转到Menu2NextFragment:
action的id 和 destination:
id 就是这个 action 的 id,
destination 是目的地,要跳转到哪里的
还可以设置动画
查看design:
Menu2Fragment和Menu2NextFragment之间有根带箭头的线,右侧Action的位置有跳转id。
要跳转到第二个 Fragment 得使用
NavController
来发起页面跳转,可以通过以下方法获取NavController:
NavHostFragment.findNavController(Fragment)Navigation.findNavController(Activity, @IdRes int viewId)Navigation.findNavController(View)
获取到NavController后,就可以通过它的navigate()方法发起页面跳转,navigate()接受action id 或 fragment id 以及导航选项及Bundle参数等作为参数。
/**
     * Find a {@link NavController} given the id of a View and its containing
     * {@link Activity}. This is a convenience wrapper around {@link #findNavController(View)}.
     *
     * This method will locate the {@link NavController} associated with this view.
     * This is automatically populated for the id of a {@link NavHost} and its children.
     *
     * @param activity The Activity hosting the view
     * @param viewId The id of the view to search from
     * @return the {@link NavController} associated with the view referenced by id
     * @throws IllegalStateException if the given viewId does not correspond with a
     * {@link NavHost} or is not within a NavHost.
     */
    @NonNull
    public static NavController findNavController(@NonNull Activity activity, @IdRes int viewId) {
        View view = ActivityCompat.requireViewById(activity, viewId);
        NavController navController = findViewNavController(view);
        if (navController == null) {
            throw new IllegalStateException("Activity " + activity
                    + " does not have a NavController set on " + viewId);
        }
        return navController;
    }
    /**
     * Find a {@link NavController} given a local {@link View}.
     *
     * This method will locate the {@link NavController} associated with this view.
     * This is automatically populated for views that are managed by a {@link NavHost}
     * and is intended for use by various {@link android.view.View.OnClickListener listener}
     * interfaces.
     *
     * @param view the view to search from
     * @return the locally scoped {@link NavController} to the given view
     * @throws IllegalStateException if the given view does not correspond with a
     * {@link NavHost} or is not within a NavHost.
     */
    @NonNull
    public static NavController findNavController(@NonNull View view) {
        NavController navController = findViewNavController(view);
        if (navController == null) {
            throw new IllegalStateException("View " + view + " does not have a NavController set");
        }
        return navController;
    }
还有一种是通过 NavHostFragment 类
/**
     * Find a {@link NavController} given a local {@link Fragment}.
     *
     * This method will locate the {@link NavController} associated with this Fragment,
     * looking first for a {@link NavHostFragment} along the given Fragment's parent chain.
     * If a {@link NavController} is not found, this method will look for one along this
     * Fragment's {@link Fragment#getView() view hierarchy} as specified by
     * {@link Navigation#findNavController(View)}.
     *
     * @param fragment the locally scoped Fragment for navigation
     * @return the locally scoped {@link NavController} for navigating from this {@link Fragment}
     * @throws IllegalStateException if the given Fragment does not correspond with a
     * {@link NavHost} or is not within a NavHost.
     */
    @NonNull
    public static NavController findNavController(@NonNull Fragment fragment) {
        Fragment findFragment = fragment;
        while (findFragment != null) {
            if (findFragment instanceof NavHostFragment) {
                return ((NavHostFragment) findFragment).getNavController();
            }
            Fragment primaryNavFragment = findFragment.requireFragmentManager()
                    .getPrimaryNavigationFragment();
            if (primaryNavFragment instanceof NavHostFragment) {
                return ((NavHostFragment) primaryNavFragment).getNavController();
            }
            findFragment = findFragment.getParentFragment();
        }

        // Try looking for one associated with the view instead, if applicable
        View view = fragment.getView();
        if (view != null) {
            return Navigation.findNavController(view);
        }
        throw new IllegalStateException("Fragment " + fragment
                + " does not have a NavController set");
    }
都是 public static 的方法,所以得到 NavController 之后呢,NavController 有 navigate 方法可以做跳转的
/**
     * Navigate to a destination from the current navigation graph. This supports both navigating
     * via an {@link NavDestination#getAction(int) action} and directly navigating to a destination.
     *
     * @param resId an {@link NavDestination#getAction(int) action} id or a destination id to
     *              navigate to
     * @param args arguments to pass to the destination
     */
    public final void navigate(@IdRes int resId, @Nullable Bundle args) {
        navigate(resId, args, null);
    }
这里的参数 resId ,从注释中也知道是 action 的那个 id。所以,给按钮添加事件做跳转
修改Menu2Fragment:
class Menu2Fragment : Fragment() {
    lateinit var binding: FragmentMenu2Binding
    override fun onCreateView(inflater: LayoutInflater, container: ViewGroup?,
                              savedInstanceState: Bundle?): View? {

        binding = DataBindingUtil.inflate(inflater,R.layout.fragment_menu2, container, false)
        return binding.root
    }

    override fun onViewCreated(view: View, savedInstanceState: Bundle?) {
        super.onViewCreated(view, savedInstanceState)
        binding.btnToSecondFragment.addClickAction {
               Navigation.findNavController(view).navigate(R.id.action_livedata_fragment_to_livedata2_fragment)
        }
    }
}
传递数据
有时候可能要从第一个 Fragment 带些数据去第二个 Fragment,那怎么办,也很简单,navigate 有个俩参数的方法
public final void navigate(@IdRes int resId, @Nullable Bundle args) {
        navigate(resId, args, null);
    }
第二个参数 Bundle 是经常用的了,跳转后 Activity 可以用 getIntent() 获取,Fragment 可以通过 getArguments() 获取,修改Menu2Fragment的点击事件:
binding.btnToSecondFragment.addClickAction {
        var bundle: Bundle = bundleOf(
                    "test" to getString(R.string.menu2next_args),
                    "num" to 9
        )
        Navigation.findNavController(view).navigate(R.id.action_livedata_fragment_to_livedata2_fragment, bundle)
}
Menu2NextFragment:
class Menu2NextFragment : Fragment() {

    lateinit var binding: FragmentMenu2NextBinding
    override fun onCreateView(inflater: LayoutInflater, container: ViewGroup?,
                              savedInstanceState: Bundle?): View? {
        binding = DataBindingUtil.inflate(inflater, R.layout.fragment_menu2_next, container, false)
        return binding.root
    }

    override fun onViewCreated(view: View, savedInstanceState: Bundle?) {
        super.onViewCreated(view, savedInstanceState)
        var test: String = arguments?.getString("test")?:""
        var num: Int = arguments?.getInt("num")?:0
    }
}
这里是 Fragment ,跳转后用 getArguments() 去获取
类型安全的方式传递数据
Navigation 还提供了一种安全的数据传递,是怎样的呢?先配置安全插件,在 Project 根目录下的 build.gradle导入:
dependencies {
        //...
        classpath "android.arch.navigation:navigation-safe-args-gradle-plugin:1.0.0-alpha04"
    }
在 app 下的 build.gradle 里 apply, 同步一下 gradle
apply plugin: 'androidx.navigation.safeargs'
配置完成后,我们在nav添加Arguments数据传递:
argument 有三个属性 name、defaultValue 和 type,
- name 就是名字到时会生成这个名字的 set 和 get 方法,
- defaultValue 是默认值,
- type 就是数据类型,有以下几种可以使用
怎么用呢?使用也简单,生成的 argument 的类使用 Builder 模式,这里的数据是从Menu2Fragment 传数据给Menu2NextFragment。
查看生成的Menu2FragmentArgs里的Builder方法:
public static class Builder {
    @NonNull
    private String test = "@string/menu2next_args";

    private int num = 0;

    public Builder(Menu2FragmentArgs original) {
      this.test = original.test;
      this.num = original.num;
    }

    public Builder() {
    }

    @NonNull
    public Menu2FragmentArgs build() {
      Menu2FragmentArgs result = new Menu2FragmentArgs();
      result.test = this.test;
      result.num = this.num;
      return result;
    }

    @NonNull
    public Builder setTest(@NonNull String test) {
      if (test == null) {
        throw new IllegalArgumentException("Argument \"test\" is marked as non-null but was passed a null value.");
      }
      this.test = test;
      return this;
    }

    @NonNull
    public Builder setNum(int num) {
      this.num = num;
      return this;
    }

    @NonNull
    public String getTest() {
      return test;
    }

    public int getNum() {
      return num;
    }
  }
使用如下:
var bundle: Bundle = bundleOf(
           "test" to getString(R.string.menu2next_args),
            "num" to 9
)
var menu2FragmentArgs: Menu2FragmentArgs = Menu2FragmentArgs.Builder(Menu2FragmentArgs.fromBundle(bundle)).build()
Navigation.findNavController(view).navigate(R.id.action_livedata_fragment_to_livedata2_fragment, menu2FragmentArgs.toBundle())
Menu2NextFragment接收:
var menu2FragmentArgs: Menu2FragmentArgs = Menu2FragmentArgs.fromBundle(arguments)
var test: String = menu2FragmentArgs.test
var num: Int = menu2FragmentArgs.num
返回
defaultNavHost 这个属性和返回键有关的,如果把这个属性改为 false,从第一个 Fragment 跳到第二个 Fragment 再按返回键就会直接退出程序。
第二个 Fragment 可以不用按返回键返回第一个 Fragment, 通过 NavController 去控制,修改下Menu2NextFragment的布局,添加个按钮。
class Menu2NextFragment : Fragment() {
    //...
    override fun onViewCreated(view: View, savedInstanceState: Bundle?) {
        super.onViewCreated(view, savedInstanceState)
        //...
        binding.btnBackMenu1Fragment.addClickAction {
            Navigation.findNavController(view).popBackStack(R.id.menu2_fragment, false)
        }
    }
}
NavController 有 navigateUp() 和 popBackStack() 都可以返回上一级,有什么区别:
popBackStack() 如果当前的返回栈是空的就会报错,因为栈是空的了,navigateUp() 则不会,还是停留在当前界面
看看 popBackStack() 源码,第一句就是判断返回栈是不是空的
public boolean popBackStack() {
        if (mBackStack.isEmpty()) {
            // Nothing to pop if the back stack is empty
            return false;
        }
        // Pop just the current destination off the stack
        return popBackStack(getCurrentDestination().getId(), true);
    }
查看navigateUp源码,做了判断 返回栈是不是只剩一个,不是的话就会去调用 popBackStack()
public boolean navigateUp() {
        if (mBackStack.size() == 1) {
            // If there's only one entry, then we've deep linked into a specific destination
            // on another task so we need to find the parent and start our task from there
            NavDestination currentDestination = getCurrentDestination();
            int destId = currentDestination.getId();
            NavGraph parent = currentDestination.getParent();
            while (parent != null) {
                if (parent.getStartDestination() != destId) {
                    TaskStackBuilder parentIntents = new NavDeepLinkBuilder(NavController.this)
                            .setDestination(parent.getId())
                            .createTaskStackBuilder();
                    parentIntents.startActivities();
                    if (mActivity != null) {
                        mActivity.finish();
                    }
                    return true;
                }
                destId = parent.getId();
                parent = parent.getParent();
            }
            // We're already at the startDestination of the graph so there's no 'Up' to go to
            return false;
        } else {
            return popBackStack();
        }
    }
popBackStack还有个方法
public boolean popBackStack(@IdRes int destinationId, boolean inclusive) {//...}
第一个参数是 Navigation 文件的 fragment 的 id,不是 action 的,
第二个参数是指是否包含第一个参数 id 那个也弹出栈
动态加载Navigation
有时候不想马上启动 Start Destination,或者从别的地方收到传过来的数据,然后要在 Start Destination 中用的需求,这时就不能在 layout 中写 navGraph,因为写了 navGraph 一启动就会去加载 Start Destination,这时可以用代码去动态加载 Navigation 文件的内容,从 NavHostFragment 入手。
- 修改下 Activity 的 layout,把 NavHostFragment 的 navGraph 属性去掉
- 在 Activity 里加载
var navHostFragment: NavHostFragment = supportFragmentManager.findFragmentById(R.id.garden_nav_fragment) as NavHostFragment
var navSimple: NavGraph = navHostFragment.navController.navInflater.inflate(R.navigation.nav_garden)
var menu2FragDestination: NavDestination = navSimple.findNode(R.id.menu2_fragment)
var menu2FragmentArgs: Menu2FragmentArgs = Menu2FragmentArgs.fromBundle(bundleOf("test" to getString(R.string.menu2next_args), "num" to 9))
menu2FragDestination.setDefaultArguments(menu2FragmentArgs.toBundle())
navHostFragment.navController.graph = navSimple
这里先通过 FragmentManager 找到 NavHostFragment,navHostFragment 有 getNavController() 方法,
NavController 里 getNavInflater() 方法获得 NavInflater,
NavInflater 这个类似 LayoutInflater, 通过 inflate() 去加载 Navigation,
设置了数据后通过 NavController 的 setGraph(NavGraph graph) 就加载出来了
参考文章:
- Android Navigation Architecture Component 使用详解
- Android官方架构组件Navigation:大巧不工的Fragment管理框架
- 导航库 Navigation 小结
