TensorFlow+深度学习笔记7
TensorFlow+深度学习笔记7
标签(空格分隔): TensorFlow+深度学习笔记
本周掌握的知识
- 了解了text转image算法的大致过程;
- 使用GitHub的代码训练得到了自己的模型,并且实现了text转image的过程
- 详细阅读了代码,对方法的细节步骤有较深了解
Text-to-Image论文学习
论文工作与贡献
这篇文章的主要工作是将文字所描述场景的文字信息转换为肉眼可见的图像信息(“translating visual concepts from characters to pixels”)。
在近几年的研究工作中,通用强大的递归神经网络体系结构( recurrent neural network architectures)已经能够学习辨析文本特征表示。此外深度卷积对抗生成网络(deep convolutional generative adversarialnetworks)也可以产生令人满意的特殊类型的图像(人脸、唱片封面等等)。本篇论文最大的贡献就是在这两个研究领域搭建了一座桥梁,使得计算机能够通过文本生成符合文本信息的图像。
Attribute Representatin是一个很受欢迎和有趣的研究方向。这篇文章将研究文本到图像的问题,这个问题是有挑战性的,因为首先要解决下面两个问题:
1 learn a text feature representation that captures the important visual details;
2 use these features to synthesize a compelling image that a human might mistake for real.
文章提到这两个问题在深度学习的帮助下都得到了解决:自然语言表示(natural language representation)和图像合成(image synthesis)
但是仍然存在一个没有被解决的问题:“the distribution of images conditioned on a text description is highly multimodal”。也就是说对于给定的文本信息,生成的图像是多模态的。
作者的贡献:

简单说就是作者的方法可以从文本信息生成令人信服的合成图像(鸟和花)。
相关工作
| 序号 | 研究人员 | 研究内容 |
|---|---|---|
| 1 | Goodfellow et al. | trained a stacked multimodal autoencoder on audio and video signals and were able to learn a shared modality-invariant representation |
| 2 | Srivastava & Salakhutdinov | developed a deep Boltzmann machine and jointly modeled images and text tags |
| 3 | Sohn et al. | proposed a multimodal conditional prediction framework (hallucinating one modality given the other) and provided theoretical justification |
| 4 | Dosovitskiyet al. | trained a deconvolutional network (several layers of convolution and upsampling) to generate 3D chair renderings conditioned on a set of graphics codes indicating shape, position and lighting |
| 5 | Yanget al. | added an encoder network as well as actions to this approach. They trained a recurrent convolutional encoder decoder that rotated 3D chair models and human faces conditioned on action sequences of rotations |
| 6 | Reedet al. | encode transformations from analogy pairs, and use a convolutional decoder to predict visual analogies on shapes, video game characters and 3D cars |
| 7 | Denton et al. | used a Laplacian pyramid of adversarial generator and discriminators to synthesize images at multiple resolutions |
| 8 | Radford et al. | used a standard convolutional decoder, but developed a highly effective and stable architecture incorporating batch normalization to achieve striking image synthesis results |
| 9 | Vinyals et al.; Mao et al.; Karpathy & Li; Donahue et al. | using recurrent neural network decoders to generate text descriptions conditioned on images |
| 10 | Ren et al. | generate answers to questions about the visual content of images |
| 11 | Wang et al.; Zhu et al. | applied sequence models to both text (in the form of books) and movies to perform a joint alignment. |
| 12 | Mansimov et al. | generated images from text captions, using a variational recurrent autoencoder with attention to paint the image in multiple steps, similar to DRAW(Gregoretal.,2015) |
主要的差别在于:
1 上面的这些工作都是基于class labels的,而本篇论文使用的方法是基于text description。我个人认为这篇论文的方法和cGAN很相似,所以我认为它是有监督学习。
2 上面的有关图像生成的论文都使用信息检索的方式,例如给定一段文字,在数据集中检索出符合文字描述的图像。而本文的方法是在给定文本信息的基础上合成全新的图像。
网络架构与方法原理
在正式介绍本文的网络架构和方法原理之前,作者介绍了相关的技术背景:
1 Generative adversarial networks : 可以参考前面的学习笔记
2 .Deep symmetric structured joint embedding :
为了得到一个视觉上可以判别的文本表示(text description),作者采用了Reed等人发在CVPR的一篇文章的方法,利用CNN和recurrent text encoders根据图像集去学习一个对应的函数。这个文本分类器是通过下面的结构损失函数进行优化训练的:

当一张图像有了其类别信息的时候,文本的编码应该有更高的兼容性得分,反之亦然。
本文的方法就是基于文本特征(由混合字符级卷积递归网络编码得到),训练一个深度卷积GAN。
网络结构:
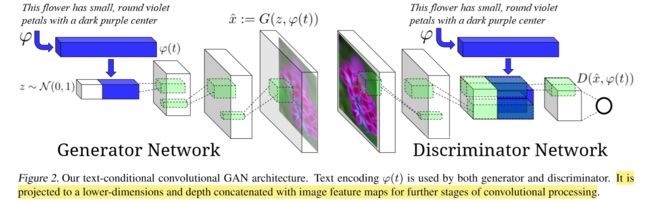
简答理解就是:生成器G将文本信息经过预处理得到特征表达,然后将其和噪声向量组合在一起。在上图中蓝色长方体就代表文本信息的特征表达,z对应的白色长方体是噪声向量。将得到的组合向量输入到反卷积网络中,经过多层处理最终得到一幅图像。
判别器D将图像进行卷积操作之后,将文本信息在深度方向上和原图像卷积得到的特征向量组合在一起,最后得到一个二值元,用来判断图像的真假。
GAN-CLS:
训练条件GAN的最直接的方法是将(text, image)对看做一个联合观察(joint observations), 然后训练判别器去判断这个联合观察是真是假。但是这个方法是比较天真的,因为判别器没有明确的指示去判断训练的真实图像和绑定的文本信息是否对应。
在这种GAN网络结构中,判别器有两种输入:real images with matching text和synthetic images with arbitrary text。所以必须显示地将两种错误分开:unrealistic images(for any text)和realistic images of the wrong class that mismatch the conditioning information。
作者修改了GAN训练算法来分离这两种error。除开给判别器提供real/fake inputs外,作者给判别器还添加了第三种输入:real images with mismatched text。通过学习image/text的匹配信息,还要学习图像的真实信息,判别器可以提供额外的信息给生成器。
算法1总结了训练过程:

GAN-INT:


这部分不仅用了以前的文本信息t,还是用了插值的文本信息。这是因为深度网络学习到的特征表示具有可插值性。也就是说对一对pair图像,经过相同层以后,对这些特征插值,那么插值后的特征也在数据流型附近。
也就是说,”一只羊在吃草”和”一只鸟在书上唱歌”,它们的深度特征插值后,可能就变成了“一只羊在树上唱歌”。这样做可以增加生成器G的创新性。
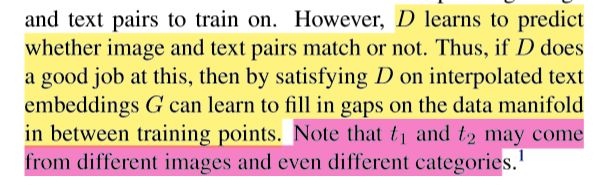
D能够很好的判断给定的图片与给定的文本t是否一致,那么如果用这种插值的文本t, G会努力缩小训练数据点之间的差异。t1和t2可能会来自不同的图像甚至不同的类别。
Inverting the generator for style transfer:
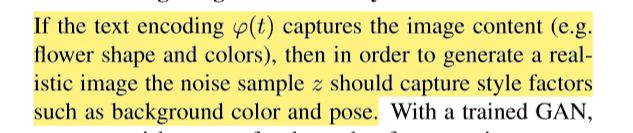
文本信息是用来描述图像内容的(content),噪声z用来描述图像风格(style,包括背景和姿态)。我们希望z能够起到这种加入style的作用,从而产生更真实多样化的图像。作着想做这样的工作 : wish to transfer the style of a query image onto the content of a particular text description.。然后作者弄了一个invert G网络,损失函数如下:

其中S是风格编码网络(style encoder network)。
当拥有生成器G和风格编码网络S之后,作者想把query image的风格转移到文本t上的过程如下:
![]()
论文实现细节

CUB数据集有200种类别的鸟,Oxford-102数据集有102种类别的花。作者采用的方法是训练集和测试集类不相交。

结果质量:
CUB数据集:
Oxford-102数据集:

从上面的实验结果来看,产生的花的结果明显要优于鸟的结果,作者推测这是因为鸟具有较强的结构规律使得判别器D能够很容易辨别出fake小鸟图像。
在上一部分已经提到噪声z起到的作用就是加入style的作用,作者还测试了哪一种方法具有较好的style表示作用。作者把图像按照style进行聚类(平均背景颜色、鸟类姿态等等),然后取属于同一聚类的样本求得z。通过求解相同聚类的图像的style表示z之间的余弦距离,从而确定不同的训练方式中z所起到的style作用的强弱:

随机化的z可以加入不同的style,从而增加生成样本的真实性与多样性

最后得到的结论是:GAN-INT模型、GAN-INT-CLS模型的z具有较好的style表示作用
泛化性:
作者为了测试他们方法的泛化性,在MS-COCO数据集上面进行了训练测试。从远处看得到的图像是比较好的,但是靠近仔细观察图像的话会发现图像条理不够分明。解决合并层次结构(“incorporate hierarchical structure”)这样的问题将会留到未来的工作中。
论文重现详细记录
重现过程
一开始使用的源码链接是paarthneekhara
训练的时候出现了各种问题:

这个问题通过交换concat的参数位置就能够解决(我的tensorflow版本是1.0.1,上面链接的版本是0.x)
接下来出现这样的问题:
还是因为tensorflow版本的原因,stackoverflow有一摸一样的问题,但是没有人回答,之后在上面Github链接的Issues中找到了解决方法,这是tensorflow1.0的源码链接:YearnyeenHo
我首先按照GitHub链接的方法训练,将epochs参数设置为300,训练时间为1天左右(Github训练的时间为2~3天,应该是硬件设备型号的不同所以我的更快一点),下面是测试结果:
Caption 1: the flower shown has yellow anther red pistil and bright red petals

Caption 2: this flower has a lot of small round pink petals.

但是我发现Caption 1得到的结果并不理想,猜想是训练度不够,于是我将epochs参数设置为600,训练了2天左右,得到的结果如下:
Caption 1: the flower shown has yellow anther red pistil and bright red petals

Caption 2: this flower has a lot of small round pink petals.

可以看到Caption 1得到的结果明显要比epoches=300的时候好很多,但是此时Caption 2得到的结果却不是怎么理想。
代码讲解
import tensorflow as tf
from Utils import ops

class GAN:
    '''
    OPTIONS
    z_dim : Noise dimension 100
    t_dim : Text feature dimension 256
    image_size : Image Dimension 64
    gf_dim : Number of conv in the first layer generator 64
    df_dim : Number of conv in the first layer discriminator 64
    gfc_dim : Dimension of gen untis for for fully connected layer 1024
    caption_vector_length : Caption Vector Length 2400
    batch_size : Batch Size 64
    '''
    def __init__(self, options):
        self.options = options

        self.g_bn0 = ops.batch_norm(name='g_bn0')
        self.g_bn1 = ops.batch_norm(name='g_bn1')
        self.g_bn2 = ops.batch_norm(name='g_bn2')
        self.g_bn3 = ops.batch_norm(name='g_bn3')

        self.d_bn1 = ops.batch_norm(name='d_bn1')
        self.d_bn2 = ops.batch_norm(name='d_bn2')
        self.d_bn3 = ops.batch_norm(name='d_bn3')
        self.d_bn4 = ops.batch_norm(name='d_bn4')


    def build_model(self):
        img_size = self.options['image_size']
        #[64, 64, 64, 3]
        t_real_image = tf.placeholder('float32', [self.options['batch_size'],img_size, img_size, 3 ], name = 'real_image')
        #[64, 64, 64, 3]
        t_wrong_image = tf.placeholder('float32', [self.options['batch_size'],img_size, img_size, 3 ], name = 'wrong_image')
        #[64, 2400]
        t_real_caption = tf.placeholder('float32', [self.options['batch_size'], self.options['caption_vector_length']], name = 'real_caption_input')
        #[64, 100]
        t_z = tf.placeholder('float32', [self.options['batch_size'], self.options['z_dim']])

        #将图像和噪声传入产生器G,得到fake图像
        fake_image = self.generator(t_z, t_real_caption)

        #判别器判断返回sigmoid函数值和判断结果的二元值
        disc_real_image, disc_real_image_logits   = self.discriminator(t_real_image, t_real_caption)
        disc_wrong_image, disc_wrong_image_logits   = self.discriminator(t_wrong_image, t_real_caption, reuse = True)
        disc_fake_image, disc_fake_image_logits   = self.discriminator(fake_image, t_real_caption, reuse = True)

        #计算各种损失函数
        g_loss = tf.reduce_mean(tf.nn.sigmoid_cross_entropy_with_logits(logits=disc_fake_image_logits, labels=tf.ones_like(disc_fake_image)))

        d_loss1 = tf.reduce_mean(tf.nn.sigmoid_cross_entropy_with_logits(logits=disc_real_image_logits, labels=tf.ones_like(disc_real_image)))
        d_loss2 = tf.reduce_mean(tf.nn.sigmoid_cross_entropy_with_logits(logits=disc_wrong_image_logits, labels=tf.zeros_like(disc_wrong_image)))
        d_loss3 = tf.reduce_mean(tf.nn.sigmoid_cross_entropy_with_logits(logits=disc_fake_image_logits, labels=tf.zeros_like(disc_fake_image)))

        d_loss = d_loss1 + d_loss2 + d_loss3

        t_vars = tf.trainable_variables()
        d_vars = [var for var in t_vars if 'd_' in var.name]
        g_vars = [var for var in t_vars if 'g_' in var.name]

        input_tensors = {
            't_real_image' : t_real_image,
            't_wrong_image' : t_wrong_image,
            't_real_caption' : t_real_caption,
            't_z' : t_z
        }

        variables = {
            'd_vars' : d_vars,
            'g_vars' : g_vars
        }

        loss = {
            'g_loss' : g_loss,
            'd_loss' : d_loss
        }

        outputs = {
            'generator' : fake_image
        }

        checks = {
            'd_loss1': d_loss1,
            'd_loss2': d_loss2,
            'd_loss3' : d_loss3,
            'disc_real_image_logits' : disc_real_image_logits,
            'disc_wrong_image_logits' : disc_wrong_image,
            'disc_fake_image_logits' : disc_fake_image_logits
        }

        return input_tensors, variables, loss, outputs, checks

    def build_generator(self):
        #img_size默认为64
        img_size = self.options['image_size']
        #caption_vector_length默认为2400 t_real_caption的shape为[64, 2400]
        t_real_caption = tf.placeholder('float32', [self.options['batch_size'], self.options['caption_vector_length']], name = 'real_caption_input')
        #z_dim默认为100 t_z的shape为[64, 100]
        t_z = tf.placeholder('float32', [self.options['batch_size'], self.options['z_dim']])
        fake_image = self.sampler(t_z, t_real_caption)

        input_tensors = {
            't_real_caption' : t_real_caption,
            't_z' : t_z
        }

        outputs = {
            'generator' : fake_image
        }

        return input_tensors, outputs

    # Sample Images for a text embedding
    def sampler(self, t_z, t_text_embedding):
        tf.get_variable_scope().reuse_variables()

        s = self.options['image_size']
        s2, s4, s8, s16 = int(s/2), int(s/4), int(s/8), int(s/16)
        #这里op.linear的操作是进行一个线性矩阵乘法
        #ops.lrelu 的操作为 return tf.maximum(x, leak*x)
        #这个操作的目的是将text特征向量降维到256维
        reduced_text_embedding = ops.lrelu( ops.linear(t_text_embedding, self.options['t_dim'], 'g_embedding') )
        #这一步是将z噪声向量和将维后的text特征向量在1维度上连接起来,正如网络结构图上显示的白色长方体和蓝色长方体连接起来那样
        z_concat = tf.concat([t_z, reduced_text_embedding], 1)
        #这一步输出的维度为64*8*4*4 8192
        z_ = ops.linear(z_concat, self.options['gf_dim']*8*s16*s16, 'g_h0_lin')
        h0 = tf.reshape(z_, [-1, s16, s16, self.options['gf_dim'] * 8])
        h0 = tf.nn.relu(self.g_bn0(h0, train = False))

        #反卷积操作其中ops.deconv2d的第二个参数是期望输出的图像的shape [64, 8, 8, 64*4]
        #每一层反卷积操作后面都要跟上relu操作
        h1 = ops.deconv2d(h0, [self.options['batch_size'], s8, s8, self.options['gf_dim']*4], name='g_h1')
        h1 = tf.nn.relu(self.g_bn1(h1, train = False))

        #输出的图像的shape [64, 16, 16, 64*2]
        h2 = ops.deconv2d(h1, [self.options['batch_size'], s4, s4, self.options['gf_dim']*2], name='g_h2')
        h2 = tf.nn.relu(self.g_bn2(h2, train = False))

        #输出的图像的shape [64, 32, 32, 64*1]
        h3 = ops.deconv2d(h2, [self.options['batch_size'], s2, s2, self.options['gf_dim']*1], name='g_h3')
        h3 = tf.nn.relu(self.g_bn3(h3, train = False))

        #输出的图像的shape [64, 64, 64, 3]
        h4 = ops.deconv2d(h3, [self.options['batch_size'], s, s, 3], name='g_h4')

        return (tf.tanh(h4)/2. + 0.5)

    # GENERATOR IMPLEMENTATION based on : https://github.com/carpedm20/DCGAN-tensorflow/blob/master/model.py
    def generator(self, t_z, t_text_embedding):
        #s的默认值是64
        s = self.options['image_size']
        s2, s4, s8, s16 = int(s/2), int(s/4), int(s/8), int(s/16) #32, 16, 8, 4
        #这里op.linear的操作是进行一个线性矩阵乘法
        #ops.lrelu 的操作为 return tf.maximum(x, leak*x)
        #这个操作的目的是将text特征向量降维到256维 这里't_dim'默认为256
        reduced_text_embedding = ops.lrelu( ops.linear(t_text_embedding, self.options['t_dim'], 'g_embedding') )
        #这一步是将z噪声向量和将维后的text特征向量在1维度上连接起来,正如网络结构图上显示的白色长方体和蓝色长方体连接起来那样
        z_concat = tf.concat([t_z, reduced_text_embedding], 1)
        #这一步输出的维度为64*8*4*4 8192
        z_ = ops.linear(z_concat, self.options['gf_dim']*8*s16*s16, 'g_h0_lin')
        h0 = tf.reshape(z_, [-1, s16, s16, self.options['gf_dim'] * 8])
        h0 = tf.nn.relu(self.g_bn0(h0))

        #反卷积操作其中ops.deconv2d的第二个参数是期望输出的图像的shape [64, 8, 8, 64*4]
        #每一层反卷积操作后面都要跟上relu操作
        h1 = ops.deconv2d(h0, [self.options['batch_size'], s8, s8, self.options['gf_dim']*4], name='g_h1')
        h1 = tf.nn.relu(self.g_bn1(h1))

        #输出的图像的shape [64, 16, 16, 64*2]
        h2 = ops.deconv2d(h1, [self.options['batch_size'], s4, s4, self.options['gf_dim']*2], name='g_h2')
        h2 = tf.nn.relu(self.g_bn2(h2))

        #输出的图像的shape [64, 32, 32, 64*1]
        h3 = ops.deconv2d(h2, [self.options['batch_size'], s2, s2, self.options['gf_dim']*1], name='g_h3')
        h3 = tf.nn.relu(self.g_bn3(h3))

        #输出的图像的shape [64, 64, 64, 3]
        h4 = ops.deconv2d(h3, [self.options['batch_size'], s, s, 3], name='g_h4')

        return (tf.tanh(h4)/2. + 0.5)

    # DISCRIMINATOR IMPLEMENTATION based on : https://github.com/carpedm20/DCGAN-tensorflow/blob/master/model.py
    def discriminator(self, image, t_text_embedding, reuse=False):
        #共享变量
        if reuse:
            tf.get_variable_scope().reuse_variables()

        #第1层卷积操作输出图像的维度为64, 图像长宽都为32
        h0 = ops.lrelu(ops.conv2d(image, self.options['df_dim'], name = 'd_h0_conv')) #32
        #第2层卷积操作输出图像的维度为64*2, 图像长宽都为16
        h1 = ops.lrelu( self.d_bn1(ops.conv2d(h0, self.options['df_dim']*2, name = 'd_h1_conv'))) #16
        #第3层卷积操作输出图像的维度为64*4, 图像长宽都为8
        h2 = ops.lrelu( self.d_bn2(ops.conv2d(h1, self.options['df_dim']*4, name = 'd_h2_conv'))) #8
        #第4层卷积操作输出图像的维度为64*8, 图像长宽都为4
        h3 = ops.lrelu( self.d_bn3(ops.conv2d(h2, self.options['df_dim']*8, name = 'd_h3_conv'))) #4

        # ADD TEXT EMBEDDING TO THE NETWORK
        reduced_text_embeddings = ops.lrelu(ops.linear(t_text_embedding, self.options['t_dim'], 'd_embedding'))
        reduced_text_embeddings = tf.expand_dims(reduced_text_embeddings,1)
        reduced_text_embeddings = tf.expand_dims(reduced_text_embeddings,2)
        tiled_embeddings = tf.tile(reduced_text_embeddings, [1,4,4,1], name='tiled_embeddings')

        #将图像经过多层卷积得到的结果与tiled_embeddings连接起来
        h3_concat = tf.concat([h3, tiled_embeddings], 3, name='h3_concat')
        h3_new = ops.lrelu( self.d_bn4(ops.conv2d(h3_concat, self.options['df_dim']*8, 1,1,1,1, name = 'd_h3_conv_new'))) #4

        #线性操作,得到一个二值元,用来判断图像真假
        h4 = ops.linear(tf.reshape(h3_new, [self.options['batch_size'], -1]), 1, 'd_h3_lin')

        return tf.nn.sigmoid(h4), h4