算法与游戏实战技术之刀光拖尾实现
笔者介绍:姜雪伟,IT公司技术合伙人,IT高级讲师,CSDN社区专家,特邀编辑,畅销书作者,国家专利发明人;已出版书籍:《手把手教你架构3D游戏引擎》电子工业出版社和《Unity3D实战核心技术详解》电子工业出版社等。
本篇文章主要是针对我在CSDN做的《算法与游戏实战技术》视频讲座中即将分享的刀光拖尾算法实现的技术文章,详情可以观看视频教程。
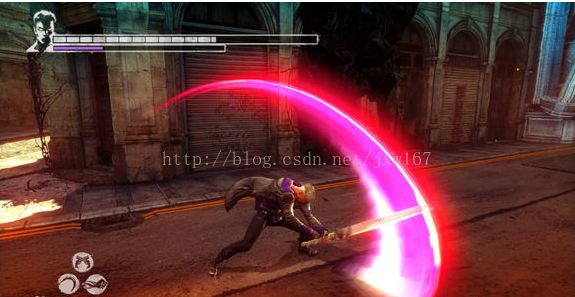
刀光拖尾的实现方式主要有两种:一种是美术使用MAX工具制作的特效实现的,也就是美术根据动作调的特效,这个特效是不跟随动作的,只是角色做动作时播放一下特效而已,按照这种方式实现的特效扩展起来非常麻烦,动作只要改动,对应的特效也随之改动,效果如下图所示:
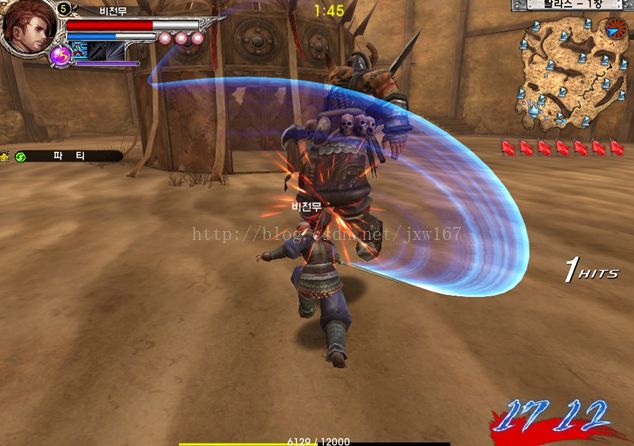
另一种方式是使用曲线插值实现的,它是获取到动作取样点然后带入曲线公式进行插值处理,这种实现方式可以不拘于动作的表现,
直接用代码动态去绘制的,它是跟随动作一起运动的,纹理贴图可以随意更换,而且更易于扩展,效果非常好,当然也可以不用插值实现
,直接通过采样点进行动态绘制,效果如下所示:
笔者以前做端游时,实现过刀光拖尾算法,当时在游戏公司使用的游戏引擎还不完善,很多功能都需要去开发或者完善。引擎的刀光拖尾算法也
需要完成,笔者负责实现刀光的拖尾算法,刚开始我选择的插值算法是贝塞尔曲线,结果插值的效果感觉不很理想,当然使用贝塞尔曲线也是
可以解决问题的,最终选择了B样条曲线插值。下面把我当时实现思路给读者解释一下:角色拿着武器在挥动的过程中是通过动作取样函数获取
到武器挥动时的一系列点。这些点作为关键点带入B样条曲线公式中,关键点之间可以等分成10段或者是多段,这样可以让曲线更加平滑了。
另外要实现刀光的淡入淡出效果,动作取样的关键点可以通过时间控制其产生和消失,这个是跟随动作实现的。
下面介绍一下,使用Unity实现的刀光拖尾,网上也有相关的资料,该拖尾的实现方式并没有使用线性插值,只是将取样点连成三角形面片
然后将材质赋到三角面片上,再根据时间控制其销毁。代码实现的主要思路是先把取样点存入到列表中,再根据这些取样点绘制成三角面片。
最后根据时间对其做淡入淡出效果,先给读者展示的函数是将取样点添加到List表中,函数如下所示:
public void Itterate(float itterateTime) {
position = transform.position;
now = itterateTime;
// Add a new trail section
if (sections.Count == 0 || (sections[0].point - position).sqrMagnitude > minDistance * minDistance) {
TronTrailSection section = new TronTrailSection();
section.point = position;
if (alwaysUp)
section.upDir = Vector3.up;
else
section.upDir = transform.TransformDirection(Vector3.up);
section.time = now;
sections.Insert(0, section);
}
}接下来就是动作取样了,动作取样是关键点的获取,函数如下所示:
	void RunAnimations ()
	{
		//
		if (t > 0) {
			eulerAngles = transform.eulerAngles;
			position = transform.position;
			while (tempT < t) {

				tempT += animationIncrement;
				for (int i = 0; i < fadingStates.Count; i++) {
					if (FadeOutAnimation (fadingStates[i], animationIncrement)) {
						fadingStates.RemoveAt (i);
						i--;
					}
				}
				if (currentState != null)
					FadeInCurrentState (animationIncrement);
				//
				m = tempT / t;
				transform.eulerAngles = new Vector3(Mathf.LerpAngle(lastEulerAngles.x, eulerAngles.x, m),Mathf.LerpAngle(lastEulerAngles.y, eulerAngles.y, m),Mathf.LerpAngle(lastEulerAngles.z, eulerAngles.z, m));
				transform.position = Vector3.Lerp(lastPosition, position, m);
				//
				// ** Samples the animation at that moment
				//
				animation.Sample ();
				//
				// ** Adds the information to the WeaponTrail
				//
				for (int j = 0; j < trails.Count; j++) {
					if (trails[j].time > 0) {
						trails[j].Itterate (Time.time - t + tempT);
					} else {
						trails[j].ClearTrail ();
					}
				}
			}
			//
			// ** End of loop
			//
			tempT -= t;
			//
			// ** Sets the position and rotation to what they were originally
			transform.position = position;
			transform.eulerAngles = eulerAngles;
			lastPosition = position;
			lastEulerAngles = eulerAngles;
			//
			// ** Finally creates the meshes for the WeaponTrails (one per frame)
			//
			for (int j = 0; j < trails.Count; j++) {
				if (trails[j].time > 0) {
					trails[j].UpdateTrail (Time.time, t);
				}
			}
		}
	}
取样点完成后,开始更新刀光拖尾函数了,函数代码如下所示:
public void UpdateTrail(float currentTime, float deltaTime) { // ** call once a frame **
// Rebuild the mesh
mesh.Clear();
//
// Remove old sections
while (sections.Count > 0 && currentTime > sections[sections.Count - 1].time + time) {
sections.RemoveAt(sections.Count - 1);
}
// We need at least 2 sections to create the line
if (sections.Count < 2)
return;
//
vertices = new Vector3[sections.Count * 2];
colors = new Color[sections.Count * 2];
uv = new Vector2[sections.Count * 2];
//
currentSection = sections[0];
//
// Use matrix instead of transform.TransformPoint for performance reasons
localSpaceTransform = transform.worldToLocalMatrix;
// Generate vertex, uv and colors
for (var i = 0; i < sections.Count; i++) {
//
currentSection = sections[i];
// Calculate u for texture uv and color interpolation
float u = 0.0f;
if (i != 0)
u = Mathf.Clamp01((currentTime - currentSection.time) / time);
//
// Calculate upwards direction
Vector3 upDir = currentSection.upDir;
// Generate vertices
vertices[i * 2 + 0] = localSpaceTransform.MultiplyPoint(currentSection.point);
vertices[i * 2 + 1] = localSpaceTransform.MultiplyPoint(currentSection.point + upDir * height);
uv[i * 2 + 0] = new Vector2(u, 0);
uv[i * 2 + 1] = new Vector2(u, 1);
// fade colors out over time
Color interpolatedColor = Color.Lerp(startColor, endColor, u);
colors[i * 2 + 0] = interpolatedColor;
colors[i * 2 + 1] = interpolatedColor;
}
// Generate triangles indices
int[] triangles = new int[(sections.Count - 1) * 2 * 3];
for (int i = 0; i < triangles.Length / 6; i++) {
triangles[i * 6 + 0] = i * 2;
triangles[i * 6 + 1] = i * 2 + 1;
triangles[i * 6 + 2] = i * 2 + 2;
triangles[i * 6 + 3] = i * 2 + 2;
triangles[i * 6 + 4] = i * 2 + 1;
triangles[i * 6 + 5] = i * 2 + 3;
}
// Assign to mesh
mesh.vertices = vertices;
mesh.colors = colors;
mesh.uv = uv;
mesh.triangles = triangles;
//
// Tween to the desired time
//
if (time > desiredTime){
time -= deltaTime*timeTransitionSpeed;
if(time <= desiredTime) time = desiredTime;
} else if (time < desiredTime){
time += deltaTime*timeTransitionSpeed;
if(time >= desiredTime) time = desiredTime;
}
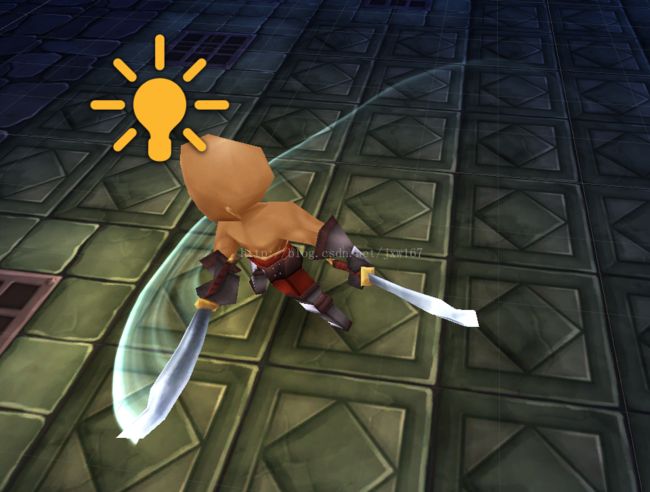
}动作的取样点生成网格效果展示如下所示:
在网格贴上材质后实现的效果如下所示:
拖尾算法实现方式不用曲线插值一样可以实现出来,当然实现插值的方式也是可以实现的。