Android 通知栏Notification总结一:基本用法
转载自http://www.cnblogs.com/travellife/p/Android-Notification-xiang-jie.html
和http://blog.csdn.net/vipzjyno1/article/details/25248021/
今天来整理下下通知栏Notification的使用,顾名思义,通知栏就是系统有些消息需要通知用户,而又为了不打扰用户的正常使用手机而设立的框架。

一、概述
功能
主要是提醒功能和交互功能:
- 1 . 显示接收到短消息、及时消息等信息(如QQ、微信、新浪、短信),日历事件提醒。
- 2 . 警告,如电量低,杀毒软件的报毒等
- 3 . 显示客户端的推送消息,如广告、优惠、版本更新、推荐新闻等,常用的第三方 SDK 有: JPush 、 个推 、 信鸽 、 网易云信(偏重 IM ) 、 阿里云推送
- 4 . 显示正在进行的事物,例如:后台运行的程序,如音乐播放进度、下载进度等,用户可以进行交互。
一些链接
- 官方:http://developer.android.com/design/patterns/notifications.html
- 译文:http://adchs.github.io/patterns/notifications.html
- 使用教程 :http://developer.android.com/training/notify-user/index.html
- 开发文档 :http://developer.android.com/reference/android/app/Notification.html
- 在 Android 5.0(Api level 21) 中引入的 Material Design 尤为重要。关于 Notification 的设计指南请参考 Notification Pattern:https://material.io/guidelines/patterns/notifications.html
基本结构
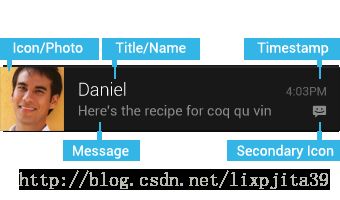
Notification支持文字内容显示、震动、三色灯、铃声等多种提示形式,基础的Notification如下图:

包含以下几个部分:
1 . 发送通知的应用图标或者发送人的头像(Icon/Photo)
2 . 通知的标题(Title/Name)
3 . 通知的消息(Message)
4 . 时间戳,默认为系统发出通知的时间(Timestamp)
5 . 当主标题显示发送人头像时,在副标题位置显示应用图标(Secondary Icon)
四、基本用法
Notification的基本用法有创建,更新,取消三种。
创建
1.获取 NotificationManager 实例:
NotificationManager notifyManager = (NotificationManager) getSystemService(Context.NOTIFICATION_SERVICE);2.实例化 Notification.Builder 并设置相关属性:
//实例化Notification.Builde并设置相关属性
Notification.Builder builder = new Notification.Builder(this)
     //设置小图标
     .setSmallIcon(R.mipmap.icon)
     //设置通知标题
     .setContentTitle("最简单的Notification")
     //设置通知内容
     .setContentText("只有小图标、标题、内容")
     //设置通知时间,默认为系统发出通知的时间,通常不用设置
     .setWhen(System.currentTimeMillis());
PS:
1. Notification.Builder类是Android 4.1(api 16)及之后的版本加入的,为了兼容4.1之前的版本,Google在Android support v4中加入了NotificationCompat.Builder类,所以若项目要兼容4.1之前的Notification请使用NotificationCompat.Builder,但是对于某些在Android 4.1加入的特性,即使 NotificationCompat.Builder 支持该方法,在4.1之前的版本 引用块内容2.这三个属性一定要设置,若不设置在运行的时候会抛出异常:
1).setSmallIcon()
2).setContentTitle()
3).setContentText()
3.通过 builder.build() 方法生成 Notification 对象,并发送通知
//生成 Notification
Notification notification = builder.build();
//发送通知,id为1
int id = 1;

//只设置id
notifyManager.notify(id, notification);

//设置tag和id
notifyManager.notify(String tag, int id, Notification notify)
PS:
这里的tag和id只是为了方便索引这条通知而设立的,之后的更新和取消会用到。
给 Notification 设置 Action
前面只是简单的创建Notification,并不具备与用户交互的能力,这是因为我们并没有给 Notification 设置 Action ,这里,我们来实现一个点击 Notification 跳转到 MainActivity 的效果。代码如下:
/**
* 发送一个点击跳转到MainActivity的消息
*/
private void sendSimplestNotificationWithAction() {
   //获取PendingIntent
   Intent mainIntent = new Intent(this, MainActivity.class);
   PendingIntent mainPendingIntent = PendingIntent.getActivity(this, 0, mainIntent, PendingIntent.FLAG_UPDATE_CURRENT);
   //创建 Notification.Builder 对象
   NotificationCompat.Builder builder = new NotificationCompat.Builder(this)
           .setSmallIcon(R.mipmap.ic_launcher)
           //点击通知后自动清除
           .setAutoCancel(true)
           .setContentTitle("我是带Action的Notification")
           .setContentText("点我会打开MainActivity")
           .setContentIntent(mainPendingIntent);
   //发送通知
   mNotifyManager.notify(3, builder.build());
}
相比发送最简单的通知,发送具有 Action 的通知多了创建 Intent 、 PendingIntent 和 setContentIntent() 这几步。
不难看出, PendingIntent 才是重点,那么, PendingIntent 是什么呢?
PendingIntent是一个特殊的Intent,字面意思可以解释为延迟的Intent,用于在某个事件结束后执行特定的 Action 。从上面带 Action 的通知也能验证这一点,当用户点击通知时,才会执行。
PendingIntent 是 Android 系统管理并持有的用于描述和获取原始数据的对象的标志(引用)。也就是说,即便创建该PendingIntent对象的进程被杀死了,这个PendingItent对象在其他进程中还是可用的。
日常使用中的短信、闹钟等都用到了 PendingIntent。
PendingIntent 主要可以通过以下三种方式获取:
//获取一个用于启动 Activity 的 PendingIntent 对象
public static PendingIntent getActivity(Context context, int requestCode, Intent intent, int flags);

//获取一个用于启动 Service 的 PendingIntent 对象
public static PendingIntent getService(Context context, int requestCode, Intent intent, int flags);

//获取一个用于向 BroadcastReceiver 广播的 PendingIntent 对象
public static PendingIntent getBroadcast(Context context, int requestCode, Intent intent, int flags)
PendingIntent 具有以下几种 flag:
1.FLAG_CANCEL_CURRENT: 如果当前系统中已经存在一个相同的 PendingIntent 对象,那么就将先将已有的 PendingIntent 取消,然后重新生成一个 PendingIntent 对象。
2.FLAG_NO_CREATE: 如果当前系统中不存在相同的 PendingIntent 对象,系统将不会创建该 PendingIntent 对象而是直接返回 null 。
3.FLAG_ONE_SHOT: 该 PendingIntent 只作用一次。
4.FLAG_UPDATE_CURRENT : 如果系统中已存在该 PendingIntent 对象,那么系统将保留该 PendingIntent 对象,但是会使用新的 Intent 来更新之前 PendingIntent 中的 Intent 对象数据,例如更新 Intent 中的 Extras 。
更新
更新很简单,只需要再次发送相同的ID的通知即可,如果之前的通知还没取消,则会直接更新该通知的相关的属性;如果之前的通知已经被取消,则会重新创建一个新通知。
取消
取消通知有如下5中方式:
1 . 点击通知栏的清除按钮,会清除所有可清除的通知
2 . 设置了 setAutoCancel() 或 FLAG_AUTO_CANCEL 的通知,点击该通知时会清除它:
private void sendFlagAutoCancelNotification() {
        //设置一个Intent,不然点击通知不会自动消失
        Intent resultIntent = new Intent(this, MainActivity.class);
        PendingIntent resultPendingIntent = PendingIntent.getActivity(
                this, 0, resultIntent, PendingIntent.FLAG_UPDATE_CURRENT);
        NotificationCompat.Builder builder = new NotificationCompat.Builder(this)
                .setSmallIcon(R.mipmap.ic_launcher)
                .setContentTitle("Send Notification Use FLAG_AUTO_CLEAR")
                .setContentText("Hi,My id is 1,i can be clear.")
                .setContentIntent(resultPendingIntent);
        Notification notification = builder.build();
        //设置 Notification 的 flags = FLAG_NO_CLEAR
        //FLAG_AUTO_CANCEL 表示该通知能被状态栏的清除按钮给清除掉
        //等价于 builder.setAutoCancel(true);
        notification.flags |= Notification.FLAG_AUTO_CANCEL;
        mNotificationManager.notify(DEFAULT_NOTIFICATION_ID, notification);
    }
3 . 通过 NotificationManager 调用 cancel(int id) 方法清除指定 ID 的通知
4 . 通过 NotificationManager 调用 cancel(String tag, int id) 方法清除指定 TAG 和 ID 的通知
5 . 通过 NotificationManager 调用 cancelAll() 方法清除所有该应用之前发送的通知
PS:
如果你是通过 NotificationManager.notify(String tag, int id, Notification notify) 方法创建的通知,那么只能通过 NotificationManager.cancel(String tag, int id) 方法才能清除对应的通知,调用NotificationManager.cancel(int id) 无效。
属性讲解
主要是Notification.Builder里面的属性,有些方法上面已经出现讲解过,这里就不描述了。
1.设置flag
实例:
Notification notification = builder.build();
notification.flags |= Notification.FLAG_AUTO_CANCEL;
可以设置的值:
| flag | 含义 |
|---|---|
| Notification.FLAG_SHOW_LIGHTS | 三色灯提醒,在使用三色灯提醒时候必须加该标志符 |
| Notification.FLAG_ONGOING_EVENT | 发起正在运行事件(活动中) |
| Notification.FLAG_INSISTENT | 让声音、振动无限循环,直到用户响应 (取消或者打开) |
| Notification.FLAG_ONLY_ALERT_ONCE | 发起Notification后,铃声和震动均只执行一次 |
| Notification.FLAG_AUTO_CANCEL | 用户单击通知后自动消失 |
| Notification.FLAG_NO_CLEAR | 表示该通知不能被状态栏的清除按钮给清除掉,也不能被手动清除,但能通过 cancel() 方法清除 |
| Notification.FLAG_FOREGROUND_SERVICE | 表示正在运行的服务 |
2.setDefaults(int defaults)
功能:向通知添加声音、闪灯和振动效果,可以组合多个属性
可以设置的属性值:
| 属性 | 含义 |
|---|---|
| Notification.DEFAULT_VIBRATE | 添加默认震动提醒 需要 VIBRATE permission |
| Notification.DEFAULT_SOUND | 添加默认声音提醒 |
| Notification.DEFAULT_LIGHTS | 添加默认三色灯提醒 |
| Notification.DEFAULT_ALL | 添加默认以上3种全部提醒 |
3.setVibrate(long[] pattern)
功能:设置震动方式
实例:
Notification.Builder builder = new Notification.Builder(this);
builder.setVibrate(new long[] {0,300,500,700});
效果:延迟0ms,然后振动300ms,再延迟500ms,接着再振动700ms
以上的效果还有这种写法:
builder.build().vibrate = new long[] {0,300,500,700}; 如果希望设置默认的振动方式,只需setDefaults(Notification.DEFAULT_VIBRATE);
4.setLights(intledARGB ,intledOnMS ,intledOffMS )
功能:android支持三色灯提醒,这个方法就是设置不同场景下的不同颜色的灯。
描述:其中ledARGB 表示灯光颜色、 ledOnMS 亮持续时间、ledOffMS 暗的时间。
注意:1)只有在设置了标志符Flags为Notification.FLAG_SHOW_LIGHTS的时候,才支持三色灯提醒。
2)这边的颜色跟设备有关,不是所有的颜色都可以,要看具体设备。
实例:
Notification.Builder builder = new Notification.Builder(this);
builder.setLights(0xff0000ff, 300, 0)
同理,以下方法也可以设置同样效果:
Notification notify = builder.build();
notify.flags = Notification.FLAG_SHOW_LIGHTS;
notify.ledARGB = 0xff0000ff;
notify.ledOnMS = 300;
notify.ledOffMS = 300;
如果希望设置默认的三色灯提醒,只需setDefaults(Notification.DEFAULT_LIGHTS);
5.setSound(Uri soundUri)
功能:设置默认或则自定义的铃声,来提醒。
描述:soundUri为音乐的路径。
实例:
Notification.Builder builder = new Notification.Builder(this);
//使用sd卡上的音乐文件
builder.setSound(Uri.parse("file:///sdcard/xx/xx.mp3"));
//获取Android多媒体库内的铃声
builder.setSound(Uri.withAppendedPath(Audio.Media.INTERNAL_CONTENT_URI, "5"))
如果希望设置默认的音乐,只需setDefaults(Notification.DEFAULT_SOUND);
6.setPriority(int pri)
功能:设置优先级
可以设置的属性值:
| 属性 | 含义 |
|---|---|
| Notification.PRIORITY_MAX | 重要而紧急的通知,通知用户这个事件是时间上紧迫的或者需要立即处理的。 |
| Notification.PRIORITY_HIGH | 高优先级用于重要的通信内容,例如短消息或者聊天,这些都是对用户来说比较有兴趣的。 |
| Notification.PRIORITY_DEFAULT | 默认优先级用于没有特殊优先级分类的通知。 |
| Notification.PRIORITY_LOW | 低优先级可以通知用户但又不是很紧急的事件。 |
| Notification.PRIORITY_MIN | 用于后台消息 (例如天气或者位置信息)。最低优先级通知将只在状态栏显示图标,只有用户下拉通知抽屉才能看到内容。 |
7.setOngoing(boolean ongoing)
功能:设置为ture,表示它为一个正在进行的通知。他们通常是用来表示一个后台任务,用户积极参与(如播放音乐)或以某种方式正在等待,因此占用设备(如一个文件下载,同步操作,主动网络连接)
8.setProgress(int max, int progress,boolean indeterminate)
功能:设置带进度条的通知,可以在下载中使用。
描述:max:进度条最大数值 、progress:当前进度、indeterminate:表示进度是否不确定,true为不确定。
注意:此方法在4.0及以后版本才有用,如果为早期版本:需要自定义通知布局,其中包含ProgressBar视图
使用:如果为确定的进度条:调用setProgress(max, progress, false)来设置通知,在更新进度的时候在此发起通知更新progress,并且在下载完成后要移除进度条,通过调用setProgress(0, 0, false)既可。
如果为不确定(持续活动)的进度条,这是在处理进度无法准确获知时显示活动正在持续,所以调
用setProgress(0, 0, true) ,操作结束时,调用setProgress(0, 0, false)并更新通知以移除指示条
。
9.setAutoCancel(boolean autoCancel)
功能:设置该属性以后,用户点击该通知时会清除它。
补充说明
1 . 关于 setSmallIcon() 与 setLargeIon()。
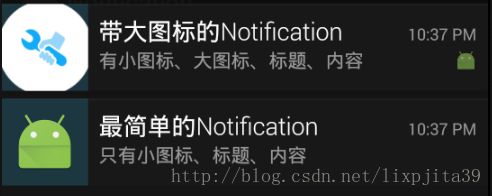
在 Notification.Builder 中有设置通知的大小图标的两个方法。这两个方法有什么区别呢?当 setSmallIcon() 与 setLargeIcon() 同时存在时, smallIcon 显示在通知的右下角, largeIcon 显示在左侧;当只设置 setSmallIcon() 时, smallIcon 显示在左侧。看下图你就明白了。对于部分 ROM )
可能修改过源码,如 MIUI上通知的大图标和小图标是没有区别的。
如下图:
2 . 关于setDefaults(int defaults)
Default 属性有四种,一旦设置了 Default 效果,相应的自定义的效果就会失效。
