要记住每一个对你好的人,因为他们本可以不那么做。
---久节奏,慢读书
一、什么是RestAssured
偶然在逛帖子的时候发现一个接口测试框架,觉得不错,学习学习。
官方地址:http://rest-assured.io/
那么瞧瞧官方是怎么说的:
Testing and validating REST services in Java is harder than in dynamic languages such as Ruby and Groovy. REST Assured brings the simplicity of using these languages into the Java domain.
与动态语言(如Ruby或Groovy)相比,用java测试和验证REST服务要困难的多。RestAssured将使用这些语言的简单性带入java域。
可能前面也有记录过HttpClient相关的帖子,但是个人觉得RestAssured更为简单、便捷、易读!
二、RestAssured常规用法
官方文档:https://github.com/rest-assured/rest-assured/wiki/Usage
Maven依赖:
<dependency>
            <groupId>io.rest-assuredgroupId>
            <artifactId>rest-assuredartifactId>
            <version>3.0.6version>
            <scope>testscope>
dependency>
其他的如jsonPath,xmlPath,Spring的依赖去上方地址去查找。
1、简单的get无参请求
先仿照官方文档搞个demo。
import org.junit.Test;

import static io.restassured.RestAssured.*;
import static io.restassured.matcher.ResponseAwareMatcher.*;
import static org.hamcrest.Matcher.*;

public class Baidu {
    @Test
    public void testGetHtml(){
        given()
                .log().all().get("https://www.baidu.com")
        .then()
          .log().all().statusCode(200);
    }
}
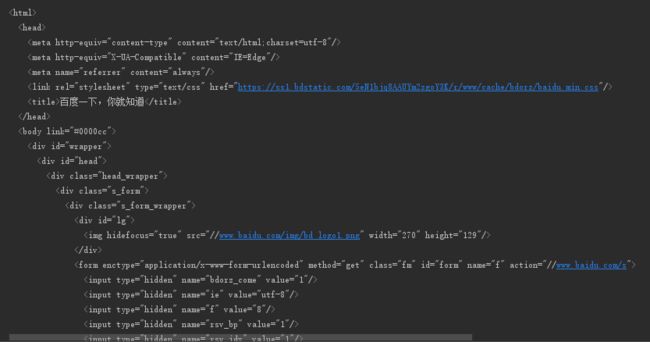
看一下输入内容
百度的html文档。
那么解析一下代码。
given()表示开头输入数据。
.log()表示打印日志。
.all()表示打印所有的日志。
.get(https://www.baidu.com)表示get请求该域名(post请求方式:.post())。
.then()表示对结果进行断言。
.statusCode()表示对状态码进行断言。
其实是等价于:curl -L https://www.baidu.com
ps:此处有个细节内容
import static xx.xxx.*;
导入该类的静态方法;也可只导入某个静态方法;在测试类中,可直接用方法名调用静态方法,而不必用ClassName.方法名的方式。
例如:可以将System.out.printIn();写成静态方法print(),在使用的时候直接print()即可。
上述测试方法中的given()、.then()。
2、传参get请求
上例中并没有传入参数,那再上一个传入参数的demo。
import org.junit.Test;

import static io.restassured.RestAssured.*;

public class LocalInterface {
    @Test
    public void testlocal(){
        given()
                .queryParam("username","Richered")
        .when()
                .get("http://localhost:8000/CGIProject/cgi-bin/")
        .then()
                .statusCode(200);
    }
}
此处请求本地启动的cgi服务接口。
可以看到,.queryParam()传入参数username=Richered。
.get()请求接口http://localhost:8000/CGIProject/cgi-bin/
请求成功。
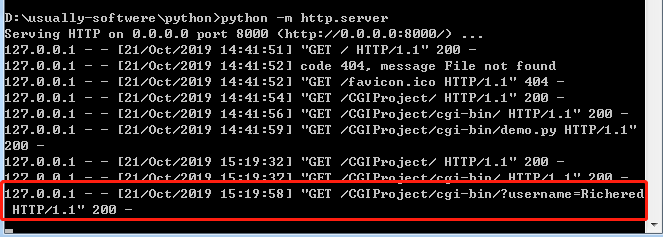
查看服务端接收到的请求。
可以看到是标准的http请求。
3、http头信息处理方法
那么我们在日常的工作中难免会自定义请求头信息,最常见的是自定义Cookie。
请求头如何去构造。
given()
                .queryParam("username","Richered")
                .header("Cookie","Custom Cookie")
提供方法.header()即可搞定。
4、form表单传参
given()
                .header("Cookie","Custom Cookie")
                .formParam("username","Richered")
方法.formParam()
5、https请求
useRelaxedHTTPSValidation();
该方法表示信任证书
6、向代理服务器发送请求
proxy("127.0.0.1",8000);
7、发送请求数据为json报文
ps:json、xml类的报文需要引入其提供的依赖.
<dependency>
      <groupId>io.rest-assuredgroupId>
      <artifactId>json-schema-validatorartifactId>
      <version>4.1.2version>
      <scope>testscope>
dependency>
demo:
@Test public void testPostJson(){ HashMapmap = new HashMap (); map.put("username","admin"); map.put("password","admin"); map.put("capcha","n6d58"); given().log().all() .contentType(ContentType.JSON) .body(map) .when() .post("http://localhost:8080/renren-fast/sys/login") .then() .statusCode(200); }
可以看到发送json报文的方式是使用HashMap的方式进行组合json格式。
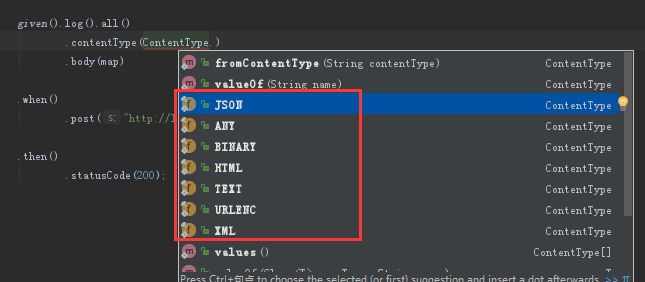
ps:需要指定请求报文的类型:contentType(ContentType.JSON)
那么其他报文类型也是一样的
8、断言
断言绝对是重中之重。上方的demo中有提到断言,.statusCode()【断言其状态码】,当然我们断言仅仅凭状态码是不够的。
RestAssured支持jsonpath、xpath语法、Groovy语法断言。
其断言方式大概有这么几种:
1、标志性断言:assertXXX:assertEqual
2、Hamcrest断言assertThat:assertThat(x, is(3))
3、RestAssured断言:then().xx
4、body断言:Xmlpath、jsonpath等
这里就直接使用官方demo来写例子。
ps:官方的json报文还是和前面Jmeter断言那一篇的报文例子一样。
jsonpath、xpath语法在这儿就不提了,都是基本功,一些基本用法可以翻翻前面的内容。
demo响应报文内容:
{
   "store":{
      "book":[
         {
            "author":"Nigel Rees",
            "category":"reference",
            "price":8.95,
            "title":"Sayings of the Century"
         },
         {
            "author":"Evelyn Waugh",
            "category":"fiction",
            "price":12.99,
            "title":"Sword of Honour"
         },
         {
            "author":"Herman Melville",
            "category":"fiction",
            "isbn":"0-553-21311-3",
            "price":8.99,
            "title":"Moby Dick"
         },
         {
            "author":"J. R. R. Tolkien",
            "category":"fiction",
            "isbn":"0-395-19395-8",
            "price":22.99,
            "title":"The Lord of the Rings"
         }
      ]
   }
}
官方demo:断言该报文中价格低于10的书籍title为:Moby Dick和Sayings of the Century
@Test
    public void TestAssertion(){
        given()
                .contentType(ContentType.JSON)
        .when()
                .get("http://localhost:8000/CGIProject/cgi-bin/store.json")
        .then()
                .log().all()
                .body("store.book.findAll { it.price < 10 }.title",hasItems("Sayings of the Century", "Moby Dick"));
    }
使用闭包查找价格低于10的所有书籍,返回书籍的title,再使用hasItems匹配断言标题。
findAll关键字、hasItems()方法
再做一个错误的断言例子,断言一下价格低于5的书籍是否为Sayings of the Century和 Moby Dick(修改上方表达式中的价格即可),查看一下报错、
其断言失败的原因很清楚,无与表达式相匹配的结果;表达式内容。
官方提供了更为复杂的demo2:
要求:断言所有作者姓名长度之和大于50.
展示Groovy强大的时候来了。
看看其处理方式,简单又易懂。
then().
       body("store.book.author.collect { it.length() }.sum()", greaterThan(50));
store.book.author:得到所有的作者
使用闭包{it.lenth()},调用结果列表中的collect方法,其作用为:对每个作者使用length()方法。
在列表中只需要使用.sum()方法对所有长度进行求和。最终结果为53,大于50.
ps:groovy使用*为列表每个元素调用函数的方法非常方便:
def words = ['ant','buffalo','cat','dinosaur']
assert[3,6,3,8] ==words*.length()
详情请去官方文档中查看。
使用jsonpath的方式也一并贴上来:
int sumOfAllAuthorLengths = from(response).getInt("store.book.author*.length().sum()");
assertThat(sumOfAllAuthorLengths, is(53));
还有一个需要注意的地方,断言内容为float和double类型的数据,需要加f和d
9、官方推荐书写格式
given()
        .xxxxx
.when()
        .xxxxx
.then()
        .xxxxx
10、获取响应数据
在上方的例子中,为了方便查看请求过程,使用了.log().all()的方法。
那么获取响应数据:
 InputStream stream = get("http://localhost:8000/CGIProject/cgi-bin/store.json").asInputStream();
 byte[] byteArray = get("http://localhost:8000/CGIProject/cgi-bin/store.json").asByteArray();
 String json = get("http://localhost:8000/CGIProject/cgi-bin/store.json").asString();
11、上下文关联
在常见的业务逻辑中,会有这么一种业务逻辑。
例如:先登录-->购买商品
购买商品必须先登录成功,那么开发的实现方式均不一致。
有可能是登录成功之后响应报文中传给客户端一些参数,继续请求;有可能是登录成功将校验成功的令牌存入cookie中,当然还有更为复杂的,此处只是举例。
针对这种业务逻辑RestAssured中如何处理
响应报文demo:
{
     "title" : "My Title",
      "_links": {
              "self": { "href": "/title" },
              "next": { "href": "/title?page=2" }
           }
 }
@Test
    public void Relation(){
        String nextTitleLink = given().
                                    param("param_name","param_value").
                                when().
                                    get("http://localhost:8000/CGIProject/cgi-bin/MyTitle.json").
                                then().
                                    contentType(ContentType.JSON).
                                    body("title", equalTo("My Title")).
                                extract().
                                    path("_links.next.href");
        System.out.println(nextTitleLink);

        given().log().all()
                .get("http://localhost:8000/CGIProject/cgi-bin/MyTitle.json" + nextTitleLink);

    }
extract().path("jsonpath表达式")
该例既请求校验了接口,也拿到了自己需要的参数数据;
那如果需要从响应报文中取到多个参数呢?官方也给出了解释
@Test
    public void Relation1(){
        Response response = given().
                                    param("param_name","param_value").
                                 when().
                                    get("http://localhost:8000/CGIProject/cgi-bin/MyTitle.json").
                                 then().
                                    contentType(ContentType.JSON).
                                    body("title", equalTo("My Title")).
                                  extract().
                                    response();
        String nextTitleLink = response.path("_links.next.href");
        String headerValue = response.header("headerName");
    }
ok、本篇先记录学习这些,后续补充


