unity与原生iOS项目的整合(一)
目录介绍
1、软件环境
unity3D:5.4.1f1
xcode:8.3.3
2、准备工作
2.1、新建一个iOS工程,简称iOS原生工程
2.2、unity导出的iOS工程,简称Unity工程
Unity工程使用之前一定要清楚导出的时候的设备选择,注意Unity导出工程时设置的参数项注意项
Target SDK 的设置关系到iOS工程测试和编译的环境
3、集成步骤
3.1 添加Unity工程中的文件到iOS工程中
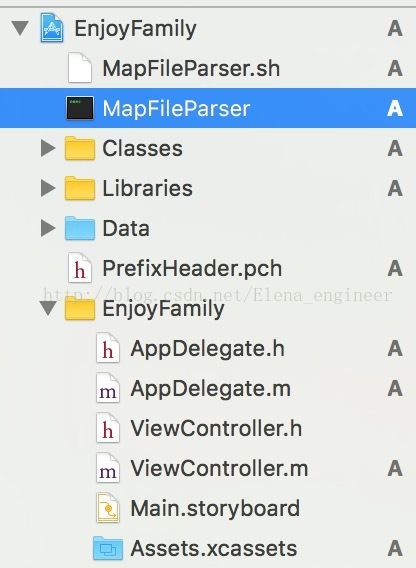
(1)将Unity工程下的3个文件夹Classes、Libraries、Data ,两个文件 MapFileParser 、 MapFileParser.sh添加至iOS工程中,
添加时注意选择Copy items if needed选项,Classes和Libraries文件夹选择 Create groups,而Data文件夹选择Create folder references选项。
添加完Unity文件夹之后的工程结构
添加完毕以后可以把Unity文件夹中的一些无关文件清理掉,它们会影响编译速度,删除时选择Remove Reference:
Classes->Native文件夹下的*.h文件Libraries文件夹下的libil2cpp文件夹
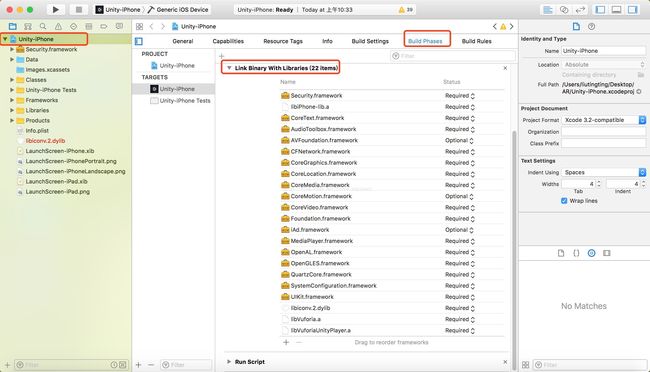
3.2添加相关框架
需要添加哪些framework可以参见Unity工程的TARGETS -> General -> Linked Frameworks and Libraries,如图所示:
3.3. 配置Build Settings相关选项
Enable Bitcode -> NO(2)
Other Linker Flags添加
-weak_framework CoreMotion -weak-lSystem
"$(SRCROOT)""$(SRCROOT)/Classes"$(SRCROOT)/Classes/Native$(SRCROOT)/Libraries/libil2cpp/include$(SRCROOT)/Libraries
$(SRCROOT)是指.xcproj文件所在的路径,如果此处路径配置不正确,可能会出现诸如il2cpp-config.h file not found的编译错误。
3.5 Library Search Paths
"$(SRCROOT)""$(SRCROOT)/Libraries"
3.6 Custom Compiler Flags -> Other C Flags 添加 -DINIT_SCRIPTING_BACKEND=1
3.7 C Language Dialect选择C99 [-std=c99]
3.8 新建pch文件:PrefixHeader.pch, 设置Prefix Header的路径(注意文件导入的位置)
3.9Precompile Prefix Header选择YES
3.10 C++ Language Dialect选择C++11 [-std=c++11]
3.11Enable C++ Runtime Types选择NO
3.12Warnings-Objective C->Overriding Deprecated Objective-C Methods选择YES
3.13Warnings-Objective C->Unintentional Root Classes选择YES
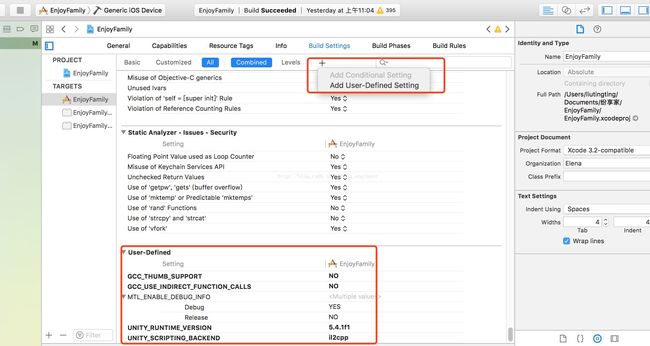
3.14 User-Defined
添加如下选项:
GCC_THUMB_SUPPORT->NOGCC_USE_INDIRECT_FUNCTION_CALLS->NOUNITY_RUNTIME_VERSION->5.4.0f3UNITY_SCRIPTING_BACKEND->il2cpp

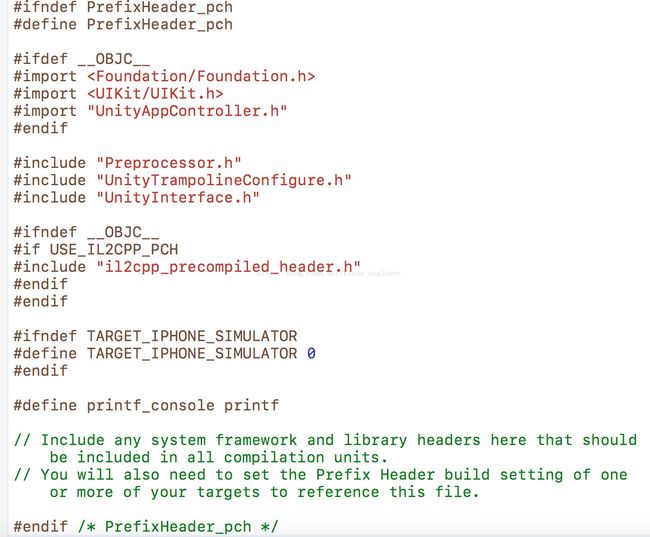
4、pch文件内容替换
将Classes文件夹下的Prefix.pch文件中的内容全部复制粘贴到PrefixHeader.pch文件的
#define PrefixHeader_pch
#endif /* PrefixHeader_pch */UnityAppController.h文件如图所示:5. Supporting Files下面的main.m
- 重命名成
main.mm -
将
Classes文件夹下的main.mm文件中的全部内容复制到Supporting Files文件夹下的main.mm文件中,并进行修改://const char* AppControllerClassName = @”UnityAppController”;
const char* AppControllerClassName = “AppDelegate”; -
Build Phases中移除Classes下的main.mm
6.
//inline UnityAppController*GetAppController()
//{
// return (UnityAppController*)[UIApplication sharedApplication].delegate;
//}
#import "AppDelegate.h"
inlineUnityAppController* GetAppController()
{
AppDelegate *delegate = (AppDelegate *)[UIApplicationsharedApplication].delegate;
return delegate.unityController;
}
7、 AppDelegate.h和AppDelegate.m
#import
@interface AppDelegate :UIResponder <UIApplicationDelegate>
@property (strong,nonatomic)UIWindow *window;
@property (strong,nonatomic)UIWindow *unityWindow;
@property (nonatomic,strong)UnityAppController *unityController;
- (void)showUnityWindow;
- (void)hideUnityWindow;
@end
(2)AppDelegate.m 文件的修改
#import "AppDelegate.h"
@interfaceAppDelegate ()
@end
@implementation AppDelegate
- (UIWindow *)unityWindow {
returnUnityGetMainWindow();
}
- (void)showUnityWindow {
[self.unityWindowmakeKeyAndVisible];
}
- (void)hideUnityWindow {
[self.windowmakeKeyAndVisible];
}
- (BOOL)application:(UIApplication *)application didFinishLaunchingWithOptions:(NSDictionary *)launchOptions {
// Override point for customization after application launch.
self.window.backgroundColor = [UIColorredColor];
self.unityController = [[UnityAppControlleralloc]init];
[self.unityControllerapplication:applicationdidFinishLaunchingWithOptions:launchOptions];
returnYES;
}
- (void)applicationWillResignActive:(UIApplication *)application {
// Sent when the application is about to move from active to inactive state. This can occur for certain types of temporary interruptions (such as an incoming phone call or SMS message) or when the user quits the application and it begins the transition to the background state.
// Use this method to pause ongoing tasks, disable timers, and throttle down OpenGL ES frame rates. Games should use this method to pause the game.
[self.unityControllerapplicationWillResignActive:application];
}
- (void)applicationDidEnterBackground:(UIApplication *)application {
// Use this method to release shared resources, save user data, invalidate timers, and store enough application state information to restore your application to its current state in case it is terminated later.
// If your application supports background execution, this method is called instead of applicationWillTerminate: when the user quits.
[self.unityControllerapplicationDidEnterBackground:application];
}
- (void)applicationWillEnterForeground:(UIApplication *)application {
// Called as part of the transition from the background to the inactive state; here you can undo many of the changes made on entering the background.
[self.unityControllerapplicationWillEnterForeground:application];
}
- (void)applicationDidBecomeActive:(UIApplication *)application {
// Restart any tasks that were paused (or not yet started) while the application was inactive. If the application was previously in the background, optionally refresh the user interface.
[self.unityControllerapplicationDidBecomeActive:application];
}
- (void)applicationWillTerminate:(UIApplication *)application {
// Called when the application is about to terminate. Save data if appropriate. See also applicationDidEnterBackground:.
[self.unityControllerapplicationWillTerminate:application];
}
@end
8、ViewController.m
#import "ViewController.h"
#import "AppDelegate.h"
staticid object;
@interfaceViewController ()<UIAlertViewDelegate>
@property (nonatomic,strong)UIButton *showUnityButton;
@end
@implementation ViewController
- (void)viewDidLoad {
[superviewDidLoad];
object =self;
// Do any additional setup after loading the view, typically from a nib.
self.view.backgroundColor = [UIColorblueColor];
self.showUnityButton = [UIButtonbuttonWithType:UIButtonTypeSystem];
[self.showUnityButtonsetTitle:@"Show Unity"forState:UIControlStateNormal];
self.showUnityButton.frame =CGRectMake(0,20,100,44);
self.showUnityButton.center = self.view.center;
[self.showUnityButtonaddTarget:selfaction:@selector(showUnityView:)forControlEvents:UIControlEventTouchUpInside];
[self.viewaddSubview:self.showUnityButton];
}
- (void)showUnityView:(id)sender {
[(AppDelegate *)[UIApplicationsharedApplication].delegateshowUnityWindow];
UnitySendMessage("Main Camera","OnClick","交互");
}
@end
文章参考主要网址:http://qingqinghebiancao.github.io/2016/09/07/Unity集成到iOS本地工程中/


