【MedusaSTears】vmvare虚拟机网络设置方式:Linux系统虚拟机如何访问宿主机本地win7的MySQL数据库
关键词: Linux虚拟机访问本地数据库 虚拟机如何访问宿主机MySQL
所以按照我这配置,保证你能 宿主机 虚拟机 互联
而且 虚拟机能和Xshell互联
宿主机可以访问 虚拟机内 tomcat 之类的
虚拟机 可以 访问宿主机 MySQL
虚拟机 可以 正常联网
直接上干货: 代码里面 加解释
有关宿主机和虚拟机之间网络通信以及我是怎么设置的,我会在下边补充
软硬件环境:

1.win7 64位  +  jdk 1.8 64位

3.主机,宿主机,本地的数据库:    MySQL_5.6 端口号:9099

4.主机,宿主机,本地的虚拟机:    vmware-12

5.虚拟机内系统Linux: CentOS-7-x86_64-Minimal-1810.iso
6.虚拟机内系统Linux的jdk:    jdk1.8 64位
由于精简版centos里面命令很少,所以需要yum安装
[root@bogon /root]# telnet 192.168.61.0 9099
-bash: telnet: 未找到命令
[root@bogon /root]# yum -y install telnet
已加载插件:fastestmirror
Loading mirror speeds from cached hostfile
* base: centos.ustc.edu.cn
* extras: centos.ustc.edu.cn
* updates: mirrors.shu.edu.cn
base | 3.6 kB 00:00:00
extras | 3.4 kB 00:00:00
updates | 3.4 kB 00:00:00
updates/7/x86_64/primary_db | 1.3 MB 00:00:18
正在解决依赖关系
--> 正在检查事务
---> 软件包 telnet.x86_64.1.0.17-64.el7 将被 安装
--> 解决依赖关系完成
依赖关系解决
======================================================================================================
Package 架构 版本 源 大小
======================================================================================================
正在安装:
telnet x86_64 1:0.17-64.el7 base 64 k
事务概要
======================================================================================================
安装 1 软件包
总下载量:64 k
安装大小:113 k
Downloading packages:
telnet-0.17-64.el7.x86_64.rpm | 64 kB 00:00:00
Running transaction check
Running transaction test
Transaction test succeeded
Running transaction
正在安装 : 1:telnet-0.17-64.el7.x86_64 1/1
验证中 : 1:telnet-0.17-64.el7.x86_64 1/1
已安装:
telnet.x86_64 1:0.17-64.el7
完毕!
安装后这里涉及到的IP就是:我不确定我宿主机本地本机的IP端口到底是多少,所以用telnet挨个测试
[root@bogon /root]# telnet 192.168.61.0 9099
Trying 192.168.61.0...
telnet: connect to address 192.168.61.0: Network is unreachable
[root@bogon /root]# telnet 192.168.61.2 9099
Trying 192.168.61.2...
telnet: connect to address 192.168.61.2: Connection refused
[root@bogon /root]# telnet 192.168.61.1 9099
Trying 192.168.61.1...
Connected to 192.168.61.1.
Escape character is '^]'.
J
5.6.263!L:|(J!`Do'q%a=H6q[mysql_native_passwordConnection closed by foreign host.
`这里看到:只有192.168.61.1是有反应的,所以确定了本地宿主机本机的IP是多少了
有关宿主机和虚拟机之间网络通信以及我是怎么设置的,我会在下边补充
网上找到的如何在命令行连接mysql的语法:
mysql -u 用户名 -p密码 -h 服务器IP地址 -P 服务器端MySQL端口号 -D 数据库名
[root@bogon /root]# mysql -u root -p 123456 -h 192.168.61.1 -P 9099 -D ms3
-bash: mysql: 未找到命令
[root@bogon /root]# yum -y install mysql
已加载插件:fastestmirror
Loading mirror speeds from cached hostfile
* base: centos.ustc.edu.cn
* extras: centos.ustc.edu.cn
* updates: mirrors.shu.edu.cn
正在解决依赖关系
--> 正在检查事务
---> 软件包 mariadb.x86_64.1.5.5.60-1.el7_5 将被 安装
--> 解决依赖关系完成
依赖关系解决
======================================================================================================
Package 架构 版本 源 大小
======================================================================================================
正在安装:
mariadb x86_64 1:5.5.60-1.el7_5 base 8.9 M
事务概要
======================================================================================================
安装 1 软件包
总下载量:8.9 M
安装大小:49 M
Downloading packages:
mariadb-5.5.60-1.el7_5.x86_64.rpm | 8.9 MB 00:00:46
Running transaction check
Running transaction test
Transaction test succeeded
Running transaction
正在安装 : 1:mariadb-5.5.60-1.el7_5.x86_64 1/1
验证中 : 1:mariadb-5.5.60-1.el7_5.x86_64 1/1
已安装:
mariadb.x86_64 1:5.5.60-1.el7_5
完毕!
安装之后连接,前几次是密码输入错了,不是123456
[root@bogon /root]# mysql -u root -p 123456 -h 192.168.61.1 -P 9099 -D ms3
Enter password:
ERROR 1045 (28000): Access denied for user 'root'@'192.168.61.155' (using password: YES)
[root@bogon /root]# mysql -u root -p 123456 -h 192.168.61.1 -P 9099
Enter password:
ERROR 1045 (28000): Access denied for user 'root'@'192.168.61.155' (using password: YES)
这里把 -p 123456 识别为了数据库,看来那个命令也不全对
[root@bogon /root]# mysql -u root -p 123456 -h 192.168.61.1 -P 9099
Enter password:
ERROR 1049 (42000): Unknown database '123456'
最后按照这个格式登陆 并输入正确的密码 就连接上了
mysql -u 账号 -h 远程地址 -P 远程端口号 -p (密码回车之后会让你填)
[root@bogon /root]# mysql -u root -h 192.168.61.1 -P 9099 -p
Enter password:
Welcome to the MariaDB monitor. Commands end with ; or \g.
Your MySQL connection id is 6
Server version: 5.6.26 MySQL Community Server (GPL)
Copyright (c) 2000, 2018, Oracle, MariaDB Corporation Ab and others.
Type 'help;' or '\h' for help. Type '\c' to clear the current input statement.
MySQL [(none)]> show databases;
+--------------------+
| Database |
+--------------------+
| information_schema |
| ms3 |
| mysql |
| performance_schema |
+--------------------+
4 rows in set (0.00 sec)
MySQL [(none)]> Ctrl-C -- exit!
Aborted
[root@bogon /root]#
有关我的宿主机本地本机的网络设置 以及 虚拟机Linux里面的设置如下:
我的vmware和本地机器用的 VMnet8 (NAT 模式)
1.设置虚拟机网络模式:
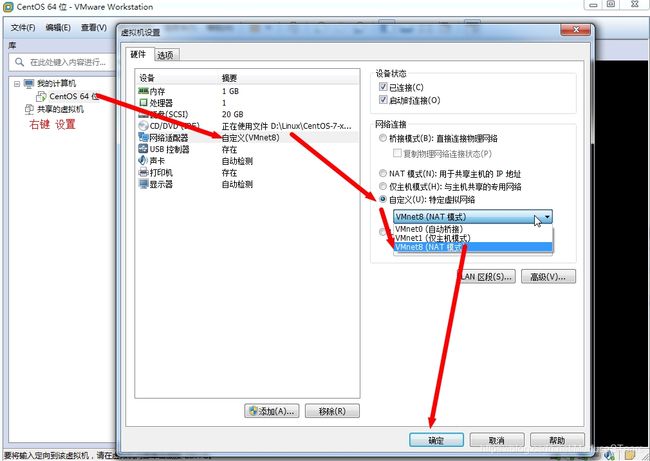
这幅图根据提示操作
注意代码框里的内容,也是重要的一步: 修改centos虚拟机里的IP地址
代码我贴在图片下边

#按照这个路径找,你的配置不一定叫做ens33
#/etc/sysconfig/network-scripts/ifcfg-xxxx

[root@bogon /root]# vim /etc/sysconfig/network-scripts/ifcfg-ens33

TYPE=Ethernet
PROXY_METHOD=none
BROWSER_ONLY=no
BOOTPROTO=static  #这里改成静态,否则Xshell之类的找不到
DEFROUTE=yes
IPV4_FAILURE_FATAL=no
IPV6INIT=yes
IPV6_AUTOCONF=yes
IPV6_DEFROUTE=yes
IPV6_FAILURE_FATAL=no
IPV6_ADDR_GEN_MODE=stable-privacy
NAME=ens33
UUID=d4af5452-12bd-4872-9770-a201205a6efb
DEVICE=ens33
ONBOOT=yes

#如果上边改成BOOTPROTO=static则需要添加以下配置

IPADDR=192.168.61.155
NERMASK=255.255.255.0
GATEWAY=192.168.61.2
DNS1=192.168.61.2
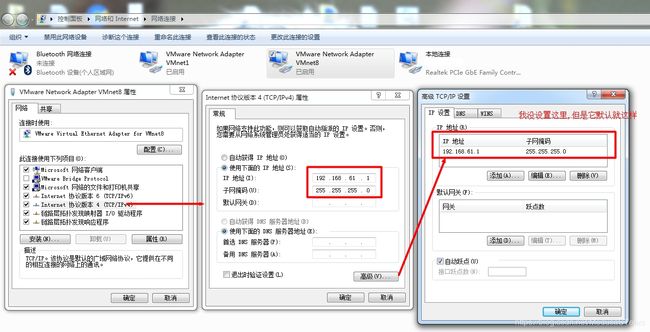
2.本机(因为我用的NAT连接方式,所以只修改VMnet8网卡):
3.最后注意:
刷新文件 重启网卡
[root@bogon /root]# vim /etc/sysconfig/network-scripts/ifcfg-ens33
[root@bogon /root]# source /etc/sysconfig/network-scripts/ifcfg-ens33
[root@bogon /root]# service network restart
Restarting network (via systemctl):                        [  确定  ]


# 这里补充一个ping本机的情况  刚开始就被一个文章坑了,ping 61.1 根本过不去!!
# 所以按照我这配置,保证你能 宿主机 虚拟机 互联

[root@bogon /root]# ping 192.168.61.1
PING 192.168.61.1 (192.168.61.1) 56(84) bytes of data.
^C
--- 192.168.61.1 ping statistics ---
17 packets transmitted, 0 received, 100% packet loss, time 16007ms


[root@bogon /root]# ping 192.168.61.0
Do you want to ping broadcast? Then -b. If not, check your local firewall rules.
[root@bogon /root]# ping 192.168.61.0 -b
WARNING: pinging broadcast address
PING 192.168.61.0 (192.168.61.0) 56(84) bytes of data.
64 bytes from 192.168.61.2: icmp_seq=1 ttl=128 time=0.524 ms
64 bytes from 192.168.61.2: icmp_seq=2 ttl=128 time=0.338 ms
64 bytes from 192.168.61.2: icmp_seq=3 ttl=128 time=0.324 ms
64 bytes from 192.168.61.2: icmp_seq=4 ttl=128 time=0.308 ms
^C
--- 192.168.61.0 ping statistics ---
6 packets transmitted, 6 received, 0% packet loss, time 5005ms
rtt min/avg/max/mdev = 0.305/0.355/0.524/0.080 ms


[root@bogon /root]# ping 192.168.61.2
PING 192.168.61.2 (192.168.61.2) 56(84) bytes of data.
64 bytes from 192.168.61.2: icmp_seq=1 ttl=128 time=0.474 ms
64 bytes from 192.168.61.2: icmp_seq=2 ttl=128 time=0.262 ms
64 bytes from 192.168.61.2: icmp_seq=3 ttl=128 time=0.266 ms
64 bytes from 192.168.61.2: icmp_seq=4 ttl=128 time=0.270 ms
^C
--- 192.168.61.2 ping statistics ---
4 packets transmitted, 4 received, 0% packet loss, time 3000ms
rtt min/avg/max/mdev = 0.262/0.318/0.474/0.090 ms
MedusaSTears
2019.01.18