界面编程之登录界面
初次写博客,拙劣之处,还请大家谅解、指出,共同学习。
界面:预期一个ImageView,显示logo,两个输入框分别输入账号密码,两个按钮一个用于登录另一个用于注册。
XML文件:主布局采取LinearLayout布局,然后进行LinearLayout的嵌套使用。下面是XML的布局代码:activity_login
            android:textColorHint="#E0E0E0"

            android:numeric="integer"

            android:textSize="20dip"
            />
让EditText之前有一段空白,就在之前添加了TextView组件,最初把TextView与EditText设置成同样的高度,发现并不能实现预期效果。小弟现在还不是很了解为什么,如果哪位清楚的话还劳烦给评论下。最后,我把输入框的父容器LinearLayout的高度固定,让EditText和TextView的高度选择match_parent(fill_parent)。
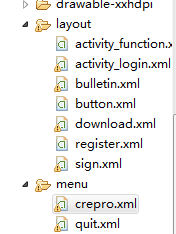
按钮我们在界面里只写了一个登录按钮,为了美观,我选择把注册按钮放在ActionBar上。添加这个按钮可以用java也可以用XML,为了简介,我选择XML,构建menu文件夹,并在此文件夹下创建crepro.xml。如图所示:
以下为crepro.xml的代码:
public class Login extends Activity{
	EditText pwdedit,idedit;
	String name="",pwd="";
	OnClickListener log;
	@Override
	protected void onCreate(Bundle savedInstanceState) {
		super.onCreate(savedInstanceState);
		setContentView(R.layout.activity_login);
		pwdedit=(EditText)findViewById(R.id.pwd);
		idedit=(EditText)findViewById(R.id.ID);
//如果大家仔细观察就会发现QQ的安卓版账号密码的输入框hint字体风格不同,就是因为这里没有处理。 pwdedit.setTransformationMethod(new PasswordTransformationMethod()); //接下来就是ActionBar的操作
ActionBar actionBar=getActionBar();
actionBar.setBackgroundDrawable(getBaseContext().getResources().getDrawable(R.drawable.backcolor));
Button login=(Button)findViewById(R.id.log);
//获取账号和密码
log=new OnClickListener()
{
@Override
public void onClick(View v)
{
name=idedit.getText().toString();
pwd=pwdedit.getText().toString();
final HttpPost httpRequest=new HttpPost("");//这里的域名自己设置
final List params=new ArrayList();
params.add(new BasicNameValuePair("name",name));
params.add(new BasicNameValuePair("pwd", pwd));
//建立子线程进行通信
new Thread()
{
public void run() {
try{
//发出HTTP请求
DefaultHttpClient httpClient=new DefaultHttpClient();
httpClient.getParams().setParameter(CoreConnectionPNames.CONNECTION_TIMEOUT,20000);
HttpEntity en=new UrlEncodedFormEntity(params,HTTP.UTF_8);
httpRequest.setEntity(en);
//取得HTTP response
HttpResponse httpResponse=httpClient.execute(httpRequest);
//若状态码为200则请求成功,取到返回数据
if(httpResponse.getStatusLine().getStatusCode()==HttpStatus.SC_OK)
{
//取出返回的字符串
String result=EntityUtils.toString(httpResponse.getEntity());
//System.out.println("result"+result);
if(string.equal("loginsucceed"))//个人设置
{
//跳转activity
Intent intent=new Intent(Login.this,FunctionActivity.class);
startActivity(intent);
}
}
}
catch(Exception e)
{
e.printStackTrace();
}
};
}.start();
}
};
login.setOnClickListener(log);
} //注册按钮就在这里通过menu文件传送到java文件中
@Override
public boolean onCreateOptionsMenu(Menu menu) {
MenuInflater menuInflater=new MenuInflater(this);
menuInflater.inflate(R.menu.crepro, menu);
return super.onCreateOptionsMenu(menu);
} //对于注册功能,是我的队友写的网页,我直接利用WebView打卡网页,在此不列出代码。
public boolean onMenuItemSelected(int featureId, android.view.MenuItem item)
{
switch (item.getItemId()) { //点击注册按钮时
case R.id.regist:
//进行链接的连接
Intent intent =new Intent(this,Register.class);
startActivity(intent);
break;
default:
break;
}
return true;
};
}
要给按钮加一个特效,让用户感觉得到自己已经点击了按钮。所以在drawable文件夹下创建文件buttonstyle.xml以下为代码:
    #C2FF68
    #FFE66F
在drawable文件夹中建立gradient.xml文件,代码如下:
这样,就需要在activity_login文件中添加这样一句:android:background="@drawable/gradient"关于ActionBar,我之后还会有博客更新,请期待!拙劣之处还请见谅!

