Fault Tolerant演进之路
对于7×24小时不间断运行的流程序来说,要保证fault tolerant是很难的,这不像是离线任务,如果失败了只需要清空已有结果,重新跑一次就可以了。对于流任务,如果要保证能够重新处理已处理过的数据,就要把数据保存下来;而这就面临着几个问题:比如一是保存多久的数据?二是重复计算的数据应该怎么处理,怎么保证幂等性?
对于一个流系统,我们有以下希望:
最好能做到exactly-once
处理延迟越低越好
吞吐量越高越好
计算模型应当足够简单易用,又具有足够的表达力
从错误恢复的开销越低越好
足够的流控制能力(背压能力)
Storm的Record acknowledgement模式
storm的fault tolerant是这样工作的:每一个被storm的operator处理的数据都会向其上一个operator发送一份应答消息,通知其已被下游处理。storm的源operator保存了所有已发送的消息的每一个下游算子的应答消息,当它收到来自sink的应答时,它就知道该消息已经被完整处理,可以移除了。
如果没有收到应答,storm就会重发该消息。显而易见,这是一种at least once的逻辑。另外,这种方式面临着严重的幂等性问题,例如对一个count算子,如果count的下游算子出错,source重发该消息,那么防止该消息被count两遍的逻辑需要程序员自己去实现。最后,这样一种处理方式非常低效,吞吐量很低。
Spark streaming的micro batch模式
前面提到,storm的实现方式就注定了与高吞吐量无缘。那么,为了提高吞吐量,把一批数据聚集在一起处理就是很自然的选择。Spark Streaming的实现就是基于这样的思路:
我们可以在完全的连续计算与完全的分批计算中间取折中,通过控制每批计算数据的大小来控制延迟与吞吐量的制约,如果想要低延迟,就用小一点的batch,如果想要大吞吐量,就不得不忍受更高的延迟(更久的等待数据到来的时间和更多的计算),如下图所示。

以这样的方式,可以在每个batch中做到exactly-once,但是这种方式也有其弊端:
首先,batch的方式使得一些需要跨batch的操作变得非常困难,例如session window;用户不得不自己想办法去实现相关逻辑。
其次,batch模式很难做好背压。当一个batch因为种种原因处理慢了,那么下一个batch要么不得不容纳更多的新来数据,要么不得不堆积更多的batch,整个任务可能会被拖垮,这是一个非常致命的问题。
最后,batch的方式基本意味着其延迟是有比较高的下限的,实时性上不好。
Google Cloud Dataflow的事务式模型
我们在传统数据库,如mysql中使用binlog来完成事务,这样的思路也可以被用在实现exactly-once模型中。例如,我们可以log下每个数据元素每一次被处理时的结果和当时所处的操作符的状态。这样,当我们需要fault tolerant时,我们只需要读一下log就可以了。这种模式规避了storm和spark所面临的问题,并且能够很好的实现exactly-once,唯一的弊端是:如何尽可能的减少log的成本?Flink给了我们答案。
Flink的分布式快照机制
实现exactly-once的关键是什么?是能够准确的知道和快速记录下来当前的operator的状态、当前正在处理的元素(以及正处在不同算子之间传递的元素)。如果上面这些可以做到,那么fault tolerant无非就是从持久化存储中读取上次记录的这些元信息,并且恢复到程序中。那么Flink是如何实现的呢?
Flink的分布式快照的核心是其轻量级异步分布式快照机制。为了实现这一机制,flink引入了一个概念,叫做Barrier。Barrier是一种标记,它被source产生并且插入到流数据中,被发送到下游节点。当下游节点处理到该barrier标志时,这就意味着在该barrier插入到流数据时,已经进入系统的数据在当前节点已经被处理完毕。

如图所示,每当一个barrier流过一个算子节点时,就说明了在该算子上,可以触发一次检查点,用以保存当前节点的状态和已经处理过的数据,这就是一份快照。(在这里可以联想一下micro-batch,把barrier想象成分割每个batch的逻辑,会好理解一点)这样的方式下,记录快照就像和前面提到的micro-batch一样容易。
与此同时,该算子会向下游发送该barrier。因为数据在算子之间是按顺序发送的,所以当下游节点收到该barrier时,也就意味着同样的一批数据在下游节点上也处理完毕,可以进行一次checkpoint,保存基于该节点的一份快照,快照完成后,会通知JobMananger自己完成了这个快照。这就是分布式快照的基本含义。
再看这张图:

有时,有的算子的上游节点和下游节点都不止一个,应该怎么处理呢?如果有不止一个下游节点,就向每个下游发送barrier。同理,如果有不止一个上游节点,那么就要等到所有上游节点的同一批次的barrier到达之后,才能触发checkpoint。因为每个节点运算速度不同,所以有的上游节点可能已经在发下个barrier周期的数据了,有的上游节点还没发送本次的barrier,这时候,当前算子就要缓存一下提前到来的数据,等比较慢的上游节点发送barrier之后,才能处理下一批数据。
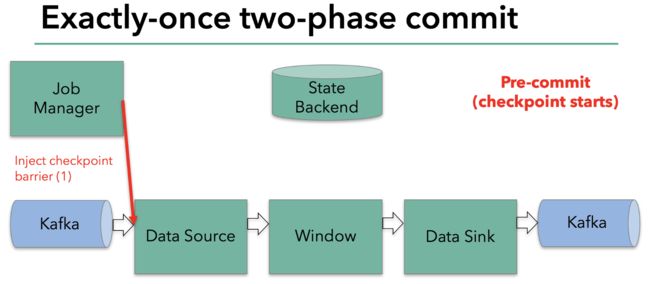
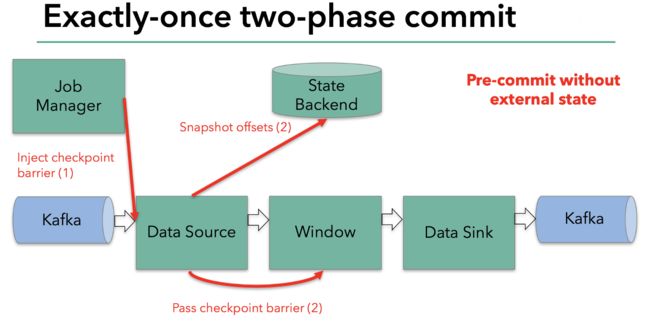
当整个程序的最后一个算子sink都收到了这个barrier,也就意味着这个barrier和上个barrier之间所夹杂的这批元素已经全部落袋为安。这时,最后一个算子通知JobManager整个流程已经完成,而JobManager随后发出通知,要求所有算子删除本次快照内容,以完成清理。这整个部分,就是Flink的两阶段提交的checkpoint过程,如下面四幅图所示:


总之,通过这种方式,flink实现了我们前面提到的六项对流处理框架的要求:exactly-once、低延迟、高吞吐、易用的模型、方便的恢复机制。
最后,贴一个美团做的flink与storm的性能对比:flink与storm的性能对比
checkpoint的生命周期
接下来,我们结合源码来看看flink的checkpoint到底是如何实现其生命周期的:
由于flink提供的SocketSource并不支持checkpoint,所以这里我以FlinkKafkaConsumer010作为sourceFunction。
触发checkpoint
要完成一次checkpoint,第一步必然是发起checkpoint请求。那么,这个请求是哪里发出的,怎么发出的,又由谁控制呢?
还记得如果我们要设置checkpoint的话,需要指定checkpoint间隔吧?既然是一个指定间隔触发的功能,那应该会有类似于Scheduler的东西存在,flink里,这个负责触发checkpoint的类是CheckpointCoordinator。
flink在提交job时,会启动这个类的startCheckpointScheduler方法,如下所示
public void startCheckpointScheduler() {
        synchronized (lock) {
            if (shutdown) {
                throw new IllegalArgumentException("Checkpoint coordinator is shut down");
            }

            // make sure all prior timers are cancelled
            stopCheckpointScheduler();

            periodicScheduling = true;
            currentPeriodicTrigger = timer.scheduleAtFixedRate(
                    new ScheduledTrigger(),
                    baseInterval, baseInterval, TimeUnit.MILLISECONDS);
        }
    }

    private final class ScheduledTrigger implements Runnable {

        @Override
        public void run() {
            try {
                triggerCheckpoint(System.currentTimeMillis(), true);
            }
            catch (Exception e) {
                LOG.error("Exception while triggering checkpoint.", e);
            }
        }
    }
启动之后,就会以设定好的频率调用triggerCheckPoint()方法。这个方法太长,我大概说一下都做了什么:
- 检查符合触发checkpoint的条件,例如如果禁止了周期性的checkpoint,尚未达到触发checkpoint的最小间隔等等,就直接return
- 检查是否所有需要checkpoint和需要响应checkpoint的ACK(ack涉及到checkpoint的两阶段提交,后面会讲)的task都处于running状态,否则return
- 如果都符合,那么执行checkpointID = checkpointIdCounter.getAndIncrement();以生成一个新的id,然后生成一个PendingCheckpoint。PendingCheckpoint是一个启动了的checkpoint,但是还没有被确认。等到所有的task都确认了本次checkpoint,那么这个checkpoint对象将转化为一个CompletedCheckpoint。
定义一个超时callback,如果checkpoint执行了很久还没完成,就把它取消 - 触发MasterHooks,用户可以定义一些额外的操作,用以增强checkpoint的功能(如准备和清理外部资源)
接下来是核心逻辑:
// send the messages to the tasks that trigger their checkpoint
    for (Execution execution: executions) {
        execution.triggerCheckpoint(checkpointID, timestamp, checkpointOptions);
    }
这里是调用了Execution的triggerCheckpoint方法,一个execution就是一个executionVertex的实际执行者。我们看一下这个方法:
public void triggerCheckpoint(long checkpointId, long timestamp, CheckpointOptions checkpointOptions) {
        final LogicalSlot slot = assignedResource;

        if (slot != null) {
        //TaskManagerGateway是用来跟taskManager进行通信的组件
            final TaskManagerGateway taskManagerGateway = slot.getTaskManagerGateway();

            taskManagerGateway.triggerCheckpoint(attemptId, getVertex().getJobId(), checkpointId, timestamp, checkpointOptions);
        } else {
            LOG.debug("The execution has no slot assigned. This indicates that the execution is " +
                "no longer running.");
        }
    }
再往下跟就进入了Task类的范畴,我们将在下一小节进行解读。本小节主要讲了CheckpointCoordinator类是如何触发一次checkpoint,从其名字也可以看出来其功能:检查点协调器。
Task层面checkpoint的准备工作
先说Task类中的部分,该类创建了一个CheckpointMetaData的对象,并且生成了一个Runable匿名类用于执行checkpoint,然后以异步的方式触发了该Runable:
public void triggerCheckpointBarrier(
            final long checkpointID,
            long checkpointTimestamp,
            final CheckpointOptions checkpointOptions) {

            ......

            Runnable runnable = new Runnable() {
                @Override
                public void run() {
                    // set safety net from the task's context for checkpointing thread
                    LOG.debug("Creating FileSystem stream leak safety net for {}", Thread.currentThread().getName());
                    FileSystemSafetyNet.setSafetyNetCloseableRegistryForThread(safetyNetCloseableRegistry);

                    try {
                        boolean success = invokable.triggerCheckpoint(checkpointMetaData, checkpointOptions);
                        if (!success) {
                            checkpointResponder.declineCheckpoint(
                                    getJobID(), getExecutionId(), checkpointID,
                                    new CheckpointDeclineTaskNotReadyException(taskName));
                        }
                    }

                    ......
                }
            };
            executeAsyncCallRunnable(runnable, String.format("Checkpoint Trigger for %s (%s).", taskNameWithSubtask, executionId));
        }
    }
上面代码里的invokable事实上就是我们的StreamTask了。Task类实际上是将checkpoint委托给了更具体的类去执行,而StreamTask也将委托给更具体的类,直到业务代码。
StreamTask是这样实现的:
- 如果task还在运行,那就可以进行checkpoint。方法是先向下游所有出口广播一个Barrier,然后触发本task的State保存。
- 如果task结束了,那我们就要通知下游取消本次checkpoint,方法是发送一个CancelCheckpointMarker,这是类似于Barrier的另一种消息。
- 注意,从这里开始,整个执行链路上开始出现Barrier,可以和前面讲Fault Tolerant原理的地方结合看一下。
private boolean performCheckpoint(
            CheckpointMetaData checkpointMetaData,
            CheckpointOptions checkpointOptions,
            CheckpointMetrics checkpointMetrics) throws Exception {

        synchronized (lock) {
            if (isRunning) {

                operatorChain.broadcastCheckpointBarrier(
                        checkpointMetaData.getCheckpointId(),
                        checkpointMetaData.getTimestamp(),
                        checkpointOptions);

                checkpointState(checkpointMetaData, checkpointOptions, checkpointMetrics);
                return true;
            }
            else {

                ......

            }
        }
    }
完成broadcastCheckpointBarrier方法后,在checkpointState()方法中,StreamTask还做了很多别的工作:
public void executeCheckpointing() throws Exception {

            ......

            try {
                //这里,就是调用StreamOperator进行snapshotState的入口方法
                for (StreamOperator op : allOperators) {
                    checkpointStreamOperator(op);
                }

                // we are transferring ownership over snapshotInProgressList for cleanup to the thread, active on submit
                AsyncCheckpointRunnable asyncCheckpointRunnable = new AsyncCheckpointRunnable(
                    owner,
                    operatorSnapshotsInProgress,
                    checkpointMetaData,
                    checkpointMetrics,
                    startAsyncPartNano);

                owner.cancelables.registerCloseable(asyncCheckpointRunnable);
                //这里注册了一个Runnable,在执行完checkpoint之后向JobManager发出CompletedCheckPoint消息,这也是fault tolerant两阶段提交的一部分
                owner.asyncOperationsThreadPool.submit(asyncCheckpointRunnable);

                ......

            }
        }
说到checkpoint,我们印象里最直观的感受肯定是我们的一些做聚合的操作符的状态保存,比如sum的和以及count的值等等。这些内容就是StreamOperator部分将要触发保存的内容。可以看到,除了我们直观的这些操作符的状态保存外,flink的checkpoint做了大量的其他工作。
接下来,我们就把目光转向操作符的checkpoint机制。
操作符的状态保存及barrier传递
第四章时,我们已经了解了StreamOperator的类关系,这里,我们就直接接着上一节的checkpointStreamOperator(op)方法往下讲。
顺便,前面也提到了,在进行checkpoint之前,operator初始化时,会执行一个initializeState方法,在该方法中,如果task是从失败中恢复的话,其保存的state也会被restore进来。
传递barrier是在进行本operator的statesnapshot之前完成的,我们先来看看其逻辑,其实和传递一条数据是类似的,就是生成一个CheckpointBarrier对象,然后向每个streamOutput写进去:
public void broadcastCheckpointBarrier(long id, long timestamp, CheckpointOptions checkpointOptions) throws IOException {
        try {
            CheckpointBarrier barrier = new CheckpointBarrier(id, timestamp, checkpointOptions);
            for (RecordWriterOutput streamOutput : streamOutputs) {
                streamOutput.broadcastEvent(barrier);
            }
        }
        catch (InterruptedException e) {
            throw new IOException("Interrupted while broadcasting checkpoint barrier");
        }
    }
下游的operator接收到本barrier,就会触发其自身的checkpoint。
StreamTask在执行完broadcastCheckpointBarrier之后,
我们当前的wordcount程序里有两个operator chain,分别是:
- kafka source -> flatmap
- keyed aggregation -> sink
我们就按这个顺序来捋一下checkpoint的过程。
1.kafka source的checkpoint过程
public final void snapshotState(FunctionSnapshotContext context) throws Exception {
        if (!running) {
            LOG.debug("snapshotState() called on closed source");
        } else {
            unionOffsetStates.clear();

            final AbstractFetcher fetcher = this.kafkaFetcher;
            if (fetcher == null) {
                // the fetcher has not yet been initialized, which means we need to return the
                // originally restored offsets or the assigned partitions
                for (Map.Entry subscribedPartition : subscribedPartitionsToStartOffsets.entrySet()) {
                    unionOffsetStates.add(Tuple2.of(subscribedPartition.getKey(), subscribedPartition.getValue()));
                }

                if (offsetCommitMode == OffsetCommitMode.ON_CHECKPOINTS) {
                    // the map cannot be asynchronously updated, because only one checkpoint call can happen
                    // on this function at a time: either snapshotState() or notifyCheckpointComplete()
                    pendingOffsetsToCommit.put(context.getCheckpointId(), restoredState);
                }
            } else {
                HashMap currentOffsets = fetcher.snapshotCurrentState();

                if (offsetCommitMode == OffsetCommitMode.ON_CHECKPOINTS) {
                    // the map cannot be asynchronously updated, because only one checkpoint call can happen
                    // on this function at a time: either snapshotState() or notifyCheckpointComplete()
                    pendingOffsetsToCommit.put(context.getCheckpointId(), currentOffsets);
                }

                for (Map.Entry kafkaTopicPartitionLongEntry : currentOffsets.entrySet()) {
                    unionOffsetStates.add(
                            Tuple2.of(kafkaTopicPartitionLongEntry.getKey(), kafkaTopicPartitionLongEntry.getValue()));
                }
            }

            if (offsetCommitMode == OffsetCommitMode.ON_CHECKPOINTS) {
                // truncate the map of pending offsets to commit, to prevent infinite growth
                while (pendingOffsetsToCommit.size() > MAX_NUM_PENDING_CHECKPOINTS) {
                    pendingOffsetsToCommit.remove(0);
                }
            }
        }
    }
kafka的snapshot逻辑就是记录一下当前消费的offsets,然后做成tuple(partitiion,offset)放进一个StateBackend里。StateBackend是flink抽象出来的一个用于保存状态的接口。
2.FlatMap算子的checkpoint过程
没什么可说的,就是调用了snapshotState()方法而已。
3.本operator chain的state保存过程
细心的同学应该注意到了,各个算子的snapshot方法只把自己的状态保存到了StateBackend里,没有写入的持久化操作。这部分操作被放到了AbstractStreamOperator中,由flink统一负责持久化。其实不需要看源码我们也能想出来,持久化无非就是把这些数据用一个流写到磁盘或者别的地方,接下来我们来看看是不是这样:
//还是AbstractStreamOperator.java的snapshotState方法
            if (null != operatorStateBackend) {
                snapshotInProgress.setOperatorStateManagedFuture(
                    operatorStateBackend.snapshot(checkpointId, timestamp, factory, checkpointOptions));
            }
那么这个operatorStateBackend是怎么保存状态的呢?
- 首先把各个算子的state做了一份深拷贝;
- 然后以异步的方式执行了一个内部类的runnable,该内部类的run方法实现了一个模版方法,首先打开stream,然后写入数据,然后再关闭stream。
我们来看看这个写入数据的方法:
public SnapshotResult performOperation() throws Exception {
                    long asyncStartTime = System.currentTimeMillis();

                    CheckpointStreamFactory.CheckpointStateOutputStream localOut = this.out;

                    // get the registered operator state infos ...
                    List> operatorMetaInfoSnapshots =
                        new ArrayList<>(registeredOperatorStatesDeepCopies.size());

                    for (Map.Entry> entry : registeredOperatorStatesDeepCopies.entrySet()) {
                        operatorMetaInfoSnapshots.add(entry.getValue().getStateMetaInfo().snapshot());
                    }

                    // ... write them all in the checkpoint stream ...
                    DataOutputView dov = new DataOutputViewStreamWrapper(localOut);

                    OperatorBackendSerializationProxy backendSerializationProxy =
                        new OperatorBackendSerializationProxy(operatorMetaInfoSnapshots, broadcastMetaInfoSnapshots);

                    backendSerializationProxy.write(dov);

                    ......

                }
注释写的很清楚,我就不多说了。
4.后继operatorChain的checkpoint过程
前面说到,在flink的流中,barrier流过时会触发checkpoint。在上面第1步中,上游节点已经发出了Barrier,所以在我们的keyed aggregation -> sink 这个operatorchain中,我们将首先捕获这个barrier。
捕获barrier的过程其实就是处理input数据的过程,对应着StreamInputProcessor.processInput()方法,该方法我们在第四章已经讲过,这里我们简单回顾一下:
//每个元素都会触发这一段逻辑,如果下一个数据是buffer,则从外围的while循环里进入处理用户数据的逻辑;这个方法里默默的处理了barrier的逻辑
            final BufferOrEvent bufferOrEvent = barrierHandler.getNextNonBlocked();
            if (bufferOrEvent != null) {
                if (bufferOrEvent.isBuffer()) {
                    currentChannel = bufferOrEvent.getChannelIndex();
                    currentRecordDeserializer = recordDeserializers[currentChannel];
                    currentRecordDeserializer.setNextBuffer(bufferOrEvent.getBuffer());
                }
                else {
                    // Event received
                    final AbstractEvent event = bufferOrEvent.getEvent();
                    if (event.getClass() != EndOfPartitionEvent.class) {
                        throw new IOException("Unexpected event: " + event);
                    }
                }
            }
处理barrier的过程在这段代码里没有体现,因为被包含在了getNextNonBlocked()方法中,我们看下这个方法的核心逻辑:
//BarrierBuffer.getNextNonBlocked方法
            else if (bufferOrEvent.getEvent().getClass() == CheckpointBarrier.class) {
                if (!endOfStream) {
                    // process barriers only if there is a chance of the checkpoint completing
                    processBarrier((CheckpointBarrier) bufferOrEvent.getEvent(), bufferOrEvent.getChannelIndex());
                }
            }
            else if (bufferOrEvent.getEvent().getClass() == CancelCheckpointMarker.class) {
                processCancellationBarrier((CancelCheckpointMarker) bufferOrEvent.getEvent());
            }
先提一嘴,大家还记得之前的部分也提到过CheckpointMarker吧,这里正好也对上了。
处理barrier也是个麻烦事,大家回想一下5.1节提到的屏障的原理图,一个opertor必须收到从每个inputchannel发过来的同一序号的barrier之后才能发起本节点的checkpoint,如果有的channel的数据处理的快了,那该barrier后的数据还需要缓存起来,如果有的inputchannel被关闭了,那它就不会再发送barrier过来了:
private void processBarrier(CheckpointBarrier receivedBarrier, int channelIndex) throws Exception {
        final long barrierId = receivedBarrier.getId();

        // fast path for single channel cases
        if (totalNumberOfInputChannels == 1) {
            if (barrierId > currentCheckpointId) {
                // new checkpoint
                currentCheckpointId = barrierId;
                notifyCheckpoint(receivedBarrier);
            }
            return;
        }

        // -- general code path for multiple input channels --

        if (numBarriersReceived > 0) {
            // this is only true if some alignment is already progress and was not canceled

            if (barrierId == currentCheckpointId) {
                // regular case
                onBarrier(channelIndex);
            }
            else if (barrierId > currentCheckpointId) {
                // we did not complete the current checkpoint, another started before
                LOG.warn("Received checkpoint barrier for checkpoint {} before completing current checkpoint {}. " +
                        "Skipping current checkpoint.", barrierId, currentCheckpointId);

                // let the task know we are not completing this
                notifyAbort(currentCheckpointId, new CheckpointDeclineSubsumedException(barrierId));

                // abort the current checkpoint
                releaseBlocksAndResetBarriers();

                // begin a the new checkpoint
                beginNewAlignment(barrierId, channelIndex);
            }
            else {
                // ignore trailing barrier from an earlier checkpoint (obsolete now)
                return;
            }
        }
        else if (barrierId > currentCheckpointId) {
            // first barrier of a new checkpoint
            beginNewAlignment(barrierId, channelIndex);
        }
        else {
            // either the current checkpoint was canceled (numBarriers == 0) or
            // this barrier is from an old subsumed checkpoint
            return;
        }

        // check if we have all barriers - since canceled checkpoints always have zero barriers
        // this can only happen on a non canceled checkpoint
        if (numBarriersReceived + numClosedChannels == totalNumberOfInputChannels) {
            // actually trigger checkpoint
            if (LOG.isDebugEnabled()) {
                LOG.debug("Received all barriers, triggering checkpoint {} at {}",
                        receivedBarrier.getId(), receivedBarrier.getTimestamp());
            }

            releaseBlocksAndResetBarriers();
            notifyCheckpoint(receivedBarrier);
        }
    }
总之,当收到全部的barrier之后,就会触发notifyCheckpoint(),该方法又会调用StreamTask的triggerCheckpoint,和之前的operator是一样的。
如果还有后续的operator的话,就是完全相同的循环,不再赘述。
5.报告完成checkpoint事件
当一个operator保存完checkpoint数据后,就会启动一个异步对象AsyncCheckpointRunnable,用以报告该检查点已完成,其具体逻辑在reportCompletedSnapshotStates中。这个方法把任务又最终委托给了RpcCheckpointResponder这个类:
checkpointResponder.acknowledgeCheckpoint(
            jobId,
            executionAttemptID,
            checkpointId,
            checkpointMetrics,
            acknowledgedState);
从这个类也可以看出来,它的逻辑是通过rpc的方式远程调JobManager的相关方法完成报告事件,底层也是通过akka实现的。
那么,谁响应了这个rpc调用呢?是该任务的JobMaster。
//JobMaster.java
    public void acknowledgeCheckpoint(
            final JobID jobID,
            final ExecutionAttemptID executionAttemptID,
            final long checkpointId,
            final CheckpointMetrics checkpointMetrics,
            final TaskStateSnapshot checkpointState) {

        final CheckpointCoordinator checkpointCoordinator = executionGraph.getCheckpointCoordinator();
        final AcknowledgeCheckpoint ackMessage = new AcknowledgeCheckpoint(
            jobID,
            executionAttemptID,
            checkpointId,
            checkpointMetrics,
            checkpointState);

        if (checkpointCoordinator != null) {
            getRpcService().execute(() -> {
                try {
                    checkpointCoordinator.receiveAcknowledgeMessage(ackMessage);
                } catch (Throwable t) {
                    log.warn("Error while processing checkpoint acknowledgement message");
                }
            });
        } else {
            log.error("Received AcknowledgeCheckpoint message for job {} with no CheckpointCoordinator",
                    jobGraph.getJobID());
        }
    }
JobMaster反手就是一巴掌就把任务又rpc给了CheckpointCoordinator.receiveAcknowledgeMessage()方法。
之前提到,coordinator在触发checkpoint时,生成了一个PendingCheckpoint,保存了所有operator的id。
当PendingCheckpoint收到一个operator的完成checkpoint的消息时,它就把这个operator从未完成checkpoint的节点集合移动到已完成的集合。当所有的operator都报告完成了checkpoint时,CheckpointCoordinator会触发completePendingCheckpoint()方法,该方法做了以下事情:
- 把pendinCgCheckpoint转换为CompletedCheckpoint
- 把CompletedCheckpoint加入已完成的检查点集合,并从未完成检查点集合删除该检查点
- 再度向各个operator发出rpc,通知该检查点已完成
本文里,收到这个远程调用的就是那两个operator chain,我们来看看其逻辑:
public void notifyCheckpointComplete(long checkpointId) throws Exception {
        synchronized (lock) {
            if (isRunning) {
                LOG.debug("Notification of complete checkpoint for task {}", getName());

                for (StreamOperator operator : operatorChain.getAllOperators()) {
                    if (operator != null) {
                        operator.notifyCheckpointComplete(checkpointId);
                    }
                }
            }
            else {
                LOG.debug("Ignoring notification of complete checkpoint for not-running task {}", getName());
            }
        }
    }
再接下来无非就是层层通知对应的算子做出响应罢了。
至此,flink的两阶段提交的checkpoint逻辑全部完成。
5.3 承载checkpoint数据的抽象:State & StateBackend
State是快照数据的载体,StateBackend是快照如何被保存的抽象。
State分为 KeyedState和OperatorState,从名字就可以看出来分别对应着keyedStream和其他的oeprator。从State由谁管理上,也可以区分为raw state和Managed state。Flink管理的就是Managed state,用户自己管理的就是raw state。Managed State又分为ValueState、ListState、ReducingState、AggregatingState、FoldingState、MapState这么几种,看名字知用途。
StateBackend目前提供了三个backend,MemoryStateBackend,FsStateBackend,RocksDBStateBackend,都是看名字知用途系列。
State接口、StateBackend接口及其实现都比较简单,代码就不贴了, 尤其State本质上就是一层容器封装。
贴个别人写的状态管理的文章吧:详解Flink中的状态管理