JAVA图形界面设计
图形界面设计
1 Java Swing 概述
图形化界面(Graphics User Interface,GUI)是指采用图形方式显示的计算机操作用户界面。
通过图形化界面,用户和程序之间可以方便地进行交互。Java的抽象窗口工具包(Abstract Window Toolkit,AWT)提供许多用来设计GUI的组件类。
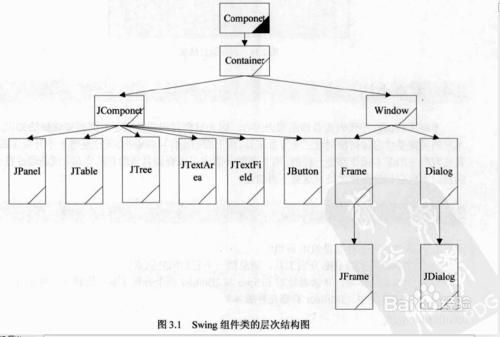
java.awt和javax.swing 包中一部分类的层次关系UML类图。
GUI组件按其作用可分为基本组件(Component)和容器(Container)两大类:GUI基本组件,其上不能容纳其他组件,如按钮、文本框等图形界面元素。容器是一种特殊的组件,可以用来容纳其他的组件,如窗口、对话框等。
如果我们要在一个窗口中显示按钮、文本框等,需要将这些组件放到一个容器中。在java.awt中主要有两个容器类Window类、Panel类和Applet类。但是Panel类必须放到Frame顶级容器中,一般不独立使用。同样我们也可以把Panel类和它的子类理解为一种中间容器,组件可以放到这个中间容器中,也可以放到顶级容器中。
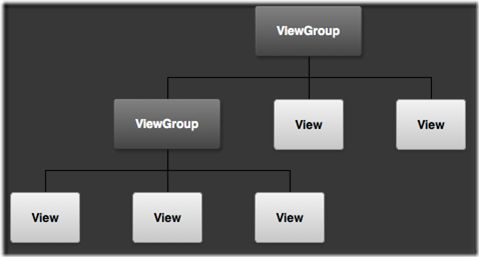
容器和组件的概念与Android中的UI组件非常相似,View组件一定要依附在ViewGroup这个容器之下,此外,因为ViewGroup继承自View,ViewGroup也可以当做View组件使用。
2 窗口
一个基于GUI的应用程序应当提供一个能直接和操作系统直接交互的容器,该容器可以被直接显示、绘制在操作系统所控制的平台上,如显示器上,这样的容器被称作GUI设计中的底层容器。
JFrame类的实例就是一个底层容器,即通常称的窗口。其他容器必须被添加到底层容器中,以便借助这个底层容器和操作系统进行信息交互。
2.1 JFrame常用方法
JFrame() 创建一个无标题的窗口

JFrame(String s) 创建标题为s的窗口

public void setVisible(boolean b) 设置窗口是否可见,窗口默认不可见

public void dispose() 撤销当前的窗口,并释放当前窗口所使用的资源

public void setDefaultCloseOperation(int operation)  设置单击窗体右上角关闭图标后,程序会做出怎样的处理
    WindowConstants.DISPOSE_ON_CLOSE 隐藏当前的窗口,并释放窗体占有的其他资源
    WindowConstants.DO_NOTHING_ON_CLOSE 什么也不做
    WindowConstants.HIDE_ON_CLOSE 隐藏当前窗口
    WindowConstants.EXIT_ON_CLOSE 结束窗口所在的应用程序
- 1
- 2
- 3
- 4
- 5
- 6
- 7
- 8
- 9
- 10
- 11
- 12
- 13
- 1
- 2
- 3
- 4
- 5
- 6
- 7
- 8
- 9
- 10
- 11
- 12
- 13
示例-JFrame创建两个窗口
import javax.swing.JFrame;
import javax.swing.WindowConstants;

public class Windows {
    public static void main(String[] args) {
        JFrame window1 = new JFrame("撤销窗口"); //创建标题名
        JFrame window2 = new JFrame("退出程序");
        window1.setBounds(0,0,400,200);// 显示X轴位置,显示Y轴位置 ,宽,长
        window2.setBounds(400,0,400,200);
        window1.setVisible(true); // 窗口默认是不可见的
        window1.setDefaultCloseOperation(WindowConstants.DISPOSE_ON_CLOSE);
        //设置单击窗体右上角关闭图标后,程序会做出怎样的处理。
        window2.setVisible(true);
        window2.setDefaultCloseOperation(WindowConstants.EXIT_ON_CLOSE);
    }
}
- 1
- 2
- 3
- 4
- 5
- 6
- 7
- 8
- 9
- 10
- 11
- 12
- 13
- 14
- 15
- 16
- 1
- 2
- 3
- 4
- 5
- 6
- 7
- 8
- 9
- 10
- 11
- 12
- 13
- 14
- 15
- 16
2.2 菜单条、菜单、菜单项
窗口中的菜单条、菜单、菜单项是我们所熟悉的组件,菜单放在菜单条里,菜单项放在菜单中。
菜单条
JComponent类的子类JMenubar负责创建菜单条,即JMenubar的一个实例就是一个菜单条,JFrame类用一个把菜单条放到窗口的方法:setJMenuBar( JMenuBar bar);该方法将菜单条添加到窗口的顶端,需要注意的是,只能向窗口添加一个菜单条。
菜单
JComponent类的子类JMenu负责创建菜单,即JMenu的一个实例就是一个菜单。- 菜单项
JComponent类的子类JMenuItem负责创建菜单项,即JMenuItem的一个实例就是一个菜单项
JMenuItem(String text, Icon icon)
- 1
- 1
嵌入子菜单
JMenu是JMenuItem的子类,因此菜单本身也是一个菜单项,当把一个菜单看作菜单项添加到摸个菜单中时,称这个菜单为子菜单。菜单上的图标
可以用 图标类Icon声明一个图标,使用ImageIcon类创建一个图标。
Icon icon = new ImageIcon("a.png");
- 1
- 1
然后菜单项调用setIcon(Icon icon)设置图标
示例-带菜单的窗口
图片资源a.png、b.png、c.png、d.png存放到项目目录下
Main.java
public class Main {
    public static void main(String[] args) {
        WindowMenu win = new WindowMenu("带窗口的菜单", 20, 30, 400, 500);
    }
}
- 1
- 2
- 3
- 4
- 5
- 6
- 1
- 2
- 3
- 4
- 5
- 6
WindowMenu.java
import java.awt.event.InputEvent;
import java.awt.event.KeyEvent;

import javax.swing.ImageIcon;
import javax.swing.JFrame;
import javax.swing.JMenu;
import javax.swing.JMenuBar;
import javax.swing.JMenuItem;
import javax.swing.KeyStroke;
import javax.swing.WindowConstants;

/**
 * 自定义窗口WindowMenu
 * @author Peng
 */
public class WindowMenu extends JFrame {
    JMenuBar menubar;
    JMenu menu, subMenu;
    JMenuItem item1, item2;

    public WindowMenu() {
    }

    public WindowMenu(String s, int x, int y, int w, int h) {
        init(s);
        setLocation(x, y);
        setSize(w, h);
        setVisible(true);
        setDefaultCloseOperation(WindowConstants.DISPOSE_ON_CLOSE);
    }

    void init(String s) {
        setTitle(s);
        menubar = new JMenuBar();
        menu = new JMenu("菜单"); // JMnud的实例就是一个菜单

        /**
         * 一级菜单项
         */
        subMenu = new JMenu("软件项目"); // 子菜单
        item1 = new JMenuItem("Java话题"); // 创建菜单项
        //为菜单项设置图标
        ImageIcon icon = new ImageIcon("a.png");
        item1.setIcon(icon);

        //使用JMenuItem的构造方法设置图标
        item2 = new JMenuItem("动画话题", new ImageIcon("b.png"));
        item1.setAccelerator(KeyStroke.getKeyStroke('A'));
        item2.setAccelerator(KeyStroke.getKeyStroke(KeyEvent.VK_S, InputEvent.CTRL_MASK));
        menu.add(item1);
        menu.addSeparator();
        menu.add(item2);
        menu.add(subMenu);
        /**
         * 添加二级菜单项
         */
        subMenu.add(new JMenuItem("汽车销售系统", new ImageIcon("c.png")));
        subMenu.add(new JMenuItem("农场信息系统", new ImageIcon("d.png")));
        menubar.add(menu); // 菜单条中加入菜单
        setJMenuBar(menubar); // 添加一个菜单条

    }
}
- 1
- 2
- 3
- 4
- 5
- 6
- 7
- 8
- 9
- 10
- 11
- 12
- 13
- 14
- 15
- 16
- 17
- 18
- 19
- 20
- 21
- 22
- 23
- 24
- 25
- 26
- 27
- 28
- 29
- 30
- 31
- 32
- 33
- 34
- 35
- 36
- 37
- 38
- 39
- 40
- 41
- 42
- 43
- 44
- 45
- 46
- 47
- 48
- 49
- 50
- 51
- 52
- 53
- 54
- 55
- 56
- 57
- 58
- 59
- 60
- 61
- 62
- 63
- 64
3 常用组件与布局
3.1 常见组件
文本框
使用JComponent的子类JTextField创建文本框。文本框的允许用户输入单行文本。文本区
使用JComponent的子类JButton类创建按钮,允许用户单击按钮。标签
使用JComponent的子类JLabel类创建标签,标签为用户提供信息提示。选择框
使用JComponent的子类JCheckBox类来创建选择框,为用户提供多项悬着。选择框提供两种状态,选中和未选中,用户通过单击该组件切换状态。单选按钮
使用JComponent的子类的JRadioButton类创建单项选择框,为用户提供单项选择。下拉列表
使用JComponent的子类的JComboBox类来创建下拉列表,为用户提供下拉列表。密码框
使用JComponent的子类的子类JPasswordField创建密码框,允许输入单行密码,密码框默认回显字符是“*”,也可以通过setEchoChar(char c)来重新设置回显字符。密码框调用char[] getPassword()方法可以返回实际的密码。
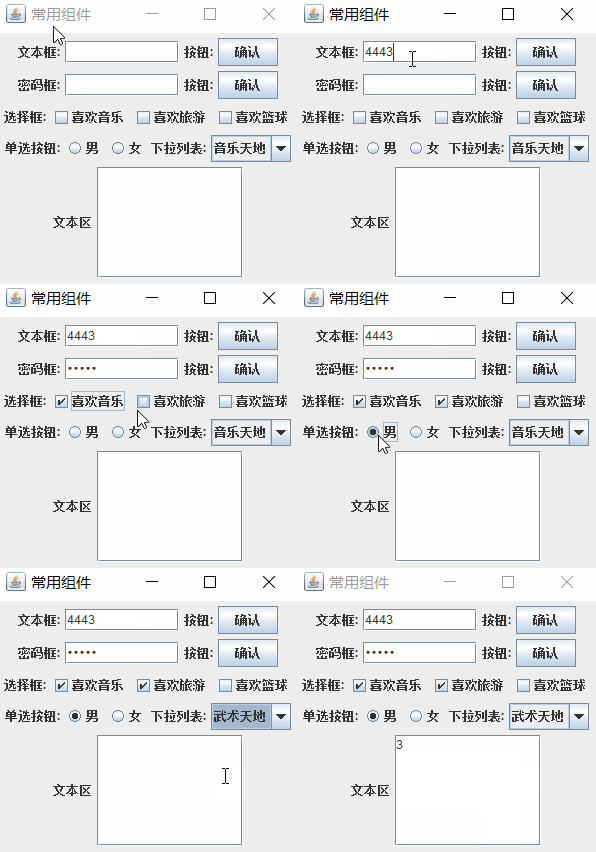
示例 -常见组件
效果图:
Main.java
public class Main {
    public static void main(String[] args) {
        ComponentInWindow win = new ComponentInWindow();
        win.setBounds(100, 100, 320, 310);
        win.setTitle("常用组件");
    }
}
- 1
- 2
- 3
- 4
- 5
- 6
- 7
- 8
- 1
- 2
- 3
- 4
- 5
- 6
- 7
- 8
ComponentInWindow.java
import java.awt.FlowLayout;
import javax.swing.ButtonGroup;
import javax.swing.JButton;
import javax.swing.JCheckBox;
import javax.swing.JComboBox;
import javax.swing.JFrame;
import javax.swing.JLabel;
import javax.swing.JPasswordField;
import javax.swing.JRadioButton;
import javax.swing.JScrollPane;
import javax.swing.JTextArea;
import javax.swing.JTextField;
public class ComponentInWindow extends JFrame {
JTextField text;
JButton button;
JCheckBox checkBox1, checkBox2, checkBox3;
JRadioButton radio1, radio2;
ButtonGroup group;
JComboBox
- 1
- 2
- 3
- 4
- 5
- 6
- 7
- 8
- 9
- 10
- 11
- 12
- 13
- 14
- 15
- 16
- 17
- 18
- 19
- 20
- 21
- 22
- 23
- 24
- 25
- 26
- 27
- 28
- 29
- 30
- 31
- 32
- 33
- 34
- 35
- 36
- 37
- 38
- 39
- 40
- 41
- 42
- 43
- 44
- 45
- 46
- 47
- 48
- 49
- 50
- 51
- 52
- 53
- 54
- 55
- 56
- 57
- 58
- 59
- 60
- 61
- 62
- 63
- 64
- 65
- 66
- 67
- 68
- 69
- 70
- 71
- 72
- 73
- 74
- 75
- 76
- 77
- 78
- 79
- 80
3.2 常见容器
JComponent 是 Comtainer的 子类,因此 JComponent 的子类创建的组件也都是容器,但我们很少将 JButton、JTextField、JCheckBox 等组件当容器来使用。JComponent 专门提供了一些经常用来添加组建的容器。相对于底层容器 JFrame ,下面提到的容器被习惯地称为中间容器,中间容器必须被添加到底层容器中才能发挥作用。
Jpanel面板
我们会经常使用 JPanel 创建一个面板,再向这个面板添加组件,然后把这个面板添加到其他容器中。JPanel 面板的默认布局是 FlowLayout 布局。滚动窗格 JScrollPane
拆分窗格 JSpitPane
分层窗格 JLayeredPane
3.3 常用布局
当把组件添加到容器中时,希望控制组件在容器中的位置,这就需要用到布局设计。
容器可以使用方法设置自己的布局。
setLayout(布局对象);
- 1
- 1
设置自己的布局。
- FlowLayout 布局
FlowLayout 类创建的对象称作 FlowLayout 型布局。FlowLayout 型布局是 JPanel 型布局的默认布局,即 JPanel 及其子类创建的容器对象,如果不专门指定布局,则他们的布局就是 FlowLayout 布局。
FlowLayout flow = new FlowLayout(); // 居中对齐
容器.setLayout(flow);
- 1
- 2
- 1
- 2
or
setLayout(new FlowLayout());
- 1
- 1
通过add 方法将组件按先后顺序,从左到右,默认水平和垂直间隙是 5 个像素的方式排列。组件的大小为默认的最佳大小,例如,控件的大小刚好能保证显示其上面的名字。
- BorderLayout 布局
- CardLayout 布局
- GridLayout 布局
- BoxLayout 布局
- null 布局
4 处理事件
处理组件的点击或者选择事件。
4.1 事件处理模式
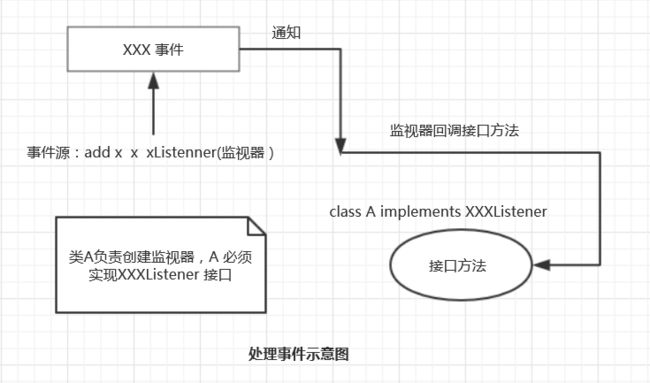
事件源
能够产生处理了事件的对象都可以成为事件源,如文本框,按钮,下拉式列表等。也就是说,事件源必须是一个对象,而且这个对象必须是Java认为能够发生事件的对象。监视器
我们需要一个对象对事件源进行监视,以便对发生的事件作出处理。事件源通过调用相应的方法将某个对象注册为自己的监视器。例如,对于文本框,这个方法是:
addActionListener(监视器);
- 1
- 1
对于注册监视器的文本框,在文本框获得焦点后,当用户对文本框进行操作,如按下回车键,Java 运行环境就会自动用 ActionEvent 类创建一个对象,触发 ActionEvent 事件 。对文本框进行相应的操作就会导致相应的事件发生,并通知监视器,监视器就会做出相应的处理。
- 处理事件的接口
为了让监视器这个对象能够对事件源发生的事件进行处理,创建该视图对象的类必须实现相应的接口,即必须在类体中重写接口的所有方法,那么当事件源发生事件是,监视器会自动调用类中被重写的接口方法。
4.2 ActionEvent 事件
ActionEvent 事件源
文本框、按钮、菜单项、密码框、和单选按钮都可以触发事件,都可以成为事件源。注册监视器
能触发 ActionEvent 事件的组件,使用addActionListener(ActionListener listen),将实现 ActionListener 接口的类的实例注册为事件源的监视器。ActionListener 接口
ActionListener 接口位于 java.awt.event包中,该接口只有一个方法
public void actionPerformed(ActionEvent e)
- 1
- 1
在这里执行想要的操作
- ActionEvent 类中的方法
public Object getSourcee() 获取事件源对象的引用,返回向上转型为Object对象的应用

publi String getActionCommand() 获取和事件发生的一个命令字符串,例,文本框引发事件,文本框内的文本字符串就是和该事件相关的一个命令字符串。
- 1
- 2
- 3
- 1
- 2
- 3
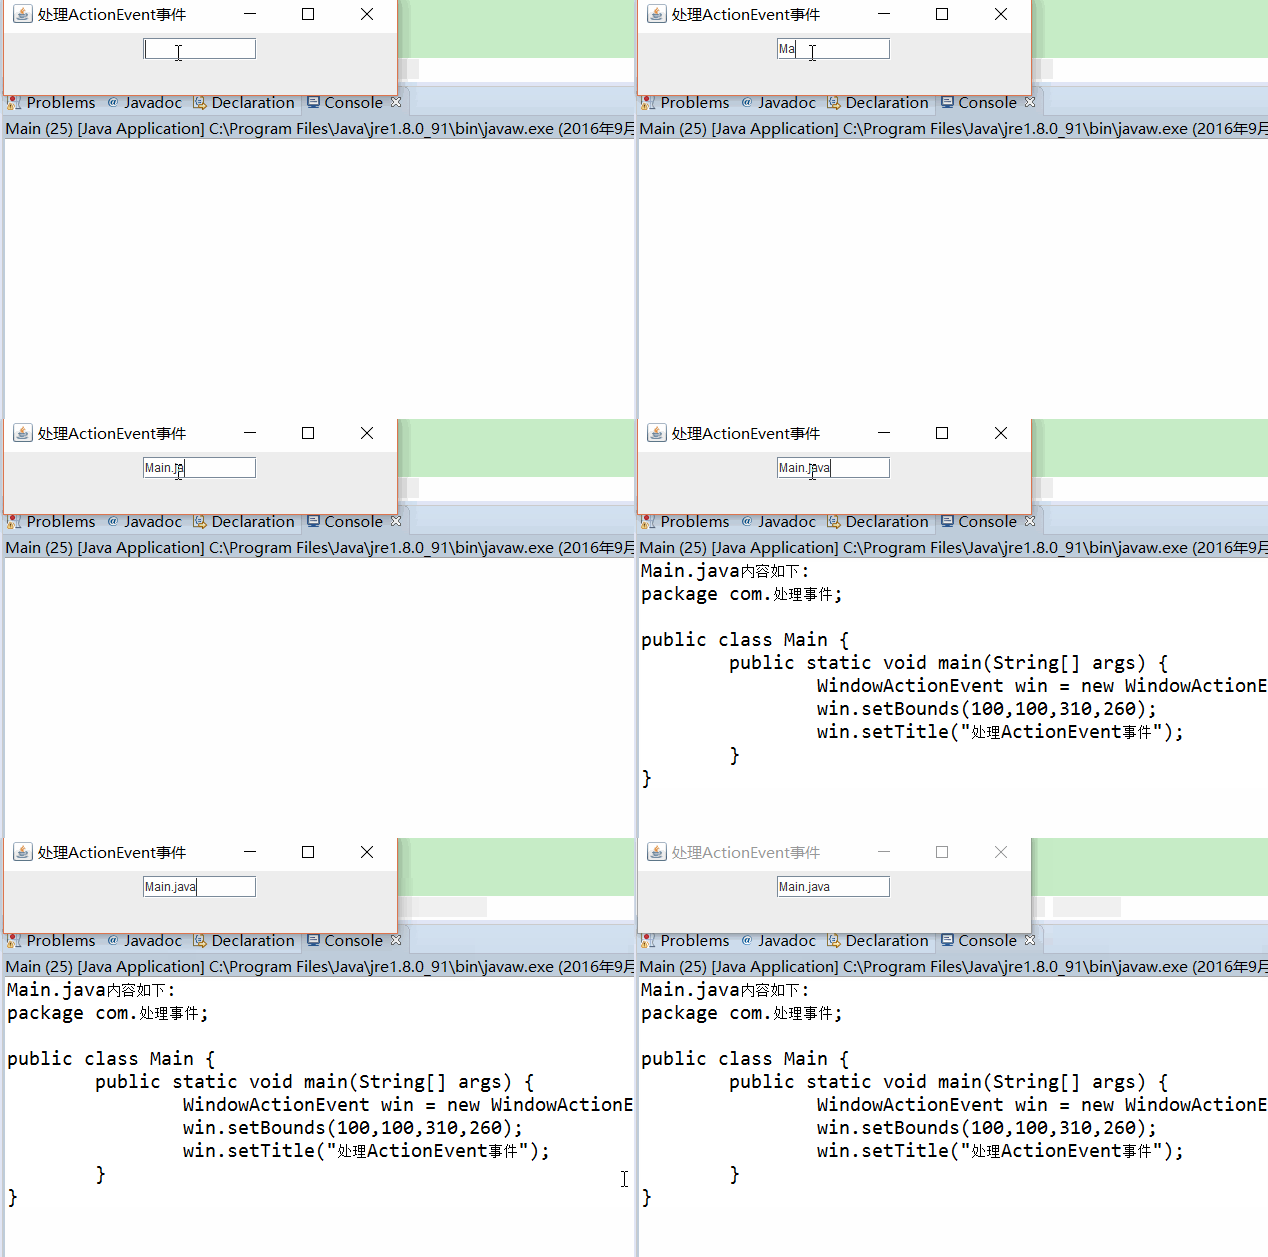
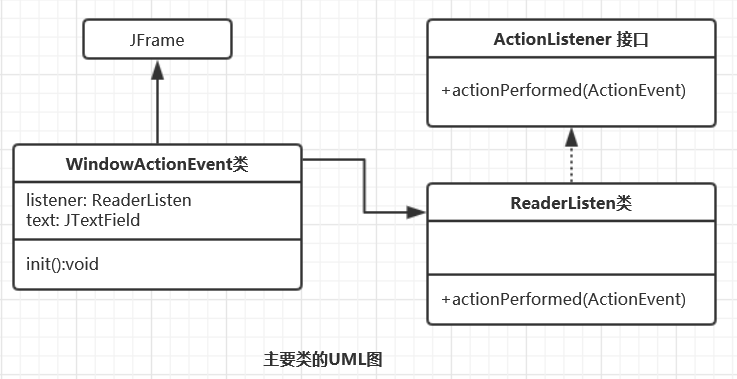
示例-文本框监听事件
在文本框内输入文件名(默认目录下要有文件),回车后,通过BufferReader流读出内容。
Main.java
public class Main {
    public static void main(String[] args) {
        WindowActionEvent win = new WindowActionEvent();
        win.setBounds(100,100,310,260);
        win.setTitle("处理ActionEvent事件");
    }
}
- 1
- 2
- 3
- 4
- 5
- 6
- 7
- 8
- 1
- 2
- 3
- 4
- 5
- 6
- 7
- 8
WindowActionEvent.java
import java.awt.FlowLayout;
import java.awt.HeadlessException;
import java.awt.event.ActionEvent;
import java.awt.event.ActionListener;
import java.io.BufferedReader;
import java.io.File;
import java.io.FileReader;

import javax.swing.JFrame;
import javax.swing.JTextField;

public class WindowActionEvent extends JFrame {
    JTextField text;
    ReaderListen listener;

    public WindowActionEvent() throws HeadlessException {
        init();
        setVisible(true);
        setDefaultCloseOperation(JFrame.EXIT_ON_CLOSE);
    }

    void init() {
        setLayout(new FlowLayout());
        text = new JTextField(10);
        listener = new ReaderListen();
        text.addActionListener(listener);
        add(text);
    }
}

class ReaderListen implements ActionListener {

    @Override
    public void actionPerformed(ActionEvent e) {
        String fileName = e.getActionCommand();
        System.out.println(fileName + "内容如下:");
        try {
            File file = new File(fileName);
            FileReader inOne = new FileReader(file);// 在项目目录下 自己把Main.java复制一份到项目目录下
            BufferedReader inTwo = new BufferedReader(inOne);
            String s = null;
            while ((s = inTwo.readLine()) != null) {
                System.out.println(s);
            }
            inOne.close();
            inTwo.close();
        } catch (Exception e2) {
            e2.printStackTrace();
        }
    }
}
- 1
- 2
- 3
- 4
- 5
- 6
- 7
- 8
- 9
- 10
- 11
- 12
- 13
- 14
- 15
- 16
- 17
- 18
- 19
- 20
- 21
- 22
- 23
- 24
- 25
- 26
- 27
- 28
- 29
- 30
- 31
- 32
- 33
- 34
- 35
- 36
- 37
- 38
- 39
- 40
- 41
- 42
- 43
- 44
- 45
- 46
- 47
- 48
- 49
- 50
- 51
- 1
- 2
- 3
- 4
- 5
- 6
- 7
- 8
- 9
- 10
- 11
- 12
- 13
- 14
- 15
- 16
- 17
- 18
- 19
- 20
- 21
- 22
- 23
- 24
- 25
- 26
- 27
- 28
- 29
- 30
- 31
- 32
- 33
- 34
- 35
- 36
- 37
- 38
- 39
- 40
- 41
- 42
- 43
- 44
- 45
- 46
- 47
- 48
- 49
- 50
- 51
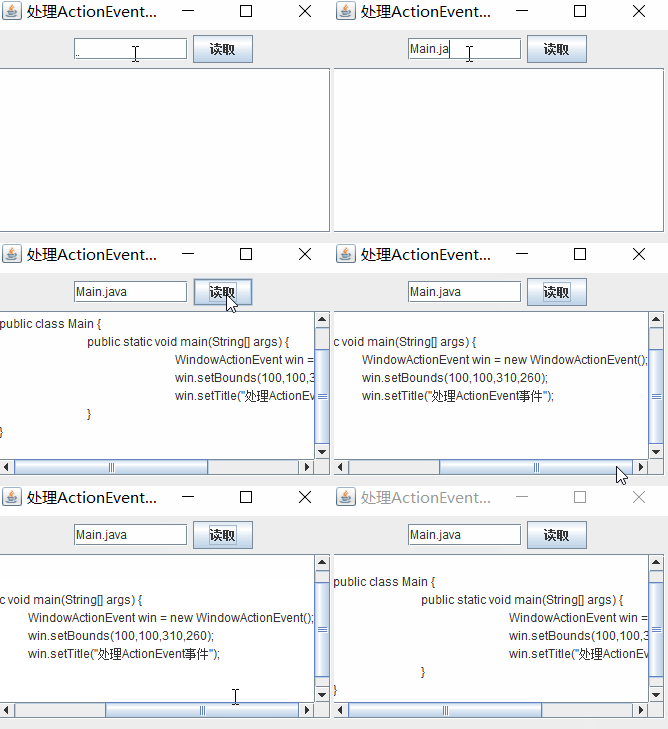
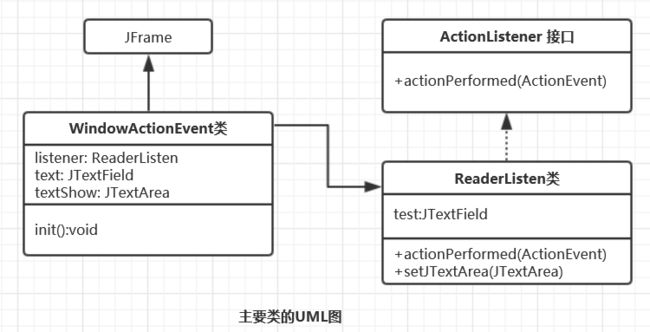
示例2-文本框、文本区框、按钮的监听事件
效果图:
Main.java
public class Main {
    public static void main(String[] args) {
        WindowActionEvent win = new WindowActionEvent();
        win.setBounds(100,100,360,300);
        win.setTitle("处理ActionEvent事件");
    }
}
- 1
- 2
- 3
- 4
- 5
- 6
- 7
- 8
- 1
- 2
- 3
- 4
- 5
- 6
- 7
- 8
WindowActionEvent.java
import java.awt.FlowLayout;
import java.awt.HeadlessException;
import java.awt.event.ActionEvent;
import java.awt.event.ActionListener;
import java.io.BufferedReader;
import java.io.File;
import java.io.FileReader;

import javax.swing.JButton;
import javax.swing.JFrame;
import javax.swing.JScrollPane;
import javax.swing.JTextArea;
import javax.swing.JTextField;

public class WindowActionEvent extends JFrame {
    JTextField text;
    JTextArea textShow;
    JButton button;
    ReaderListen listener;

    public WindowActionEvent() throws HeadlessException {
        init();
        setVisible(true);
        setDefaultCloseOperation(JFrame.EXIT_ON_CLOSE);
    }

    void init() {
        setLayout(new FlowLayout());
        text = new JTextField(10);
        button = new JButton("读取");
        textShow = new JTextArea(9,30);
        listener = new ReaderListen();
        listener.setJTextField(text);
        listener.setJTextArea(textShow);
        text.addActionListener(listener);
        button.addActionListener(listener);
        add(text);
        add(button);
        add(new JScrollPane(textShow));
    }
}

class ReaderListen implements ActionListener {
    JTextField text;
    JTextArea textShow;

    public void setJTextField(JTextField text) {
        this.text = text;
    }


    public void setJTextArea(JTextArea textShow) {
        this.textShow = textShow;
    }


    @Override
    public void actionPerformed(ActionEvent e) {

        try {
            File file = new File(text.getText()); //getDocument()
            FileReader inOne = new FileReader(file);
            BufferedReader inTwo = new BufferedReader(inOne);
            String s = null;
            while ((s = inTwo.readLine()) != null) {
                textShow.append(s+"\n");
            }
            inOne.close();
            inTwo.close();
        } catch (Exception e2) {
            e2.printStackTrace();
        }

    }

}
- 1
- 2
- 3
- 4
- 5
- 6
- 7
- 8
- 9
- 10
- 11
- 12
- 13
- 14
- 15
- 16
- 17
- 18
- 19
- 20
- 21
- 22
- 23
- 24
- 25
- 26
- 27
- 28
- 29
- 30
- 31
- 32
- 33
- 34
- 35
- 36
- 37
- 38
- 39
- 40
- 41
- 42
- 43
- 44
- 45
- 46
- 47
- 48
- 49
- 50
- 51
- 52
- 53
- 54
- 55
- 56
- 57
- 58
- 59
- 60
- 61
- 62
- 63
- 64
- 65
- 66
- 67
- 68
- 69
- 70
- 71
- 72
- 73
- 74
- 75
- 76
- 77
4.3 ActionItem 事件
Item事件源
选择框和下拉列表都可以触发 ItemEvent 事件。选择框提供两种状态,一种是未选中,另一种是选中,用户点击切换了状态,就会触发 ItemEvent 事件。对于下拉列表,用户选中了下拉列表中某个选项,就会触发 ItemEvent 事件。注册监视器
选择框和下拉列表组件使用addItemListener(ItemListener listen),注册为事件源的监视器。ItemListener 接口
class MyListener implements ItemListener{
        @Override
        public void itemStateChanged(ItemEvent e) {
            // 触发事件后,你想要的操作
        }
    }
- 1
- 2
- 3
- 4
- 5
- 6
- 1
- 2
- 3
- 4
- 5
- 6
ItemEvent 事件对象使用 getSource() 方法返回 ItemEvent 事件源,使用 getItemSelectable 方法返回发生 ItemEvent 事件的事件源。
    @Override
    public void itemStateChanged(ItemEvent e) {
    ...
    e.getSource();
    e.getItemSelectable();
    .
    ..
    }
- 1
- 2
- 3
- 4
- 5
- 6
- 7
- 8
- 9
- 1
- 2
- 3
- 4
- 5
- 6
- 7
- 8
- 9
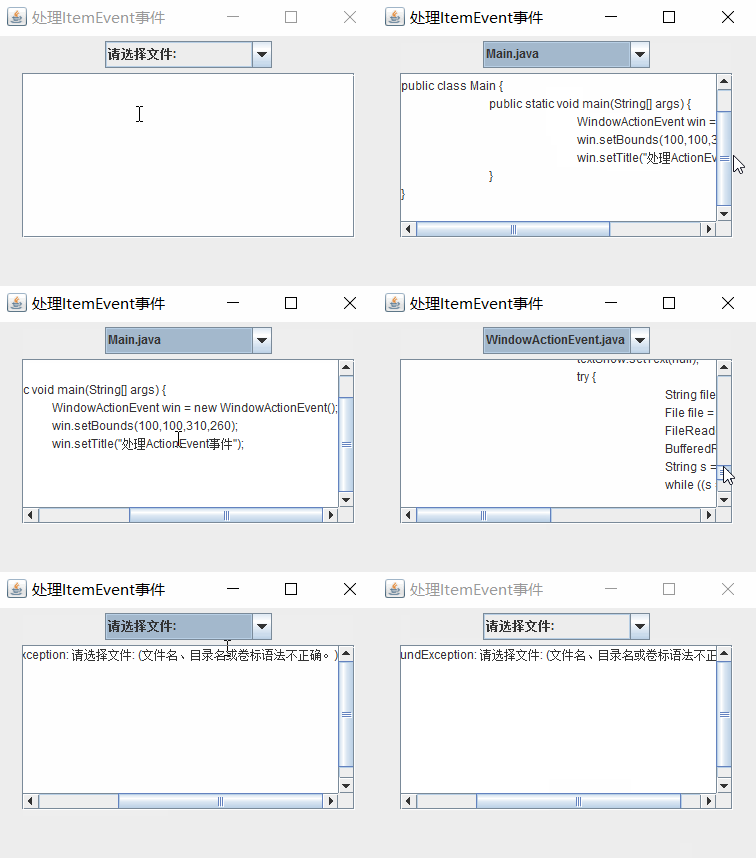
示例 -下拉列表
下拉列表的选项是当前目录下Java文件的名字,用户选择下拉列表的选项后,监视器负责在文本区显示文件的内容。
效果图:
Main.java
public class Main {
    public static void main(String[] args) {
        WindowActionEvent win = new WindowActionEvent();
        win.setBounds(100, 100, 400, 300);
        win.setTitle("处理ItemEvent事件");
    }
}
- 1
- 2
- 3
- 4
- 5
- 6
- 7
- 8
- 1
- 2
- 3
- 4
- 5
- 6
- 7
- 8
WindowActionEvent.java
import java.awt.FlowLayout;
import java.awt.HeadlessException;
import java.awt.event.ActionEvent;
import java.awt.event.ActionListener;
import java.awt.event.ItemEvent;
import java.awt.event.ItemListener;
import java.io.BufferedReader;
import java.io.File;
import java.io.FileReader;
import java.io.FilenameFilter;

import javax.swing.JButton;
import javax.swing.JComboBox;
import javax.swing.JFrame;
import javax.swing.JScrollPane;
import javax.swing.JTextArea;
import javax.swing.JTextField;

public class WindowActionEvent extends JFrame {
    JComboBox choice;
    JTextArea textShow;
    ReaderListen listener;

    public WindowActionEvent() throws HeadlessException {
        init();
        setVisible(true);
        setDefaultCloseOperation(JFrame.EXIT_ON_CLOSE);
    }

    void init() {
        setLayout(new FlowLayout());
        choice = new JComboBox<>();
        choice.addItem("请选择文件:");

        File dir = new File(".");
        FileAccept fileAccept = new FileAccept("java"); // 设置后缀名
        String[] fileName = dir.list(fileAccept);// 把.java后缀的文件名返回,并存到数组中
        for (String name : fileName) { // 遍历返回的.java文件名
            choice.addItem(name); // 把文件名添加到下拉列表中
        }
        textShow = new JTextArea(9, 30);
        listener = new ReaderListen();

        /**
         * 在ItemListener中自定义这个方法
         * 主要是要用到下拉列表框和文本区的变量,进行相应的操作
         */
        listener.setJComboBox(choice);
        listener.setJTextArea(textShow);

        choice.addItemListener(listener);
        add(choice);
        add(new JScrollPane(textShow)); //滚动窗格  常用容器

    }

    class FileAccept implements FilenameFilter { // 文件名过滤器
        private String type;

        FileAccept(String type) {
            this.type = type;
        }

        @Override
        public boolean accept(File dir, String name) {
            return name.endsWith(type);
        }

    }
}

class ReaderListen implements ItemListener {
    JComboBox choice;
    JTextArea textShow;

    public void setJComboBox(JComboBox choice) {
        this.choice = choice;
    }

    public void setJTextArea(JTextArea textShow) {
        this.textShow = textShow;

    }

    @Override
    public void itemStateChanged(ItemEvent e) {
        textShow.setText(null);
        try {
            String fileName = choice.getSelectedItem().toString(); // 获取下拉列表名称
            File file = new File(fileName);
            FileReader inOne = new FileReader(file);
            BufferedReader inTwo = new BufferedReader(inOne); // 专门用来逐行读取
            String s = null;
            while ((s = inTwo.readLine()) != null) { //逐行读出
                textShow.append(s + "\n"); // 依次添加到textShow中
            }
            inOne.close();
            inTwo.close();
        } catch (Exception e2) {
            textShow.append(e2.toString());
        }
    }
}
- 1
- 2
- 3
- 4
- 5
- 6
- 7
- 8
- 9
- 10
- 11
- 12
- 13
- 14
- 15
- 16
- 17
- 18
- 19
- 20
- 21
- 22
- 23
- 24
- 25
- 26
- 27
- 28
- 29
- 30
- 31
- 32
- 33
- 34
- 35
- 36
- 37
- 38
- 39
- 40
- 41
- 42
- 43
- 44
- 45
- 46
- 47
- 48
- 49
- 50
- 51
- 52
- 53
- 54
- 55
- 56
- 57
- 58
- 59
- 60
- 61
- 62
- 63
- 64
- 65
- 66
- 67
- 68
- 69
- 70
- 71
- 72
- 73
- 74
- 75
- 76
- 77
- 78
- 79
- 80
- 81
- 82
- 83
- 84
- 85
- 86
- 87
- 88
- 89
- 90
- 91
- 92
- 93
- 94
- 95
- 96
- 97
- 98
- 99
- 100
- 101
- 102
- 103
4.4 DocumentEvent 事件
DocumentEvent 事件源
文本区 (JTextArea)含有一个实现 Document 接口的示例,该实例被称作文本区所维护的文档,文本区调用 getDocument 方法返回所维护的文档。文本区的文档能触发 DocumentEvent 事件。注册监视器
事件源使用 addDocumentListener (DocumentListener listen),将实现 DocumentListener 接口的类的实例注册为事件源的监视器。DocumentListener 接口
在 java.swing.event 包中,该接口有三个方法:
public void removeUpdate(DocumentEvent e)
public void insertUpdate(DocumentEvent e)
public void changedUpdate(DocumentEvent e)
- 1
- 2
- 3
- 1
- 2
- 3
示例-文本区
有两个文本区。当用户在一个文本区输入若干字符串时(用逗号、空格或回车符作为单词间的分隔符),另一个文本区同时对用户输入的英文单词按字典集排序。
效果图:
Main.java
public class {
   public static void main(String args[]) {
      WindowDocument win=new WindowDocument();
      win.setBounds(10,10,360,260);
      win.setTitle("处理DocumentEvent事件");
   }
}
- 1
- 2
- 3
- 4
- 5
- 6
- 7
- 1
- 2
- 3
- 4
- 5
- 6
- 7
WindowDocument.java
import java.awt.FlowLayout;

import javax.swing.JFrame;
import javax.swing.JScrollPane;
import javax.swing.JTextArea;
public class WindowDocument extends JFrame {
   JTextArea inputText,showText; //一个用于输入,一个用于输出
   PoliceListen listen;
   WindowDocument() {
      init();
      setLayout(new FlowLayout());
      setVisible(true);
      setDefaultCloseOperation(JFrame.EXIT_ON_CLOSE);
   }
   void init() {
      inputText = new JTextArea(9,10);
      showText = new JTextArea(9,10);
      add(new JScrollPane(inputText));
      add(new JScrollPane(showText));
      listen = new PoliceListen();
      listen.setInputText(inputText);
      listen.setShowText(showText);
      (inputText.getDocument()).addDocumentListener(listen);//向文档注册监视器
   }
}
- 1
- 2
- 3
- 4
- 5
- 6
- 7
- 8
- 9
- 10
- 11
- 12
- 13
- 14
- 15
- 16
- 17
- 18
- 19
- 20
- 21
- 22
- 23
- 24
- 25
- 1
- 2
- 3
- 4
- 5
- 6
- 7
- 8
- 9
- 10
- 11
- 12
- 13
- 14
- 15
- 16
- 17
- 18
- 19
- 20
- 21
- 22
- 23
- 24
- 25
PoliceListenjava
import javax.swing.event.*;
import javax.swing.*;
import java.util.*;

public class PoliceListen implements DocumentListener {
    JTextArea inputText, showText;

    public void setInputText(JTextArea text) {
        inputText = text;
    }

    public void setShowText(JTextArea text) {
        showText = text;
    }

    public void removeUpdate(DocumentEvent e) {
        changedUpdate(e);
    }

    public void insertUpdate(DocumentEvent e) {
        changedUpdate(e);
    }

    public void changedUpdate(DocumentEvent e) {
        String str = inputText.getText();
        // 空格、数字和符号(!"#$%&'()*+,-./:;<=>?@[\]^_`{|}~)组成的正则表达式:
        String regex = "[\\s\\d\\p{Punct}]+";
        String words[] = str.split(regex);
        Arrays.sort(words); // 按字典序从小到大排序
        showText.setText(null);
        for (String s : words)
            showText.append(s + ",");
    }
}
- 1
- 2
- 3
- 4
- 5
- 6
- 7
- 8
- 9
- 10
- 11
- 12
- 13
- 14
- 15
- 16
- 17
- 18
- 19
- 20
- 21
- 22
- 23
- 24
- 25
- 26
- 27
- 28
- 29
- 30
- 31
- 32
- 33
- 34
- 35
- 1
- 2
- 3
- 4
- 5
- 6
- 7
- 8
- 9
- 10
- 11
- 12
- 13
- 14
- 15
- 16
- 17
- 18
- 19
- 20
- 21
- 22
- 23
- 24
- 25
- 26
- 27
- 28
- 29
- 30
- 31
- 32
- 33
- 34
- 35
4.5 MouseEvent 事件
事件源
任何组价上都可以发生鼠标事件,如鼠标进入组件,退出组件,在组件上方单击按钮,拖到按钮等都会触发鼠标事件,即导致 MouseEvent 类自动创建一个事件对象。
使用 MouseListener 接口处理鼠标事件
鼠标事件
MouseListener 接口可以处理的5种鼠标事件
- 在事件源上按下鼠标键
- 释放事件源上的鼠标键
- 在事件源上点击鼠标键
- 鼠标进入事件源
- 鼠标退出事件源
MouseEvent 方法
int getX()  获取鼠标指针在事件源坐标系中的 X-坐标
int getY()  获取鼠标指针在事件源坐标系中的 Y-坐标

int getButton() 返回更改了状态的鼠标按键(如果有)。

int getClickCount() 返回与此事件关联的鼠标单击次数。

Point getPoint()    返回事件相对于源组件的 x, y 坐标。

Object getSource()  获取发生鼠标事件的事件源

String getMouseModifiersText(int modifiers) 返回一个描述事件期间所按下的修改键和鼠标按键(如“Shift”或“Ctrl+Shift”)的 String。
- 1
- 2
- 3
- 4
- 5
- 6
- 7
- 8
- 9
- 10
- 11
- 12
- 1
- 2
- 3
- 4
- 5
- 6
- 7
- 8
- 9
- 10
- 11
- 12
注册 MouseEvent 事件源
public void mousePressed(MouseEvent e)   处理组件上按下鼠标按钮事件
public void mouseReleased(MouseEvent e)  处理释放组件上的鼠标按钮事件
public void mouseEntered(MouseEvent e)   处理鼠标进入组件的事件
public void mouseExited(MouseEvent e)    处理在鼠标退出组件被调用事件
public void mouseClicked(MouseEvent e)   处理在源组件上点击鼠标按钮事件
- 1
- 2
- 3
- 4
- 5
- 1
- 2
- 3
- 4
- 5
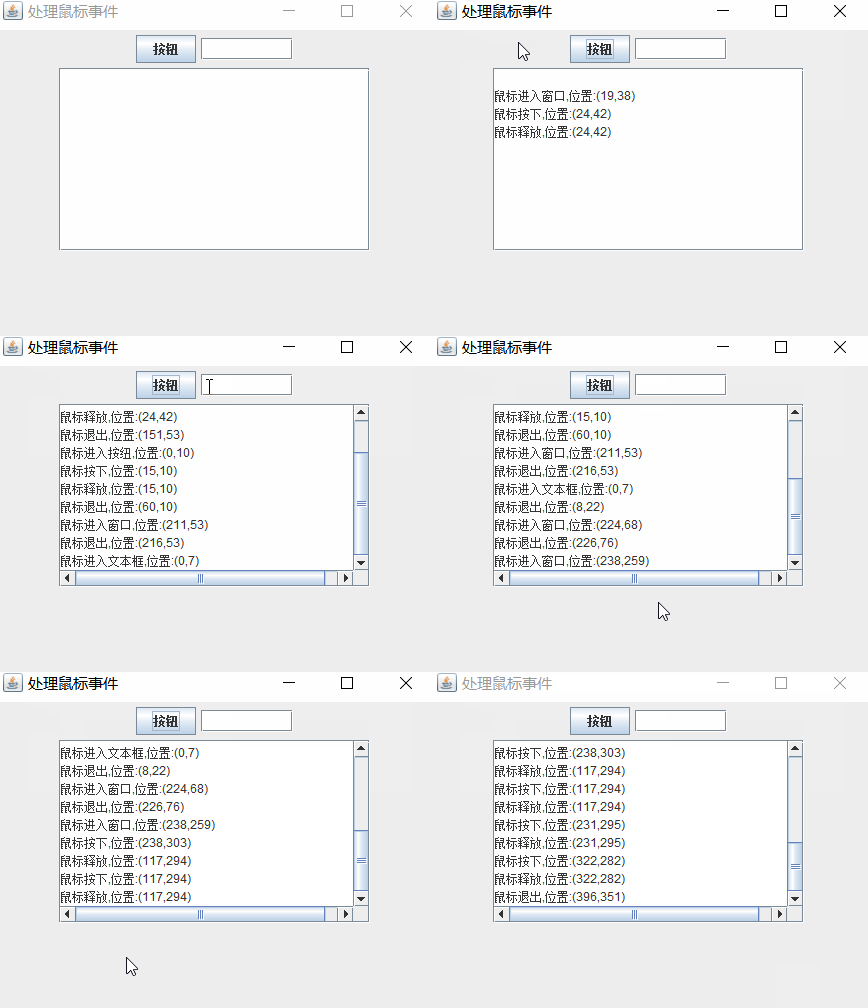
示例-使用 MouseListener 接口处理鼠标事件
分别监视按钮 、文本框、和窗口上的按钮事件,当发生鼠标事件时,获取鼠标指针的坐标值,注意,事件源的坐标系上的左上角是原点。
软件效果:
Main.java
public class Main {
   public static void main(String args[]) {
      WindowMouse win=new WindowMouse();
      win.setTitle("处理鼠标事件");
      win.setBounds(100,100,460,360);
   }
}
- 1
- 2
- 3
- 4
- 5
- 6
- 7
- 8
- 1
- 2
- 3
- 4
- 5
- 6
- 7
- 8
WindowMouse.java
import java.awt.*;
import javax.swing.*;
public class WindowMouse extends JFrame {
   JTextField text;
   JButton button;
   JTextArea textArea;
   MousePolice police;
   WindowMouse() {
      init();
      setBounds(100,100,420,220);
      setVisible(true);
      setDefaultCloseOperation(JFrame.EXIT_ON_CLOSE);
   }
   void init() {
      setLayout(new FlowLayout());
      text=new JTextField(8);
      textArea=new JTextArea(10,28);
      police=new MousePolice();
      police.setJTextArea(textArea);
      text.addMouseListener(police);
      button=new JButton("按钮");
      button.addMouseListener(police);
      addMouseListener(police);
      add(button);
      add(text);
      add(new JScrollPane(textArea));
   }
}
- 1
- 2
- 3
- 4
- 5
- 6
- 7
- 8
- 9
- 10
- 11
- 12
- 13
- 14
- 15
- 16
- 17
- 18
- 19
- 20
- 21
- 22
- 23
- 24
- 25
- 26
- 27
- 28
- 29
- 1
- 2
- 3
- 4
- 5
- 6
- 7
- 8
- 9
- 10
- 11
- 12
- 13
- 14
- 15
- 16
- 17
- 18
- 19
- 20
- 21
- 22
- 23
- 24
- 25
- 26
- 27
- 28
- 29
MousePolice.java
import java.awt.event.*;
import javax.swing.*;
public class MousePolice implements MouseListener {
   JTextArea area;
   public void setJTextArea(JTextArea area) {
      this.area=area;
   }
   public void mousePressed(MouseEvent e) {
      area.append("\n鼠标按下,位置:"+"("+e.getX()+","+e.getY()+")");
   }
   public void mouseReleased(MouseEvent e) {
      area.append("\n鼠标释放,位置:"+"("+e.getX()+","+e.getY()+")");
   }
   public void mouseEntered(MouseEvent e)  {
      if(e.getSource() instanceof JButton) // 得到的事件源是JButton的对象时,返回true
        area.append("\n鼠标进入按纽,位置:"+"("+e.getX()+","+e.getY()+")");
      if(e.getSource() instanceof JTextField)
        area.append("\n鼠标进入文本框,位置:"+"("+e.getX()+","+e.getY()+")");
      if(e.getSource() instanceof JFrame)
        area.append("\n鼠标进入窗口,位置:"+"("+e.getX()+","+e.getY()+")");
   }
   public void mouseExited(MouseEvent e) {
      area.append("\n鼠标退出,位置:"+"("+e.getX()+","+e.getY()+")");
   }
   public void mouseClicked(MouseEvent e) {
      if(e.getClickCount()>=2)
         area.setText("鼠标连击,位置:"+"("+e.getX()+","+e.getY()+")");
   }
}
- 1
- 2
- 3
- 4
- 5
- 6
- 7
- 8
- 9
- 10
- 11
- 12
- 13
- 14
- 15
- 16
- 17
- 18
- 19
- 20
- 21
- 22
- 23
- 24
- 25
- 26
- 27
- 28
- 29
- 1
- 2
- 3
- 4
- 5
- 6
- 7
- 8
- 9
- 10
- 11
- 12
- 13
- 14
- 15
- 16
- 17
- 18
- 19
- 20
- 21
- 22
- 23
- 24
- 25
- 26
- 27
- 28
- 29
使用 MouseMotionListener 接口处理鼠标事件
使用 MouseMotionListener 接口可以处理以下两种操作触发的鼠标事件。
- 在事件源上拖动鼠标
- 在事件源上移动鼠标
事件源注册监视器的方法 addMouseMotionListener (MotionListener listen)
MouseMotionListener 接口的方法:
mouseDragged ( MouseEvent )  处理了负责拖动鼠标触发的事件。即当拖动鼠标是(不必再事件源上),监视器调用接口中的这个方法对事件作出处理。

mouseMoved ( MouseEvent ) 负责处理移动鼠标触发的事件。即当事件源上移动鼠标时,监视器调用接口中的这个方法对事件作出处理。
- 1
- 2
- 3
- 1
- 2
- 3
可以使用坐标变换来实现组件的拖动。当鼠标拖动组件时,可以先获取鼠标指针在组件坐标系中的实时坐标x,y,以及组件的左上角在容器坐标系中的坐标a,b;如果在拖动组件时,想让鼠标指针相对于拖动的组件保持静止,那么组件左上角在容器作弊作息中的位置应当是a+x-x0, b+y-y0,其中x0,y0是最初在组件上按下鼠标时,鼠标指针在组建坐标系中的初始位置。
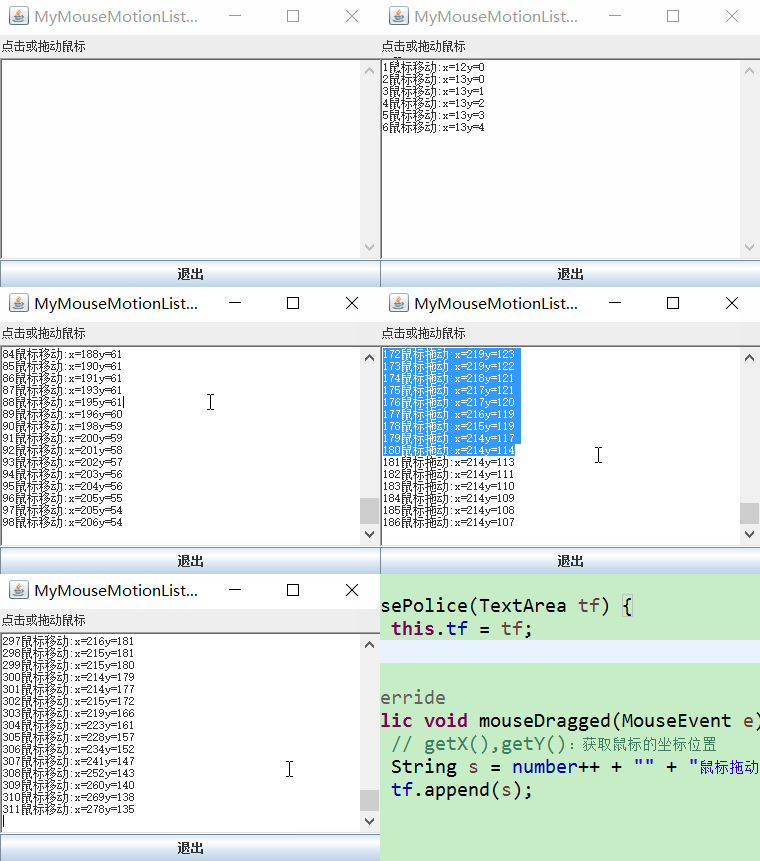
示例- 使用 MouseMotionListener 接口处理鼠标事件
当鼠标移动或拖动时,给出提示并显示鼠标所在位置的坐标。
MyMouseMotionListener.java
import java.awt.BorderLayout;
import java.awt.Label;
import java.awt.TextArea;
import java.awt.event.ActionEvent;
import java.awt.event.ActionListener;

import javax.swing.JButton;
import javax.swing.JFrame;

public class MyMouseMotionListener {

    JFrame myframe; // JFrame通常默认使用BorderLayout布局管理器的
    TextArea tf; // 文本区
    MousePolice mousepolice; // 实现监视器接口的类
    JButton exitButton; // 按钮

    public MyMouseMotionListener() {
        Label label = new Label("点击或拖动鼠标"); // 初始化标签
        myframe = new JFrame("MyMouseMotionListener"); // 创建标题为MyMouseMotionListener的窗口
        tf = new TextArea(); // 初始化文本区
        exitButton = new JButton("退出"); // 初始化退出按钮
        mousepolice = new MousePolice(tf); // 利用构造方法把 TextArea传递到监视器
        tf.addMouseMotionListener(mousepolice); // 注册监视器

        exitButton.addActionListener(new ActionListener() { // 按钮的监听事件 匿名内部类方式

            @Override
            public void actionPerformed(ActionEvent e) {
                System.exit(0); // 正常退出
            }
        });

        myframe.add(label, BorderLayout.NORTH); // 添加标签 位置为北
        myframe.add(tf, BorderLayout.CENTER); // 添加文本 在中部
        myframe.add(exitButton, BorderLayout.SOUTH); // 设置退出按钮 在南
        myframe.setSize(400, 300); // 设置窗口大小
        // myframe.setBounds(x, y, 400, 300); 这个方法可以设置窗口在显示屏幕的位置 x,y
        myframe.setVisible(true); // 窗口可视

    }

    public static void main(String[] args) {
        new MyMouseMotionListener();
    }
}
- 1
- 2
- 3
- 4
- 5
- 6
- 7
- 8
- 9
- 10
- 11
- 12
- 13
- 14
- 15
- 16
- 17
- 18
- 19
- 20
- 21
- 22
- 23
- 24
- 25
- 26
- 27
- 28
- 29
- 30
- 31
- 32
- 33
- 34
- 35
- 36
- 37
- 38
- 39
- 40
- 41
- 42
- 43
- 44
- 45
- 1
- 2
- 3
- 4
- 5
- 6
- 7
- 8
- 9
- 10
- 11
- 12
- 13
- 14
- 15
- 16
- 17
- 18
- 19
- 20
- 21
- 22
- 23
- 24
- 25
- 26
- 27
- 28
- 29
- 30
- 31
- 32
- 33
- 34
- 35
- 36
- 37
- 38
- 39
- 40
- 41
- 42
- 43
- 44
- 45
MousePolice.java
import java.awt.TextArea;
import java.awt.event.MouseEvent;
import java.awt.event.MouseMotionListener;

public class MousePolice implements MouseMotionListener {
    int number = 1;
    TextArea tf;

    MousePolice(TextArea tf) {
        this.tf = tf;
    }

    @Override
    public void mouseDragged(MouseEvent e) {
        // getX(),getY():获取鼠标的坐标位置
        String s = number++ + "" + "鼠标拖动:x=" + e.getX() + "y=" + e.getY() + "\n";
        tf.append(s);

    }

    @Override
    public void mouseMoved(MouseEvent e) {
        String s = number++ + "" + "鼠标移动:x=" + e.getX() + "y=" + e.getY() + "\n";
        tf.append(s);

    }
}
- 1
- 2
- 3
- 4
- 5
- 6
- 7
- 8
- 9
- 10
- 11
- 12
- 13
- 14
- 15
- 16
- 17
- 18
- 19
- 20
- 21
- 22
- 23
- 24
- 25
- 26
- 27
- 1
- 2
- 3
- 4
- 5
- 6
- 7
- 8
- 9
- 10
- 11
- 12
- 13
- 14
- 15
- 16
- 17
- 18
- 19
- 20
- 21
- 22
- 23
- 24
- 25
- 26
- 27
4.6 焦点事件
组件可以触发焦点事件。使用 addFocusListener( FocusListener listen) 注册焦点事件。
创建监视器的类必须要实现 FocusListener 接口,该接口有两个方法:
public void focusGained(FocusEvent e) 组件从无输入焦点变成有输入的的焦点时调用

public void focusLost (FocusEvent e) 组件从有输入焦点变成无输入的的焦点时调用
- 1
- 2
- 3
- 1
- 2
- 3
一个组件可以调用:
public boolean requestFocusInWindow()
- 1
- 1
获得输入焦点
4.7 键盘事件
当按下、释放和敲击键盘上一个键时就触发了键盘事件。当一个组件处于激活状态时,敲击键盘上一个键就导致这个组件触发键盘事件。
使用 KeyListener 接口处理键盘事件,该接口的三个方法:
void keyPressed(KeyEvent e)   按下某个键时调用此方法。
void keyReleased(KeyEvent e)  释放某个键时调用此方法。
void keyTyped(KeyEvent e)     键入某个键时调用此方法。
- 1
- 2
- 3
- 1
- 2
- 3
当一个组件使用 addKeyListener 方法注册监视器后,当该组件处于激活状态时,按下这个键,就会触发 KeyEvent 事件。
用 KeyEvent 类的 public int getKeyCode(),可以判断哪个键被按下、敲击或释放,getKeyCode()返回一个键码表。也可以用 public char getKeyChar判断哪个键被按下、敲击和释放,返回的是键上的字符。
键码表
| 键码 | 键 |
|---|---|
| VK_F1-VK_F12 | 功能键 F1-F12 |
| VK_0-VK_9 | 0~9 数字键 |
| VK_A-VK_Z | a~z 键 |
| VK_KP_DOWN | 用于数字键盘向下方向键的常量 |
| VK_KP_LEFT | 用于数字键盘向左方向键的常量 |
| VK_KP_RIGHT | 用于数字键盘向右方向键的常量 |
| VK_KP_UP | 用于数字键盘向上方向键的常量 |
更多键码
示例-文本框的键盘事件
在文本框输入序列号,当数字达到设定个数时,光标移动到下个文本框。
Winows.java
import java.awt.*;
import javax.swing.*;

class Winows extends JFrame {
    JTextField text[] = new JTextField[3]; // 3个文本框
    Police police;
    JButton b;

    Winows() {
        setLayout(new FlowLayout());
        police = new Police(); // 初始化监视器
        for (int i = 0; i < 3; i++) {
            text[i] = new JTextField(7); // 文本框显示的长度
            text[i].addKeyListener(police); // 监视键盘事件
            text[i].addFocusListener(police);
            add(text[i]);
        }
        b = new JButton("确定");
        add(b);
        text[0].requestFocusInWindow(); // 第一个文本框获得焦点,光标处于第一个文本框
        setVisible(true);
        setDefaultCloseOperation(JFrame.EXIT_ON_CLOSE);
    }

}

public class Win {
    public static void main(String args[]) {
        Winows win = new Winows();
        win.setTitle("输入序列号");
        win.setBounds(10, 10, 460, 160);
    }
}
- 1
- 2
- 3
- 4
- 5
- 6
- 7
- 8
- 9
- 10
- 11
- 12
- 13
- 14
- 15
- 16
- 17
- 18
- 19
- 20
- 21
- 22
- 23
- 24
- 25
- 26
- 27
- 28
- 29
- 30
- 31
- 32
- 33
- 1
- 2
- 3
- 4
- 5
- 6
- 7
- 8
- 9
- 10
- 11
- 12
- 13
- 14
- 15
- 16
- 17
- 18
- 19
- 20
- 21
- 22
- 23
- 24
- 25
- 26
- 27
- 28
- 29
- 30
- 31
- 32
- 33
Police.java
import java.awt.event.*;
import javax.swing.*;

public class Police implements KeyListener, FocusListener {

    public void keyPressed(KeyEvent e) {
        JTextField t = (JTextField) e.getSource(); // 获取事件源
        if (t.getCaretPosition() >= 5) // 光标的位置(>0)大于5则焦点移动到下一个文本框(可以输入6个数字)
            t.transferFocus(); //失去当前焦点  transferFocus(false);
    }

    public void keyTyped(KeyEvent e) {
    }

    public void keyReleased(KeyEvent e) {
    }

    public void focusGained(FocusEvent e) {
        JTextField text = (JTextField) e.getSource();
        text.setText(null);
    }

    public void focusLost(FocusEvent e) {
    }
}
- 1
- 2
- 3
- 4
- 5
- 6
- 7
- 8
- 9
- 10
- 11
- 12
- 13
- 14
- 15
- 16
- 17
- 18
- 19
- 20
- 21
- 22
- 23
- 24
- 25
- 26
- 1
- 2
- 3
- 4
- 5
- 6
- 7
- 8
- 9
- 10
- 11
- 12
- 13
- 14
- 15
- 16
- 17
- 18
- 19
- 20
- 21
- 22
- 23
- 24
- 25
- 26
4.8 匿名类实体或窗口做监视器
匿名类的使用比较容易操作事件源所在的外部类的成员,不必把监视器需要处理的对象的引用传递给监视器。但是处理比较复杂的时,使用内部类或匿名类会让系统缺乏弹性,以为每次修改内部类的代码都会导致整个外部类同时被编译,反之也是。
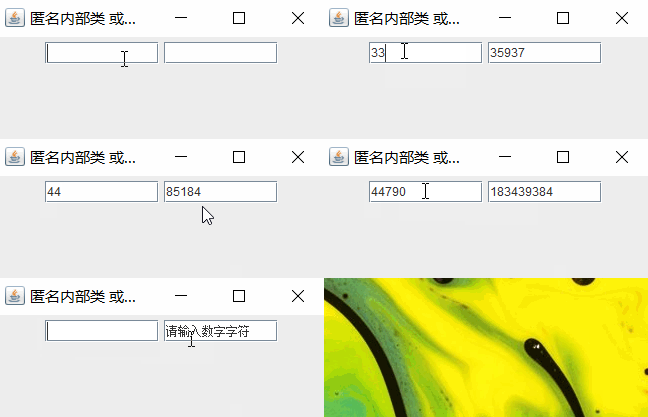
示例-使用匿名类实体或窗口做监视器
窗口有两个文本框: text1 和 text2,当前窗口作为text1 的监视器,用户在 text1输入一个整数,当前窗口的 text2 中显示该数的平方根(没有作超出范围的异常处理),另外,一个匿名类的实例也注册为了 text1 的监视器,当在text1中输入 Exit 时,程序立即退出。
效果图:
Main.java
public class Main {
   public static void main(String args[]) {
      WindowPolice win = new WindowPolice();
      win.setTitle("匿名内部类 或窗口做监视器");
      win.setBounds(100, 100, 350, 150);
   }
}
- 1
- 2
- 3
- 4
- 5
- 6
- 7
- 8
- 9
- 1
- 2
- 3
- 4
- 5
- 6
- 7
- 8
- 9
WindowPolice.java
import java.awt.FlowLayout;
import java.awt.event.ActionEvent;
import java.awt.event.ActionListener;

import javax.swing.JFrame;
import javax.swing.JTextField;

public class WindowPolice extends JFrame implements ActionListener {
    JTextField text1, text2; // 两个文本框

    public WindowPolice() {
        init();
        setVisible(true);
        setDefaultCloseOperation(JFrame.EXIT_ON_CLOSE);
    }

    void init() {
        setLayout(new FlowLayout());
        text1 = new JTextField(10);
        text2 = new JTextField(10);
        text1.addActionListener(this); // WindowPolice类的实例(当前窗口)做监视器
        add(text1);
        add(text2);
        text1.addActionListener(new ActionListener() { // 匿名类实例做监视器
            public void actionPerformed(ActionEvent e) {
                String str = text1.getText();
                if (str.equalsIgnoreCase("Exit"))
                    System.exit(0);
            }
        });
    }

    public void actionPerformed(ActionEvent e) { // 重写接口中的方法
        String str = text1.getText();
        int n = 0, m = 0;
        try {
            n = Integer.parseInt(str); // 转化为 int 型数据
            m = n * n * n;
            text2.setText("" + m);
        } catch (Exception ee) {
            text2.setText("请输入数字字符");
            text1.setText(null);
        }
    }
}
- 1
- 2
- 3
- 4
- 5
- 6
- 7
- 8
- 9
- 10
- 11
- 12
- 13
- 14
- 15
- 16
- 17
- 18
- 19
- 20
- 21
- 22
- 23
- 24
- 25
- 26
- 27
- 28
- 29
- 30
- 31
- 32
- 33
- 34
- 35
- 36
- 37
- 38
- 39
- 40
- 41
- 42
- 43
- 44
- 45
- 46
- 1
- 2
- 3
- 4
- 5
- 6
- 7
- 8
- 9
- 10
- 11
- 12
- 13
- 14
- 15
- 16
- 17
- 18
- 19
- 20
- 21
- 22
- 23
- 24
- 25
- 26
- 27
- 28
- 29
- 30
- 31
- 32
- 33
- 34
- 35
- 36
- 37
- 38
- 39
- 40
- 41
- 42
- 43
- 44
- 45
- 46
4.9 事件总结
授权模式
Java事件处理是基于授权模式,即事件源调用方法将某个对象注册为自己的监视器。在安卓中的一个按钮的监听事件,也要 button.setOnClickListener(OnClickListener listener) 设置一个监听。
接口回调
Java语言使用接口回调技术来实现处理事件的过程。
addXXXListener(XXXListener listener)
- 1
- 1
方法中的参数是一个接口,listener 可以引用任何实现了该接口的类所创建的对象,当事件发生时,接口 listener 立刻回调被类实现的接口中的方法。
方法绑定
从方法绑定的角度看,Java将某种事件的处理绑定到对应的接口,即绑定到接口中的方法,也就是说,当事件源触发事件发生后,监视器准确知道去调用哪个方法。
保持松耦度
监视器和事件源应当保持一种松耦合关系,也就是说尽量让事件所在的类和监视器是组合关系,尽量不要让事件源所在类的实例以及它的子类的实例或内部类、匿名类的实例做监视器。
也就是说,当事件源触发事件发生后,系统知道某个方法会被执行,但无需关心到底是哪个对象去调用这个方法,因为任何实现接口的类的实例(作为监视器)都可以调用这个方法来处理事件。
其实这就是为了降低耦合度,使代码结构更清晰 更容易维护。
软件工程中对象之间的耦合度就是对象之间的依赖性。指导使用和维护对象的主要问题是对象之间的多重依赖性。对象之间的耦合越高,维护成本越高。因此对象的设计应使类和构件之间的耦合最小。
内聚与耦合
内聚标志一个模块内各个元素彼此结合的紧密程度,它是信息隐蔽和局部化概念的自然扩展。内聚是从功能角度来度量模块内的联系,一个好的内聚模块应当恰好做一件事。它描述的是模块内的功能联系。耦合是软件结构中各模块之间相互连接的一种度量,耦合强弱取决于模块间接口的复杂程度、进入或访问一个模块的点以及通过接口的数据。 程序讲究的是低耦合,高内聚。就是同一个模块内的各个元素之间要高度紧密,但是各个模块之间的相互依存度却要不那么紧密。[2]
内聚和耦合是密切相关的,同其他模块存在高耦合的模块意味着低内聚,而高内聚的模块意味着该模块同其他模块之间是低耦合。在进行软件设计时,应力争做到高内聚,低耦合。
5 使用MVC结构
MVC全名是Model View Controller,是模型(model)-视图(view)-控制器(controller)的缩写,一种软件设计典范,用一种业务逻辑、数据、界面显示分离的方法组织代码,将业务逻辑聚集到一个部件里面,在改进和个性化定制界面及用户交互的同时,不需要重新编写业务逻辑。MVC被独特的发展起来用于映射传统的输入、处理和输出功能在一个逻辑的图形化用户界面的结构中。
MVC是一种通过3个不同部分构造个软件或组件的理想方法。
- Model(模型) 用于存储数据的对象
- View(视图) 为模型提供数据显示的对象
- Controller(控制器) 处理用户的交互操作、对于用户的操作作出响应,让模型和试图进行必要的交互,即通过视图的修改、获取模型中的数据;当模型中的数据变化时,让视图更新显示。
从面向对象的角度看,MVC结构可以使程序更具有对象化特性,也更容易维护。在设计程序时,可以将某个对象看作“模型”,然后为“模型”提供恰当的显示组件,即“视图”。为了对用户的操作做出响应,可以使用某个组件做“控制器”,当发生组件事件时,通过“视图”修改或得到“模型”中维护着的数据,并让“视图”更新显示。
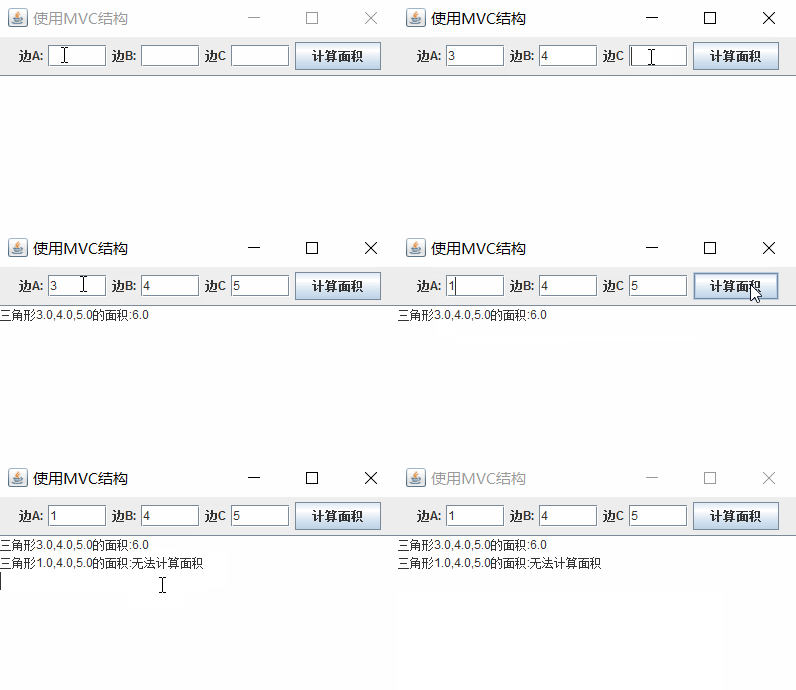
示例-三角形计算面积
编写一个封装三角形的类,然后编写一个窗口。要求窗口使用 3个文本框和一个文本区为三角形对象中的数据提供视图,其中3个文本框用来显示和更新三角形对象的3个边的长度;文本区对象用来显示三角形的面积,计算面积按钮就像一个控制器,点击出结果。
效果图:
Main.java
public class Main {
   public static void main(String args[]){
      WindowTriangle win=new WindowTriangle();
      win.setTitle("使用MVC结构");
      win.setBounds(100,100,420,260);
   }
}
- 1
- 2
- 3
- 4
- 5
- 6
- 7
- 8
- 9
- 10
- 1
- 2
- 3
- 4
- 5
- 6
- 7
- 8
- 9
- 10
Triangle.java
public class Triangle {
    double sideA, sideB, sideC, area;
    boolean isTriange = false;

    public String getArea() {
        if (isTriange) {
            double p = (sideA + sideB + sideC) / 2.0;
            area = Math.sqrt(p * (p - sideA) * (p - sideB) * (p - sideC)); // 海伦公式
            return String.valueOf(area); // Double.toString(area)
        } else {
            return "无法计算面积";
        }
    }

    public void setA(double a) {
        sideA = a;
        if (sideA + sideB > sideC && sideA + sideC > sideB && sideC + sideB > sideA)
            // 两边之和大于第三边 或 两边只差小于第三边 来判断是否是三角形
            isTriange = true;
        else
            isTriange = false;
    }

    public void setB(double b) {
        sideB = b;
        if (sideA + sideB > sideC && sideA + sideC > sideB && sideC + sideB > sideA)
            isTriange = true;
        else
            isTriange = false;
    }

    public void setC(double c) {
        sideC = c;
        if (sideA + sideB > sideC && sideA + sideC > sideB && sideC + sideB > sideA)
            isTriange = true;
        else
            isTriange = false;
    }
}
- 1
- 2
- 3
- 4
- 5
- 6
- 7
- 8
- 9
- 10
- 11
- 12
- 13
- 14
- 15
- 16
- 17
- 18
- 19
- 20
- 21
- 22
- 23
- 24
- 25
- 26
- 27
- 28
- 29
- 30
- 31
- 32
- 33
- 34
- 35
- 36
- 37
- 38
- 39
- 40
- 1
- 2
- 3
- 4
- 5
- 6
- 7
- 8
- 9
- 10
- 11
- 12
- 13
- 14
- 15
- 16
- 17
- 18
- 19
- 20
- 21
- 22
- 23
- 24
- 25
- 26
- 27
- 28
- 29
- 30
- 31
- 32
- 33
- 34
- 35
- 36
- 37
- 38
- 39
- 40
WindowTriangle.java
import java.awt.*;
import java.awt.event.*;
import javax.swing.*;

public class WindowTriangle extends JFrame implements ActionListener {
    Triangle triangle; // 数据对象
    JTextField textA, textB, textC; // 数据对象的视图
    JTextArea showArea; // 数据对象的视图
    JButton controlButton; // 控制器对象

    WindowTriangle() {
        init();
        setVisible(true);
        setDefaultCloseOperation(JFrame.EXIT_ON_CLOSE);
    }

    void init() {
        triangle = new Triangle();
        textA = new JTextField(5);
        textB = new JTextField(5);
        textC = new JTextField(5);
        showArea = new JTextArea();
        controlButton = new JButton("计算面积");
        JPanel pNorth = new JPanel();
        pNorth.add(new JLabel("边A:"));
        pNorth.add(textA);
        pNorth.add(new JLabel("边B:"));
        pNorth.add(textB);
        pNorth.add(new JLabel("边C"));
        pNorth.add(textC);
        pNorth.add(controlButton);
        controlButton.addActionListener(this); // 宽口作为监视器
        add(pNorth, BorderLayout.NORTH);
        add(new JScrollPane(showArea), BorderLayout.CENTER);
    }

    public void actionPerformed(ActionEvent e) {
        try {
            double a = Double.parseDouble(textA.getText().trim()); //
            double b = Double.parseDouble(textB.getText().trim());
            double c = Double.parseDouble(textC.getText().trim());
            triangle.setA(a); // 更新数据
            triangle.setB(b);
            triangle.setC(c);
            String area = triangle.getArea();
            showArea.append("三角形" + a + "," + b + "," + c + "的面积:");
            showArea.append(area + "\n"); // 更新视图
        } catch (Exception ex) {
            showArea.append("\n" + ex + "\n");
        }
    }
}
- 1
- 2
- 3
- 4
- 5
- 6
- 7
- 8
- 9
- 10
- 11
- 12
- 13
- 14
- 15
- 16
- 17
- 18
- 19
- 20
- 21
- 22
- 23
- 24
- 25
- 26
- 27
- 28
- 29
- 30
- 31
- 32
- 33
- 34
- 35
- 36
- 37
- 38
- 39
- 40
- 41
- 42
- 43
- 44
- 45
- 46
- 47
- 48
- 49
- 50
- 51
- 52
- 53
- 1
- 2
- 3
- 4
- 5
- 6
- 7
- 8
- 9
- 10
- 11
- 12
- 13
- 14
- 15
- 16
- 17
- 18
- 19
- 20
- 21
- 22
- 23
- 24
- 25
- 26
- 27
- 28
- 29
- 30
- 31
- 32
- 33
- 34
- 35
- 36
- 37
- 38
- 39
- 40
- 41
- 42
- 43
- 44
- 45
- 46
- 47
- 48
- 49
- 50
- 51
- 52
- 53
6 对话框
JDialog类和JFrame 都是 Window 的子类,二者的实例都是底层容器,但二者有相似之处也有不同的地方,主要区别是,JDialog 类创建的对话框必须依赖于某个窗口。
对话框分为无模式和有模式两种。当弹出有模式的对话框是时,只让程序响应对话框内部的事件,而且将堵塞其他线程的执行,用户不能再激活所在程序的其他窗口,直到该对话框消失。无模式对话框处于激活状态时,能再激活其他窗口但不堵塞其他线程的执行。
进行一个重要的操作之前,通过弹出一个有模式的对话框来表明操作的重要性。
6.1 消息对话框
消息对话框是有模式的对话框。创建一个消息对话框,可以使用 javax.swing 包中的方法 JOptionPane 类的静态方法:
public static void showMessageDialog(Component parentComponent,
        Object message, String title, int messageType)
- 1
- 2
- 1
- 2
parentComponent 指定对话框可见时的位置,输入组件,会在该组件的正前方显示出来如果为null,对话框会在屏幕的正前方显示出来
message 对话框显示的信息
title 对话框显示的标题
messageType 指定对话框的外观
- 1
- 2
- 3
- 4
- 1
- 2
- 3
- 4
messageType 的取值:
JOptionPane.ERROR_MESSAGE
JOptionPane.INFORMATION_MESSAGE
JOptionPane.WARNING_MESSAGE 显示一个 !号
JOptionPane.QUESTION_MESSAGE
JOptionPane.PLAIN_MESSAGE
- 1
- 2
- 3
- 4
- 5
- 1
- 2
- 3
- 4
- 5
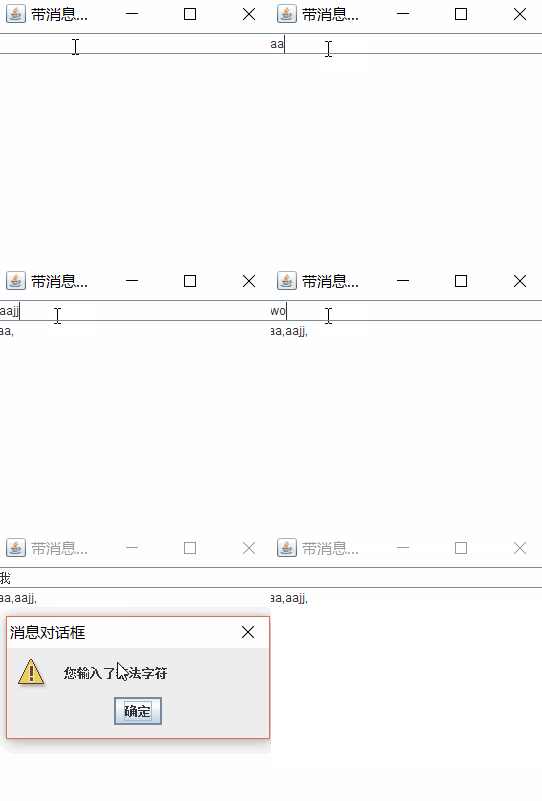
示例-消息对话框
要求用户在文本框中只能输入英文字母,当用户输入非英文字母时,弹出对话框。
效果图:
Main.java
public class Main {
   public static void main(String args[]) {
      WindowMess win=new WindowMess();
      win.setTitle("带消息对话框的窗口");
      win.setBounds(80,90,300,300);
   }
}
- 1
- 2
- 3
- 4
- 5
- 6
- 7
- 8
- 1
- 2
- 3
- 4
- 5
- 6
- 7
- 8
WindowMess.java
import java.awt.BorderLayout;
import java.awt.event.ActionEvent;
import java.awt.event.ActionListener;

import javax.swing.JFrame;
import javax.swing.JOptionPane;
import javax.swing.JTextArea;
import javax.swing.JTextField;

public class WindowMess extends JFrame implements ActionListener {
    JTextField inputEnglish;
    JTextArea show;
    String regex = "[a-zZ-Z]+";

    WindowMess() {
        inputEnglish = new JTextField(22);
        inputEnglish.addActionListener(this);
        show = new JTextArea();
        add(inputEnglish, BorderLayout.NORTH);
        add(show, BorderLayout.CENTER);
        setVisible(true);
        setDefaultCloseOperation(JFrame.EXIT_ON_CLOSE);
    }

    public void actionPerformed(ActionEvent e) {
        if (e.getSource() == inputEnglish) {
            String str = inputEnglish.getText();
            if (str.matches(regex)) {
                show.append(str + ",");
            } else { // 弹出“警告”消息对话框。
                JOptionPane.showMessageDialog(this, "您输入了非法字符", "消息对话框", JOptionPane.WARNING_MESSAGE);
                inputEnglish.setText(null);
            }
        }
    }
}
- 1
- 2
- 3
- 4
- 5
- 6
- 7
- 8
- 9
- 10
- 11
- 12
- 13
- 14
- 15
- 16
- 17
- 18
- 19
- 20
- 21
- 22
- 23
- 24
- 25
- 26
- 27
- 28
- 29
- 30
- 31
- 32
- 33
- 34
- 35
- 36
- 37
- 1
- 2
- 3
- 4
- 5
- 6
- 7
- 8
- 9
- 10
- 11
- 12
- 13
- 14
- 15
- 16
- 17
- 18
- 19
- 20
- 21
- 22
- 23
- 24
- 25
- 26
- 27
- 28
- 29
- 30
- 31
- 32
- 33
- 34
- 35
- 36
- 37
6.2 输入对话框
输入对话框含有供用户输入文本的文本框、一个确认按钮和一个取消按钮,是有模式的对话框。
public static String showInputDialog(Component parentComponent,
        Object message, String title, int messageType)throws HeadlessException
- 1
- 2
- 1
- 2
parentComponent 指定对话框可见时的位置,输入组件,会在该组件的正前方显示出来如果为null,对话框会在屏幕的正前方显示出来
message 对话框显示的信息
title 对话框显示的标题
messageType 指定对话框的外观
- 1
- 2
- 3
- 4
- 1
- 2
- 3
- 4
messageType 的取值:
JOptionPane.ERROR_MESSAGE
JOptionPane.INFORMATION_MESSAGE
JOptionPane.WARNING_MESSAGE 显示一个 !号
JOptionPane.QUESTION_MESSAGE
JOptionPane.PLAIN_MESSAGE
- 1
- 2
- 3
- 4
- 5
- 1
- 2
- 3
- 4
- 5
HeadlessException 当使用对显示设备,键盘,鼠标等的系统调用时,而本地的显示设备,键盘,鼠标等不支持调用就会出现该异常.
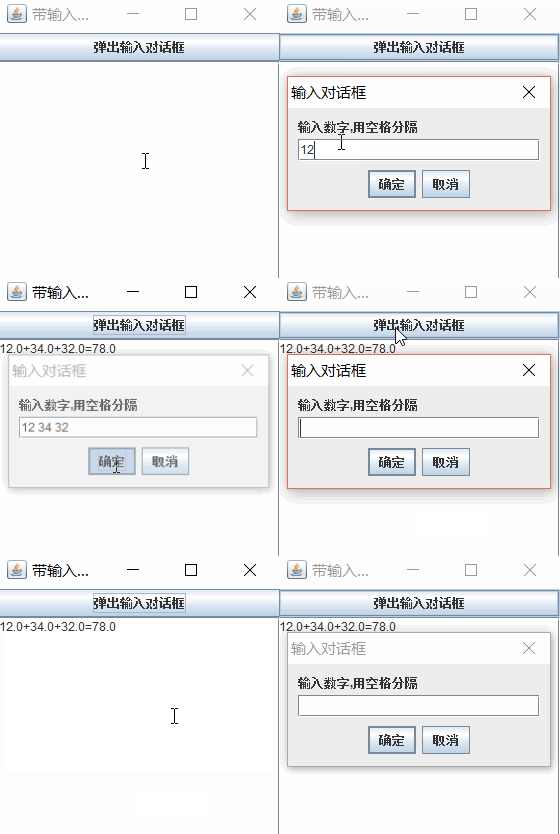
示例- 输入对话框
用户单击按钮弹出输入对话框,用户输入若干个数字后,按对话框上的确定按钮,程序将计算这些数字的和。
效果图:
Main.java
//package com.对话框.输入对话框;
public class Main {
   public static void main(String args[]) {
      WindowInput win=new WindowInput();
      win.setTitle("带输入对话框的窗口");
      win.setBounds(80,90,300,300);
   }
}
- 1
- 2
- 3
- 4
- 5
- 6
- 7
- 8
- 9
- 1
- 2
- 3
- 4
- 5
- 6
- 7
- 8
- 9
WindowInput.java
//package com.对话框.输入对话框;
import java.awt.BorderLayout;
import java.awt.event.ActionEvent;
import java.awt.event.ActionListener;
import java.util.InputMismatchException;
import java.util.Scanner;

import javax.swing.JButton;
import javax.swing.JFrame;
import javax.swing.JOptionPane;
import javax.swing.JScrollPane;
import javax.swing.JTextArea;

public class WindowInput extends JFrame implements ActionListener {
    JTextArea showResult; // 文本区
    JButton openInput; // 按钮

    WindowInput() {
        openInput = new JButton("弹出输入对话框");
        showResult = new JTextArea();
        add(openInput, BorderLayout.NORTH); // 按钮位置在上放
        add(new JScrollPane(showResult), BorderLayout.CENTER); // 滚动窗格 文本显示居中
        openInput.addActionListener(this); // 注册窗口为监视器
        setVisible(true);
        setDefaultCloseOperation(JFrame.EXIT_ON_CLOSE);
    }

    public void actionPerformed(ActionEvent e) {
        String str = JOptionPane.showInputDialog(this, "输入数字,用空格分隔", "输入对话框", JOptionPane.PLAIN_MESSAGE);
        if (str != null) {
            Scanner scanner = new Scanner(str); // 利用空格分割字符
            double sum = 0;
            int k = 0;
            while (scanner.hasNext()) {
                try {
                    double number = scanner.nextDouble();
                    if (k == 0)
                        showResult.append("" + number);
                    else
                        showResult.append("+" + number);
                    sum = sum + number;
                    k++;
                } catch (InputMismatchException exp) {
                    String t = scanner.next();
                }
            }
            showResult.append("=" + sum + "\n");
        }
    }
}
- 1
- 2
- 3
- 4
- 5
- 6
- 7
- 8
- 9
- 10
- 11
- 12
- 13
- 14
- 15
- 16
- 17
- 18
- 19
- 20
- 21
- 22
- 23
- 24
- 25
- 26
- 27
- 28
- 29
- 30
- 31
- 32
- 33
- 34
- 35
- 36
- 37
- 38
- 39
- 40
- 41
- 42
- 43
- 44
- 45
- 46
- 47
- 48
- 49
- 50
- 51
- 1
- 2
- 3
- 4
- 5
- 6
- 7
- 8
- 9
- 10
- 11
- 12
- 13
- 14
- 15
- 16
- 17
- 18
- 19
- 20
- 21
- 22
- 23
- 24
- 25
- 26
- 27
- 28
- 29
- 30
- 31
- 32
- 33
- 34
- 35
- 36
- 37
- 38
- 39
- 40
- 41
- 42
- 43
- 44
- 45
- 46
- 47
- 48
- 49
- 50
- 51
6.3 确认对话框
确认对话框是有模式对话框。可以使用 javax.swing 包中的方法 JOptionPane 类的静态方法创建。
public static int showConfirmDialog(Component parentComponent,
        Object message, String title, int optionType)
        throws HeadlessException
- 1
- 2
- 3
- 1
- 2
- 3
optionType的取值
    JOptionPane.DEFAULT_OPTION //“确定”按钮
    JOptionPane.YES_NO_OPTION // “是”、“否”按钮
    JOptionPane.YES_NO_CANCEL_OPTION //“是”、“否”、“取消”按钮
    JOptionPane.OK_CANCEL_OPTION //“确定”、“取消”按钮
- 1
- 2
- 3
- 4
- 1
- 2
- 3
- 4
当确认对话框消失后,showConfirmDialog 会返回下列整数之一:
    JOptionPane.YES_OPTION      点击 “是”
    JOptionPane.NO_OPTION       点击 “否”
    JOptionPane.CANCEL_OPTION   点击 “取消”
    JOptionPane.OK_OPTION       点击 “确认”
    JOptionPane.CLOSED_OPTION   点击对话框上的关闭按钮
- 1
- 2
- 3
- 4
- 5
- 6
- 1
- 2
- 3
- 4
- 5
- 6
示例- 确认对话框
用户在文本框中输入内容,确认后显示在文本区中,不确认不显示。
效果图:
Main.java
//package com.对话框.确认对话框;

public class Main {
   public static void main(String args[]) {
      WindowEnter win=new WindowEnter();
      win.setTitle("带确认对话框的窗口");
      win.setBounds(80,90,300,200);
   }
}
- 1
- 2
- 3
- 4
- 5
- 6
- 7
- 8
- 9
- 10
- 1
- 2
- 3
- 4
- 5
- 6
- 7
- 8
- 9
- 10
WindowEnter.java
//package com.对话框.确认对话框;

import java.awt.BorderLayout;
import java.awt.event.ActionEvent;
import java.awt.event.ActionListener;

import javax.swing.JFrame;
import javax.swing.JOptionPane;
import javax.swing.JScrollPane;
import javax.swing.JTextArea;
import javax.swing.JTextField;

public class WindowEnter extends JFrame implements ActionListener {
    JTextField inputName;
    JTextArea save;

    WindowEnter() {
        inputName = new JTextField(22);
        inputName.addActionListener(this);
        save = new JTextArea();
        add(inputName, BorderLayout.NORTH);
        add(new JScrollPane(save), BorderLayout.CENTER);
        setVisible(true);
        setDefaultCloseOperation(JFrame.EXIT_ON_CLOSE);
    }

    public void actionPerformed(ActionEvent e) {
        String s = inputName.getText();
        int n = JOptionPane.showConfirmDialog(this, "确认是否正确", "确认对话框", JOptionPane.YES_NO_OPTION);
        if (n == JOptionPane.YES_OPTION) {
            save.append("\n" + s);
        } else if (n == JOptionPane.NO_OPTION) {
            inputName.setText(null);
        }
    }
}
- 1
- 2
- 3
- 4
- 5
- 6
- 7
- 8
- 9
- 10
- 11
- 12
- 13
- 14
- 15
- 16
- 17
- 18
- 19
- 20
- 21
- 22
- 23
- 24
- 25
- 26
- 27
- 28
- 29
- 30
- 31
- 32
- 33
- 34
- 35
- 36
- 37
- 1
- 2
- 3
- 4
- 5
- 6
- 7
- 8
- 9
- 10
- 11
- 12
- 13
- 14
- 15
- 16
- 17
- 18
- 19
- 20
- 21
- 22
- 23
- 24
- 25
- 26
- 27
- 28
- 29
- 30
- 31
- 32
- 33
- 34
- 35
- 36
- 37
6.4 颜色对话框
颜色对话框是有模式的对话框。可以使用 javax.swing 包中的方法 JColorChooser 类的静态方法创建。
 public static Color showDialog(Component component,
        String title, Color initialColor) throws HeadlessException
- 1
- 2
- 1
- 2
parentComponent 指定对话框可见时的位置,输入组件,会在该组件的正前方显示出来如果为null,对话框会在屏幕的正前方显示出来
title 指定对话框的标题
initialColor 指定颜色对话框返回的初始颜色
- 1
- 2
- 3
- 1
- 2
- 3
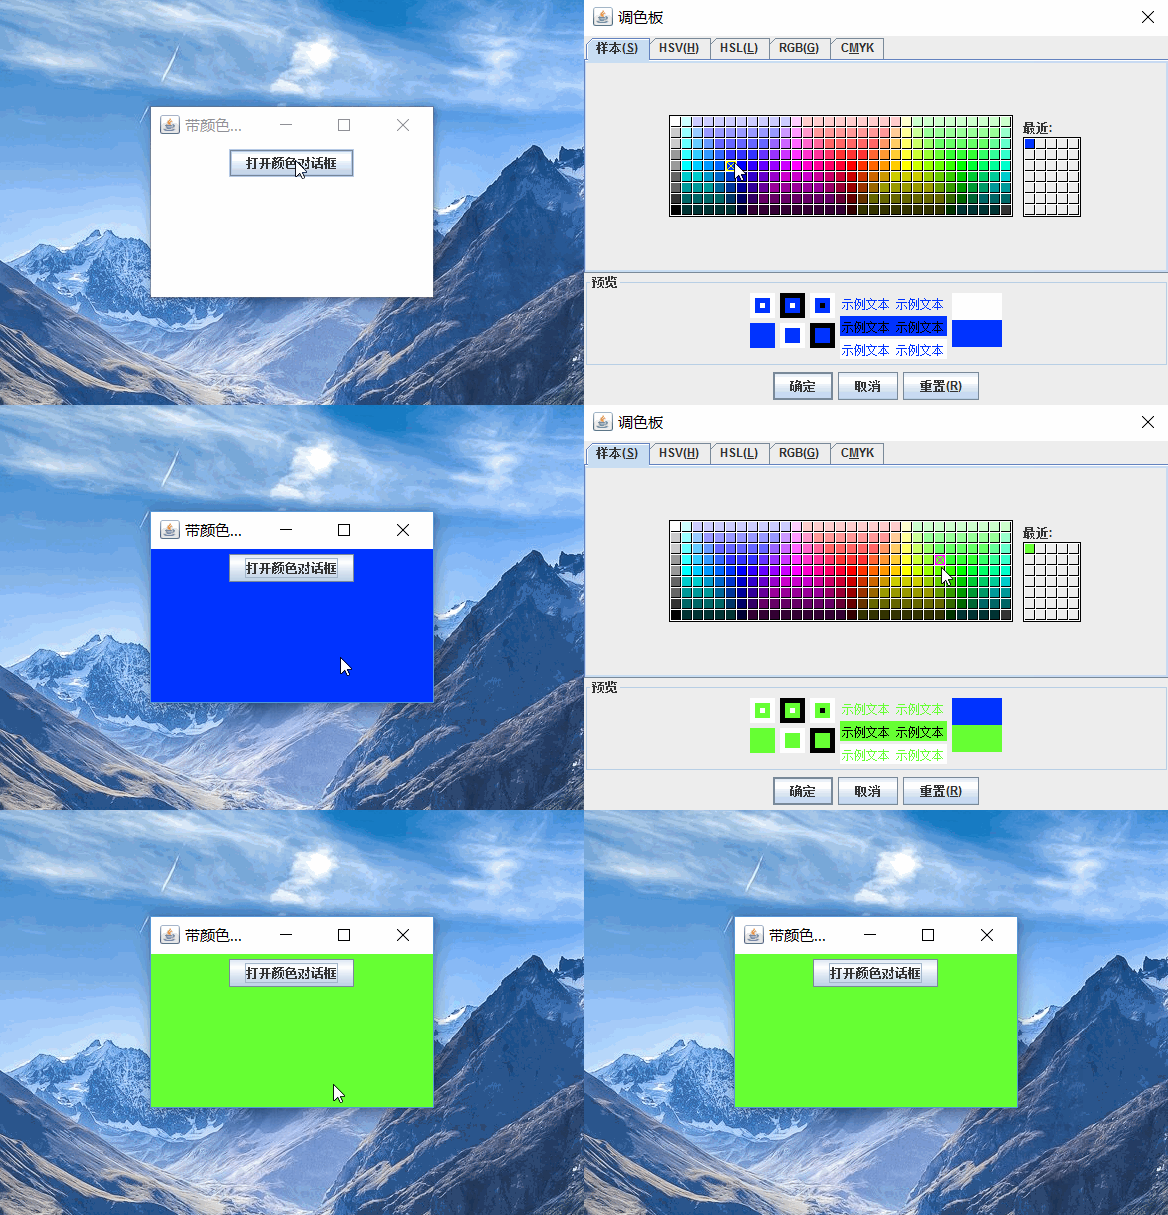
用户通过颜色对话框选择颜色后,如果单击“确定”按钮,那么颜色对话框消失,showDialog() 方法返回颜色对话框所选择的颜色,点击“取消”按钮,则返回null。
示例- 颜色对话框
用户单击按钮时,弹出颜色对话框,然后根据用户选中的颜色来改变窗口的颜色。
效果图:
Main.java
//package com.对话框.颜色对话框;

public class Main {
   public static void main(String args[]) {
      WindowColor win=new WindowColor();
      win.setTitle("带颜色对话框的窗口");
      win.setBounds(80,90,300,200);
   }
}
- 1
- 2
- 3
- 4
- 5
- 6
- 7
- 8
- 9
- 10
- 1
- 2
- 3
- 4
- 5
- 6
- 7
- 8
- 9
- 10
WindowColor.java
//package com.对话框.颜色对话框;

import java.awt.Color;
import java.awt.FlowLayout;
import java.awt.event.ActionEvent;
import java.awt.event.ActionListener;

import javax.swing.JButton;
import javax.swing.JColorChooser;
import javax.swing.JFrame;

public class WindowColor extends JFrame implements ActionListener {
    JButton button;

    WindowColor() {
        button = new JButton("打开颜色对话框");
        button.addActionListener(this);
        setLayout(new FlowLayout());
        add(button);
        setVisible(true);
        setDefaultCloseOperation(JFrame.EXIT_ON_CLOSE);
    }

    public void actionPerformed(ActionEvent e) {
        Color newColor = JColorChooser.showDialog(this, "调色板", getContentPane().getBackground());
        if (newColor != null) {
            getContentPane().setBackground(newColor);
        }
    }
}
- 1
- 2
- 3
- 4
- 5
- 6
- 7
- 8
- 9
- 10
- 11
- 12
- 13
- 14
- 15
- 16
- 17
- 18
- 19
- 20
- 21
- 22
- 23
- 24
- 25
- 26
- 27
- 28
- 29
- 30
- 31
- 1
- 2
- 3
- 4
- 5
- 6
- 7
- 8
- 9
- 10
- 11
- 12
- 13
- 14
- 15
- 16
- 17
- 18
- 19
- 20
- 21
- 22
- 23
- 24
- 25
- 26
- 27
- 28
- 29
- 30
- 31
6.5 文件对话框
文件对话框是一个从文件中选择文件的界面,是一个有模式的对话框。使用 javax.swing 包中的 JFileChooser 类创建文件对话框。
showSaveDialog (Component a) 保存文件界面
showSaveDialog (Component a) 打开文件界面
- 1
- 2
- 1
- 2
参数 a 指定对话框可见的位,当 a 为null时,文件对话框的出现在屏幕的中央;如果组件 a 不为空,文件对话框在 a 的正前方居中显示。
用户单击文件对话框上的“确定”,“取消”,文件对话框消失, showSaveDialog ()方法 和showSaveDialog()方法返回下列常量之一:
JFileChooser.APPROVE_OPTION
JFileChooser.CANCEL_OPTION
- 1
- 2
- 1
- 2
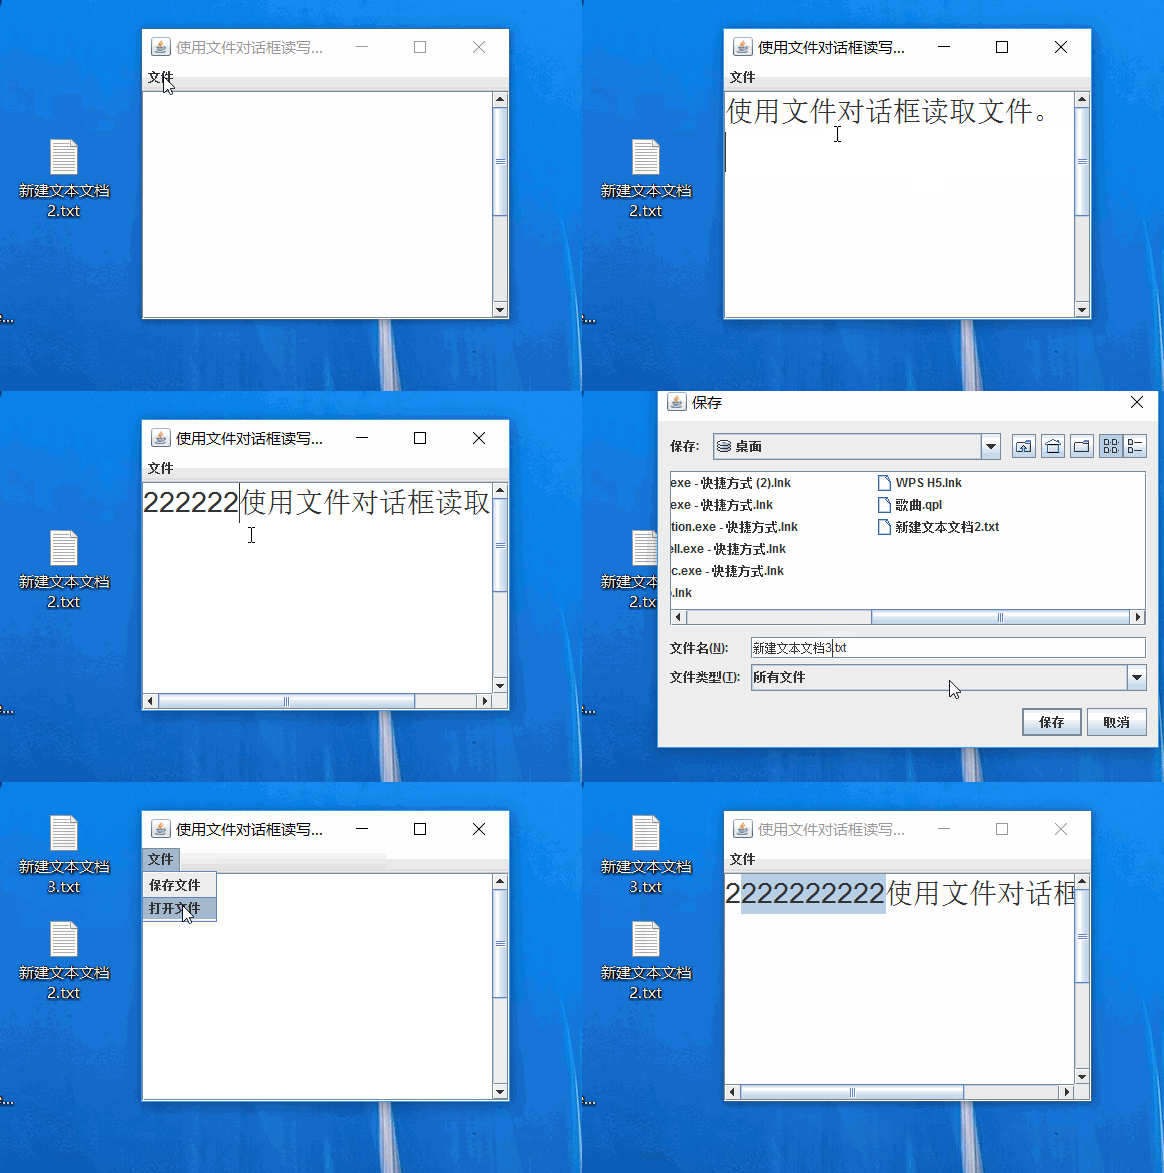
示例-文件对话框
使用文本对话框打开或保存文件。
效果图:
Main.jva
//package com.对话框.文本对话框;
public class Main {
    public static void main(String args[]) {
        WindowReader win = new WindowReader();
        win.setTitle("使用文件对话框读写文件");
        win.setBounds(80, 90, 300, 300);
    }
}
- 1
- 2
- 3
- 4
- 5
- 6
- 7
- 8
- 9
- 1
- 2
- 3
- 4
- 5
- 6
- 7
- 8
- 9
WindowReader.java
//package com.对话框.文本对话框;
import java.awt.BorderLayout;
import java.awt.Font;
import java.awt.event.ActionEvent;
import java.awt.event.ActionListener;
import java.io.BufferedReader;
import java.io.BufferedWriter;
import java.io.File;
import java.io.FileReader;
import java.io.FileWriter;
import java.io.IOException;

import javax.swing.JFileChooser;
import javax.swing.JFrame;
import javax.swing.JMenu;
import javax.swing.JMenuBar;
import javax.swing.JMenuItem;
import javax.swing.JScrollPane;
import javax.swing.JTextArea;

public class WindowReader extends JFrame implements ActionListener {
    JFileChooser fileDialog; // 文件对话框
    JMenuBar menubar; // 菜单条
    JMenu menu; // 菜单
    JMenuItem itemSave, itemOpen; // 菜单项
    JTextArea text; // 文本区
    BufferedReader in; // 缓冲读取流
    FileReader fileReader; // 文件读取流
    BufferedWriter out; // 缓冲写入流
    FileWriter fileWriter; // 文件写入流

    WindowReader() {
        init();
        setSize(300, 400);
        setVisible(true);
        setDefaultCloseOperation(JFrame.EXIT_ON_CLOSE);
    }

    void init() {
        text = new JTextArea(10, 10);
        text.setFont(new Font("楷体_gb2312", Font.PLAIN, 28));
        add(new JScrollPane(text), BorderLayout.CENTER);

        menubar = new JMenuBar();
        menu = new JMenu("文件");
        itemSave = new JMenuItem("保存文件");// 初始化菜单项
        itemOpen = new JMenuItem("打开文件");

        itemSave.addActionListener(this); // 注册监视器
        itemOpen.addActionListener(this);

        menu.add(itemSave);// 菜单中加入菜单项
        menu.add(itemOpen);

        menubar.add(menu); // 菜单条中加入菜单
        setJMenuBar(menubar);
        fileDialog = new JFileChooser();
    }

    // 监听事件
    public void actionPerformed(ActionEvent e) {
        if (e.getSource() == itemSave) {
            int state = fileDialog.showSaveDialog(this);
            if (state == JFileChooser.APPROVE_OPTION) {
                try {
                    // 保存文件
                    File dir = fileDialog.getCurrentDirectory();
                    String name = fileDialog.getSelectedFile().getName();
                    File file = new File(dir, name);
                    fileWriter = new FileWriter(file);
                    out = new BufferedWriter(fileWriter);
                    out.write(text.getText());
                    out.close();
                    fileWriter.close();
                } catch (IOException exp) {
                }
            }
        } else if (e.getSource() == itemOpen) {
            int state = fileDialog.showOpenDialog(this);
            if (state == JFileChooser.APPROVE_OPTION) {
                text.setText(null);
                try {
                    // 打开文件
                    File dir = fileDialog.getCurrentDirectory();
                    String name = fileDialog.getSelectedFile().getName();
                    File file = new File(dir, name);
                    fileReader = new FileReader(file);
                    in = new BufferedReader(fileReader);
                    String s = null;
                    while ((s = in.readLine()) != null) {
                        text.append(s + "\n");
                    }
                    in.close();
                    fileReader.close();
                } catch (IOException exp) {
                }
            }
        }
    }
}
- 1
- 2
- 3
- 4
- 5
- 6
- 7
- 8
- 9
- 10
- 11
- 12
- 13
- 14
- 15
- 16
- 17
- 18
- 19
- 20
- 21
- 22
- 23
- 24
- 25
- 26
- 27
- 28
- 29
- 30
- 31
- 32
- 33
- 34
- 35
- 36
- 37
- 38
- 39
- 40
- 41
- 42
- 43
- 44
- 45
- 46
- 47
- 48
- 49
- 50
- 51
- 52
- 53
- 54
- 55
- 56
- 57
- 58
- 59
- 60
- 61
- 62
- 63
- 64
- 65
- 66
- 67
- 68
- 69
- 70
- 71
- 72
- 73
- 74
- 75
- 76
- 77
- 78
- 79
- 80
- 81
- 82
- 83
- 84
- 85
- 86
- 87
- 88
- 89
- 90
- 91
- 92
- 93
- 94
- 95
- 96
- 97
- 98
- 99
- 100
- 101
6.6自定义对话框
创建对话框和创建窗口类似,通过建立 JDialog 的子类来建立一个对话框类。JDialog 对象也是一种容器,因此也可以给 JDialog 对话框指派布局管理器,对话框的默认布局为 BoarderLayout 布局。但组件不能直接加到对话框中,对话框也包含一个内容面板,应当把组件加到 JDialog 对象的内容面板中。由于对话框依赖窗口,因此要建立对话框,必须先要创建一个窗口。
JDialog类常用的构造方法有3个:
JDialog()  构造一个初始化不可见的非强制型对话框。

JDialog(JFramef,String s)  构造一个初始化不可见的非强制型对话框,参数f设置对话框所依赖的窗口,参数s用于设置标题。通常先声明一个JDialog类的子类,然后创建这个子类的一个对象,就建立了一个对话框。

JDialog(JFrame f,String s,boolean b)  构造一个标题为s,初始化不可见的对话框。参数f设置对话框所依赖的窗口,参数b决定对话框是否强制或非强制型。
- 1
- 2
- 3
- 4
- 5
- 1
- 2
- 3
- 4
- 5
JDialog 类的其他常用方法有以下几个:
    getTitle()             获取对话框的标题。
    setTitle(String s)     设置对话框的标题。
    setModal(boolean b)    设置对话框的模式。
    setSize()              设置框的大小。
    setVisible(boolean b)  显示或隐藏对话框
- 1
- 2
- 3
- 4
- 5
- 1
- 2
- 3
- 4
- 5
示例- 自定义对话框
使用自定义对话框改变窗口的标题。
效果图:
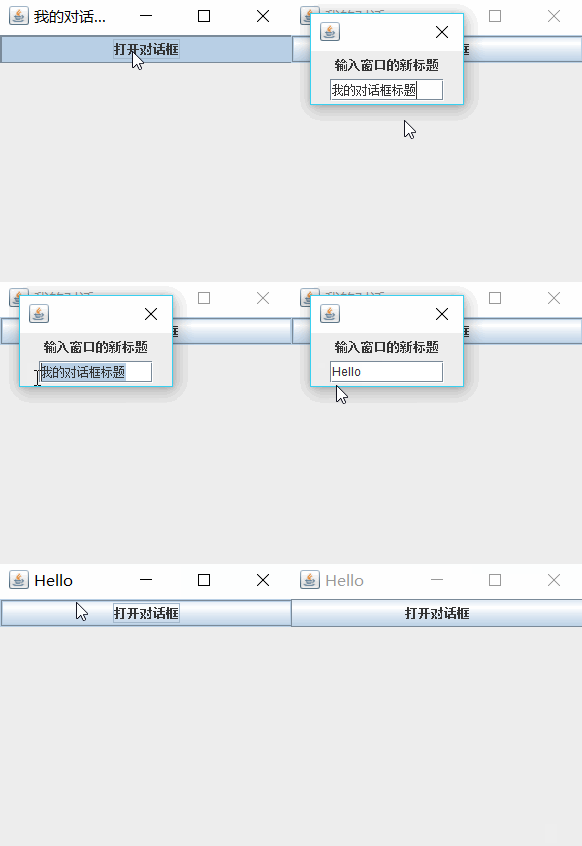
Main.java
//package com.对话框.自定义对话框;

public class Main {
   public static void main(String args[]) {
      MyWindow win=new MyWindow();
      win.setTitle("带自定义对话框的窗口");
      win.setSize(300,300);
   }
}
- 1
- 2
- 3
- 4
- 5
- 6
- 7
- 8
- 9
- 10
- 1
- 2
- 3
- 4
- 5
- 6
- 7
- 8
- 9
- 10
MyDialog.java
//package com.对话框.自定义对话框;

import java.awt.FlowLayout;
import java.awt.event.ActionEvent;
import java.awt.event.ActionListener;

import javax.swing.JDialog;
import javax.swing.JFrame;
import javax.swing.JLabel;
import javax.swing.JTextField;

public class MyDialog extends JDialog implements ActionListener { // 对话框类
    JTextField inputTitle;
    String title;

    MyDialog(JFrame f, String s) { // 构造方法
        super(f, s);
        inputTitle = new JTextField(10);
        inputTitle.addActionListener(this);
        setLayout(new FlowLayout());
        add(new JLabel("输入窗口的新标题"));
        add(inputTitle);
        setBounds(60, 60, 100, 100);
        setDefaultCloseOperation(JFrame.DISPOSE_ON_CLOSE);
    }

    public void actionPerformed(ActionEvent e) {
        title = inputTitle.getText();
        setVisible(false);
    }

    public String getTitle() {
        return title;
    }
}
- 1
- 2
- 3
- 4
- 5
- 6
- 7
- 8
- 9
- 10
- 11
- 12
- 13
- 14
- 15
- 16
- 17
- 18
- 19
- 20
- 21
- 22
- 23
- 24
- 25
- 26
- 27
- 28
- 29
- 30
- 31
- 32
- 33
- 34
- 35
- 36
- 1
- 2
- 3
- 4
- 5
- 6
- 7
- 8
- 9
- 10
- 11
- 12
- 13
- 14
- 15
- 16
- 17
- 18
- 19
- 20
- 21
- 22
- 23
- 24
- 25
- 26
- 27
- 28
- 29
- 30
- 31
- 32
- 33
- 34
- 35
- 36
MyWindow.java
//package com.对话框.自定义对话框;

import java.awt.BorderLayout;
import java.awt.event.ActionEvent;
import java.awt.event.ActionListener;

import javax.swing.JButton;
import javax.swing.JFrame;

public class MyWindow extends JFrame implements ActionListener {
    JButton button;
    MyDialog dialog;

    MyWindow() {
        init();
        setVisible(true);
        setDefaultCloseOperation(JFrame.EXIT_ON_CLOSE);
    }

    void init() {
        button = new JButton("打开对话框");
        button.addActionListener(this);
        add(button, BorderLayout.NORTH);
        dialog = new MyDialog(this, "我是对话框"); // 对话框依赖于MyWindow创建的窗口
        dialog.setModal(true); // 有模式对话框
    }

    public void actionPerformed(ActionEvent e) {
        dialog.setVisible(true);
        String str = dialog.getTitle();
        setTitle(str);
    }
}
- 1
- 2
- 3
- 4
- 5
- 6
- 7
- 8
- 9
- 10
- 11
- 12
- 13
- 14
- 15
- 16
- 17
- 18
- 19
- 20
- 21
- 22
- 23
- 24
- 25
- 26
- 27
- 28
- 29
- 30
- 31
- 32
- 33
- 34
- 1
- 2
- 3
- 4
- 5
- 6
- 7
- 8
- 9
- 10
- 11
- 12
- 13
- 14
- 15
- 16
- 17
- 18
- 19
- 20
- 21
- 22
- 23
- 24
- 25
- 26
- 27
- 28
- 29
- 30
- 31
- 32
- 33
- 34
7 发布GUI程序
可以使用 jar.exe 把一些文件压缩成一个 JAR 文件,来发布我们的应用程序。我们可以把 java 应用程序中涉及的类压缩成一个 JAR 文件,如 Hello.jar ,然后使用 java 解释器 (使用参数-jar)执行这个压缩文件,或用鼠标双击文件,执行这个压缩文件。
java -jar Hello.jar
- 1
- 1
如何生成Jar文件
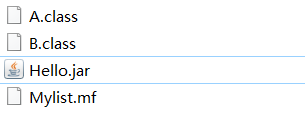
假设 D:\test 目录中的应用程序有两个类 A、B,其中A是主类。生成一个 JAR 文件的步骤如下:
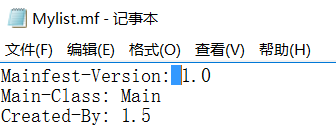
首先使用文本编辑器(比如记事本)编写一个清单文件。
Mylist.mf:
注意蓝色处间隔一个空格,存放到D:\test下。
生成JAR文件
在cmd命令行中输入下面的名利,生成Hello.jar
D:\test> jar cfm Hello.jar Mylist.mf A.class B.class
- 1
- 1
or
D:\test> jar cfm Hello.jar Mylist.mf *.class
- 1
- 1
其中的 cfm,c 代表要生成一个新的 JAR 文件,f 表示文件名,m 代表文件清单的名字。
参考
1.耿祥义、张跃平的《Java程序设计实用教程》
