一、程序加载
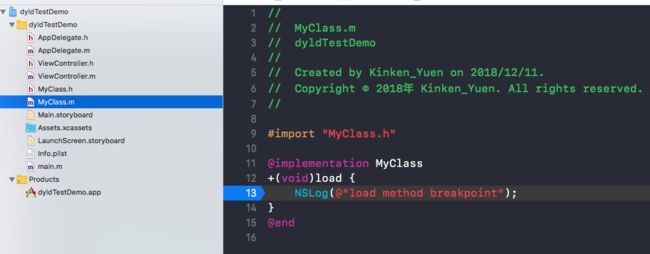
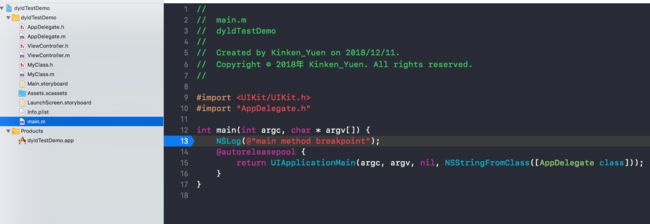
正向开发中,我们平时编写的程序的入口函数都是main.m里面的main函数,所以很多时候都会以为程序就是从这开始执行。其实main函数之前就有一系列的事情发生,比如+load方法与constructor构造函数就是在main函数之前执行的。
二、dyld、dyld_shared_cache简介
程序启动运行时会依赖很多系统动态库,而系统动态库会通过dyld(动态加载器)(
/usr/lib/dyld)加载到内存中,最开始系统内核读取程序可执行文件的Header段信息做一些准备工作,之后就会将工作交给dyld。由于不止一个程序需要使用系统动态库,所以不可能在每个程序加载时都去加载所有的系统动态库,为了优化程序启动速度和利用动态库缓存,苹果从iOS3.1之后,将所有系统库(私有与公有)编译成一个大的缓存文件,这就是dyld_shared_cache,该缓存文件存在iOS系统下的/System/Library/Caches/com.apple.dyld/目录下
三、dyld加载流程
(一)、从新建Demo工程简单入手
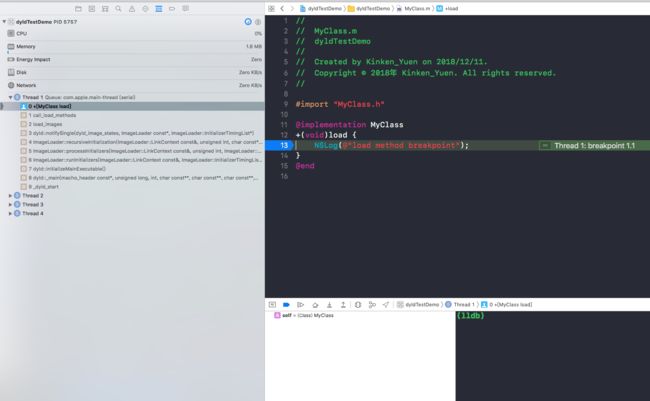
创建一个新的iOS App工程,新建一个自定义类,并且在+load方法内下断点,同时也在main方法内下断点,运行工程,接着查看函数调用栈。
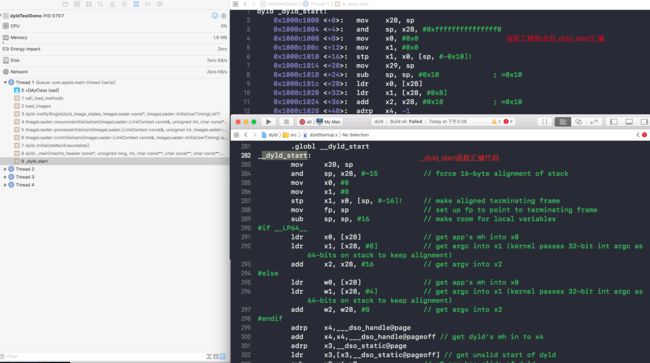
从左侧函数调用栈可以看到首先调用的是dyld的
__dyld_start函数,我们查看 dyld源码(我是对比着433.5版本的dyld2以及635.2版本的dyld3看),搜索
__dyld_start,可以在dyldStartup.s文件内找到
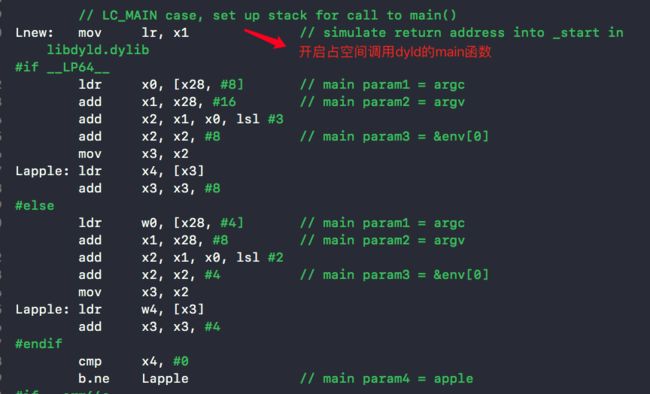
__dyld_start的汇编实现。
往下查看,
__dyld_start内部调用了
dyldbootstrap::start()方法,然后再调用dyld的main函数
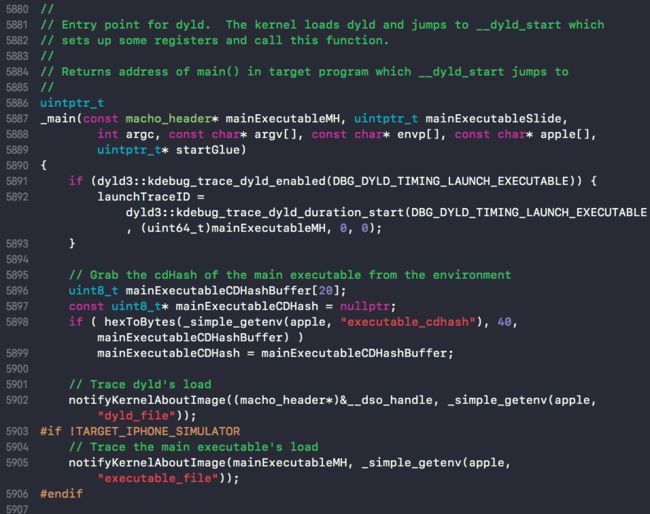
转到dyld.cpp查看dyld的main函数,注意此main函数不是我们程序的main,而是dyld这个可执行文件的入口main函数,我们全局搜索_main,找到函数实现,如下:
函数注释部分:dyld的入口,系统内核(XNU)初始化好寄存器后会加载dyld并且跳到
__dyld_start函数并且调用该(main)函数
main函数内部大体做了以下操作:
uintptr_t
_main(const macho_header* mainExecutableMH, uintptr_t mainExecutableSlide,
        int argc, const char* argv[], const char* envp[], const char* apple[],
        uintptr_t* startGlue)
{
    ......
    uintptr_t result = 0;
    //保存传入的可执行文件的头部(是一个struct macho_header结构体),后面根据头部访问信息
    sMainExecutableMachHeader = mainExecutableMH;
    ......
    //根据可执行文件头部,参数等设置上下文信息
    setContext(mainExecutableMH, argc, argv, envp, apple);

    // Pickup the pointer to the exec path.
    //获取可执行文件路径
    sExecPath = _simple_getenv(apple, "executable_path");

    //  Remove interim apple[0] transition code from dyld
    if (!sExecPath) sExecPath = apple[0];
    //将相对路径转换成绝对路径
    if ( sExecPath[0] != '/' ) {
        // have relative path, use cwd to make absolute
        char cwdbuff[MAXPATHLEN];
        if ( getcwd(cwdbuff, MAXPATHLEN) != NULL ) {
            // maybe use static buffer to avoid calling malloc so early...
            char* s = new char[strlen(cwdbuff) + strlen(sExecPath) + 2];
            strcpy(s, cwdbuff);
            strcat(s, "/");
            strcat(s, sExecPath);
            sExecPath = s;
        }
    }

    // Remember short name of process for later logging
    //获取可执行文件的名字
    sExecShortName = ::strrchr(sExecPath, '/');
    if ( sExecShortName != NULL )
        ++sExecShortName;
    else
        sExecShortName = sExecPath;
    //配置进程是否受限
    configureProcessRestrictions(mainExecutableMH);
    ......
    {
        //检查设置环境变量
        checkEnvironmentVariables(envp);
        //如果DYLD_FALLBACK为nil,将其设置为默认值
        defaultUninitializedFallbackPaths(envp);
    }
    ......
    //如果设置了DYLD_PRINT_OPTS环境变量,则打印参数
    if ( sEnv.DYLD_PRINT_OPTS )
        printOptions(argv);
    //如果设置了DYLD_PRINT_ENV环境变量,则打印环境变量
    if ( sEnv.DYLD_PRINT_ENV )
        printEnvironmentVariables(envp);
    //根据Mach-O头部获取当前运行架构信息
    getHostInfo(mainExecutableMH, mainExecutableSlide);

    // load shared cache
    //检查共享缓存是否开启,iOS中必须开启
    checkSharedRegionDisable((dyld3::MachOLoaded*)mainExecutableMH, mainExecutableSlide);
#if TARGET_IPHONE_SIMULATOR
    //  until  is fixed
    gLinkContext.sharedRegionMode = ImageLoader::kUsePrivateSharedRegion;
    //
#endif
    if ( gLinkContext.sharedRegionMode != ImageLoader::kDontUseSharedRegion ) {
        //检查共享缓存是否映射到了共享区域
        mapSharedCache();
    }
    ......


    // instantiate ImageLoader for main executable
    //加载可执行文件并生成一个ImageLoader实例对象
    sMainExecutable = instantiateFromLoadedImage(mainExecutableMH, mainExecutableSlide, sExecPath);
    gLinkContext.mainExecutable = sMainExecutable;
    gLinkContext.mainExecutableCodeSigned = hasCodeSignatureLoadCommand(mainExecutableMH);

    ......

        // Now that shared cache is loaded, setup an versioned dylib overrides
    #if SUPPORT_VERSIONED_PATHS
        //检查库的版本是否有更新,有则覆盖原有的
        checkVersionedPaths();
    #endif
    ......
        // load any inserted libraries
        //加载所有DYLD_INSERT_LIBRARIES指定的库
        if  ( sEnv.DYLD_INSERT_LIBRARIES != NULL ) {
            for (const char* const* lib = sEnv.DYLD_INSERT_LIBRARIES; *lib != NULL; ++lib)
                loadInsertedDylib(*lib);
        }
        // record count of inserted libraries so that a flat search will look at
        // inserted libraries, then main, then others.
        sInsertedDylibCount = sAllImages.size()-1;

        // link main executable
        //链接主程序
        gLinkContext.linkingMainExecutable = true;
#if SUPPORT_ACCELERATE_TABLES
        if ( mainExcutableAlreadyRebased ) {
            // previous link() on main executable has already adjusted its internal pointers for ASLR
            // work around that by rebasing by inverse amount
            sMainExecutable->rebase(gLinkContext, -mainExecutableSlide);
        }
#endif
        link(sMainExecutable, sEnv.DYLD_BIND_AT_LAUNCH, true, ImageLoader::RPathChain(NULL, NULL), -1);
        sMainExecutable->setNeverUnloadRecursive();
        if ( sMainExecutable->forceFlat() ) {
            gLinkContext.bindFlat = true;
            gLinkContext.prebindUsage = ImageLoader::kUseNoPrebinding;
        }

        // link any inserted libraries
        //链接所有插入的动态库
        // do this after linking main executable so that any dylibs pulled in by inserted
        // dylibs (e.g. libSystem) will not be in front of dylibs the program uses
        if ( sInsertedDylibCount > 0 ) {
            for(unsigned int i=0; i < sInsertedDylibCount; ++i) {
                ImageLoader* image = sAllImages[i+1];
                link(image, sEnv.DYLD_BIND_AT_LAUNCH, true, ImageLoader::RPathChain(NULL, NULL), -1);
                image->setNeverUnloadRecursive();
            }
            // only INSERTED libraries can interpose
            // register interposing info after all inserted libraries are bound so chaining works
            for(unsigned int i=0; i < sInsertedDylibCount; ++i) {
                ImageLoader* image = sAllImages[i+1];
                //注册符号插入
                image->registerInterposing(gLinkContext);
            }
        }

        //  dyld should support interposition even without DYLD_INSERT_LIBRARIES
        for (long i=sInsertedDylibCount+1; i < sAllImages.size(); ++i) {
            ImageLoader* image = sAllImages[i];
            if ( image->inSharedCache() )
                continue;
            image->registerInterposing(gLinkContext);
        }
    #if SUPPORT_ACCELERATE_TABLES
        if ( (sAllCacheImagesProxy != NULL) && ImageLoader::haveInterposingTuples() ) {
            // Accelerator tables cannot be used with implicit interposing, so relaunch with accelerator tables disabled
            ImageLoader::clearInterposingTuples();
            // unmap all loaded dylibs (but not main executable)
            for (long i=1; i < sAllImages.size(); ++i) {
                ImageLoader* image = sAllImages[i];
                if ( image == sMainExecutable )
                    continue;
                if ( image == sAllCacheImagesProxy )
                    continue;
                image->setCanUnload();
                ImageLoader::deleteImage(image);
            }
            // note: we don't need to worry about inserted images because if DYLD_INSERT_LIBRARIES was set we would not be using the accelerator table
            sAllImages.clear();
            sImageRoots.clear();
            sImageFilesNeedingTermination.clear();
            sImageFilesNeedingDOFUnregistration.clear();
            sAddImageCallbacks.clear();
            sRemoveImageCallbacks.clear();
            sAddLoadImageCallbacks.clear();
            sDisableAcceleratorTables = true;
            sAllCacheImagesProxy = NULL;
            sMappedRangesStart = NULL;
            mainExcutableAlreadyRebased = true;
            gLinkContext.linkingMainExecutable = false;
            resetAllImages();
            goto reloadAllImages;
        }
    #endif

        // apply interposing to initial set of images
        for(int i=0; i < sImageRoots.size(); ++i) {
            //应用符号插入
            sImageRoots[i]->applyInterposing(gLinkContext);
        }
        ImageLoader::applyInterposingToDyldCache(gLinkContext);
        gLinkContext.linkingMainExecutable = false;

        // Bind and notify for the main executable now that interposing has been registered
        uint64_t bindMainExecutableStartTime = mach_absolute_time();
        sMainExecutable->recursiveBindWithAccounting(gLinkContext, sEnv.DYLD_BIND_AT_LAUNCH, true);
        uint64_t bindMainExecutableEndTime = mach_absolute_time();
        ImageLoaderMachO::fgTotalBindTime += bindMainExecutableEndTime - bindMainExecutableStartTime;
        gLinkContext.notifyBatch(dyld_image_state_bound, false);

        // Bind and notify for the inserted images now interposing has been registered
        if ( sInsertedDylibCount > 0 ) {
            for(unsigned int i=0; i < sInsertedDylibCount; ++i) {
                ImageLoader* image = sAllImages[i+1];
                image->recursiveBind(gLinkContext, sEnv.DYLD_BIND_AT_LAUNCH, true);
            }
        }

        //  do weak binding only after all inserted images linked
        //弱符号绑定
        sMainExecutable->weakBind(gLinkContext);
        ......
#if SUPPORT_OLD_CRT_INITIALIZATION
        // Old way is to run initializers via a callback from crt1.o
        if ( ! gRunInitializersOldWay )
            initializeMainExecutable();
    #else
        // run all initializers
        //执行初始化方法
        initializeMainExecutable();
    #endif
        // notify any montoring proccesses that this process is about to enter main()
        if (dyld3::kdebug_trace_dyld_enabled(DBG_DYLD_TIMING_LAUNCH_EXECUTABLE)) {
            dyld3::kdebug_trace_dyld_duration_end(launchTraceID, DBG_DYLD_TIMING_LAUNCH_EXECUTABLE, 0, 0, 2);
        }
        notifyMonitoringDyldMain();

        // find entry point for main executable
        //寻找目标可执行文件入口并执行
        result = (uintptr_t)sMainExecutable->getEntryFromLC_MAIN();
        if ( result != 0 ) {
            // main executable uses LC_MAIN, we need to use helper in libdyld to call into main()
            if ( (gLibSystemHelpers != NULL) && (gLibSystemHelpers->version >= 9) )
                *startGlue = (uintptr_t)gLibSystemHelpers->startGlueToCallExit;
            else
                halt("libdyld.dylib support not present for LC_MAIN");
        }
        else {
            // main executable uses LC_UNIXTHREAD, dyld needs to let "start" in program set up for main()
            result = (uintptr_t)sMainExecutable->getEntryFromLC_UNIXTHREAD();
            *startGlue = 0;
        }
#if __has_feature(ptrauth_calls)
        // start() calls the result pointer as a function pointer so we need to sign it.
        result = (uintptr_t)__builtin_ptrauth_sign_unauthenticated((void*)result, 0, 0);
#endif
    }
    catch(const char* message) {
        syncAllImages();
        halt(message);
    }
    catch(...) {
        dyld::log("dyld: launch failed\n");
    }

    CRSetCrashLogMessage("dyld2 mode");

    if (sSkipMain) {
        if (dyld3::kdebug_trace_dyld_enabled(DBG_DYLD_TIMING_LAUNCH_EXECUTABLE)) {
            dyld3::kdebug_trace_dyld_duration_end(launchTraceID, DBG_DYLD_TIMING_LAUNCH_EXECUTABLE, 0, 0, 2);
        }
        result = (uintptr_t)&fake_main;
        *startGlue = (uintptr_t)gLibSystemHelpers->startGlueToCallExit;
    }

    return result;
}
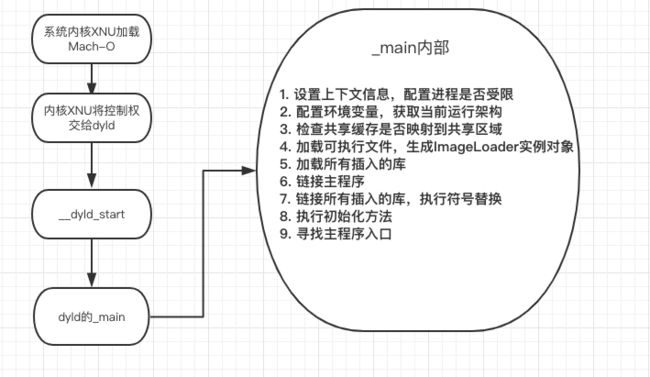
将dyld的_main函数内部流程拆分,大概有以下:
- 1. 设置上下文信息,配置进程是否受限
- 2. 配置环境变量,获取当前运行架构
- 3. 检查共享缓存是否映射到共享区域
- 4. 加载可执行文件,生成ImageLoader实例对象
- 5. 加载所有插入的库
- 6. 链接主程序
- 7. 链接所有插入的库,执行符号替换
- 8. 执行初始化方法
- 9. 寻找主程序入口
(二)、分步认识加载流程
1.设置上下文信息,配置进程是否受限
调用setContext,传入Mach-O头部,以及_main的一些参数,设置上下文。接着调用configureProcessRestrictions,跟进查看,主要看iOS平台的一段,将EncVarMode环境变量类型的Mode设置为不同(默认是envNone(受限模式,忽略环境变量)),当设置了get_task_allow权限以及开发内核时会将sEnvMode设置为envAll,但只要将get_task_allow设置了uid或gid,sEnvMode就会设置为受限模式。dyld3下该段的实现代码有了变化,暂时没有具体学习研究。
 uint32_t flags;
#if TARGET_IPHONE_SIMULATOR
    sEnvMode = envAll;
    gLinkContext.requireCodeSignature = true;
#elif __IPHONE_OS_VERSION_MIN_REQUIRED
    sEnvMode = envNone;
    gLinkContext.requireCodeSignature = true;
    if ( csops(0, CS_OPS_STATUS, &flags, sizeof(flags)) != -1 ) {
        if ( flags & CS_ENFORCEMENT ) {
            if ( flags & CS_GET_TASK_ALLOW ) {
                // Xcode built app for Debug allowed to use DYLD_* variables
                sEnvMode = envAll;
            }
            else {
                // Development kernel can use DYLD_PRINT_* variables on any FairPlay encrypted app
                uint32_t secureValue = 0;
                size_t   secureValueSize = sizeof(secureValue);
                if ( (sysctlbyname("kern.secure_kernel", &secureValue, &secureValueSize, NULL, 0) == 0) && (secureValue == 0) && isFairPlayEncrypted(mainExecutableMH) ) {
                    sEnvMode = envPrintOnly;
                }
            }
        }
        else {
            // Development kernel can run unsigned code
            sEnvMode = envAll;
            gLinkContext.requireCodeSignature = false;
        }
    }
    if ( issetugid() ) {
        sEnvMode = envNone;
    }
2.配置环境变量,获取当前运行架构
调用checkEnvironmentVariables,如果allowEnvVarsPath与allowEnvVarsPrint为空,直接跳过,否则调用processDyldEnvironmentVariable处理并设置环境变量,如下:
static void checkEnvironmentVariables(const char* envp[])
{
    if ( !gLinkContext.allowEnvVarsPath && !gLinkContext.allowEnvVarsPrint )
        return;
    const char** p;
    for(p = envp; *p != NULL; p++) {
        const char* keyEqualsValue = *p;
        if ( strncmp(keyEqualsValue, "DYLD_", 5) == 0 ) {
            const char* equals = strchr(keyEqualsValue, '=');
            if ( equals != NULL ) {
                strlcat(sLoadingCrashMessage, "\n", sizeof(sLoadingCrashMessage));
                strlcat(sLoadingCrashMessage, keyEqualsValue, sizeof(sLoadingCrashMessage));
                const char* value = &equals[1];
                const size_t keyLen = equals-keyEqualsValue;
                char key[keyLen+1];
                strncpy(key, keyEqualsValue, keyLen);
                key[keyLen] = '\0';
                if ( (strncmp(key, "DYLD_PRINT_", 11) == 0) && !gLinkContext.allowEnvVarsPrint )
                    continue;
                processDyldEnvironmentVariable(key, value, NULL);
            }
        }
        else if ( strncmp(keyEqualsValue, "LD_LIBRARY_PATH=", 16) == 0 ) {
            const char* path = &keyEqualsValue[16];
            sEnv.LD_LIBRARY_PATH = parseColonList(path, NULL);
        }
    }

#if SUPPORT_LC_DYLD_ENVIRONMENT
    checkLoadCommandEnvironmentVariables();
#endif // SUPPORT_LC_DYLD_ENVIRONMENT

#if SUPPORT_ROOT_PATH
    //  DYLD_IMAGE_SUFFIX and DYLD_ROOT_PATH cannot be used together
    if ( (gLinkContext.imageSuffix != NULL && *gLinkContext.imageSuffix != NULL) && (gLinkContext.rootPaths != NULL) ) {
        dyld::warn("Ignoring DYLD_IMAGE_SUFFIX because DYLD_ROOT_PATH is used.\n");
        gLinkContext.imageSuffix = NULL; // this leaks allocations from parseColonList
    }
#endif
}
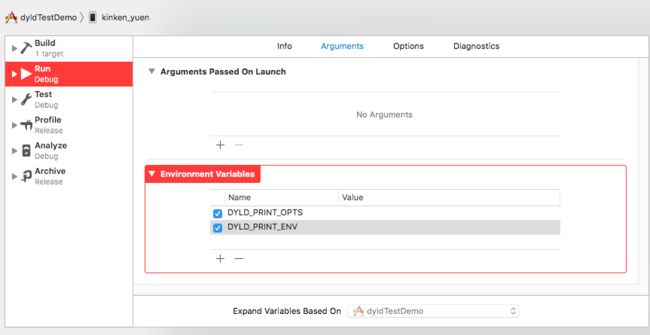
返回_main函数,往下一点查看,该段主要做的是,如果设置了这两个环境变量参数,则在App启动时,打印相关参数、环境变量信息。
    //如果设置了DYLD_PRINT_OPTS环境变量,则打印参数
    if ( sEnv.DYLD_PRINT_OPTS )
        printOptions(argv);
    //如果设置了DYLD_PRINT_ENV环境变量,则打印环境变量
    if ( sEnv.DYLD_PRINT_ENV )
        printEnvironmentVariables(envp);
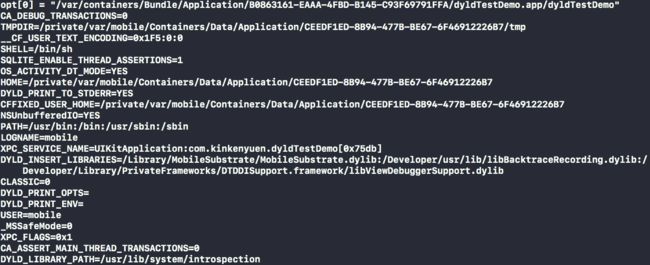
我在前面的Demo工程下加入这两个参数,运行打印了许多信息,其中包括沙盒目录,DYLD_INSERT_LIBRARIES、进程状态空间等,结果如下:
继续返回_main函数,查看getHostInfo调用,这步主要是从Mach-O头部获取当前运行架构的信息,如下:
static void getHostInfo(const macho_header* mainExecutableMH, uintptr_t mainExecutableSlide)
{
#if CPU_SUBTYPES_SUPPORTED
#if __ARM_ARCH_7K__
    sHostCPU        = CPU_TYPE_ARM;
    sHostCPUsubtype = CPU_SUBTYPE_ARM_V7K;
#elif __ARM_ARCH_7A__
    sHostCPU        = CPU_TYPE_ARM;
    sHostCPUsubtype = CPU_SUBTYPE_ARM_V7;
#elif __ARM_ARCH_6K__
    sHostCPU        = CPU_TYPE_ARM;
    sHostCPUsubtype = CPU_SUBTYPE_ARM_V6;
#elif __ARM_ARCH_7F__
    sHostCPU        = CPU_TYPE_ARM;
    sHostCPUsubtype = CPU_SUBTYPE_ARM_V7F;
#elif __ARM_ARCH_7S__
    sHostCPU        = CPU_TYPE_ARM;
    sHostCPUsubtype = CPU_SUBTYPE_ARM_V7S;
#elif __ARM64_ARCH_8_32__
    sHostCPU        = CPU_TYPE_ARM64_32;
    sHostCPUsubtype = CPU_SUBTYPE_ARM64_32_V8;
#elif __arm64e__
    sHostCPU        = CPU_TYPE_ARM64;
    sHostCPUsubtype = CPU_SUBTYPE_ARM64_E;
#elif __arm64__
    sHostCPU        = CPU_TYPE_ARM64;
    sHostCPUsubtype = CPU_SUBTYPE_ARM64_V8;
#else
    struct host_basic_info info;
    mach_msg_type_number_t count = HOST_BASIC_INFO_COUNT;
    mach_port_t hostPort = mach_host_self();
    kern_return_t result = host_info(hostPort, HOST_BASIC_INFO, (host_info_t)&info, &count);
    if ( result != KERN_SUCCESS )
        throw "host_info() failed";
    sHostCPU        = info.cpu_type;
    sHostCPUsubtype = info.cpu_subtype;
    mach_port_deallocate(mach_task_self(), hostPort);
  #if __x86_64__
      // host_info returns CPU_TYPE_I386 even for x86_64.  Override that here so that
      // we don't need to mask the cpu type later.
      sHostCPU = CPU_TYPE_X86_64;
    #if !TARGET_IPHONE_SIMULATOR
      sHaswell = (sHostCPUsubtype == CPU_SUBTYPE_X86_64_H);
      //  x86_64h: Fall back to the x86_64 slice if an app requires GC.
      if ( sHaswell ) {
        if ( isGCProgram(mainExecutableMH, mainExecutableSlide) ) {
            // When running a GC program on a haswell machine, don't use and 'h slices
            sHostCPUsubtype = CPU_SUBTYPE_X86_64_ALL;
            sHaswell = false;
            gLinkContext.sharedRegionMode = ImageLoader::kDontUseSharedRegion;
        }
      }
    #endif
  #endif
#endif
#endif
}
3. 检查共享缓存是否映射到共享区域
首先调用checkSharedRegionDisable检查是否开启共享缓存,在iOS中是必须开启的,接着调用mapSharedCache将共享缓存映射到共享区域,在dyld2源码中mapSharedCache内部先通过shared_region_check_np检查缓存是否已经映射,是则更新sharedCacheSlide和sharedCacheUUID,否则调用openSharedCacheFile打开共享缓存文件(/System/Library/Caches/com.apple.dyld/dyld_shared_cache_x),最后使用shared_region_map_and_slide_up完成映射,代码很多,就不贴出了。在dyld3中该mapSharedCache变得很简短,应该是做了优化。
4. 加载可执行文件,生成ImageLoader实例对象
跳到ImageLoader定义处ImageLoader.h,从它的注释可以看出,它是一个抽象基类,专门用于辅助加载特定可执行文件格式的类,对于程序中需要的依赖库、插入库,会创建一个对应的image对象,对这些image进行链接,调用各image的初始化方法等等,包括对runtime的初始化。
instantiateFromLoadedImage实例化一个ImageLoader对象,内部先判断文件架构是否与当前设备架构兼容,接着调用
ImageLoaderMachO::instantiateMainExecutable加载文件生成实例,不断添加image。
ImageLoaderMachO::instantiateMainExecutable内部会判断Mach-O是否压缩来使用不同的ImageLoader子类进行初始化。
5. 加载所有插入的库
从上一步Imageloader加载的代码接着往下查看,会发现
if  ( sEnv.DYLD_INSERT_LIBRARIES != NULL ) {
            for (const char* const* lib = sEnv.DYLD_INSERT_LIBRARIES; *lib != NULL; ++lib)
                loadInsertedDylib(*lib);
        }
该段的作用是遍历DYLD_INSERT_LIBRARIES环境变量,调用loadInsertedDylib加载,通过该环境变量我们可以注入自定义的一些动态库代码,loadInsertedDylib内部会从DYLD_ROOT_PATH、LD_LIBRARY_PATH、DYLD_FRAMEWORK_PATH等路径查找dylib并且检查代码签名,无效则直接抛出异常。
6. 链接主程序
内核调用ImageLoader::link函数,内部调用recursiveLoadLibraries递归加载动态库,加载动态库后,对依赖库进行排序,被依赖的排序在前面,接着调用recursiveRebase,rebase就是针对 “mach-o在加载到内存中不是固定的首地址” (苹果的ASLR地址空间随机化)这一现象做数据修正的过程。接下来调用recursiveBindWithAccounting递归绑定符号表。绑定就是将这个二进制调用的外部符号进行绑定的过程。 比如我们objc代码中需要使用到NSObject, 即符号OBJC_CLASS$_NSObject,但是这个符号又不在我们的二进制中,在系统库 Foundation.framework中,因此就需要binding这个操作将对应关系绑定到一起。lazyBinding就是在加载动态库的时候不会立即binding, 当第一次调用这个方法的时候再实施binding。 做到的方法也很简单: 通过dyld_stub_binder 这个符号来做。 lazy binding的方法第一次会调用到dyld_stub_binder, 然后dyld_stub_binder负责找到真实的方法,并且将地址bind到桩上,下一次就不用再bind了。
7. 链接所有插入的库,执行符号替换
对sAllimages内所有加载好的Image(除了主程序的Image外)中的库调用link进行链接,然后调用registerInterposing注册符号替换。
        // link any inserted libraries
        // do this after linking main executable so that any dylibs pulled in by inserted
        // dylibs (e.g. libSystem) will not be in front of dylibs the program uses
        if ( sInsertedDylibCount > 0 ) {
            for(unsigned int i=0; i < sInsertedDylibCount; ++i) {
                ImageLoader* image = sAllImages[i+1];
                link(image, sEnv.DYLD_BIND_AT_LAUNCH, true, ImageLoader::RPathChain(NULL, NULL), -1);
                image->setNeverUnloadRecursive();
            }
            // only INSERTED libraries can interpose
            // register interposing info after all inserted libraries are bound so chaining works
            for(unsigned int i=0; i < sInsertedDylibCount; ++i) {
                ImageLoader* image = sAllImages[i+1];
                image->registerInterposing(gLinkContext);
            }
        }
8. 执行初始化方法
// run all initializers
initializeMainExecutable();
initializeMainExecutable执行初始化方法,其中+load和constructor方法就是在这里执行。initializeMainExecutable内部先调用了动态库的初始化方法,后调用主程序的初始化方法。在Imageloader::recursiveInitialization里面调用了如下内容:
context.notifySingle(dyld_image_state_dependents_initialized, this, &timingInfo);
全局搜索static void notifySingle(dyld_image_states state, const ImageLoader* image, ImageLoader::InitializerTimingList* timingInfo)找到如下代码段:
if ( (state == dyld_image_state_dependents_initialized) && (sNotifyObjCInit != NULL) && image->notifyObjC() ) {
        uint64_t t0 = mach_absolute_time();
        dyld3::ScopedTimer timer(DBG_DYLD_TIMING_OBJC_INIT, (uint64_t)image->machHeader(), 0, 0);
        (*sNotifyObjCInit)(image->getRealPath(), image->machHeader());
        uint64_t t1 = mach_absolute_time();
        uint64_t t2 = mach_absolute_time();
        uint64_t timeInObjC = t1-t0;
        uint64_t emptyTime = (t2-t1)*100;
        if ( (timeInObjC > emptyTime) && (timingInfo != NULL) ) {
            timingInfo->addTime(image->getShortName(), timeInObjC);
        }
    }
此处调用了sNotifyObjCInit(从名称可以知道大概是通知runtime的意思(ObjCInit)),而sNotifyObjCInit是在此处赋值:
void registerObjCNotifiers(_dyld_objc_notify_mapped mapped, _dyld_objc_notify_init init, _dyld_objc_notify_unmapped unmapped)
{
    // record functions to call
    sNotifyObjCMapped   = mapped;
    sNotifyObjCInit     = init;
    sNotifyObjCUnmapped = unmapped;

    // call 'mapped' function with all images mapped so far
    try {
        notifyBatchPartial(dyld_image_state_bound, true, NULL, false, true);
    }
    catch (const char* msg) {
        // ignore request to abort during registration
    }

    //  call 'init' function on all images already init'ed (below libSystem)
    for (std::vector::iterator it=sAllImages.begin(); it != sAllImages.end(); it++) {
        ImageLoader* image = *it;
        if ( (image->getState() == dyld_image_state_initialized) && image->notifyObjC() ) {
            dyld3::ScopedTimer timer(DBG_DYLD_TIMING_OBJC_INIT, (uint64_t)image->machHeader(), 0, 0);
            (*sNotifyObjCInit)(image->getRealPath(), image->machHeader());
        }
    }
}
void _dyld_objc_notify_register(_dyld_objc_notify_mapped    mapped,
                                _dyld_objc_notify_init      init,
                                _dyld_objc_notify_unmapped  unmapped)
{
    dyld::registerObjCNotifiers(mapped, init, unmapped);
}
查看函数定义:
//
// Note: only for use by objc runtime
// Register handlers to be called when objc images are mapped, unmapped, and initialized.
// Dyld will call back the "mapped" function with an array of images that contain an objc-image-info section.
// Those images that are dylibs will have the ref-counts automatically bumped, so objc will no longer need to
// call dlopen() on them to keep them from being unloaded.  During the call to _dyld_objc_notify_register(),
// dyld will call the "mapped" function with already loaded objc images.  During any later dlopen() call,
// dyld will also call the "mapped" function.  Dyld will call the "init" function when dyld would be called
// initializers in that image.  This is when objc calls any +load methods in that image.
//
void _dyld_objc_notify_register(_dyld_objc_notify_mapped    mapped,
                                _dyld_objc_notify_init      init,
                                _dyld_objc_notify_unmapped  unmapped);
_dyld_objc_notify_register函数是是供objc runtime调用的,可以在objc4源码中的_objc_init中找到记录:
void _objc_init(void)
{
    static bool initialized = false;
    if (initialized) return;
    initialized = true;

    // fixme defer initialization until an objc-using image is found?
    environ_init();
    tls_init();
    static_init();
    lock_init();
    exception_init();

    _dyld_objc_notify_register(&map_images, load_images, unmap_image);
}
这几步操作实际上是sNotifyObjCInit调用就是objc中的load_images,而后者会调用所有的+load方法,我们回到新建工程的界面查看函数调用栈,也可以发现确实是这样的调用顺序:
调用context.notifySingle之后,会调用ImageLoaderMachO::doInitialization,内部调用doImageInit、ImageLoaderMachO::doModInitFunctions,其中ImageLoaderMachO::doModInitFunctions内部调用__mod_init_funcs section,也就是constructor方法。
9. 寻找主程序入口
差不多到了_main的末尾,调用getEntryFromLC_MAIN读取Mach-O的LC_MAIN段获取程序的入口地址,也就是我们的main函数入口地址。
四、小结
写到这里差不多已经乱掉,dyld加载过程真是非常复杂,这是自己学习过程的一次简陋笔记,很短时间内码出来,自己也觉得写得不太好,如果日后遇到回来再看看能否改良,如有出错,有请高手指出赐教!最后用一张图简单总结一下流程吧:
五、参考
iOS程序启动->dyld加载->runtime初始化(初识)
DYLD加载Mach-O完整流程
iOS 程序 main 函数之前发生了什么
dylib动态库加载过程分析
dyld加载Mach-O
dyld与ObjC
《iOS应用逆向与安全》--刘培庆
