React Native 实现瀑布流列表页,分组+组内横向的列表页.....
随着React Native的更新,因为其跨平台的优越性,越来越多的公司和项目采用其作为其快速开发和迭代的基础语言.
但是其并不是任何控件其都已经涵盖了,就拿我们常见的列表页来说, 一般通用的纵向或者横向列表我们可以使用RN里面的FlatList,需要分组的时候我们可以使用SectionList,但是当我们又想要分组又想要组内横向排列的时候我们会发现已有的控件就无法满足我们了....
那么是否就是黔驴技穷呢?并不是,万能的开发者不会因为这些小的需求而难住,于是我们可以通过SectionList+FlatList的组合来实现.
于是有了大的列表首先SectionList来进行分组,每组只有一个组内元素,这个组内元素是一个FlatList,然后在想普通的渲染FlatList的方式即可.
import React, { Component } from 'react';
import {
Dimensions,
SafeAreaView,
SectionList,
FlatList,
View,
Text,
TouchableOpacity,
StyleSheet,
Image
} from 'react-native';
const { width, height } = Dimensions.get('window');
const numColumns = 5;
export default class Me extends Component {
render() {
const data = [{
content: [
{key: 'mine_icon_hot', title: '排行榜'},
{key: 'mine_icon_preview', title: '审帖'},
{key: 'mine_icon_manhua', title: '漫画'},
{key: 'mine_icon_activity', title: '我的收藏'},
{key: 'mine_icon_nearby', title: '附近'},
{key: 'mine_icon_random', title: '随机穿越'},
{key: 'mine_icon_feedback', title: '意见反馈'},
{key: 'mine_icon_more', title: '更多'},
],
key: 'content',
}];
return (
)
}
_keyExtractor = (item, index) => {
return item.key;
}
_ListHeaderComponent = () => {
return (
百思不得姐
)
}
_renderItem = ({item}) => {
return (
{item.title}
)
}
_renderSectionItem = ({section}) => {
return (
好友动态
)
}
};
const styles = StyleSheet.create({
container: {
flex: 1,
},
header: {
height: 100,
backgroundColor: '#fff',
marginBottom: 10,
flexDirection: 'row',
alignItems: 'center',
paddingHorizontal: 15,
},
headerUser: {
flex: 1,
flexDirection: 'row',
alignItems: 'center',
},
footer: {
height: 50,
backgroundColor: '#fff',
flexDirection: 'row',
alignItems: 'center',
justifyContent: 'space-between',
paddingHorizontal: 15,
marginTop: 10,
},
item: {
backgroundColor: '#fff',
width: width/numColumns,
height: 80,
alignItems: 'center',
justifyContent: 'center',
},
itemImage: {
width: 40,
height: 40,
marginBottom: 5,
},
itemText: {
fontSize: 12,
}
})
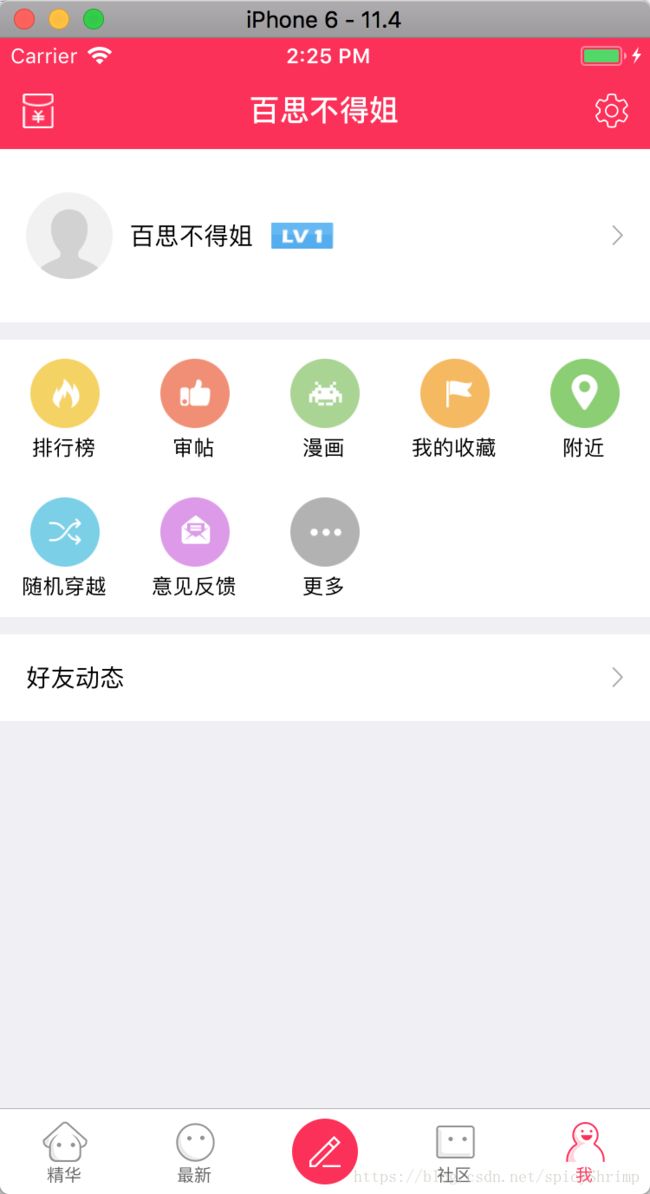
这里我们可以看到中间的一组就是横向排列的,虽然我们不一定要使用这种方式来布局,但是这个最起码是一个解决的方案,这个案例可能不明显,但是如果是有很多分组,组内又全部都是横向排列的时候,这个方案就很容易完成了.
至于瀑布流,虽然一直以来都被人诟病,因为其虽然好看,但是其因为每一个元素的高度都不一样,所以需要计算每一个的高度,从而确定下一个的排列的位置,于是这就会比较耗性能,同时因为其特殊性,导致其开发难度相较一般的列表页会稍微复杂一点,但是其实我们只要掌握其原理我们还是很容易写出来的.
首先我们要选择使用什么控件来写,一般我们会第一时间想到scrollView,这个是可以的,但是因为其相对来说封装的东西不多,且没有自己的复用机制,相对来说我们的开发难度会复杂一些,
其实一直都有一个很好的控件,但是我们一般都会忽略,那就是FlatList和SectionList的底层---VirtualizedList
是的就是这个控件,通过简单的封装就实现了FlatList和SectionList,其有自己的渲染item和复用的机制,其封装了上拉刷新和下拉加载,我们可以使用这个控件来定义任何我们想要的各种变种的列表,比如瀑布流,比如音乐卡片.....
import * as React from 'react';
import {
VirtualizedList,
View,
ScrollView,
StyleSheet,
findNodeHandle,
RefreshControl,
} from 'react-native';
type Column = {
index: number,
totalHeight: number,
data: Array,
heights: Array,
};
const _stateFromProps = ({ numColumns, data, getHeightForItem }) => {
const columns: Array = Array.from({
length: numColumns,
}).map((col, i) => ({
index: i,
totalHeight: 0,
data: [],
heights: [],
}));
data.forEach((item, index) => {
const height = getHeightForItem({ item, index });
const column = columns.reduce(
(prev, cur) => (cur.totalHeight < prev.totalHeight ? cur : prev),
columns[0],
);
column.data.push(item);
column.heights.push(height);
column.totalHeight += height;
});
return { columns };
};
export type Props = {
data: Array,
numColumns: number,
renderItem: ({ item: any, index: number, column: number }) => ?React.Element<
any,
>,
getHeightForItem: ({ item: any, index: number }) => number,
ListHeaderComponent?: ?React.ComponentType,
ListEmptyComponent?: ?React.ComponentType,
/**
* Used to extract a unique key for a given item at the specified index. Key is used for caching
* and as the react key to track item re-ordering. The default extractor checks `item.key`, then
* falls back to using the index, like React does.
*/
keyExtractor?: (item: any, index: number) => string,
// onEndReached will get called once per column, not ideal but should not cause
// issues with isLoading checks.
onEndReached?: ?(info: { distanceFromEnd: number }) => void,
contentContainerStyle?: any,
onScroll?: (event: Object) => void,
onScrollBeginDrag?: (event: Object) => void,
onScrollEndDrag?: (event: Object) => void,
onMomentumScrollEnd?: (event: Object) => void,
onEndReachedThreshold?: ?number,
scrollEventThrottle: number,
renderScrollComponent: (props: Object) => React.Element,
/**
* Set this true while waiting for new data from a refresh.
*/
refreshing?: ?boolean,
/**
* If provided, a standard RefreshControl will be added for "Pull to Refresh" functionality. Make
* sure to also set the `refreshing` prop correctly.
*/
onRefresh?: ?Function,
};
type State = {
columns: Array,
};
// This will get cloned and added a bunch of props that are supposed to be on
// ScrollView so we wan't to make sure we don't pass them over (especially
// onLayout since it exists on both).
class FakeScrollView extends React.Component<{ style?: any, children?: any }> {
render() {
return (
{this.props.children}
);
}
}
export default class MasonryList extends React.Component {
static defaultProps = {
scrollEventThrottle: 50,
numColumns: 1,
renderScrollComponent: (props: Props) => {
if (props.onRefresh && props.refreshing != null) {
return (
{this.state.columns.map(col =>
(this._listRefs[col.index] = ref)}
key={`$col_${col.index}`}
data={col.data}
getItemCount={this._getItemCount}
getItem={this._getItem}
getItemLayout={(data, index) =>
this._getItemLayout(col.index, index)}
renderItem={({ item, index }) =>
renderItem({ item, index, column: col.index })}
renderScrollComponent={this._renderScrollComponent}
keyExtractor={keyExtractor}
onEndReached={onEndReached}
onEndReachedThreshold={this.props.onEndReachedThreshold}
removeClippedSubviews={false}
/>,
)}
);
const scrollComponent = React.cloneElement(
this.props.renderScrollComponent(this.props),
{
ref: this._captureScrollRef,
removeClippedSubviews: false,
onContentSizeChange: this._onContentSizeChange,
onLayout: this._onLayout,
onScroll: this._onScroll,
onScrollBeginDrag: this._onScrollBeginDrag,
onScrollEndDrag: this._onScrollEndDrag,
onMomentumScrollEnd: this._onMomentumScrollEnd,
},
headerElement,
emptyElement && this.props.data.length === 0 ? emptyElement : content,
);
return scrollComponent;
}
}
const styles = StyleSheet.create({
contentContainer: {
flexDirection: 'row',
},
column: {
flex: 1,
},
});
这里就是用到了VirtualizedList来封装成的瀑布流,我们只要像使用FlatList一样的方式就能使用了,当然我们需要自己添加一个计算每一个item的宽度和高度的方法,
于是使用的方式就成了这样
import React, { Component } from 'react';
import {Dimensions, SafeAreaView, Text, View, StyleSheet, TouchableOpacity } from "react-native";
import MasonryList from '../Base/MasonryList';
import PlacehoderImage from '../Base/PlaceholderImage';
const { width, height } = Dimensions.get('window');

const itemWidth = (width - 16) / 2;

const secToTime = (s) => {
    let h = 0, m = 0;
    if(s > 60){
        m = parseInt(s / 60);
        s = parseInt(s % 60);
        if(m > 60) {
            h = parseInt(i / 60);
            m = parseInt(i % 60);
        }
    }
    // 补零
    const zero = (v) => {
        return (v >> 0) < 10 ? ("0" + v) : v;
    };
    return (h == 0 ? [zero(m), zero(s)].join(":") : [zero(h), zero(m), zero(s)].join(":"));
}

export default class ContentWaterfall extends React.Component {
    constructor(props) {
        super(props);
        this.state = {
            refreshing: false,
            data: [],
            np: 0,
        }
    }

    componentDidMount = () => {
        this.onRefreshing();
    }

    render() {
        return (


        )
    }

    onRefreshing = () => {
        this.setState({
            refreshing: true,
        })
        const { api } = this.props;
        fetch(api(this.state.np))
        .then((response) => response.json())
        .then((jsonData) => {
            this.setState({
                refreshing: false,
                data: jsonData.list,
                np: jsonData.info.np || 0,

            })
        });
    }

    _onEndReached = () => {
        const { api } = this.props;
        fetch(api(this.state.np))
        .then((response) => response.json())
        .then((jsonData) => {
            this.setState({
                data: [...this.state.data, ...jsonData.list],
                np: jsonData.info.np,
            })
        });
    }

    _keyExtractor = (item, index) => {
        return item.text + index;
    }

    _getHeightForItem = ({item}) => {
        return Math.max(itemWidth, itemWidth / item.video.width * item.video.height);
    }

    _renderItem = ({item}) => {
        const itemHeight = this._getHeightForItem({item});
        return (
             this._onPressContent(item)}
                style={styles.item}>


                    {secToTime(item.video.duration)}
                    {item.comment}


        )
    }

    _onPressContent = (item) => {
        this.props.navigation.navigate('ContentDetail', {item});
    }

}

const styles = StyleSheet.create({
    container: {
        flex: 1,
    },
    item: {
        margin: 4,
    },
    itemText: {
        flexDirection: 'row',
        justifyContent: 'space-between',
        alignItems: 'center',
        paddingHorizontal: 10,
        position: 'absolute',
        left: 0,
        right: 0,
        bottom: 0,
        height: 30,
        backgroundColor: '#0002',
        borderBottomLeftRadius: 4,
        borderBottomRightRadius: 4
    },
})
效果如下
于是一个完整的瀑布流就实现了
当然如果你想要看完整的源码,你可以参考我的这个共享的项目
https://github.com/spicyShrimp/Misses
这是一个仿写百思不得姐的项目,已经基本完成,如果觉得不错,可以给个☆☆,您的支持,是我最大的动力......

