oh-my-zsh配置指南
文章目录
- ctrl 和 capsLock键位交换
- 安装配置zsh
- 1、安装zsh,oh-my-zsh
- 2、使用zsh
- 3、配置zsh
- (1)配置主题
- (2)使用zsh自带的git别名
- (3)在 oh-my-zsh 进入 包含 git 仓库目录时,会变的比平时慢/卡顿
- 4、使用zsh的一些优秀工具
- (1)d 命令
- (2)G命令
- (3)autojump工具
- (4)autosuggestions工具安装和使用
- (5)r 命令,ctrl r 命令
- 5、vim配置
- 参考
- tmux配置
目前我使用的是deepin manjaro系统
ctrl 和 capsLock键位交换
1、在用户目录下
vim .xmodmap
** 2、写入下面六行代码 **
remove Lock = Caps_Lock
remove Control = Control_L
keysym Control_L = Caps_Lock
keysym Caps_Lock = Control_L
add Lock = Caps_Lock
add Control = Control_L
** 3、执行命令 **
xmodmap .xmodmap
安装配置zsh
1、安装zsh,oh-my-zsh
sudo pacman -S zsh
github地址安装oh-my-zsh
wget https://raw.githubusercontent.com/robbyrussell/oh-my-zsh/master/tools/install.sh
然后安装
chmod +x install.sh
./install.sh
安装完成之后才生产~/.zshrc这个配置文件
2、使用zsh
查看当前使用的shell
echo $SHELL

切换shell,有的系统可能使用下面的命令后并不会马上切换系统,需要重启一下
sudo chsh -s /bin/zsh
sudo chsh -s /bin/bash
或者使用命令
chsh -s $(which zsh)
需要重启电脑
3、配置zsh
(1)配置主题
查看主题
ls ~/.oh-my-zsh/themes

我使用的是agnoster主题,可以利用管道查看是否有此主题:
ls ~/.oh-my-zsh/themes | grep agnoster

如果有此主题,则修改配置文件:
vim ~/.zshrc

利用下面命令查看ZSH_THEME在第几行
bat ~/.zshrc | grep "^[^#]" -n

然后修改为
ZSH_THEME="agnoster"
保存退出即可
可以从oh-my-zsh官方主题这里选一个自己喜欢的,或者也可以自己定制一个
(2)使用zsh自带的git别名
我zsh里面的git别名觉得蛮好用的,这样就无需单独配置git了
利用命令查看git别名
bat ~/.oh-my-zsh/plugins/git/git.plugin.zsh
可以跳一些常用的使用记住即可
  42   │ alias g='git'
  43   │ alias ga='git add'
  44   │ alias gaa='git add --all'
  45   │ alias gapa='git add --patch'
  46   │ alias gau='git add --update'
  47   │ alias gav='git add --verbose'
  48   │ alias gap='git apply'
  49   │
  50   │ alias gb='git branch'
  51   │ alias gba='git branch -a'
  52   │ alias gbd='git branch -d'

  54   │ alias gbD='git branch -D'
  55   │ alias gbl='git blame -b -w'
  56   │ alias gbnm='git branch --no-merged'
  57   │ alias gbr='git branch --remote'
  58   │ alias gbs='git bisect'
  59   │ alias gbsb='git bisect bad'
  60   │ alias gbsg='git bisect good'
  61   │ alias gbsr='git bisect reset'
  62   │ alias gbss='git bisect start'
  63   │
  64   │ alias gc='git commit -v'
  65   │ alias gc!='git commit -v --amend'
  66   │ alias gcn!='git commit -v --no-edit --amend'
  67   │ alias gca='git commit -v -a'
  68   │ alias gca!='git commit -v -a --amend'
  69   │ alias gcan!='git commit -v -a --no-edit --amend'
  70   │ alias gcans!='git commit -v -a -s --no-edit --amend'
  71   │ alias gcam='git commit -a -m'
  72   │ alias gcsm='git commit -s -m'
  73   │ alias gcb='git checkout -b'
  74   │ alias gcf='git config --list'
  75   │ alias gcl='git clone --recurse-submodules'
  76   │ alias gclean='git clean -fd'
  77   │ alias gpristine='git reset --hard && git clean -dfx'
  78   │ alias gcm='git checkout master'
  79   │ alias gcd='git checkout develop'
  80   │ alias gcmsg='git commit -m'
  81   │ alias gco='git checkout'
  82   │ alias gcount='git shortlog -sn'
  83   │ compdef _git gcount
  84   │ alias gcp='git cherry-pick'
  85   │ alias gcpa='git cherry-pick --abort'
  86   │ alias gcpc='git cherry-pick --continue'
  87   │ alias gcs='git commit -S'
  88   │
  89   │ alias gd='git diff'
  90   │ alias gdca='git diff --cached'
  91   │ alias gdcw='git diff --cached --word-diff'
  92   │ alias gdct='git describe --tags `git rev-list --tags --max-count=1`'
  93   │ alias gds='git diff --staged'
  94   │ alias gdt='git diff-tree --no-commit-id --name-only -r'
  95   │ alias gdw='git diff --word-diff'
  96   │
  97   │ gdv() { git diff -w "$@" | view - }
  98   │ compdef _git gdv=git-diff
  99   │
 100   │ alias gf='git fetch'
 101   │ alias gfa='git fetch --all --prune'
 102   │ alias gfo='git fetch origin'
 103   │
 104   │ function gfg() { git ls-files | grep $@ }
 105   │ compdef _grep gfg
 106   │
 107   │ alias gg='git gui citool'
 108   │ alias gga='git gui citool --amend'
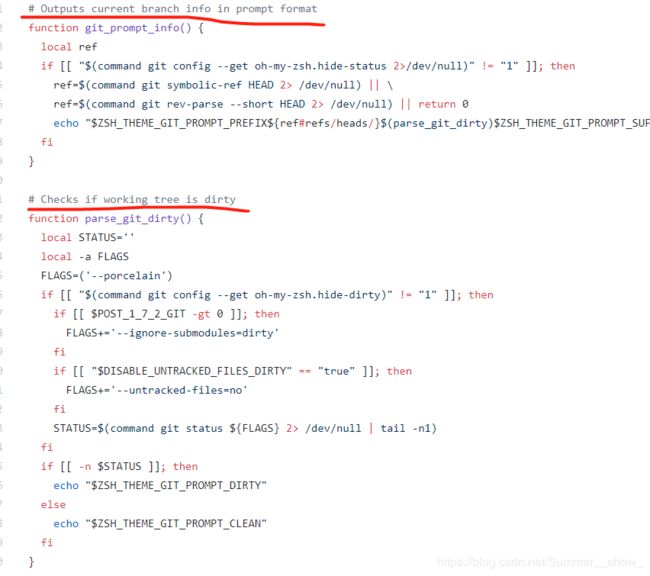
(3)在 oh-my-zsh 进入 包含 git 仓库目录时,会变的比平时慢/卡顿
一般是由下面的第一个,如果还卡就使用第二个
git config --add oh-my-zsh.hide-dirty 1
git config --add oh-my-zsh.hide-status 1
4、使用zsh的一些优秀工具
(1)d 命令
输入小写字母d,可以获取近十次路径,分别是从0到9顺序编号
然后cd -数字,例如cd -2就能切换到相应路径了
(2)G命令
大写字母G,可以切换到文件末尾
(3)autojump工具
vim ~/.zshrc
进入文件复制下面两行进去
[[ -s ~/.autojump/etc/profile.d/autojump.sh ]] && . ~/.autojump/etc/profile.d/autojump.sh
source /usr/share/autojump/autojump.zsh

然后运行
source ~/.zshrc
(4)autosuggestions工具安装和使用
这一步会把插件需要的文件克隆到 zsh 默认的插件目录 ~/.oh-my-zsh/custom/plugins, 如果你使用 dotfiles 来管理你的配置文件,这里可以为 oh-my-zsh 也创建一个软连接
git clone https://github.com/zsh-users/zsh-autosuggestions $ZSH_CUSTOM/plugins/zsh-autosuggestions
进入配置文件修改文件
vim ~/.zshrc
找到 plugins=(git) 这一行,然后添加autosuggestions即可
plugins=( git zsh-autosuggestions)
然后重新加载zsh:
1、重启终端或者
2、source ~/.zshrc
(5)r 命令,ctrl r 命令
r 命令执行上条命令
ctrl r 可以搜索之前使用过的命令
5、vim配置
set showmode
set showcmd
set mouse=a
set encoding=utf-8
set t_Co=256
filetype indent on

set autoindent
set tabstop=4
set shiftwidth=4
set expandtab
set softtabstop=4
set number
set relativenumber
set cursorline
set textwidth=80
set wrap
set linebreak
set scrolloff=5
set ruler

set showmatch
set hlsearch
set incsearch
set ignorecase
set history=1000
参考
- zsh+on-my-zsh配置教程指南(程序员必备)
- 从 Terminal 说起 —— 命令自动建议和补全
tmux配置
touch ~/.tmux.conf 在这个文件中写入下面配置
source ~/.tmux.conf 这个文件的时候会报错,不用理会。直接输入tmux进入即可
set -g prefix C-f
set -g pane-base-index 1
setw -g pane-base-index 1

bind r source-file ~/.tmux.conf \; display "Reload"
bind C-f send-prefix

bind = split-window -h
bind - split-window -v

bind h select-pane -L
bind j select-pane -D
bind k select-pane -U
bind l select-pane -R

bind -r H resize-pane -L 5
bind -r J resize-pane -D 5
bind -r K resize-pane -U 5
bind -r L resize-pane -R 5

set -g default-terminal "screen-256color"

set -g status-interval 1000
