利用Tensorboard进行可视化
真是出来混迟早是要还的,之前一直拒绝学习Tensorboard,因为实在是有替代方案,直到发现到了不得不用的地步。下面主要介绍一下怎么使用Tensorboard来可视化参数,损失以及准确率等变量。
1.可视化计算图
下面是一个单层网络的手写体分类示例:
import tensorflow as tf
from tensorflow.examples.tutorials.mnist import input_data

mnist = input_data.read_data_sets("MNIST_data", one_hot=True)

batch_size = 100
n_batch = mnist.train.num_examples // batch_size

with tf.name_scope('input'):
    x = tf.placeholder(dtype=tf.float32, shape=[None, 784], name='x_input')
    y = tf.placeholder(dtype=tf.int32, shape=[None, 10], name='y_input')

with tf.name_scope('layer'):
    with tf.name_scope('weights'):
        W = tf.Variable(tf.random_uniform([784, 10]), name='w')
    with tf.name_scope('biases'):
        b = tf.Variable(tf.zeros(shape=[10], dtype=tf.float32), name='b')
    with tf.name_scope('softmax'):
        prediction = tf.nn.softmax(tf.nn.xw_plus_b(x, W, b))
with tf.name_scope('Loss'):
    loss = tf.reduce_mean(tf.nn.softmax_cross_entropy_with_logits(labels=y, logits=prediction))
with tf.name_scope('train'):
    train_step = tf.train.GradientDescentOptimizer(0.01).minimize(loss)
with tf.name_scope('acc'):
    correct_prediction = tf.equal(tf.argmax(y, 1), tf.argmax(prediction, 1))
    acc = tf.reduce_mean(tf.cast(correct_prediction, tf.float32))

with tf.Session() as sess:
    sess.run(tf.global_variables_initializer())
    writer = tf.summary.FileWriter('logs/', sess.graph)
    for epoch in range(20):
        for batch in range(n_batch):
            batch_x, batch_y = mnist.train.next_batch(batch_size)
            _, accuracy = sess.run([train_step, acc], feed_dict={x: batch_x, y: batch_y})
            if batch % 50 == 0:
                print("### Epoch: {}, batch: {} acc on train: {}".format(epoch, batch, accuracy))
        accuracy = sess.run(acc, feed_dict={x: mnist.test.images, y: mnist.test.labels})
        print("### Epoch: {},  acc on test: {}".format(epoch, accuracy))
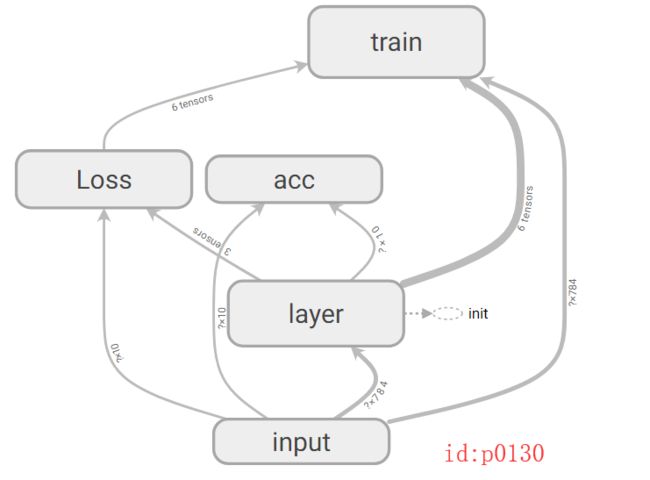
其计算图的可视化结果如下所示:

其中图中灰色的圆角矩形就是代码中的一个个命名空间tf.name_scope(),而且命名空间是可以嵌套定义的。从计算图中,可以清楚的看到各个操作的详细信息,以及数据量的形状和流向等。这一操作的实现,就全靠第31行代码。执行完这句代码后,会在你指定路径(此处为代码所在路径的logs文件夹中)中生成一个类似名为events.out.tfevents.1561711787的文件。其打开步骤如下:
-
首先需要安装
tensorflow和tensorboard; -
打开命令行(Linux终端),进入到log的上一层目录;
-
运行命令
tensorboard --logdir=logs- 如果成功,则会有以下提示:
TensorBoard 1.5.1 at http://DESKTOP-70LJI62:6006 (Press CTRL+C to quit)
- 如果有任何报错,最直接的办法就是卸载
tensorflow重新安装,若是有多个环境建议用Anaconda管理
- 如果成功,则会有以下提示:
-
将后面的地址粘贴到浏览器中(最好是谷歌),然后就能看到了,可以双击各个结点查看详细信息
2.可视化参数
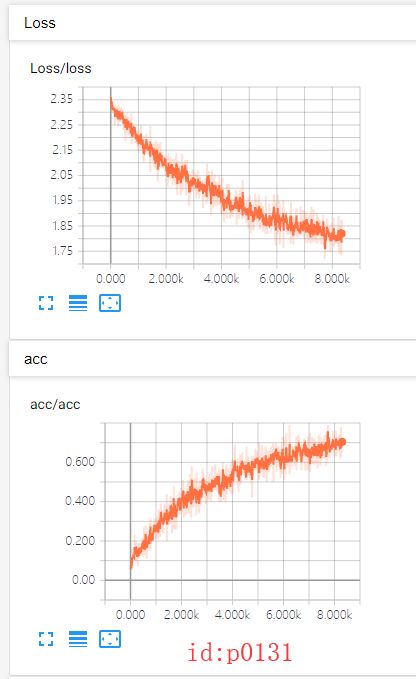
可视化网络计算图不是太有意义,而更有意义的是在训练网络的同时能够看到一些参数的变换曲线图(如:准确率,损失等),以便于更好的分析网络。

要实现这个操作,只需要添加对应的tf.summary.scalar('acc', acc)语句即可,然后最后合并所有的summary即可。但是,通常情况下网络层的参数都不是标量,而是矩阵这类的;对于这种变量,通常的做法就是计算其最大、最小、平均值以及直方图等。由于对于很多参数都会用到同样的这几个操作,所以在这里就统一定义函数:
def variable_summaries(var):
    with tf.name_scope('summaries'):
        mean = tf.reduce_mean(var)
        tf.summary.scalar('mean', mean)
        with tf.name_scope('stddev'):
            stddev = tf.sqrt(tf.reduce_mean(tf.square(var - mean)))
        tf.summary.scalar('stddev', stddev)
        tf.summary.scalar('max', tf.reduce_max(var))
        tf.summary.scalar('min', tf.reduce_min(var))
        tf.summary.histogram('histogram', var)
然后在需要可视化参数的地方,调用这个函数即可。
mnist = input_data.read_data_sets("MNIST_data", one_hot=True)

batch_size = 100

n_batch = mnist.train.num_examples // batch_size
with tf.name_scope('input'):
    x = tf.placeholder(dtype=tf.float32, shape=[None, 784], name='x_input')
    y = tf.placeholder(dtype=tf.int32, shape=[None, 10], name='y_input')

with tf.name_scope('layer'):
    with tf.name_scope('weights'):
        W = tf.Variable(tf.random_uniform([784, 10]), name='w')
        variable_summaries(W)####
    with tf.name_scope('biases'):
        b = tf.Variable(tf.zeros(shape=[10], dtype=tf.float32), name='b')
        variable_summaries(b)
    with tf.name_scope('softmax'):
        prediction = tf.nn.softmax(tf.nn.xw_plus_b(x, W, b))
with tf.name_scope('Loss'):
    loss = tf.reduce_mean(tf.nn.softmax_cross_entropy_with_logits(labels=y, logits=prediction))
    tf.summary.scalar('loss', loss)
with tf.name_scope('train'):
    train_step = tf.train.GradientDescentOptimizer(0.01).minimize(loss)
with tf.name_scope('acc'):
    correct_prediction = tf.equal(tf.argmax(y, 1), tf.argmax(prediction, 1))
    acc = tf.reduce_mean(tf.cast(correct_prediction, tf.float32))
    tf.summary.scalar('acc', acc)

merged = tf.summary.merge_all()
with tf.Session() as sess:
    sess.run(tf.global_variables_initializer())
    writer = tf.summary.FileWriter('logs/', sess.graph)
    for epoch in range(20):
        for batch in range(n_batch):
            batch_x, batch_y = mnist.train.next_batch(batch_size)
            _, summary, accuracy = sess.run([train_step, merged, acc], feed_dict={x: batch_x, y: batch_y})
            if batch % 50 == 0:
                print("### Epoch: {}, batch: {} acc on train: {}".format(epoch, batch, accuracy))
            writer.add_summary(summary, epoch * n_batch + batch)
        accuracy = sess.run(acc, feed_dict={x: mnist.test.images, y: mnist.test.labels})
        print("### Epoch: {},  acc on test: {}".format(epoch, accuracy))
如上代码中的第14、17、22、28行所示。最后,在每次迭代的时候,将合并后的merged进行计算并写道本地文件中(第40行)。最后,按照上面的方法,用tensorboard打开即可。
注:这个不用等到整个过程训练完才能可视化,而是你在训练过程中就能看到的,而且是每30秒根据生成的数据刷新一次,还是很Nice的。

3. 远程tensorboard
由于条件所限,通常在进行深度学习时都是在远处的服务器上进行训练的,所以此时该怎么在本地电脑可视化呢?答案是利用SSH的方向隧道技术,将服务器上的端口数据转发到本地对应的端口,然后就能在本地方法服务器上的日志数据了。
从上面连接成功后的提示可以知道,tensorboard所用到的端口时6006(没准儿哪天就换了),所以我们只需将该端口的数据转发到本地即可。
-
ssh -L 16006:127.0.0.1:6006 [email protected]- 其中16006是本地的任意端口,只要不和本地应用有冲突就行,随便写;
- 后面的account指你服务器的用户名,紧接是Ip
windows的话,直接在命令行里执行这条令就行(也不知道啥时候windows命令行也支持ssh了)
在登陆成功后(此时已远程登陆了服务器),同样进入到logs目录的上层目录,然后运行tensorboard --logdir=logs;最后,在本地浏览器中运行127.0.0.1:16006即可。

参考:
远程访问Tensorboard