SpringBoot集成Swagger2
SpringBoot集成Swagger2
刚开始用2.0.2.RELEASE版本的SpringBoot去继承2.7.0版本的springfox-swagger2一直出现请求下面这种情况,就是在启动SpringBoot的时候,一直循环访问null/swagger-resources/configuration/ui ,就一直是路径不对,知道后来把Swagger2版本换成2.6.1才可以访问正常。
第一步:添加依赖
pom.xml
        <dependency>
            <groupId>io.springfoxgroupId>
            <artifactId>springfox-swagger2artifactId>
            <version>2.6.1version>
        dependency>

        <dependency>
            <groupId>io.springfoxgroupId>
            <artifactId>springfox-swagger-uiartifactId>
            <version>2.6.1version>
        dependency>
第二步:对swagger接口进行简单分组
package com.pkk.encrytion.config;

import org.springframework.beans.factory.annotation.Value;
import org.springframework.context.annotation.Bean;
import org.springframework.context.annotation.Configuration;

import springfox.documentation.builders.ApiInfoBuilder;
import springfox.documentation.builders.PathSelectors;
import springfox.documentation.builders.RequestHandlerSelectors;
import springfox.documentation.service.ApiInfo;
import springfox.documentation.service.Contact;
import springfox.documentation.spi.DocumentationType;
import springfox.documentation.spring.web.plugins.Docket;
import springfox.documentation.swagger2.annotations.EnableSwagger2;

/**
 * @author peikunkun
 * @version V1.0
 * @Title: myknow
 * @Package com.pkk.encrytion.config
 * @Description:
 * @date 2018/5/14 19:39
 */
@Configuration
@EnableSwagger2
public class SwaggerUIConfig {


    /**
     * basePackage,这里是从application.properties或application.yml中配置的自定义值,用来在正式的时候关闭此接口文档
     */
    private static final String BASE_PACKAGE = "com.pkk.encrytion";

    @Value("${swagger.enable}")
    private boolean enableSwagger;


    @Bean
    public Docket encryprionDocket() {
        ApiInfo apiInfo = new ApiInfoBuilder()
                .title("加解密接口开放平台")
                .description("主要是对一些常用的加解密操作进行调试操作")
                .version("V1.0")
                .termsOfServiceUrl("kunzai.tk")
                .contact(new Contact("姓名", "接口地址", "邮箱"))
                .build();

        return new Docket(DocumentationType.SWAGGER_2)
                .groupName("加密相关操作")
                .pathMapping("/")
                .enable(enableSwagger)
                .select().apis(RequestHandlerSelectors.basePackage(BASE_PACKAGE))
                //设置此组只匹配encryption开头的(如请求地址为/encryption/desc)
                .paths(PathSelectors.ant("/encryption/*")).build()
                .apiInfo(apiInfo);
    }

    @Bean
    public Docket testDocket() {
        ApiInfo apiInfo = new ApiInfoBuilder()
                .title("测试数据相关接口")
                .version("V1.0")
                .description("主要是测试数据的相关接口")
                .contact(new Contact("姓名", "接口地址", "邮箱"))
                .build();

        return new Docket(DocumentationType.SWAGGER_2)
                .groupName("测试相关的接口")
                .pathMapping("/")
                .enable(enableSwagger)
                .select().apis(RequestHandlerSelectors.basePackage(BASE_PACKAGE))
                .paths(PathSelectors.ant("/test/*")).build()
                .apiInfo(apiInfo);
    }


}
第三步:请求的controller
package com.pkk.encrytion.controller;

import javax.servlet.http.HttpServletRequest;

import org.springframework.stereotype.Controller;
import org.springframework.web.bind.annotation.RequestMapping;
import org.springframework.web.bind.annotation.ResponseBody;

import io.swagger.annotations.Api;
import io.swagger.annotations.ApiOperation;

/**
 * @author peikunkun
 * @version V1.0
 * @Title: myknow
 * @Package com.pkk.encrytion.controller
 * @Description: <>
 * @date 2018/5/10 13:49
 */
@Controller
@Api(value = "测试接口", tags = "TestController", description = "测试接口相关")
@RequestMapping(value = "/test")
public class TestController {


    @ResponseBody
    @ApiOperation(tags = "打招呼测试接口", value = "进行打招呼户测试", notes = "请求返回打招呼的字符串")
    @RequestMapping(value = "/printHello")
    public String pringHello() {
        return "Hello SpringBoot";
    }

    @ResponseBody
    @ApiOperation(tags = "打招呼测试接口", value = "进行打招呼户测试", notes = "请求返回打招呼的字符串")
    @RequestMapping(value = "/printHello1")
    public String pringHello1() {
        return "Hello SpringBoot";
    }

    @ResponseBody
    @ApiOperation(tags = "获取上下文路径接口", value = "获取上下文路径", notes = "依据getContextPath获取上下文的路径")
    @RequestMapping(value = "/getContextPath")
    public String getContextPath(HttpServletRequest request) {
        return request.getContextPath();
    }

    @ResponseBody
    @ApiOperation(tags = "获取上下文的路径接口", value = "获取Servlet路径", notes = "依据getServletPath获取上下文的路径")
    @RequestMapping(value = "/getServletPath")
    public String getServletPath(HttpServletRequest request) {
        return request.getServletPath();
    }


    @ResponseBody
    @ApiOperation(tags = "获取路径信息接口", value = "获取路径信息", notes = "依据getPathInfo获取路径信息")
    @RequestMapping(value = "/getPathInfo")
    public String getPathInfo(HttpServletRequest request) {
        return request.getPathInfo();
    }


}
第四步:SpringBoot的启动
@SpringBootApplication
public class SpringBootApp {

    public static void main(String[] args) {
        SpringApplication.run(SpringBootApp.class, args);
    }
}
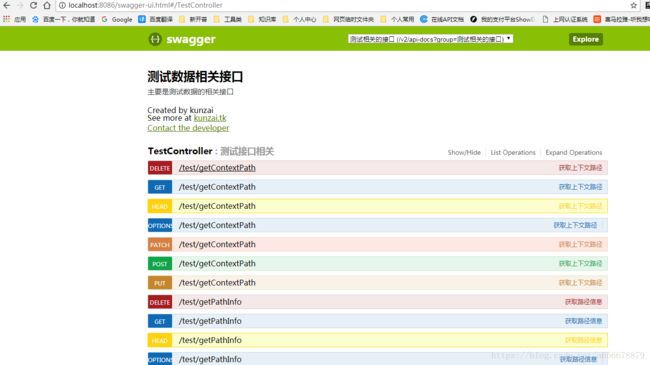
第五步:访问
访问本地的8086端口
第六步:知识拓展,swagger的常用注解
也是写文档是常用的注解,以后写文档就靠这些注解了
swagger通过注解表明该接口会生成文档,包括接口名、请求方法、参数、返回信息的等等。

@Api:修饰整个类,描述Controller的作用
@ApiOperation:描述一个类的一个方法,或者说一个接口
@ApiParam:单个参数描述
@ApiModel:用对象来接收参数
@ApiProperty:用对象接收参数时,描述对象的一个字段
@ApiResponse:HTTP响应其中1个描述
@ApiResponses:HTTP响应整体描述
@ApiIgnore:使用该注解忽略这个API
@ApiError :发生错误返回的信息
@ApiParamImplicitL:一个请求参数
@ApiParamsImplicit 多个请求参数
第七步:注意要点
- Swagger使用及Springfox+SpringBoot访问http://localhost:8080/swagger-ui.htmlui404
答:@EnableWebMvc注解和swgger冲突【去掉@EnableWebMvc接可以了】- 分组案例
@EnableSwagger2
@Configuration
@PropertySource({"classpath:config/redisdemo.properties"})
@Slf4j
public class SwaggerConfig {


    private static final String BASE_PACKAGE = "com.pkk.commonweb.controller";

    /**
     * 是否启用swagger
     */
    @Value("${redis.enable.swagger}")
    private Boolean REDIS_ENABLE_SWAGGER;


    @Bean
    public Docket redisDocket() {
        log.info("swagger启用状态:" + REDIS_ENABLE_SWAGGER);
        ApiInfo apiInfo = new ApiInfoBuilder()
                .title("redis的使用")
                .version("V1.0.0")
                .description("redis的api的简单使用")
                .build();
        return new Docket(DocumentationType.SWAGGER_2)
                .apiInfo(apiInfo)
                .groupName("REDISAPI")
                .pathMapping("/")
                .enable(REDIS_ENABLE_SWAGGER)
                .select().apis(RequestHandlerSelectors.basePackage(BASE_PACKAGE))
                .paths(PathSelectors.ant("/redis/**"))
                .build();
    }

    @Bean
    public Docket redisTestDocket() {
        log.info("swagger启用状态:" + REDIS_ENABLE_SWAGGER);
        ApiInfo apiInfo = new ApiInfoBuilder()
                .title("redis的使用")
                .version("V1.0.0")
                .description("redis的api的简单使用")
                .build();
        return new Docket(DocumentationType.SWAGGER_2)
                .apiInfo(apiInfo)
                .groupName("REDISTESTAPI")
                .pathMapping("/")
                .enable(REDIS_ENABLE_SWAGGER)
                .select().apis(RequestHandlerSelectors.basePackage(BASE_PACKAGE))
                .paths(PathSelectors.ant("/redisTest/**"))
                .build();
    }


}